Scaling and Root Planing
Classification of Periodontal Instruments
Periodontal instruments are classified according to the purposes they serve, as follows:
1. Periodontal probes are used to locate, measure, and mark pockets, as well as determine their course on individual tooth surfaces.
2. Explorers are used to locate calculus deposits and caries.
3. Scaling, root-planing, and curettage instruments are used for removal of biofilm and calcified deposits from the crown and root of a tooth, removal of altered cementum from the subgingival root surface, and debridement of the soft tissue lining the pocket. Scaling and curettage instruments are classified as follows:
• Sickle scalers are heavy instruments used to remove supragingival calculus.
• Curettes are fine instruments used for subgingival scaling, root planing, and removal of the soft tissue lining the pocket.
• Hoe, chisel, and file scalers are used to remove tenacious subgingival calculus and altered cementum. Their use is limited compared with that of curettes.
• Ultrasonic and sonic instruments are used for scaling and cleansing tooth surfaces and curetting the soft tissue wall of the periodontal pocket.41,42,61
4. Periodontal endoscopes are used to visualize deeply into subgingival pockets and furcations, allowing the detection of deposits.
5. Cleansing and polishing instruments, such as rubber cups, brushes, and dental tape, are used to clean and polish tooth surfaces. Also available are air-powder abrasive systems for tooth polishing.
The wearing and cutting qualities of some types of steel used in periodontal instruments have been tested,83,84,146 but specifications vary among manufacturers.146 Stainless steel is used most often in instrument manufacture. High-carbon-content steel instruments are also available and are considered by some clinicians to be superior.
Each group of instruments has characteristic features; individual therapists often develop variations with which they operate most effectively. Small instruments are recommended to fit into periodontal pockets without injuring the soft tissues.109,111,112,163
The parts of each instrument are referred to as the working end, shank, and handle (Figure 46-1).

Periodontal Probes
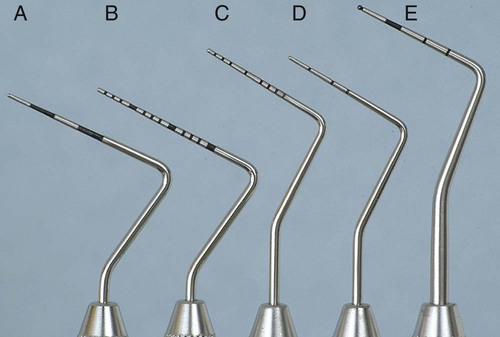
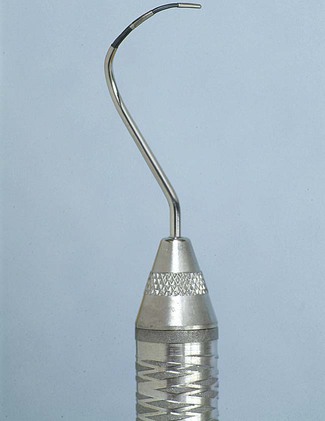
Periodontal probes are used to measure the depth of pockets and to determine their configuration. The typical probe is a tapered, rodlike instrument calibrated in millimeters, with a blunt, rounded tip (Figure 46-2). There are several other designs with various millimeter calibrations (Figure 46-3). The World Health Organization (WHO) probe has millimeter markings and a small, round ball at the tip (Figure 46-3, E). Ideally, these probes are thin, and the shank is angled to allow easy insertion into the pocket. Furcation areas can best be evaluated with the curved, blunt Nabers probe (Figure 46-4).

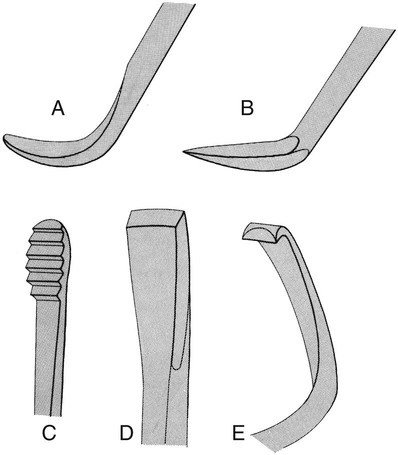
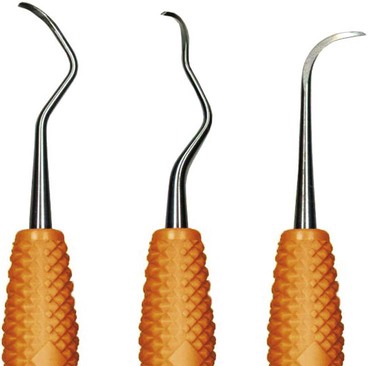
Explorers
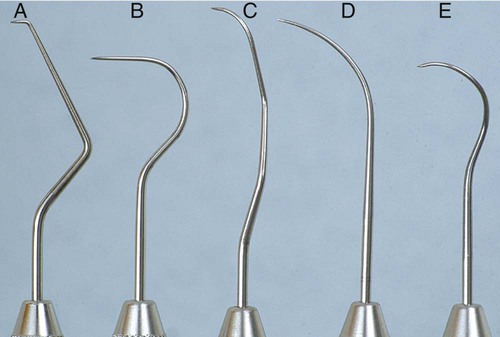
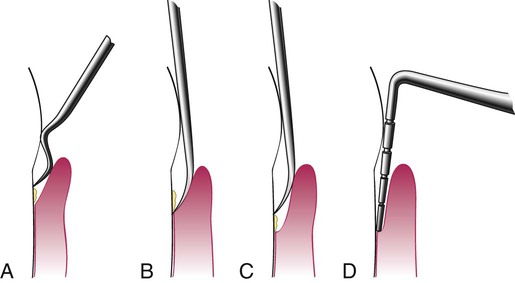
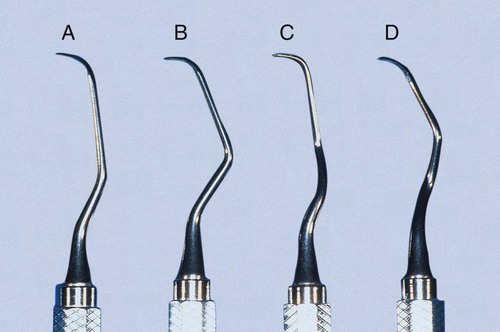
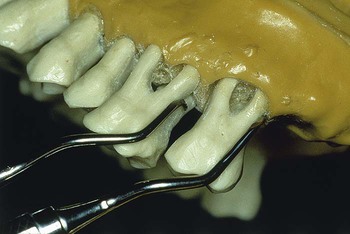
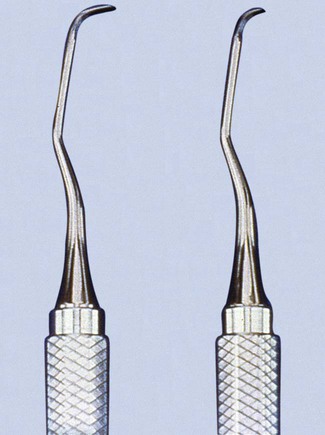
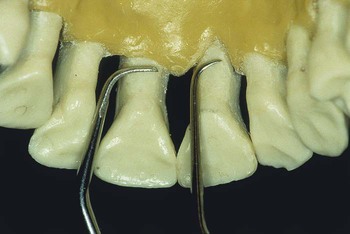
Explorers are used to locate subgingival deposits and carious areas and to check the smoothness of the root surfaces after root planing. Explorers are designed with different shapes and angles, with various uses (Figure 46-5), as well as limitations (Figure 46-6). The periodontal probe can also be useful in the detection of subgingival deposits (Figure 46-6, D).
Scaling and Curettage Instruments
Scaling and curettage instruments are illustrated in Figure 46-7.
Sickle Scalers.
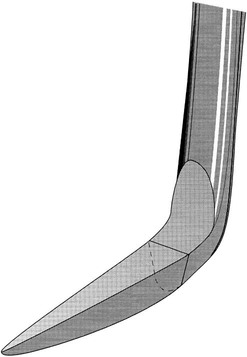
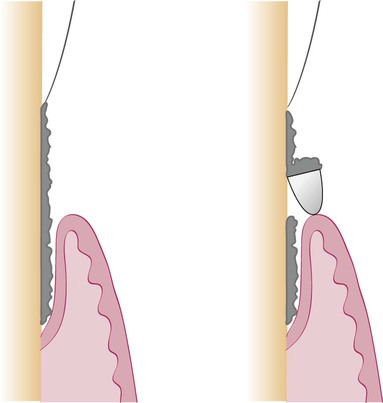
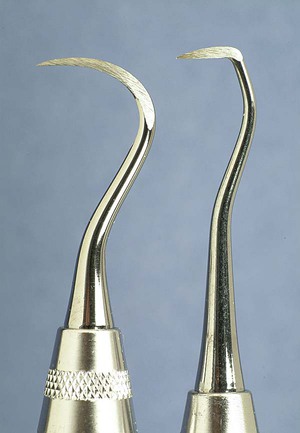
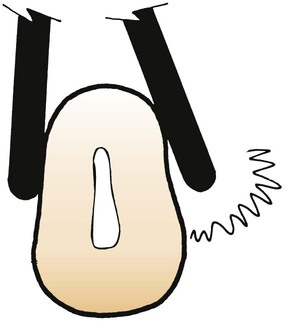
Sickle scalers have a flat surface and two cutting edges that converge in a sharply pointed tip. The shape of the instrument makes the tip strong so that it will not break off during use (Figure 46-8). The sickle scaler is used primarily to remove supragingival calculus (Figure 46-9). Because of the design of this instrument, it is difficult to insert a large sickle blade under the gingiva without damaging the surrounding gingival tissues (Figure 46-10). Small, curved sickle scaler blades such as the 204SD can be inserted under ledges of calculus several millimeters below the gingiva. Sickle scalers are used with a pull stroke.
It is important to note that sickle scalers with the same basic design can be obtained with different blade sizes and shank types to adapt to specific uses. The U15/30 (Figure 46-11), Ball, and Indiana University sickle scalers are large. The Jaquette sickle scalers #1, 2, and 3 have medium-size blades. The curved 204 posterior sickle scalers are available with large, medium, or small blades (Figure 46-12). The Montana Jack sickle scaler and the Nevi 2, Nevi 3, and Nevi 4 curved posterior sickle scalers are all thin enough to be inserted several millimeters subgingivally for removal of light to moderate ledges of calculus. The selection of these instruments should be based on the area to be scaled. Sickle scalers with straight shanks are designed for use on anterior teeth and premolars. Sickle scalers with contra-angled shanks adapt to posterior teeth.

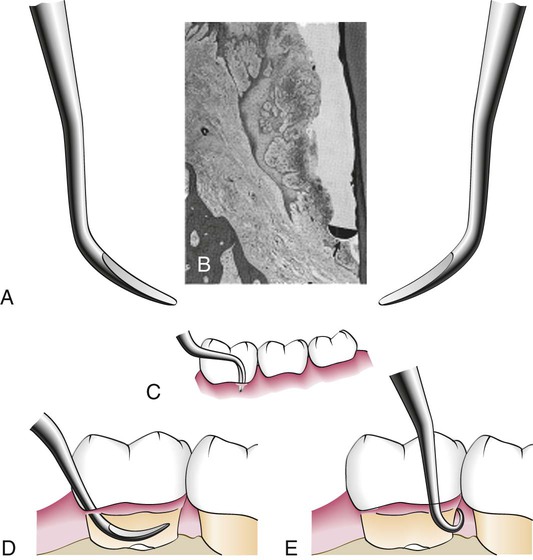
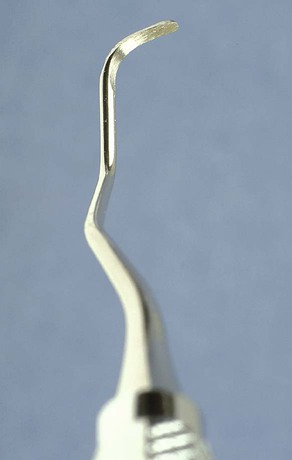
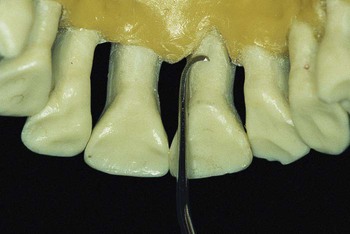
Curettes.
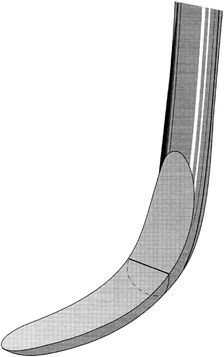
The curette is the instrument of choice for removing deep subgingival calculus, root planing altered cementum, and removing the soft tissue lining the periodontal pocket (Figure 46-13). Each working end has a cutting edge on both sides of the blade and a rounded toe. The curette is finer than the sickle scalers and does not have any sharp points or corners other than the cutting edges of the blade (Figure 46-14). Therefore curettes can be adapted and provide good access to deep pockets, with minimal soft tissue trauma (see Figure 46-10). In cross-section, the blade appears semicircular with a convex base. The lateral border of the convex base forms a cutting edge with the face of the semicircular blade. There are cutting edges on both sides of the blade. Both single- and double-end curettes may be obtained, depending on the preference of the operator.
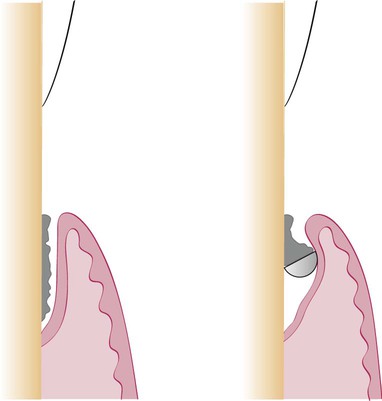
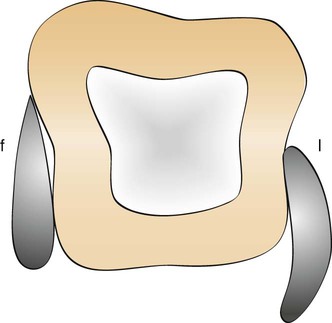
As shown in Figure 46-10, the curved blade and rounded toe of the curette allow the blade to adapt better to the root surface, unlike the straight design and pointed end of a sickle scaler, which can cause tissue laceration and trauma. There are two basic types of curettes: universal and area specific.
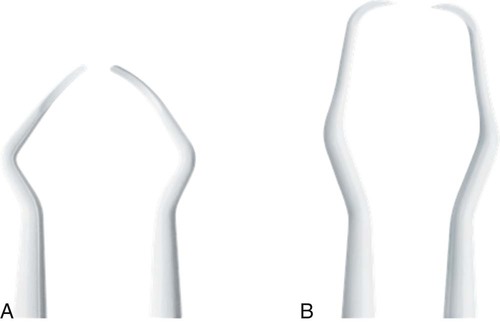
Universal Curettes.
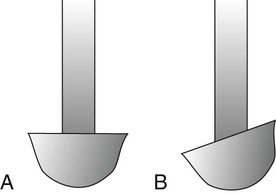
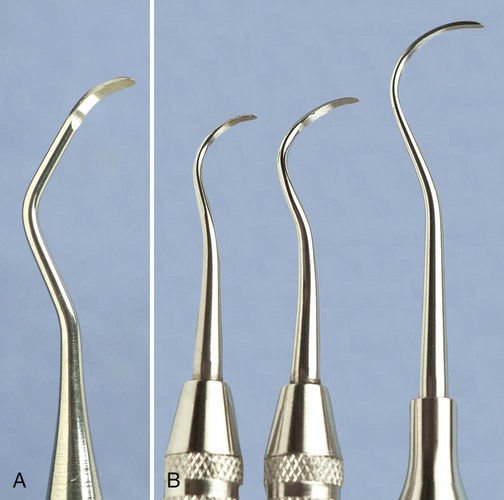
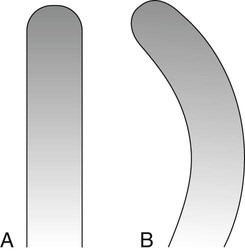
Universal curettes have cutting edges that may be inserted in most areas of the dentition by altering and adapting the finger rest, fulcrum, and hand position of the operator. The blade size and the angle and length of the shank may vary, but the face of the blade of every universal curette is at a 90-degree angle (perpendicular) to the lower shank when seen in cross-section from the tip (Figure 46-15, A). The blade of the universal curette is curved in one direction from the head of the blade to the toe. The Barnhart curettes #1-2 and 5-6 and the Columbia curettes #13-14, 2R-2L, and 4R-4L (Figures 46-16 and 46-17, A) are examples of universal curettes. Other popular universal curettes are the Younger-Good #7-8, McCall’s #17-18, and the Indiana University #17-18 (Figure 46-17, B).
Area-Specific Curettes
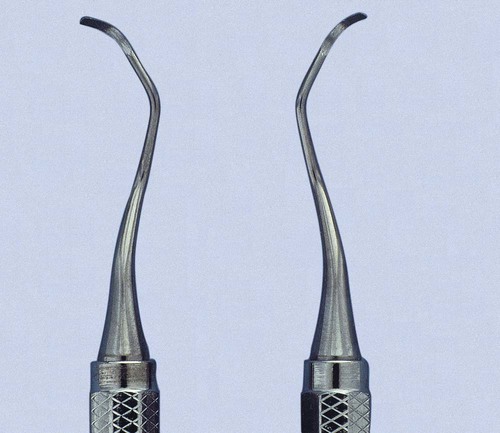
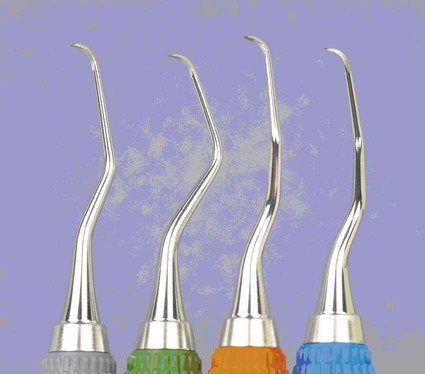
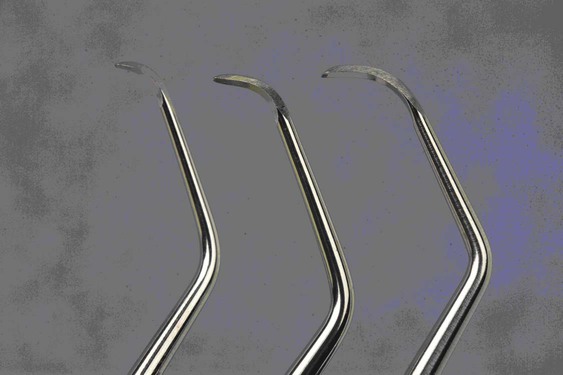
Gracey Curettes.
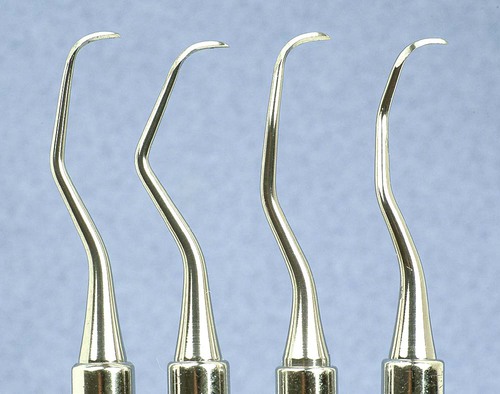
Gracey curettes are representative of the area-specific curettes, a set of several instruments designed and angled to adapt to specific anatomic areas of the dentition (Figure 46-18). These curettes and their modifications are probably the best instruments for subgingival scaling and root planing because they provide the best adaptation to complex root anatomy.
Double-ended Gracey curettes are paired in the following manner:
Gracey #1-2 and 3-4: Anterior teeth
Gracey #5-6: Anterior teeth and premolars
Gracey #7-8 and 9-10: Posterior teeth: facial and lingual
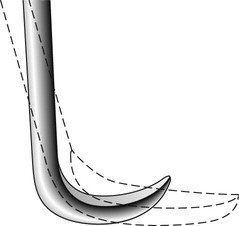
The Gracey curettes also differ from the universal curettes in that the blade is not at a 90-degree angle to the lower shank. The term offset blade is used to describe Gracey curettes because they are angled approximately 60 to 70 degrees from the lower shank (see Figure 46-15, B). This unique angulation allows the blade to be inserted in the precise position necessary for subgingival scaling and root planing, provided that the lower shank is parallel with the long axis of the tooth surface being scaled.
Area-specific curettes also have a curved blade. Whereas the blade of the universal curette is curved in one direction (Figure 46-21, A), the Gracey blade is curved from head to toe and also along the side of the cutting edge (Figure 46-21, B). Thus only a pull stroke can be used. Table 46-1 lists some of the major differences between Gracey (area-specific) curettes and universal curettes.
TABLE 46-1
Comparison of Area-Specific (Gracey) and Universal Curettes
| Gracey Curette | Universal Curette | |
| Area of use | Set of many curettes designed for specific areas and surfaces. | One curette designed for all areas and surfaces. |
| Cutting Edge | ||
| Use | One cutting edge used; work with outer edge only. | Both cutting edges used; work with either outer or inner edge. |
| Curvature | Curved in two planes; blade curves up and to the side. | Curved in one plane; blade curves up, not to the side. |
| Blade angle | Offset blade; face of blade beveled at 60 degrees to shank. | Blade not offset; face of blade beveled at 90 degrees to shank. |
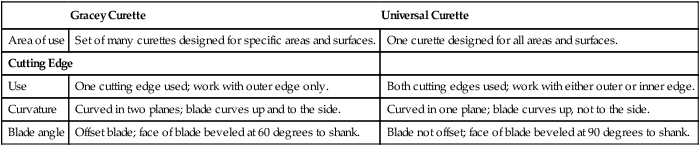
Modified from Pattison G, Pattison A: Periodontal instrumentation, ed 2, Norwalk, CT, 1992, Appleton & Lange.
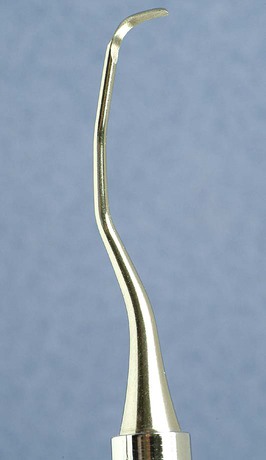
Recent additions to the Gracey curette set have been the Gracey #15-16 and 17-18. The Gracey #15-16 is a modification of the standard #11-12 and is designed for the mesial surfaces of posterior teeth (Figure 46-22). It consists of a Gracey #11-12 blade combined with the more acutely angled #13-14 shank. When the clinician is using an intraoral finger rest, it is often difficult to position the lower shank of the Gracey #11-12 so that it is parallel with the mesial surfaces of the posterior teeth, especially on the mandibular molars. The new shank angulation of the Gracey #15-16 allows better adaptation to posterior mesial surfaces from a front position with intraoral rests. If alternative fulcrums, such as extraoral or opposite-arch rests, are used, the Gracey #11-12 works well and the new #15-16 is not essential. The Gracey #17-18 is a modification of the #13-14. It has a terminal shank elongated by 3 mm and a more accentuated angulation of the shank to provide complete occlusal clearance and better access to all posterior distal surfaces. The horizontal handle position minimizes interference from opposing arches and allows a more relaxed hand position when scaling distal surfaces. In addition, the blade is 1 mm shorter to allow better adaptation of the blade to distal tooth surfaces.
Extended-Shank Curettes.
Extended-shank curettes, such as the After Five curettes (Hu-Friedy, Chicago), are modifications of the standard Gracey curette design. The terminal shank is 3 mm longer, allowing extension into deeper periodontal pockets of 5 mm or more (Figures 46-23 and 46-24). Other features of the After Five curette include a thinned blade for smoother subgingival insertion and reduced tissue distention and a large-diameter, tapered shank. All standard Gracey numbers except for the #9-10 (i.e., #1-2, #3-4, #5-6, #7-8, #11-12, or #13-14) are available in the After Five series. The After Five curettes are available in finishing or rigid designs. For heavy or tenacious calculus removal, rigid After Five curettes should be used. For light scaling or deplaquing in a periodontal maintenance patient, the thinner, finishing After Five curettes will insert subgingivally more easily.
Mini-Bladed Curettes.
Mini-bladed curettes, such as the Hu-Friedy Mini Five curettes, are modifications of the After Five curettes. The Mini Five curettes feature blades that are half the length of the After Five or standard Gracey curettes (Figure 46-25). The shorter blade allows easier insertion and adaptation in deep, narrow pockets; furcations; developmental grooves; line angles; and deep, tight, facial, lingual, or palatal pockets. In any area in which root morphology or tight tissue prevents full insertion of the standard Gracey or After Five blade, the Mini Five curettes can be used with vertical strokes, with reduced tissue distention, and without tissue trauma (Figure 46-26).
The recently introduced Micro Mini Five Gracey curettes (Hu-Friedy, Chicago) have blades that are 20% thinner and smaller than the Mini Five curettes (Figures 46-27 and 46-28) These are the smallest of all curettes, and they provide exceptional access and adaptation to tight, deep, or narrow pockets; narrow furcations; developmental depressions; line angles; and deep pockets on facial, lingual, or palatal surfaces. In areas in which root morphology or tight, thin tissue prevents easy insertion of other mini-bladed curettes, the Micro Mini Five curettes can be used with vertical strokes without causing tissue distension or tissue trauma.
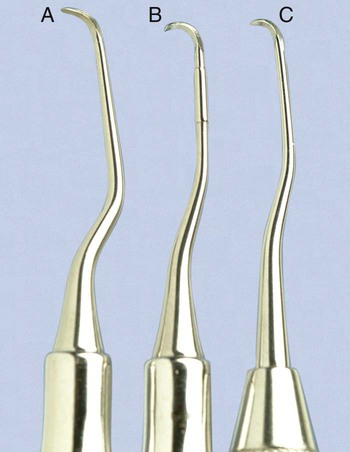
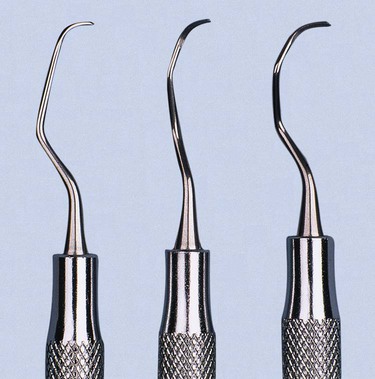
The Gracey Curvettes are another set of four mini-bladed curettes; the Sub-0 and the #1-2 are used for anterior teeth and premolars, the #11-12 is used for posterior mesial surfaces, and the #13-14 for posterior distal surfaces. The blade length of these instruments is 50% shorter than that of the conventional Gracey curette, and the blade has been curved slightly upward (Figure 46-29). This curvature allows the Gracey Curvettes to adapt more closely to the tooth surface than any other curettes, especially on the anterior teeth and on line angles (Figure 46-30). However, this curvature also carries the risk of gouging or “grooving” into the root surfaces on the proximal surfaces of the posterior teeth when the Gracey Curvette #11-12 or 13-14 is used. Additional features that represent improvements on the standard Gracey curettes are a precision-balanced blade tip in direct alignment with the handle, a blade tip perpendicular to the handle, and a shank closer to parallel with the handle.
For many years, the Morse scaler, a miniature sickle, was the only mini-bladed instrument available. However, the mini-bladed curettes have largely replaced this instrument (Figure 46-31).
Langer and Mini-Langer Curettes.
The Langer and Mini Langer curettes are a set of three curettes combining the shank design of the standard Gracey #5-6, 11-12, and 13-14 curettes with a universal blade honed at 90 degrees rather than the offset blade of the Gracey curette. This marriage of the Gracey and universal curette designs allows the advantages of the area-specific shank to be combined with the versatility of the universal curette blade. The Langer #5-6 curette adapts to the mesial and distal surfaces of anterior teeth; the Langer #1-2 curette (Gracey #11-12 shank) adapts to the mesial and distal surfaces of mandibular posterior teeth; and the Langer #3-4 curette (Gracey #13-14 shank) adapts to the mesial and distal surfaces of maxillary posterior teeth (Figure 46-32). These instruments can be adapted to both mesial and distal tooth surfaces without changing instruments. The standard Langer curette shanks are heavier than a finishing Gracey but less rigid than the rigid Gracey. Langer curettes are also available with either rigid or finishing shanks and can be obtained in the extended-shank (After Five) and mini-bladed (Mini Five) versions.
Schwartz Periotrievers.
The Schwartz Periotrievers are a set of two double-ended, highly magnetized instruments designed for the retrieval of broken instrument tips from the periodontal pocket (Figures 46-33 and 46-34). They are indispensable when the clinician has broken a curette tip in a furcation or deep pocket.138
Plastic and Titanium Instruments for Implants.
Several different companies are manufacturing plastic and titanium instruments for use on titanium and other implant abutment materials. It is important that plastic or titanium instruments be used to avoid scarring and permanent damage to the implants* (Figures 46-35, 46-36, and 46-37).
Hoe Scalers.
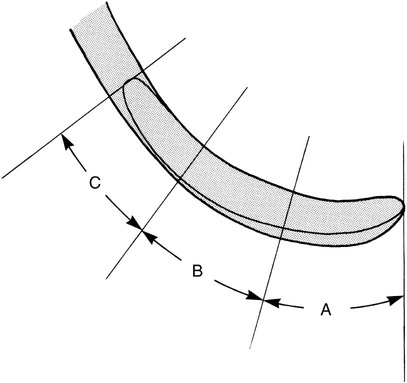
Hoe scalers are used for scaling of ledges or rings of calculus (Figure 46-38). The blade is bent at a 99-degree angle; the cutting edge is formed by the junction of the flattened terminal surface with the inner aspect of the blade. The cutting edge is beveled at 45 degrees. The blade is slightly bowed so that it can maintain contact at two points on a convex surface. The back of the blade is rounded, and the blade has been reduced to minimal thickness to permit access to the roots without interference from the adjacent tissues.
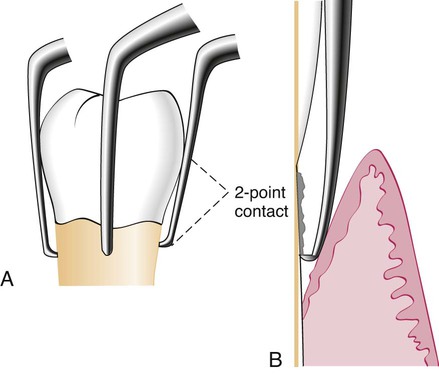
Hoe scalers are used in the following manner:
1. The blade is inserted to the base of the periodontal pocket so that it makes two-point contact with the tooth (see Figure 46-38). This stabilizes the instrument and prevents nicking of the root.
2. The instrument is activated with a firm pull stroke toward the crown, with every effort being made to preserve the two-point contact with the tooth.
Files.
Files have a series of blades on a base (Figure 46-39). Their primary function is to fracture or crush large deposits of tenacious calculus or burnished sheets of calculus. Files can easily gouge and roughen root surfaces when used improperly. Therefore they are not suitable for fine scaling and root planing. Mini-bladed curettes are currently preferred for fine scaling in areas where files were once used. Files are sometimes used for removing overhanging margins of dental restorations.
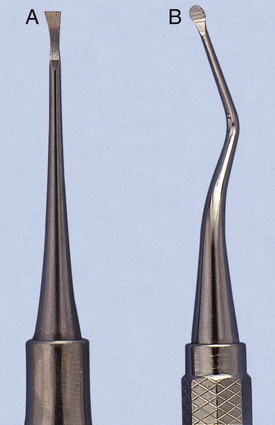
Chisel Scalers.
The chisel scaler, designed for the proximal surfaces of teeth too closely spaced to permit the use of other scalers, is usually used in the anterior part of the mouth. It is a double-ended instrument with a curved shank at one end and a straight shank at the other (see Figure 46-39); the blades are slightly curved and have a straight cutting edge beveled at 45 degrees.
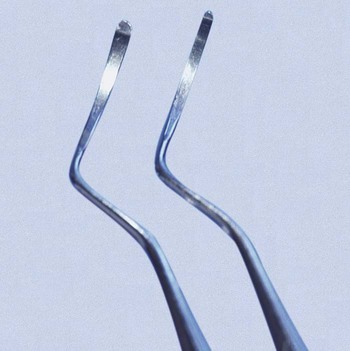
Quétin Furcation Curettes.
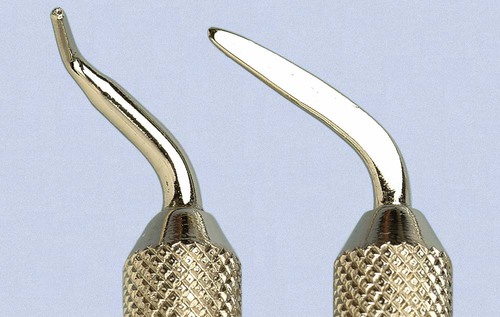
The Quétin furcation curettes are actually hoes with a shallow, half-moon radius that fits into the roof or floor of the furcation. The curvature of the tip also fits into developmental depressions on the inner aspects of the roots. The shanks are slightly curved for better access, and the tips are available in two widths (Figure 46-40). The BL1 (buccal-lingual) and MD1 (mesial-distal) instruments are small and fine, with a 0.9-mm blade width. The BL2 and MD2 instruments are larger and wider, with a 1.3-mm blade width.
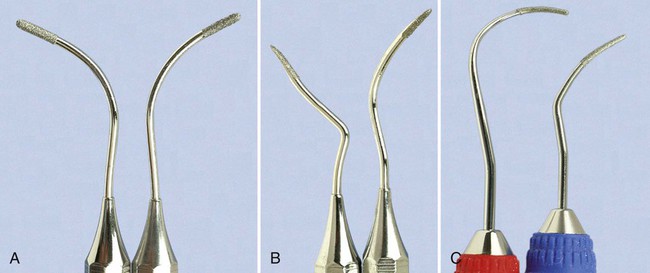
Diamond-Coated Files.
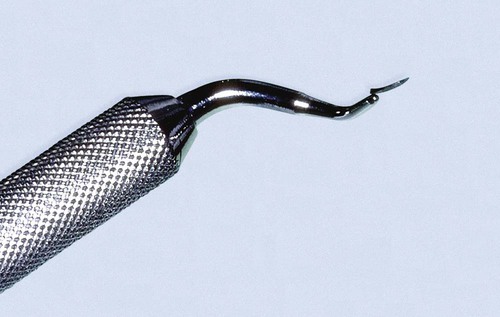
Diamond-coated files are unique instruments used for final finishing of root surfaces. These files do not have cutting edges; instead, they are coated with very-fine-grit diamond (Figure 46-41). The most useful diamond files are the buccal-lingual instruments, which are used in furcations and also adapt well to many other root surfaces.
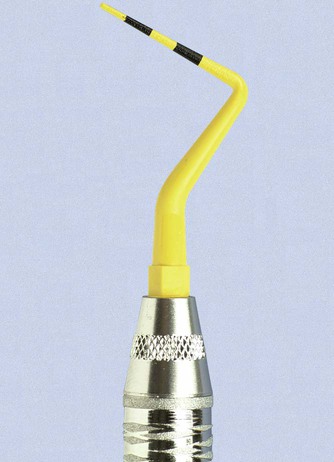
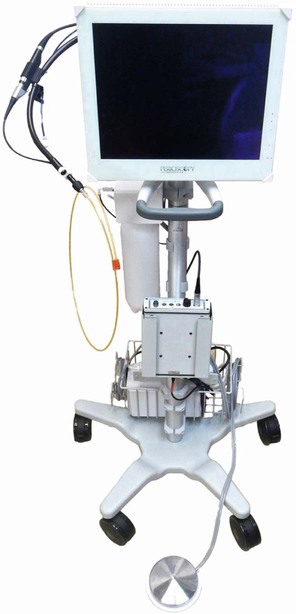
Dental Endoscope.
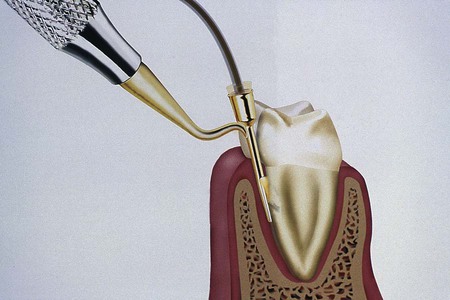
A dental endoscope has been introduced for use subgingivally in the diagnosis and treatment of periodontal disease (Figure 46-42). The Perioscopy system (Perioscopy, Inc., Oakland, CA) consists of a 0.99-mm-diameter, reusable fiberoptic endoscope over which is fitted a disposable, sterile sheath. The fiberoptic endoscope fits onto periodontal probes and ultrasonic instruments that have been designed to accept it (Figure 46-43). The sheath delivers water irrigation that flushes the pocket while the endoscope is being used, keeping the field clear. The fiberoptic endoscope attaches to a medical-grade charged-coupled device (CCD) video camera and light source that produces an image on a flat-panel monitor for viewing during subgingival exploration and instrumentation. This device allows clear visualization deeply into subgingival pockets and furcations (Figure 46-44). It permits operators to detect the presence and location of subgingival deposits and guides them in the thorough removal of these deposits. Magnification ranges from 24 to 48 times, enabling visualization of even minute deposits of plaque and calculus. Using this device, operators can achieve levels of root debridement and cleanliness that are much more difficult or impossible to produce without it.149,150,167,168 The Perioscopy system can also be used to evaluate subgingival areas for caries, defective restorations, root fractures, and resorption.

Cleansing and Polishing Instruments
Rubber Cups.
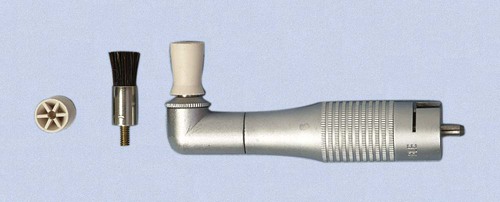
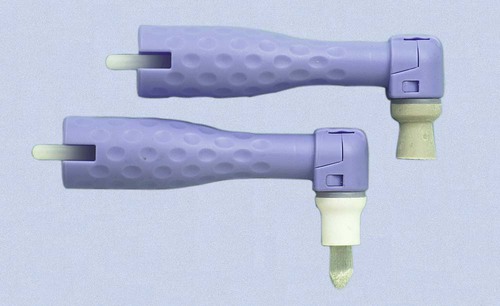
Rubber cups consist of a rubber shell with or without webbed configurations in the hollow interior (Figure 46-45). They are used in the handpiece with a special prophylaxis angle. The handpiece, prophylaxis angle, and rubber cup must be sterilized after each patient use, or a disposable plastic prophylaxis angle and rubber cup may be used and then discarded (Figure 46-46). A good cleansing and polishing paste that contains fluoride should be used and kept moist to minimize frictional heat as the cup revolves. Polishing pastes are available in fine, medium, or coarse grits and are packaged in small, convenient, single-use containers. Aggressive use of the rubber cup with any abrasive may remove the layer of cementum, which is thin in the cervical area.
Air-Powder Polishing.
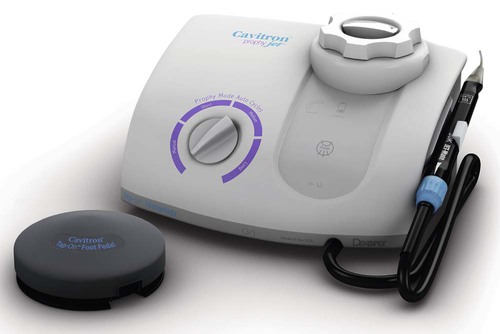
The first specially designed handpiece to deliver an air-powered slurry of warm water and sodium bicarbonate for polishing was introduced in the early 1980s. This device, called the Prophy-Jet (Dentsply International, York, PA) is very effective for the removal of extrinsic stains and soft deposits (Figure 46-47). The slurry removes stains rapidly and efficiently by mechanical abrasion and provides warm water for rinsing and lavage. The flow rate of abrasive cleansing power can be adjusted to increase the amount of powder for heavier stain removal. Currently, many manufacturers produce air-powder polishing systems that use various powder formulas.
The results of studies on the abrasive effect of the air-powder polishing devices using sodium bicarbonate and aluminum trihydroxide on cementum and dentin show that significant tooth substance can be lost.2,19,110,118 Damage to gingival tissue is transient and insignificant clinically, but amalgam restorations, composite resins, cements, and other nonmetallic materials can be roughened.13,43,67,89,161 Polishing powders containing glycine rather than sodium bicarbonate recently have been introduced for subgingival biofilm removal from root surfaces.97,117 Air-powder polishing can be used safely on titanium implant surfaces.74,91,126
Patients with medical histories of respiratory illnesses and hemodialysis are not candidates for the use of the air-powder polishing device.145,165 Powders containing sodium bicarbonate should not be used on patients with histories of hypertension, sodium-restricted diets, or medications affecting the electrolyte balance.125 Patients with infectious diseases should not be treated with this device because of the large quantity of aerosol created. A preprocedural rinse with 0.12% chlorhexidine gluconate should be used to minimize the microbial content of the aerosol.17 High-speed evacuation should also be used to eliminate as much of the aerosol as possible.57
General Principles of Instrumentation
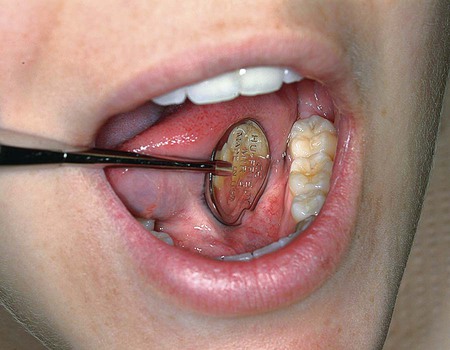
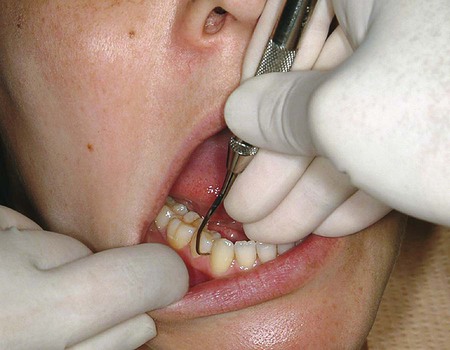
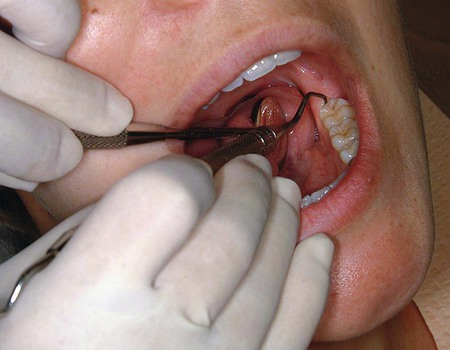
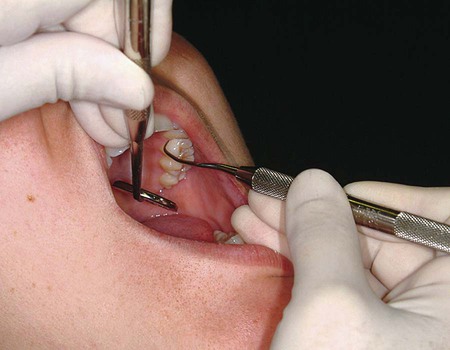
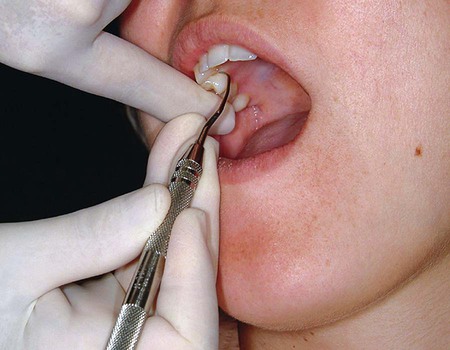
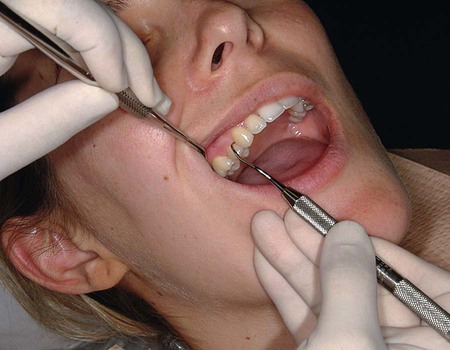
Visibility, Illumination, and Retraction
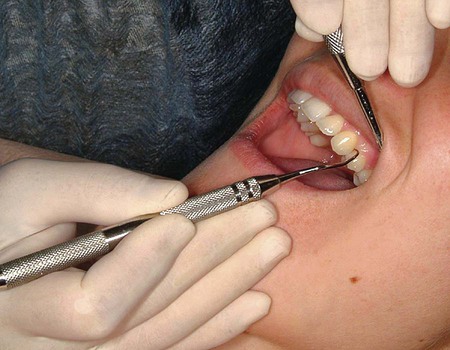
Whenever possible, direct vision with direct illumination from the dental light is most desirable (Figure 46-48). If this is not possible, indirect vision may be obtained by using the mouth mirror (Figure 46-49) and indirect illumination may be obtained by using the mirror to reflect light to where it is needed (Figure 46-50). Indirect vision and indirect illumination are often used simultaneously (Figure 46-51).


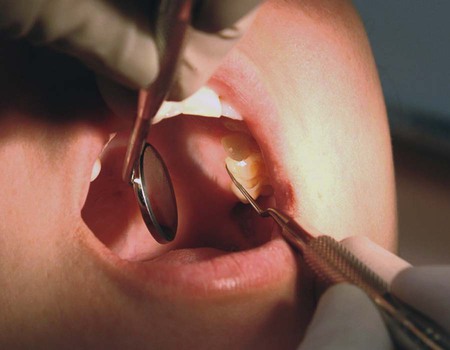
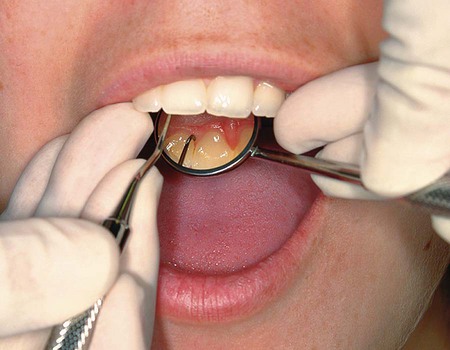
1. Use of the mirror to deflect the cheek while the fingers of the nonoperating hand retract the lips and protect the angle of the mouth from irritation by the mirror handle.
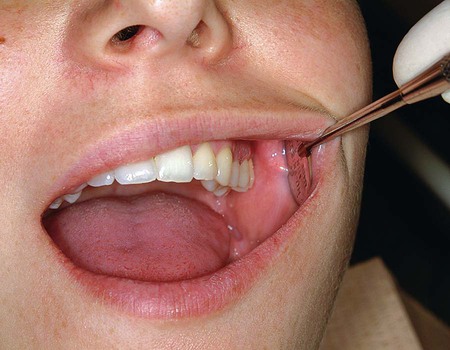
2. Use of the mirror alone to retract the lips and cheek (Figure 46-52).
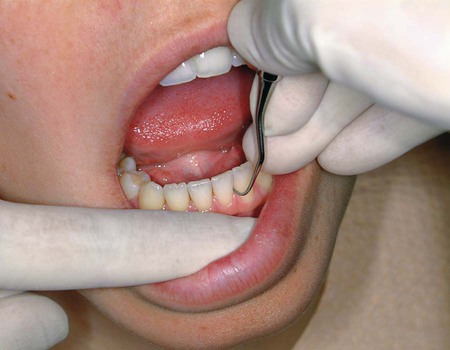
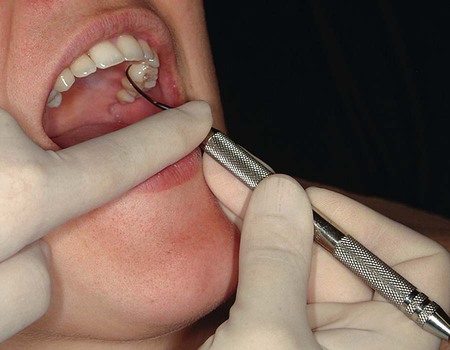
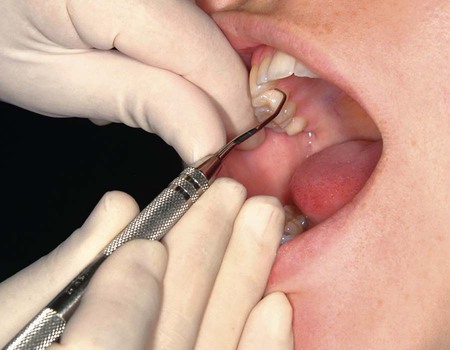
3. Use of the fingers of the nonoperating hand to retract the lips (Figure 46-53).
Instrument Stabilization
Instrument Grasp.
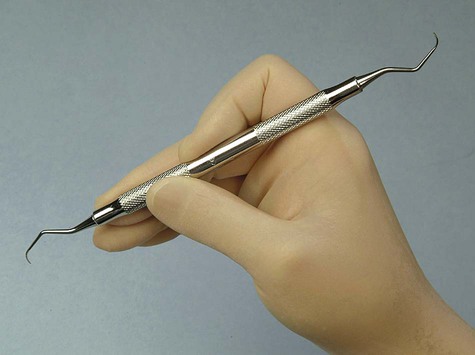
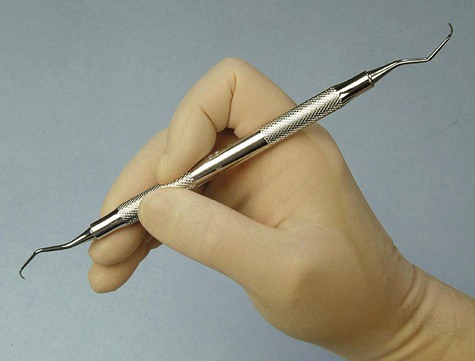
A proper grasp is essential for precise control of movements made during periodontal instrumentation. The most effective and stable grasp for all periodontal instruments is the modified pen grasp (Figure 46-55). Although other grasps are possible, this modification of the standard pen grasp (Figure 46-56) ensures the greatest control in performing intraoral procedures.
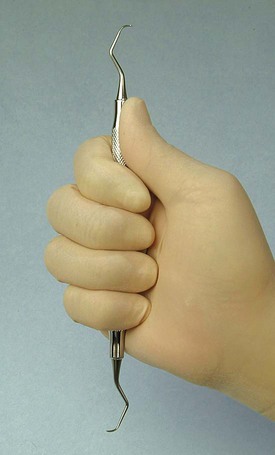
The palm and thumb grasp (Figure 46-57) is useful for stabilizing instruments during sharpening and for manipulating air and water syringes, but it is not recommended for periodontal instrumentation. Maneuverability and tactile sensitivity are so inhibited by this grasp that it is unsuitable for the precise, controlled movements necessary during periodontal procedures.
Finger Rest.
1. Conventional: The finger rest is established on tooth surfaces immediately adjacent to the working area (Figure 46-58).
2. Cross-arch: The finger rest is established on tooth surfaces on the other side of the same arch (Figure 46-59).
3. Opposite arch: The finger rest is established on tooth surfaces on the opposite arch (e.g., mandibular arch finger rest for instrumentation on the maxillary arch) (Figure 46-60).
4. Finger on finger: The finger rest is established on the index finger or thumb of the nonoperating hand (Figure 46-61).
1. Palm up: The palm-up fulcrum is established by resting the backs of the middle and fourth fingers on the skin overlying the lateral aspect of the mandible on the right side of the face (Figure 46-62).
2. Palm down: The palm-down fulcrum is established by resting the front surfaces of the middle and fourth fingers on the skin overlying the lateral aspect of the mandible on the left side of the face (Figure 46-63).
Both intraoral finger rests and extraoral fulcrums may be reinforced by applying the index finger or thumb of the nonoperating hand to the handle or shank of the instrument for added control and pressure against the tooth. The reinforcing finger is usually employed for opposite-arch or extraoral fulcrums when precise control and pressure are compromised by the longer distance between the fulcrum and the working end of the instrument. Figure 46-64 shows the index finger–reinforced rest, and Figure 46-65 shows the thumb-reinforced rest.
Instrument Activation
Adaptation.
Correct adaptation of the probe is quite simple. The tip and side of the probe should be flush against the tooth surface as vertical strokes are activated within the crevice. Bladed instruments (e.g., curettes) and sharp-pointed instruments (e.g., explorers) are more difficult to adapt. The ends of these instruments are sharp and can lacerate tissue, so adaptation in subgingival areas becomes especially important. The lower third of the working end, which is the last few millimeters adjacent to the toe or tip, must be kept in constant contact with the tooth while it is moving over varying tooth contours (Figure 46-66). Precise adaptation is maintained by carefully rolling the handle of the instrument against the index and middle fingers with the thumb. This rotates the instrument in slight degrees so that the toe or tip leads into concavities and around convexities. On convex surfaces such as line angles, it is not possible to adapt more than 1 or 2 mm of the working end against the tooth. Even on what appear to be broader, flatter surfaces, no more than 1 or 2 mm of the working end can be adapted because the tooth surface, although it may seem flat, is actually slightly curved.
If only the middle third of the working end is adapted on a convex surface so that the blade contacts the tooth at a tangent, the toe or sharp tip will jut out into soft tissue, causing trauma and discomfort (Figure 46-67).
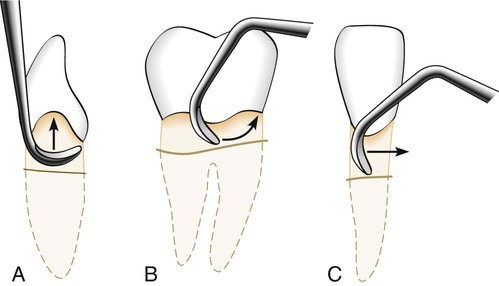
Angulation.
Correct angulation is essential for effective calculus removal. For subgingival insertion of a bladed instrument such as a curette, angulation should be as close to 0 degree as possible (Figure 46-68, A). The end of the instrument can be inserted to the base of the pocket more easily with the face of the blade flush against the tooth. During scaling and root planing, optimal angulation is between 45 and 90 degrees (Figure 46-68, B). The exact blade angulation depends on the amount and nature of the calculus, the procedure being performed, and the condition of the tissue. Blade angulation is diminished or closed by tilting the lower shank of the instrument toward the tooth. It is increased or opened by tilting the lower shank away from the tooth. During scaling strokes on heavy, tenacious calculus, angulation should be just less than 90 degrees so that the cutting edge “bites” into the calculus. With angulation of less than 45 degrees, the cutting edge will not bite into or engage the calculus properly (Figure 46-68, C). Instead, it will slide over the calculus, smoothing or “burnishing” it. If angulation is more than 90 degrees, the lateral surface of the blade, rather than the cutting edge, will be against the tooth, and the calculus will not be removed and may become burnished (Figure 46-68, D). After the calculus has been removed, angulation of just less than 90 degrees may be maintained, or the angle may be slightly closed as the root surface is smoothed with light, root-planing strokes.
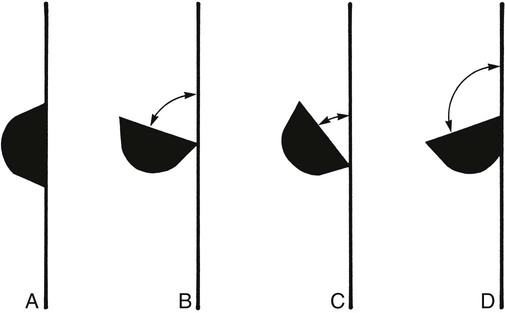
When gingival curettage is indicated, angulation greater than 90 degrees is deliberately established so that the cutting edge will engage and remove the pocket lining (Figure 46-68, D).
Strokes.
Three basic types of strokes are used during instrumentation: the exploratory stroke, the scaling stroke, and the root-planing stroke. Any of these basic strokes may be activated by a pull or a push motion in a vertical, oblique, or horizontal direction (Figure 46-69). Vertical and oblique strokes are used most frequently. Horizontal strokes are used selectively on line angles or deep pockets that cannot be negotiated with vertical or oblique strokes. The direction, length, pressure, and number of strokes necessary for either scaling or root planing are determined by four major factors: (1) gingival position and tone, (2) pocket depth and shape, (3) tooth contour, and (4) the amount and nature of the calculus or roughness.
Stay updated, free dental videos. Join our Telegram channel
VIDEdental - Online dental courses


