Chapter 4 The role of the manufacturer
Learning Objectives
From this chapter, the reader will:
• Appreciate the stages the manufacturer must go through to bring a new product to market
• Have an understanding of the tests which a manufacturer uses to verify that a material will behave satisfactorily and confirm to an international standard if appropriate
• Understand the need for suitable levels of radiopacity for identification purposes of dental materials
• Be better informed and able to understand and appraise the information presented in product promotional information.
Introduction
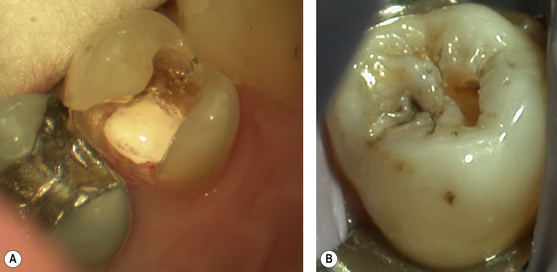
It is obvious that the manufacturer has a major role in the production of new materials which are suitable for use in the mouth. Over the past 40 years there has been a large increase in both the generic types of material and number of manufacturers producing them. This proliferation of products with their varied applications, particularly in restorative dentistry, has contributed significantly to the way modern dentistry is now practised compared with traditional techniques. The most obvious example is the ability of the dentist to prepare a tooth as conservatively as possible and then select the most appropriate material for the application. This compares with times gone by when the reverse was true as the few materials available determined the clinical preparation, often resulting in the needless loss of tooth tissue (Figure 4.1). This has resulted in a change in philosophy in clinical dentistry. Each advance in dental materials science commonly leads to the production of new products. This increases the treatment options for the clinician, thus theoretically contributing to better care for the patient.
Material Development
Problem identification and means of resolution
Most dental materials development is incremental. Only very rarely is an entirely new material developed from scratch. Usually, the manufacturer identifies a problem with an existing material and determines how to improve on or eliminate this shortcoming. Deficiencies are frequently identified in focus meetings with clinicians worldwide and from comments fed back by the sales team from their discussions with the end users, the dental team. New technology usually comes from the larger companies who have their own in-house research and development departments. These research teams examine the alternatives which may enhance material performance. Sometimes the developments come from outside the world of medicine and dentistry such as the astronautic industry (Figure 4.2).
Test specimen size
• The small volumes of materials used in the mouth. Specimen sizes used in the laboratory are, of necessity, larger than their clinical equivalents. This leads to difficulty manipulating the material during specimen preparation as larger amounts are required to be handled than is used in the mouth.
• The difficulty of mixing these large volumes by hand or mechanically. Air is often incorporated into the mix and this will weaken the test sample. Any defect in the test specimen will result in erroneous results.
• Having to mix several capsules simultaneously. Frequently this will be required to prepare one specimen. This is difficult to achieve as multiple mixing machines are required and dispensation must be rapid otherwise the material will begin to set, which means that part of the test specimen will be prepared with material that has exceeded the working time and is in the setting phase.
Mechanical Tests
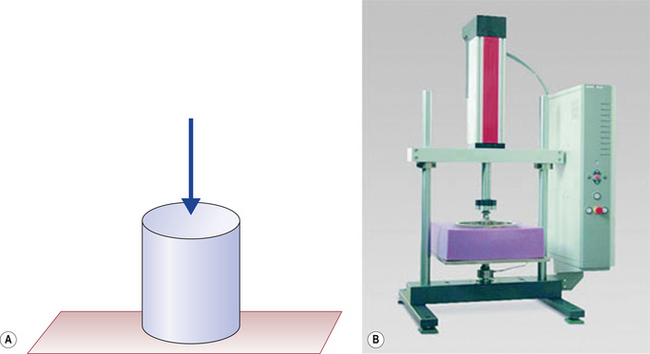
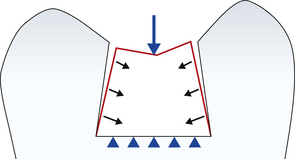
Compressive, tensile and flexural strengths together with the modulus of elasticity of the material can be measured using a series of standard mechanical tests. Compressive strength is the ability of a material to withstand axially loaded pushing forces (i.e. applied along the long axis of the object, Figure 4.3) and has some relevance in demonstrating reproducibility and reliability of materials from batch to batch during production.
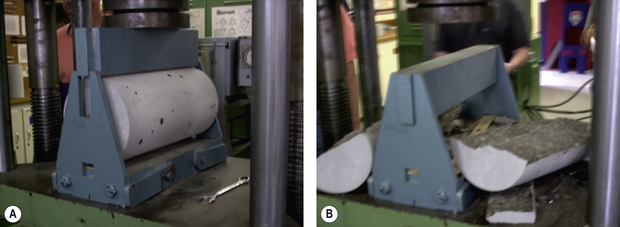
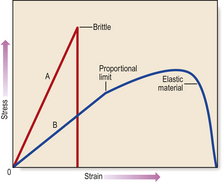
Tensile strength is the ability of a material to withstand pulling forces in an axial direction. There are two types of tensile test, one for brittle materials which do not deform (Figure 4.4) and the other for elastic materials which will elongate before breaking. The diametral tensile strength test, as its name implies, uses a cylinder of material of similar dimensions to the compressive test specimen, but in this case it is loaded along the long axis across its diameter. The compressive forces which are applied at the surface form stress concentrations within the specimen, which is equivalent to pulling the cylinder apart along the midline. This test is used for brittle materials, but it is not used very frequently as the reproducibility with dental materials is low (Figure 4.5).
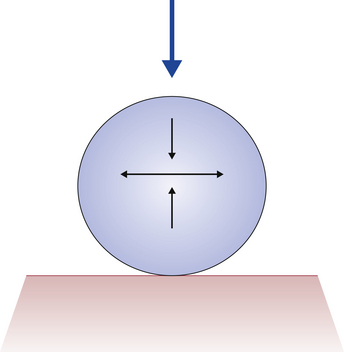
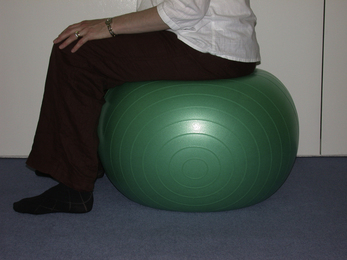
The diametral tensile strength test is unsuitable for materials that are easily compressible as the material distorts before fracture. The calculation of the strength value relies on the measurement of the diameter of the sample prior to commencement of the test remaining the same throughout the test. As can be seen from Figure 4.6, an easily compressible material such as an exercise ball will deform with the horizontal diameter increasing by a substantial amount, while the vertical diameter is reduced, without any fracture occurring.
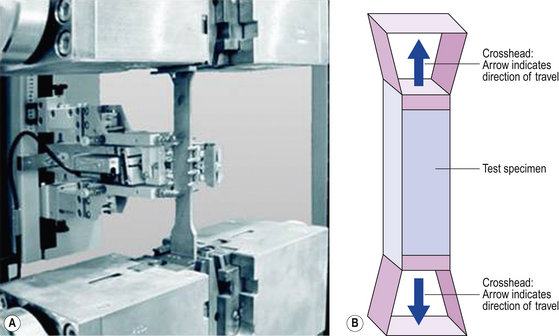
Tensile strength testing has greater significance with materials such as elastomeric impression materials as they may tear or stretch when withdrawn from between the teeth. If they stretch but do not return to their original shape, then the cast restoration constructed may not fit the prepared tooth. For these materials, a paddle-shaped specimen is prepared and connected to the two crossheads of a loading machine. The upper crosshead is then moved away from the lower and the paddle-shaped strip of material is stretched until it fractures. The elongation of the sample and the ultimate breaking strength are noted (Figure 4.7).
Stress concentration: the region where stress is concentrated in an object (often called stress raiser or stress riser). A material can fail, via a propagating crack, when a concentrated stress exceeds the material’s theoretical cohesive strength.
Tension: the magnitude of the pulling force exerted by an object on another object.
Crossheads: the support for the platens in a universal load testing machine.
Flexural strength is the ability of a material to resist load when unsupported. It is most closely related to a load being applied to a restorative material as the upper surface of the specimen is placed in compression whereas the underside is bent downward and is in tension. Flexural strength is also called transverse strength. Figure 4.8 shows the three-point bend test. Load is applied to the unsupported beam. Matchstick-shaped specimens are prepared, 2 × 2 × 25 mm in dimension. The ends of the sample are supported on two knife-edged blades which are positioned on the lower platen of the load testing machine. A knife edged blade is brought down onto the centre of the sample at a constant loading rate and the load is recorded when the sample breaks. This is then used to calculate the flexural strength.

Fig. 4.8 Flexural strength being measured either using an unsupported beam as shown here or a disc supported in a ring, as shown in Figure 4.9.
Figure 4.9 demonstrates a biaxial system where the specimen is a disc supported on a ring. As with the three-point bend text, the top of the sample is put under compression while the underneath surface is placed in tension on the specimen. Here, however, any edge defects of the sample will not affect the test result since the edge of the sample is outside the area of material being tested, i.e. the supported area. In this case, a sample is prepared 1 mm thick and approximately 1 to 1.2 cm in diameter. The sample is positioned on an annular ring placed on the lower platen of a load testing machine and a load applied at the midpoint of the sample, the centre of the diameter of the ring, using the upper crosshead. The flexural strength is calculated from the ultimate breaking strain recorded. As with the test for compressive strength, it is difficult to extrapolate any results to the clinical situation as the floor of any cavity will provide support to this surface and as such this cannot be easily simulated in the laboratory (Figure 4.10).
Modulus of elasticity
Modulus of elasticity describes the relative stiffness or rigidity of a material. Brittle materials have a high modulus of elasticity while flexible materials have a low value (Figure 4.11). Glass is a brittle material that exhibits little distortion before cracking when a load is applied to it (Figure 4.12).
Stay updated, free dental videos. Join our Telegram channel

VIDEdental - Online dental courses


