4
Fitting and Activating Removable Appliances
The fitting and activation of upper removable appliances (URAs) should be a relatively straightforward and quick procedure, even for the less experienced, if the steps in this chapter are followed and you develop a routine with which you become familiar.
It is imperative that you become very adept at fitting and activating appliances as a poorly fitting appliance will provide the patient with an excuse not to wear it and, worse, an incorrectly activated appliance may have a significant detrimental effect on the malocclusion.
- What to check prior to fitting the appliance
- The advice that should be provided to the patient prior to fitting
- How to fit the appliance, what to check for and how to improve the fit of ill-fitting appliances
- How to increase the retention of the appliance
- How to activate the appliance
- How to instruct the patient on the insertion and removal of the appliance
- The instructions and advice that should be given to the patient/parent/guardian before they leave the surgery
When the URA Arrives from the Laboratory
The impressions and the design prescription for the construction of the URA will have been sent to a dental laboratory technician. It is important that a laboratory technician who is familiar with making orthodontic appliances is used. This may mean using a different laboratory from where your restorative work is produced.
Also, appliances should routinely be fitted within 2 weeks of the impression being taken to minimise the risk of the appliance not fitting due to tooth movement/eruption in the intervening time.
As with all laboratory-produced work, the following should be checked:
- That you have the correct appliance for that particular patient
- That the appliance has been made accurately to the prescription
- That there are no sharp spicules of acrylic on the fit surface or polished surfaces
- That the tag ends of the various wire components do not come through the acrylic on the fit surface
- That the active components, screws and springs move freely, and there are no spicules of acrylic preventing movement.
Obviously, if the appliance has not been made to the prescription requested, it will need to be re-made. It may be possible to re-use the working model, but this will need to be inspected carefully and, if in doubt, it is better to take another impression.
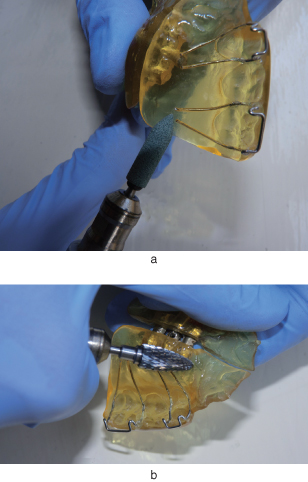
Spicules of acrylic or sharp wires can easily be trimmed using a straight handpiece with an acrylic-trimming bur or green stone (Figure 4.1).
Figure 4.1 Spicules of acrylic or sharp wires can be trimmed using a straight handpiece with a green stone (a) or an acrylic-trimming bur (b), respectively.
All active components need to be checked for movement. Palatal finger springs are most often restricted by spicules of acrylic. It is also important to ensure that the location holes for the key that turns the expansion screws are all free of plaster/acrylic and that the key can be located easily. It is sensible to check that the screw can be turned prior to demonstrating this to the patient as, occasionally, they can be quite stiff (see later for details and a demonstration of the activation of an expansion screw).
Advice to the Patient Prior to Fitting
The majority of patients being treated with URAs in general dental practice will be young and having interceptive treatment. The fitting of the appliance may be the first dental treatment that the patient has experienced, apart from having the impression taken. It is essential that the patient is advised appropriately and before any attempt is made to fit the appliance.
The patient should first be shown the appliance, both on and off the model, so they have some idea how the appliance will fit in their mouth. The patient should be warned that the appliance will:
- Feel very strange and very big when it is first fitted, ‘a bit like having a football in your mouth’
- Make the patient lisp for the first few days, until the patient’s tongue has become used to having an extra thickness on the palate
- Make the patient produce excess saliva for up to a couple of hours.
The patient should also be advised that instructions on how to insert and remove the appliance will be given once the fit of the appliance has been checked by the dentist; that they will become used to wearing the appliance after a few days (1–2 days normally if the URA is worn properly); and that the inside of their mouth will adapt to having the slightly bulky and rough appliance in 10–14 days.
Fitting the Appliance and What to Check For
Once the advice has been provided and the patient is happy to proceed, the appliance should be fitted:
- The appliance should be rotated into the patient’s mouth, with the patient in the supine position.
- The appliance should be placed in position, then firmly seated with the tip of the finger against the palatal acrylic. A well-fitting appliance should elicit a click as it is seated in position and should not ‘rock’ when finger pressure is applied to each side of the baseplate.
- The retention of the appliance should be checked by trying to remove the appliance with downward pressure on the most posterior retentive components, usually Adams’ clasps on the first permanent molars. A retentive device is one that requires firm finger pressure on the clasps to dislodge it. The patient should not be able to dislodge it with their tongue.
- All retentive components should be checked to ensure that they are positioned so that they engage the undercuts supra-gingivally and do not impinge on the gingivae. This is especially the case for the arrowheads of the Adams’ clasps.
- The baseplate should be checked for closeness of fit with the palate.
- The baseplate should also be checked to ensure that no acrylic will prevent the planned movement of teeth (Figure 4.2).
- If an anterior biteplane has been added to the appliance in order to reduce the overbite, then it is imperative that its height is sufficient to disengage the posterior occlusion by at least 2 mm. It is also necessary to ensure that there is even contact between the lower incisor and canine teeth with the biteplane as, if only one or two teeth are in contact, the full occlusal force will be transmitted through these teeth. This is potentially damaging to the teeth and will certainly make them very sore (Figure 4.3).
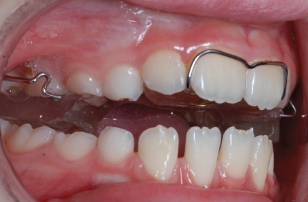
- If posterior capping has been included in the appliance to disengage the occlusion, then, as with the anterior biteplane, it is necessary to check that the posterior teeth contact the capping evenly in order to prevent differential eruption of the teeth not in contact and to limit discomfort from the appliance. It is also essential to check that the capping separates the teeth enough to allow anterior crossbites to be corrected without the lower incisors preventing labial movement of the upper incisors (Figure 4.4).
Figure 4.2 In this case, failure to remove the acrylic would prevent distal movement of UL3 by the palatal finger spring. Acrylic removal should be undertaken with an acrylic bur (as here) or greenstone on a straight handpiece.

Figure 4.3 Only one lower incisor (LR1) is in contact with this flat anterior biteplane (arrowed; a). It is necessary to ensure that there is even contact of at least three teeth with the biteplane. Therefore, the biteplane has been trimmed (arrowed; b) to bring three lower incisors into contact (c). Note that the biteplane is still active as shown by the posterior teeth being approximately 2 mm out of occlusion.
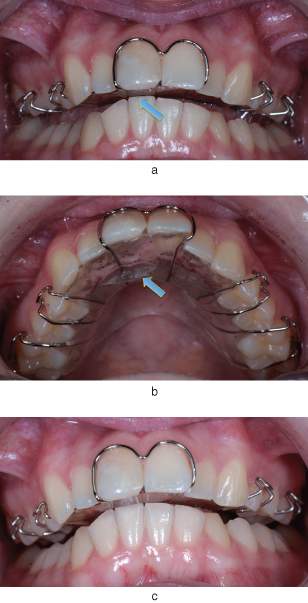
Figure 4.4 The posterior teeth contact the posterior capping evenly in order to prevent differential eruption of these teeth. The capping should provide enough separation of the anterior teeth to allow anterior crossbites to be corrected without the lower incisors preventing labial movement of the upper incisors, as shown here.
Trouble-Shooting
An appliance that has been well made by an experienced technician will generally be able to be seated in the patient’s mouth and is likely to require very little adjustment to make it fit really well. However, it is often necessary to increase the retention on the appliance, as it will become loose between the fitting and review appointments (see Chapter 5).
There are occasions when the appliance is unable to be seated or, if seated, is a poor fit. There are a number of reasons for this:
- Teeth have moved or erupted more since the impression was taken. This is more likely if there is a significant delay in fitting the appliance.
- The impression was distorted due to poor impression technique or being left too long under inappropriate conditions before being cast up.
- The appliance has been poorly made.
In many cases where the appliance does not fit straight away, it is possible to adjust the appliance so that it fits or the fit becomes more acceptable. There are a series of steps that should be followed in order to determine the cause of the inadequate fit and how this can be rectified:
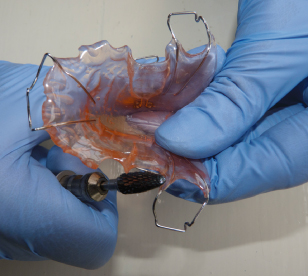
- Check that the colleting around the palatal surfaces of the teeth fits snugly, but that none of the collets is preventing the appliance from seating. Also, acrylic that extends too far along the fly-overs on wire components can have the same affect (Figure 4.5). A thorough examination will usually reveal if one or more of the collets or the acrylic around a wire component needs to be relieved. If this is the case, then relieve one collet at a time, a little at a time, with the appliance out of the patient’s mouth, using an acrylic-trimming bur in a straight handpiece. If there is over-zealous trimming of the collets/baseplate, then any tooth that does not have its palatal surface in immediate contact with the baseplate will be liable to drift palatally, especially if it is a tooth that has been clasped for retention purposes.
- Once any problems associated with the colleting have been removed but the appliance still does not seat adequately, then, if there is no posterior capping incorporated into the appliance, the poor fit will be due to the baseplate not being adapted adequately to the shape of the palate, possibly due to distortion of the impression. In these circumstances a decision must be made by the clinician as to whether the appliance will become a tolerable fit once the retention has been increased again, or whether the fit is so inadequate that the appliance will have to be re-made. If the latter, then a new impression will need to be taken and the reasons why the initial appliance did not fit should be added to the prescription sheet in order to prevent the error being repeated.
- However, if there is posterior capping incorporated into the appliance, the appliance may not seat because one of the teeth covered by the capping has erupted more or moved slightly since the impression was taken. It can sometimes be difficult to see exactly which tooth is causing the problem and, in these situations, it may be necessary to use denture relief cream on the fit surface in order that the area of initial contact between the teeth and baseplate may be identified and relieved.
- Once the baseplate has been adjusted to seat adequately, the retention should be increased a little at a time until fitting the appliance elicits a sharp click when seated and requires firm downward pressure on the clasps to remove it.
- Then, and only then, should the active components be activated.
Figure 4.5 Acrylic that prevents the appliance from seating because it extends too far along the fly-overs on wire components should be removed, as shown here.
Adjustment And/or Activation of Components
The correct adjustment of the retentive components and correct activation of the active components, in terms of both direction and force, are key to the success of a removable appliance.
Adjustment of Retentive Components
Adams’ Clasps
These are the main retentive components on all removable appliances and, as such, the success of the treatment depends on these being retentive enough to maintain the position of the appliance after activation. Many active components have a dislodging effect on the appliance once they have been activated and, without adequate retention, the appliance may not stay in the patient’s mouth and, therefore, tooth movement will be much less effective.
Prior to adjustment, the operator must ensure that the appliance is seating adequately. Once this has been confirmed, the ease with which the appliance can be removed from the mouth should be checked. If the patient is able to dislodge the appliance easily with their tongue, or only minimal finger pressure is required, then the retention needs to be increased.
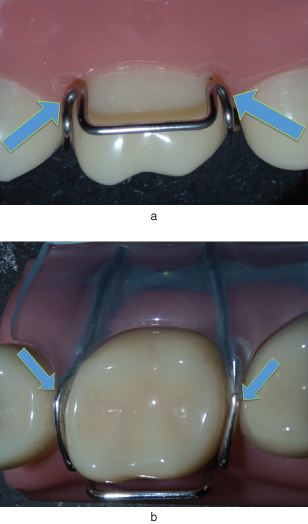
Prior to any adjustment, the correct positioning on the tooth of each part of the Adams’ clasp must be established (Figure 4.6):
- The fly-overs should be as close to the contact points of the teeth as possible as they crossover from the palatal acrylic to the buccal aspect of the tooth.
- The bridge should lie approximately two-thirds of the distance from the gingival margin to the cusp tips, and there should be a gap of no more than 1.5 mm between the bridge and the buccal surface of the tooth.
- The arrowheads should be positioned in the undercuts just above the gingival margins on the mesio-buccal and disto-buccal aspects of the crown.
Figure 4.6 Design features of an Adams’ clasp. Note the positioning of the arrowheads (arrowed; a) into the mesio- and disto-buccal undercuts of the first permanent molar, and the well-fitting fly-overs (arrowed; b) that sit well down into the embrasures to help avoid occlusal interferences with the lower arch.
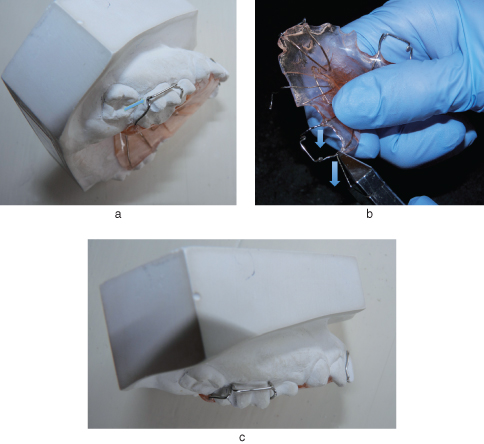
Of course, adjustment of one particular part of the Adams’ clasp will affect the other aspects, so care must be taken with the adjustments and the position of every part of the crib checked after each adjustment. For example, adjustment to the fly-over to make it lie more closely against the contact points will move the arrowheads closer to the gingival margin. It may also move the bridge away from the buccal surface of the tooth and closer to the buccal mucosa (Figure 4.7).
Figure 4.7 Adams’ clasp adjustment of the fly-overs: when the arrowheads do not initially engage the undercuts mesio- or disto-buccally (a), arrowed, then the fly-overs must be adjusted by bending them toward the gingivae where the wire exits the acrylic (b). Here the distal fly-over is being adjusted (direction of adjustment is arrowed; b), but both would be adjusted so that the undercuts are engaged as shown (c).
Adjusting a poorly fitting Adams’ clasp to make it retentive can be frustrating and time-consuming for the inexperienced. Of course, there are limits to the amount of adjustment that can be carried out at the chairside and, if the majority of appliances arriving back from the laboratory require significant adjustment, then this must be discussed with the laboratory technician or a different laboratory is used.
Once the position of all parts of the Adams’ clasp has been checked, then the retention of the appliance should be re-checked. In theory, the correct positioning of the parts should ensure that the appliance has enough retention, but patient factors and the accuracy of the impression material need to be taken into account.
If the retention still needs to be increased, then this should now be a straig/>
Stay updated, free dental videos. Join our Telegram channel
VIDEdental - Online dental courses


