Chapter 4
Entering the Canal System
Aim
To describe the importance of coronal access for effective and efficient management of endodontic infection, and provide clinical guidance for safely uncovering and refining access to the canals of permanent teeth.
Outcome
After studying this chapter, the reader should understand the relevance of dental anatomy in defining access outline, the value of investing time in carefully refining coronal access, and be more conversant with some helpful tools for accessing routine cases.
Access – The Foundation of Success
Managing endodontic infection is a sequential process (Fig 4-1). The consecutive stages of coronal access, root canal preparation, canal obturation and coronal seal build on each other to win success. Coronal access lies at the foundation, and aims to:
-
fully unroof the chamber to clean infected and decomposing tissue from all of its pulp horns and ramifications
-
uncover the coronal entrances of all root canals which need to be cleaned of soft tissue and infection
-
allow simple, unstressed flight-paths for the safe, efficient and controlled use of instruments in the canal system
-
preserve as much coronal tooth tissue as possible compatible with these aims. No matter how nice the final radiographic appearance of the root filling, a radical access cavity compromises long-term restorability and does our patients no favours.
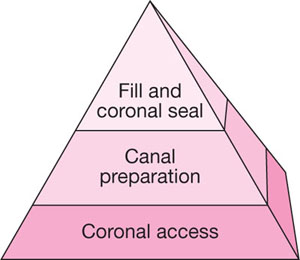
Fig 4-1 The pyramid of endodontic treatment. Everything builds on coronal access.
Faced with exciting options for canal preparation and obturation, coronal access can be overlooked as a dreary – if sometimes stressful – precursor to be dispensed with quickly before the main event. In fact, coronal access holds the key to success and rewards those who check and refine their preparation before racing to the next stage.
A lower molar, well treated in the distal canal, but with a short and inadequate root filling mesially is shown in Fig 4-2. In haste to get on, the chamber was not inspected to identify and remove the mesial part of the roof. Instruments fell straight and stress-free into the wide distal canal but the flight path of instruments to the mesial was from the distal, more difficult and frustrating (Fig 4-3a). Advancing under great and unnecessary flexion, the files started to straighten, cutting into the mesial walls to create steps or ledges (Fig 4-3a) which deepened with every exasperated action. The canals were cleaned short, filled short, and the tooth now has a guarded prognosis.
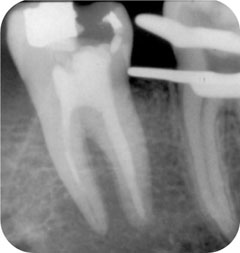
Fig 4-2 A poor root filling and unpredictable bridge abutment, but where did the fatal problem arise?
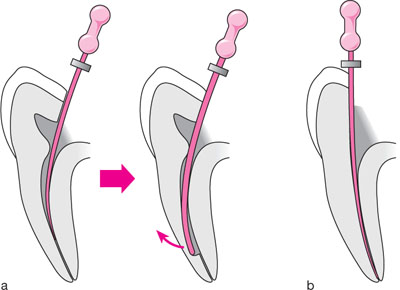
Fig 4-3(a) Difficult flight-path from the distal to find the mesial canal orifices. Instrument recoil results in a ledge which may be impossible to bypass. Dentine mud may occlude the canal below. (b) The development of a proper flight-path reduces stress on the instrument and operator.
How long might it have taken to remove the mesial pulp chamber roof, provide a simpler, stress-free flight path and win the case with little or no frustration (Fig 4-3b)? We cannot do anything about natural root curvatures, but we can deliver instruments to them in a stress-free, straight line. Access holds the key if we are to avoid rolling problems into the following stages.
Designing Coronal Access – Knowing the Anatomy and Where to Cut
Rational unroofing demands that we know where the pulp is.
Guidance is available from:
-
classical illustrations in standard texts
-
undistorted pre-operative radiographs
-
direct visual inspection of the opened chamber.
Idealised pulp anatomy and outline forms for coronal access to sound or soundly restored permanent teeth are shown in Figs 4-4, 4-6 and 4-8. In reality, many teeth presenting for access are far from sound, with caries and defective restorations to be removed, and a large pulpal exposure as the initial entry point. Even here, classical outlines help to rationalise the direction of cutting to develop good access from an unplanned initial opening.
Classic Cavity Outlines
Maxillary central incisors (Fig 4-4a)
Typical length: 23.5mm
Number of canals: 1
Basic access outline: triangular with apex at cingulum.
The coronal pulp is shaped like a fishtail, with mesial and distal pulp horns rising at the lateral limits. A circular access may find the often large canal, but will not properly unroof the pulp horns. Infection will be harboured, and the tooth may discolour as the retained tissue breaks down. For good straight-line access, the preparation will often graze into the incisal edge, but should not extend far labially to create an aesthetic compromise. With age, the pulp narrows mesiodistally and retreats cervically. Access in this case may commence lower on the crown, and be less flared mesiodistally.
Maxillary lateral incisors (Fig 4-4b)
Typical length: 22.5mm
Number of canals: 1
Basic access outline: triangular with apex at cingulum.
A smaller version of the central incisor, lateral incisors catch out the unwary who assume that the root is straight and fail to notice the marked disto-palatal curvature which is almost always present in the apical 2-3mm. Many are ledged or perforated at that point (Fig 4-5), and initial negotiation to the canal terminus often requires precurving the apical 2-3mm of small, flexible instruments (Fig 5-11).
Maxillary canines (Fig 4-4c)
Typical length: 26.5mm
Number of canals: 1
Basic access outline: oval buccolingually.
Maxillary canines have only one pulp horn, lying centrally, so there is no need to flare access mesiodistally. When the pulp is large, a circular access may be excessively wide mesiodistally, but fail to unroof the pulp horn. As the coronal pulp retreats centrally and cervically with age, the outline may be more central and circular.
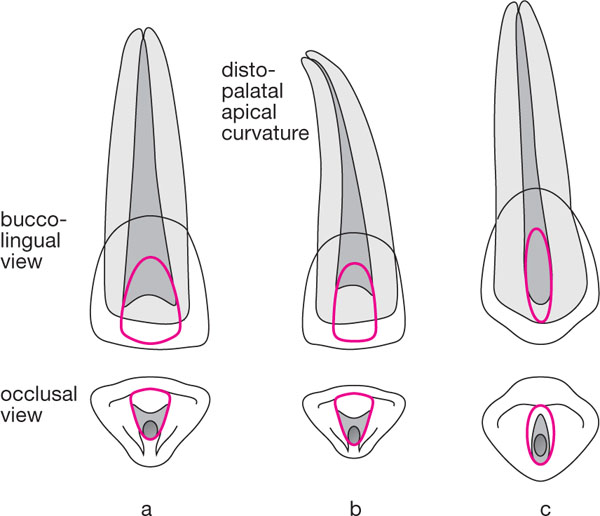
Fig 4-4 Buccolingual and occlusal views of permanent teeth showing classical pulp anatomy, canal position and access cavity outline.
Fig 4-4(a) Maxillary central incisor. (b) Maxillary lateral incisor. (c) Maxillary canine.
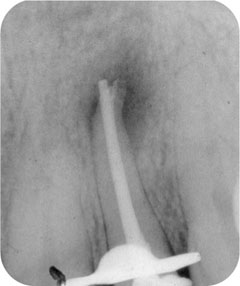
Fig 4-5 A common event in the maxillary lateral incisor. Most have a marked disto-palatal curvature in the apical third.
Maxillary premolars (Fig 4-6a,b)
Typical length: 21mm
Number of canals: first premolar – usually 2; second premolar – usually 1
Basic access outline: oval buccolingually.
Maxillary premolar pulps are narrow and fissure-like mesiodistally, but broad from the buccal to the lingual pulp horns. A mid-occlusal circular access will fail to unroof the pulp horns, and may c/>
Stay updated, free dental videos. Join our Telegram channel
VIDEdental - Online dental courses


