CHAPTER 31 Oral Surgery for the Pediatric Patient
For the pediatric patient there must be consideration to the patient’s ability to cooperate. Depending on the patient’s age, systemic health, and planned surgery, the practitioner may consider using nitrous oxide inhalational sedation, oral sedation, intramuscular sedation, intravenous sedation, or a combination of these modalities. Regardless of the route of agent administration or the selection of pharmacologic agent, the primary consideration in sedating a pediatric patient is the depth of sedation achieved. Oral sedation and nitrous oxide are the agents most commonly used in the pediatric dental office. Nitrous oxide is advantageous in that it can be titrated achieving both rapid onset and recovery from the effect of the nitrous oxide. The practitioner must be aware that nitrous oxide when combined with an oral agent (e.g., benzodiazepine or chloral hydrate) can potentiate the effect of the oral agent, producing a more profound depth of sedation and at times producing a depth of sedation equal to general anesthesia.1,2
General principles that apply to both the adult and pediatric patient include profound anesthesia, aseptic technique, visibility, and surgical site stability. Achieving profound anesthesia is dependent on knowledge of the anatomy of the second and third division of the trigeminal nerve. This is discussed in Chapter 13.
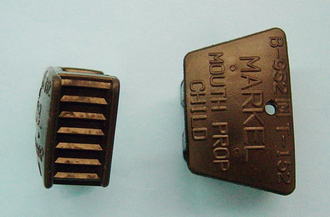
Adequate visibility is required for all dental procedures. For oral surgical procedures this entails adequate access, adequate light, and a good suction to create a debris-free surgical field. Adequate access requires appropriate mouth opening. Opening the patient’s mouth and maintaining its opening can be facilitated with a bite block (Fig. 31-1) or a Molt mouth prop. A small bite block may be used and the degree of mouth opening varied by its placement in the mouth. For maximal mouth opening the bite block is placed more posteriorly. A piece of floss may be attached to the bite block. The knot securing the floss to the bite block must be secure so that it does not loosen. If the bite block is displaced into the pharynx, the floss attached to the bite block extends out of the mouth, assisting in retrieval of the bite block. The Molt mouth prop has a ratchet-type action and can be used to assist in opening the patient’s mouth. This can be beneficial when managing the uncooperative patient. Excessive force could be applied with the Molt mouth prop causing iatrogenic injury, such as displacement of teeth or injury to the temporomandibular joint. In addition to keeping the mouth open for the surgical procedure, the bite block stabilizes the mandible. When extracting a mandibular tooth, using the bite block minimizes mandibular movement and the resultant transmission of excessive forces to the temporomandibular joint.
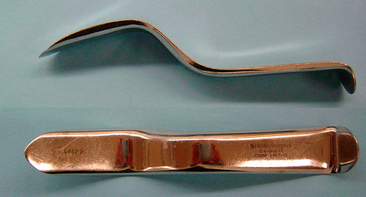
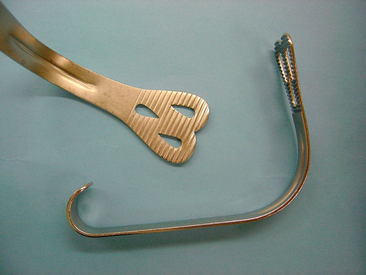
Adequate access also requires appropriate retraction. Commonly used retractors in oral surgery include the Austin retractor (Fig. 31-2), the Minnesota retractor (Fig. 31-3), and the Weider retractor (Fig. 31-4). The Austin and Minnesota retractors are usually used to retract the cheek and surgical flaps. Tongue retraction is usually performed using a Weider retractor. The Weider retractor is a heart-shaped retractor with a serrated edge. Retraction of the tongue with the Weider retractor is best achieved by placing the lateral aspect of the retractor firmly against the alveolus. A gauze or sponge packing may be placed just medial to the retractor. This packing provides a barrier between the surgical site and the pharynx preventing the tooth, surgical debris, or irrigating solution from potentially being swallowed, aspirated or irritating the pharynx. If the tongue is retracted medially, the pharyngeal barrier is displaced medially, opening up a passage between the mouth and the pharynx and there is the potential to stimulate the gag reflex. Care must also be taken not to position the retractor too far posteriorly into the pharynx, which also stimulates the gag reflex. Retraction may be performed either by the dentist using his or her nondominant hand or by the assistant.

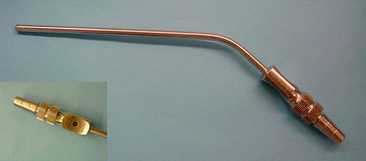
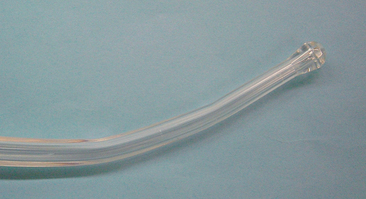
Adequate visibility depends on establishing a debris-free surgical field. This requires a good surgical assistant using high-speed surgical suction. The surgical tray should have a Fraser suction tip (Fig. 31-5), which are available in various sizes. The Fraser tip has an opening in the handle that allows regulation of the suction power. The operator of the suction places his or her thumb over the hole in the handle when the suction is placed on bone and maximal suction power is desired. When less suction power is desired (e.g., when suctioning soft tissue), the operator leaves the opening in the handle open, which decreases the suction power. The practitioner should also have a Yankauer or tonsillar suction available (Fig. 31-6). This suction removes significant quantities of debris and with its blunt tip can be passed blindly down the throat.
SIMPLE EXODONTIA
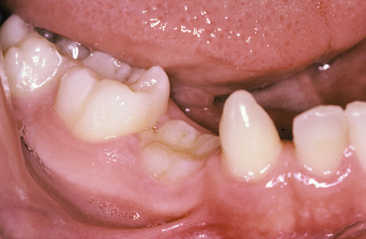
Radiographic surveys of teeth to be extracted are of prime importance. The dentist should observe the size and contour of the primary roots, the amount and type of resorption, the relation of the roots to the succedaneous teeth, and the extent of disease (Fig. 31-7).
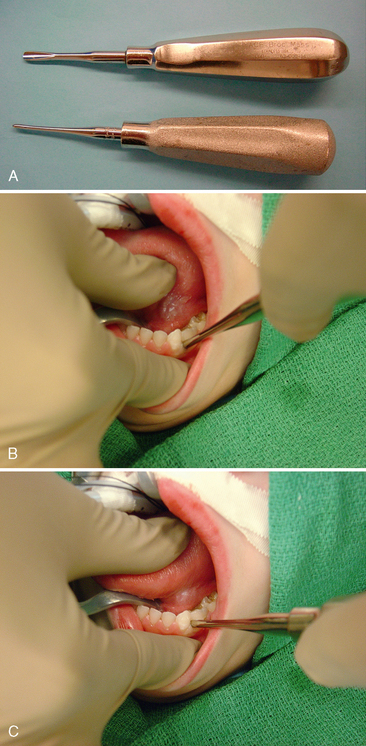
The basic details are eloquently illustrated in more detail in the fifth edition of Contemporary Oral and Maxillofacial Surgery.3 The first step in extracting a tooth is to separate the soft tissue attachment from the cervical aspect of the tooth. A #9 Molt elevator (Fig. 31-8) is most commonly used. The Molt elevator is a dual-ended instrument; one end is sharply pointed and is used to initiate the separation of the soft tissue attachment from the tooth. The sharp pointed end of this instrument is placed interproximally on the mesial aspect of the papillae. The concave aspect of the instrument faces the tooth. Using a twisting motion, the dentist elevates the papillae. The tip of the elevator is then slid through the sulcus along the crest of the alveolar bone completely separating the buccal soft tissue attachment from the tooth. The same can be done on the lingual or palatal aspect of the tooth. If a flap is reflected, the broad, rounded end of the instrument may be used in a pushing (concave aspect of instrument against bone) or a pulling motion (instrument more perpendicular to bone with the concave aspect of the instrument facing the direction of movement) to reflect a full-thickness mucoperiosteal flap.

Extracting a tooth is an exercise in administering a controlled force in a slow and deliberate fashion to expand the alveolus and disrupt the periodontal ligaments, such that the tooth can be atraumatically removed from the jaw. The second step in extracting a tooth is to use a dental elevator to luxate the tooth. A straight elevator (Fig. 31-9) is most commonly used. The straight elevator has a concave blade that is placed toward the tooth being luxated. The blades are available in various sizes. The edge of the blades may be serrated to better grasp the tooth. The separation and reflection of the dental papillae facilitates placement of the elevator such that it rests on the alveolus. The elevator is initially inserted perpendicular to the tooth in the axial plane, and either parallel or with the blade of the elevator angled toward the alveolar crest up to 45 degrees from the alveolar crest in the coronal plane. The elevator is then turned such that the portion of the blade resting on the alveolus acts as a fulcrum and the coronal portion of the blade rotates toward the tooth being extracted. This action expands the alveolus, disrupts the periodontal ligament, and establishes initial mobility of the root. The degree of mobility need not be great to achieve benefit from an elevator. Indeed, only limited movement can be achieved when there are adjacent teeth. Excessive force can fracture the tooth being extracted, converting a simple, closed extraction into an open extraction, or damage adjacent teeth or restorations. The straight elevator may in selected situations be used as a wedge. In this situation, once a space has been created between the bone surrounding the tooth socket and the tooth, the elevator is “wedged” between the alveolar bone and the tooth. Wedging the elevator inferiorly expands the alveolus, which facilitates extracting the tooth with forceps. Alternatively, as the elevator is “wedged” apically into the space between the bone and the tooth, the tooth is displaced coronally.
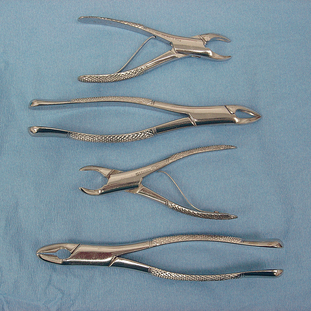
The last step in extracting a tooth is to remove the tooth with forceps, which must be appropriately selected. Several forceps are available in smaller sizes for the pediatric patient. (Fig. 31-10). The basic principles in selecting forceps are as follow:
The first force applied by the dentist when using forceps is apically directed. The apically directed force positions the center of rotation as close to the root apex of the tooth as possible. The more apical the center of rotation and the closer it is to the apex of the tooth, the less the apical third of the root is subjected to translational movement, and the less likely an apical third root fracture will occur. The apically directed force also disrupts the periodontal ligaments. With apically directed force maintained, the tooth is luxated toward the buccal and lingual/palatal aspect. Luxation is slow. Movement is in one direction, and then stopped while the alveolus is allowed to expand before movement begins in the opposite direction. With each deliberate movement, the force is increased expanding the alveolus. Rapid, jerky movements are ineffective and not recommended. Rotational forces may be applied for selected roots that are conical (anterior teeth, mandibular premolars, maxillary second premolar). The opposite hand may be placed such that the index finger or thumb is positioned on either the buccal and/or lingual/palatal aspect of the alveolus and can feel the expansion of the alveolus. Finally, once the alveolus is sufficiently expanded and the periodontal ligament disrupted, slight coronal tractional forces are applied and the tooth is removed.
A traditional dental drill should not be used for surgical procedures. The surgical drill must vent its air away from the surgical field. If a drill vents its air toward the surgical site, there is significant risk for development of air emphysema or an air embolism. Air emphysema is the result of air being forced into the tissue planes under the periosteal flap. This can cause a significant dissection of the tissue planes, resulting in crepitus and swelling that could infringe fascial spaces and cause airway problems. When drilling on bone, air could be forced into the vascular channels within the bony canals. Air that is forced into these vascular channels can travel through the bloodstream and cause an embolus in more distant and vital organs.
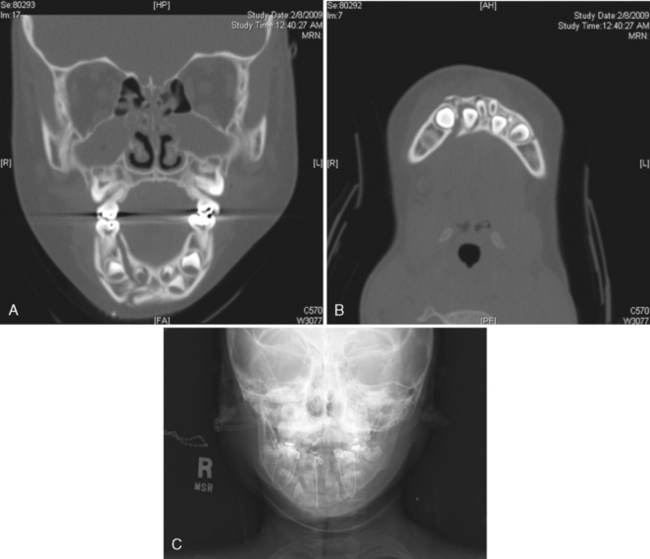
A primary tooth may be submerged or ankylosed. Ankylosed teeth may be slightly out of occlusion (Fig. 31-11) or they may be completely within the alveolar process yet show evidence of having once been in the mouth. A submerged tooth may have nonresorbed divergent roots, or may have all or nearly all the root resorbed. Despite having the root significantly resorbed, the tooth may show no signs of mobility when pressure or leverage is applied and exhibit a solid sound on percussion. These teeth may be virtually welded to the surrounding bone. The radiographic and clinical examination may not entirely predict the considerable difference in the degree of ankylosis and what difficulties may be encountered in the removal of the tooth. The basic principles pertaining to extraction are followed. A tooth with nonresorbed divergent roots in which the potential for a root fracture is high and the path of draw is inadequate may be best extracted by sectioning the tooth. If luxation is not accomplished with reasonable forceps pressure when extracting the ankylosed tooth, a surgical approach is required.
IMPACTED TEETH
IMPACTED THIRD MOLARS
The extraction of third molars is the most common surgical procedure in dentistry. It is therefore, critical for the pediatric dentist to understand the standard of care for the treatment of the impacted third molar. Refer to Contemporary Oral and Maxillofacial Surgery for a review on surgical principles and technique for extracting third molars. There are multiple reasons for extracting a third molar; however, the primary reason for the pediatric dentist to refer the patient to a surgeon for the extraction of an impacted third molar is to limit the progression of periodontal disease. Even though Ash and colleagues raised this issue almost 50 years ago, the concept of prophylactically extracting third molars to prevent disease versus extracting them when pathology develops remains a controversial subject.4
Stay updated, free dental videos. Join our Telegram channel
VIDEdental - Online dental courses


