30 Vertical Compaction of Warmed Gutta-percha
An article written over 40 years ago by Herbert Schilder, “Filling Root Canals in Three Dimensions,” was the foundation stone for an endodontic treatment concept defining the universally recognized principles of modern endodontic therapy. According to Schilder (1967), lesions of endodontic origin possess a healing capacity of 100% minus X!
In this equation, the factor X is determined by instrumentation and cleansing, mechanical sterilization and three-dimensional filling of the root canal system. Numerous clinical and histologic studies have demonstrated the occurrence of ramifications, anastomoses, indentations, and the formation of deltas within the root canals (Hess, 1925). It follows that the rate of successful clinical outcomes can be increased by improved treatment techniques that lead to improved cleaning and sealing of the root canal system in its entire complexity.
A prerequisite for successful outcome following vertical compaction of warm gutta-percha is thorough cleaning and shaping of the root canal system. In this regard, Schilder defined specific mechanical and biologic criteria (Fig. 30.1; Schilder 1974).
The goal of the cleaning procedure is to ensure the root canal system is cleared of all organic components (necrotic soft tissue, other remnants, bacteria) as well as antigenic substances and toxins. Because these substances are the primary cause of periradicular lesions, their complete removal represents the very basis for successful treatment.
Shaping refers to the development of a logical cavity form to recieve a 3D hermetic filling of the entire root canal space Equally important, when properly accomplished, shaping facilitates cleaning. A properly shaped root canal prepared for the warm gutta-percha technique should have a continuously tapering funnel (mechanical objective 1), with the narrowest diameter in the region of the apical foramen and the widest at the coronal aspect (mechanical objective 2).
The preparation should be done in multiple planes and maintain the natural curvatures of the root canal being treated. It should flow along the original anatomy of the root canal (mechanical objective 3).
The original foramen should remain in its natural position, that is, it should not be transported along the root surface (mechanical objective 4). The apical opening should be kept as small as is practically possible, and it should not be widened unnecessarily beyond its original dimension (mechanical objective 5).
The goal stated above demands appropriate adaptation of a master cone, selection of appropriate pluggers, insertion into the root canal of the master cone that is coated minimally with the sealer, controlled heating of the gutta-percha with a heat carrier and then transfer of the heat waves from the coronal to apical end, along with forcing and compacting the gutta-percha into the root canal system.
Gutta-percha needs to be heated only 3–8 °C above normal body temperature to be able to mold it and successfully adapt it to any irregularities within the canal system. The vertical compaction technique is based on capturing the maximum cushion of softened gutta-percha with appropriate pluggers and moving the entrapped material toward the apex. During this clinical procedure, the plugger should never make direct contact with the root canal wall. The vertical force/pressure from the plugger also helps to prevent shrinkage of the material when it cools to body temperature.
30.1 Schilder philosophy
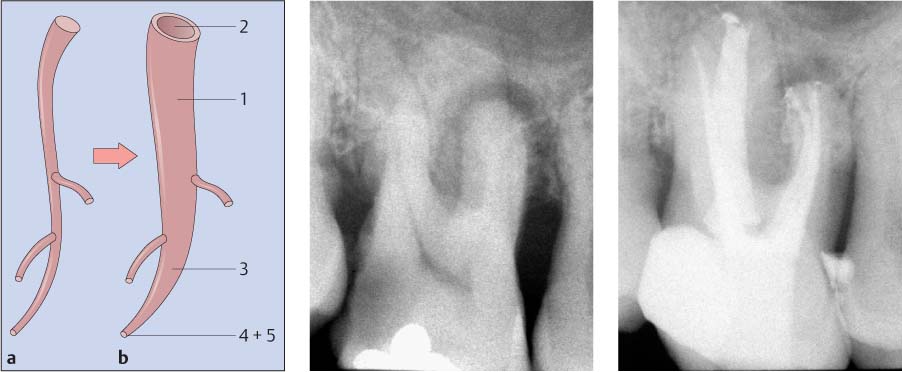
Depending on the nature of bacterial infection, lesions of endodontic origin form symmetrically around the portals of exit (foramina) of the root canal system. The complete elimination of infection from within the root canal system, in combination with a 3D root canal filling, is a prerequisite for regeneration of the periodontium at the apex.
30.2 Predictability of the Schilder philosophy
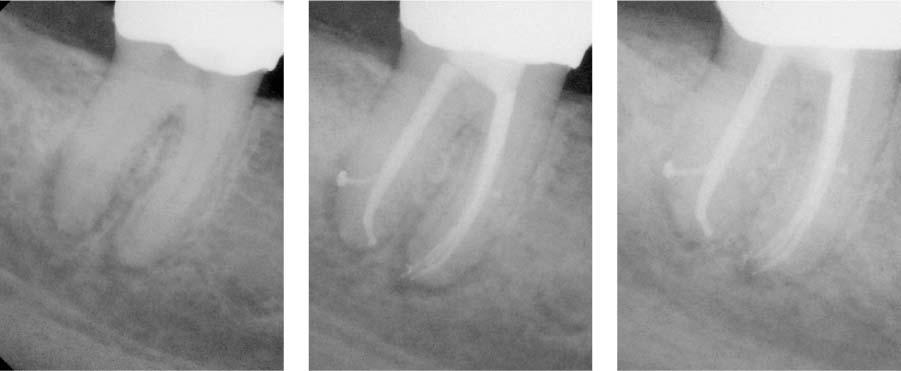
Following 3D shaping, cleaning, and filling of the root canal system, the healing capacity of the organism becomes manifest (left: preoperative radiograph, middle: immediately following root canal filling). Follow-up radiograph 3 months later (right) already demonstrating the healing capacity of the host tissue cells.
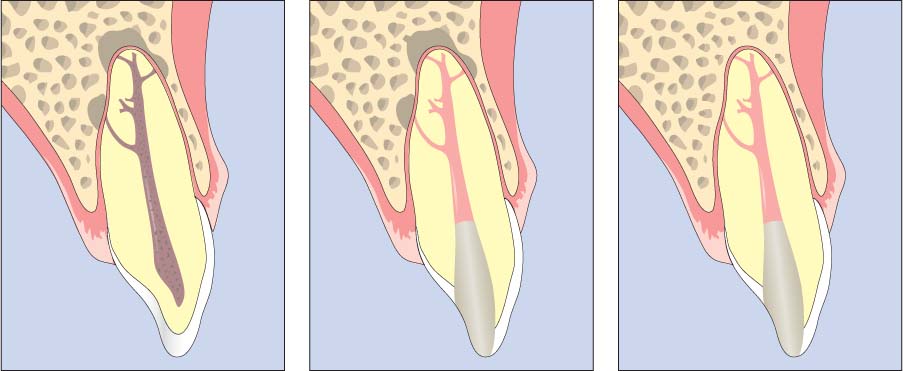
30.3 Schilder’s five mechanical objectives
Left: a Root canal system with three foramina. b Diagrammatic depiction of the five mechanical objectives (see p. 229).
Middle and right: The primary goal of the Schilder concept is a 3D continuously tapered cavity that maintains the apical foramen in its original spatial position and size without unnecessary enlargement.
The authors favor the Touch’n Heat device (SybronEndo, CA, USA) because of its manageability and effectiveness in heating the gutta-percha to the desired temperature. The heat carrier is activated via a simple finger switch and quickly becomes red hot. When properly used, the gutta-percha is warmed to 45 °C, without leaving the stable β-phase.
Schilder pluggers are used to capture a maximum cushion of softened gutta-percha and to compact it vertically. In the smaller plugger size range, alternative NiTi pluggers are available, which can ensure compaction to the necessary depth, even in narrow or severely curved canal systems.
Endodontic treatment using a prepared tray of Schilder pluggers of the most often used sizes, as well as two NiTi pluggers (sizes 40 and 60) has proved to be effective. In most cases, the Ppluggers (P = posterior) are used because with their working length of approximately 23 mm their use is indicated in the majority of root canals.
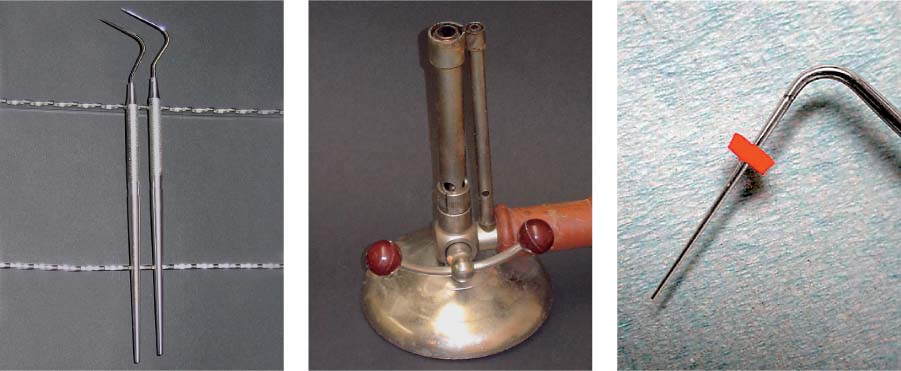
30.4 Heat transfer instrument
Heat carriers are similar to the spreaders used in the cold lateral compaction technique. Their purpose, however, is not to create space between individual gutta-percha points, but rather to distribute heat into the gutta-percha. They are available in sizes 0 and 00 (left) and are heated over a Bunsen burner (middle) until red hot.
Right: Close-up view of an electrically activated heat carrier.

30.5 Electrically activated heat transfer device
Electrical heating devices such as the Touch’n Heat (SybronEndo, CA, USA) or the System B (SybronEndo, Orange, CA, USA) permit precise control of the heat necessary to warm the gutta-percha and better control during the heating of removed guttapercha mass. They also require less time to heat up in comparison to the classic heat carriers.
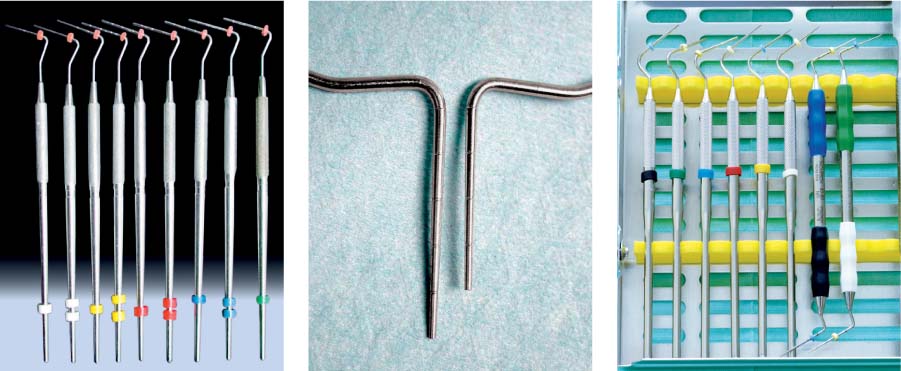
30.6 Pluggers
Endodontic pluggers resemble amalgam pluggers, except that the shaft is longer and thinner. They are fitted with markings at 5-mm intervals (middle) for simple length orientation. These are available as Schilder pluggers (Dentsply, Maillefer, Switzerland) (A = anterior) with a length of 30 mm and PPlugger (P = poste rior) with a length of 25 mm. The complete set consists of nine instruments with tip diameters of 0.40 mm (plugger size 8) up to 1.5 mm (plugger size 12) (left).
Right: Plugger tray and NiTi pluggers of the smallest sizes.
Preparation of the Gutta-percha Cone (Cone Fit)
The master gutta-percha cone must be selected very carefully. In most cases, a nonstandardized gutta-percha cone of “medium” or “fine medium” size is selected, whose taper is slightly less than the instrumented root canal. With exceptionally wide canals, one may also select a size “large” gutta-percha cone, which can then be thinned as necessary between two glass slabs and adapted individually to the taper of the canal.
The tip of the cone must be shortened so that its diameter is slightly larger than the last file that was used during instrumentation to the apical foramen. The adjusted gutta-percha cone should be fitted 0.5–1 mm short of the “radiographic terminus” of the canal, should exhibit “tug back”, and provide sufficient volume of gutta-percha for the subsequent compaction. This step in the endodontic process is checked radiographically and the appropriate height of the reference point is marked on the cone.
In ovoid canals an additional cone of “medium” size can be used in order to achieve the sufficient gutta-percha volume for optimum compaction.
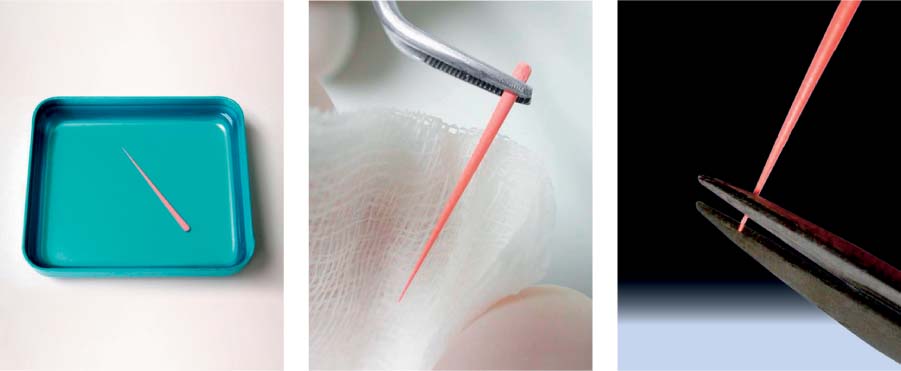
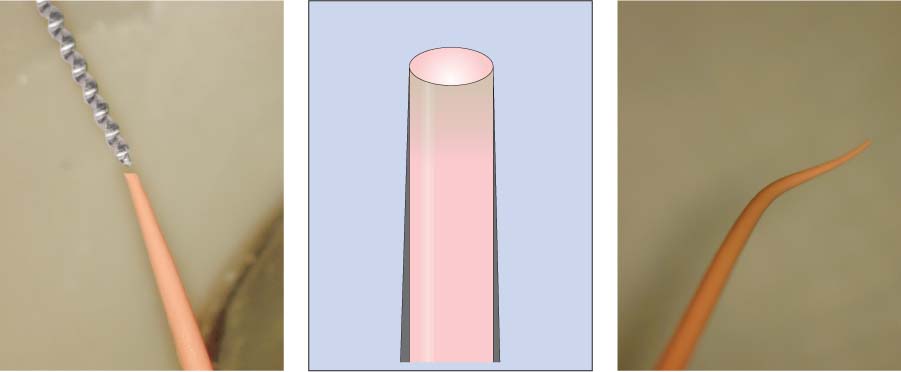
30.7 Preparing the master gutta-percha cone
Left: The gutta-percha cone is first disinfected in sodium hypochlorite solution and subsequently placed in an alcohol bath.
Middle: Before inserting the cone into the canal, the gutta-percha can be prebent using an alcohol-soaked gauze square.
Right: The tip of the gutta-percha cone is adapted to the desired diameter by trimming the tip with microscissors or a scalpel.
Stay updated, free dental videos. Join our Telegram channel
VIDEdental - Online dental courses


