Patient Assessment, Examination and Diagnosis, and Treatment Planning
This chapter provides an overview of the process through which a clinician completes patient assessment, clinical examination, diagnosis, and treatment plan for operative dentistry procedures. The chapter assumes that the reader has a background in oral medicine and an understanding of how to perform complete extraoral hard and soft tissue examinations along with intraoral cancer screening, as well as an understanding of the etiology, characteristics, risk assessment, and nonoperative management of dental caries as presented in Chapter 2. It is not in the scope of this chapter to incorporate the details of other aspects of a complete dental examination, including periodontal examination, occlusal examination, and esthetic evaluation.
Growing attention to using only the most effective and appropriate treatment has spawned interest in numerous activities. Research that provides information on treatments that work best in certain situations is expanding the knowledge base of dentistry and has led to an interest in translating the results of that research into practice activities and enhanced care for patients. This movement has been termed evidence-based dentistry and is defined as the “conscientious, explicit, and judicious use of current best evidence in making decisions about the care of individual patients.”1 Systematic reviews emerging from the focus on evidence-based dentistry will provide practitioners with a distillation of the available knowledge about various conditions and treatments. Currently, the American Dental Association (ADA) has developed a Web site (http://ebd.ada.org/) that can be used by dental professionals for evidence-based dentistry decision making. This Web site helps clinicians identify systematic reviews, describes the preferred method for assembling the best available scientific evidence, and provides an appraisal of the evidence through critical summaries. As evidence-based dentistry continues to expand, professional associations will become more active in the development of guidelines to assist dentists and their patients in making informed and appropriate decisions.
Patient Assessment
General Considerations
Magnifaction in Operative Dentistry
When choosing loupes, several parameters should be considered.2,3,4 Magnification (power) describes the increase in image size. Most dentists use magnifications of 2× to 4×. The lower power systems of 2× to 2.5× allow multiple quadrants to be viewed, whereas the higher power systems of 3× to 4× enable viewing of several teeth or a single tooth. In general, higher magnification systems are heavier, have a narrower field of view, are more expensive, and require more light than lower power systems. The use of small, lightweight LED (light-emitting diode) headlamps attached to the eyeglass frame or attached to a headband offer the considerable visual advantage of added illumination when used with loupes.
Examination, Risk Profile, Diagnosis, and Prognosis
Interpretation and Use of Diagnostic Findings
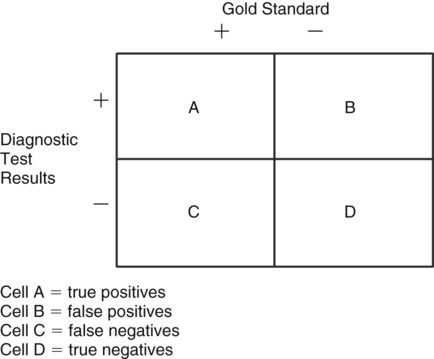
The diagnostic effort of health care professionals has been enhanced by the use of principles adopted from clinical epidemiology. This analytic approach relies on “2 × 2” contingency tables (Fig. 3-1) derived from clinical trials data. Such studies compare the results of a diagnostic test with the results obtained from a “gold standard” (knowledge of the actual condition) to determine how well a test identifies the “true,” or actual, condition. The results of the diagnostic test, positive or negative, are shown across the rows of the table, and the results of a “gold standard” or the “truth” are displayed in the columns. Cell A of the table contains the cases that the test identifies as being positive (or diseased) that actually are positive (i.e., confirmed by the “gold standard”). These cases are termed true positives. Cell B contains all cases for which a positive finding from the diagnostic test is present, but where the actual condition is negative. Therefore, this cell denotes false positives. Cell C includes the cases identified by the diagnostic test as not being diseased, but actually are diseased, as determined by the “gold standard.” Findings in this cell are termed false negatives. The final cell, cell D, includes true negatives, where the diagnostic test accurately identifies nondiseased cases that are truly negative as confirmed by the “gold standard.” A perfect diagnostic test would result in all cases being assigned to cells A or D with no false positives (cell B) or false negatives (cell C).
Examination of Teeth and Restorations
Preparation for Clinical Examination
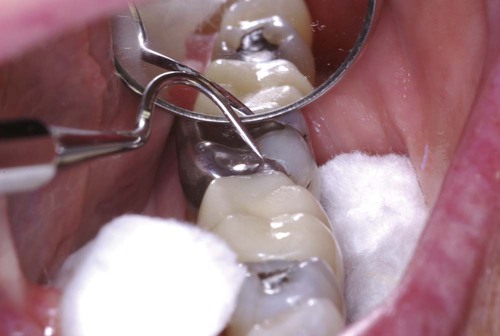
A trained assistant familiar with the terminology, notation system, and charting procedure can survey the patient’s teeth and existing restorations and record the information to save chair time for the dentist. The dentist subsequently performs the examination, confirms the charting, makes a diagnosis, establishes a risk assessment profile for the patient, establishes a prognosis, and develops the treatment plan in conjunction with the patient’s current needs and desires. The clinical examination is performed systematically in a clean, dry, well-illuminated mouth. Proper instruments, including a mirror, an explorer, and a periodontal probe, are required. A routine for charting should be established, such as starting in the upper right quadrant with the most posterior tooth and progressing around the maxillary and mandibular arches. An accurate examination is possible only when teeth are clean and dry. This may require initial scaling, flossing, and a toothbrushing prophylaxis before final clinical examination of teeth. A cotton roll in the vestibular space and another under the tongue maintain dryness and improve vision (Fig. 3-2). Dental floss is useful in identifying overhanging restorations, improper proximal contours, and open contacts.
Clinical Examination for Caries
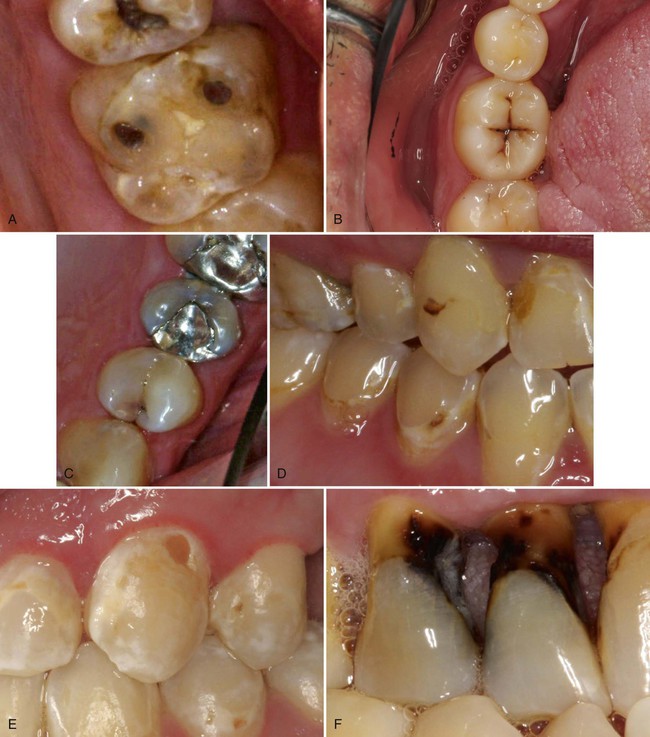
Caries lesions are most prevalent in the faulty pits and fissures of the occlusal surfaces where the developmental lobes of posterior teeth failed to coalesce, partially or completely (Fig. 3-3). It is important to remember the distinction between primary occlusal grooves and fossae and occlusal fissures and pits. Primary occlusal grooves and fossae are smooth “valley or saucer” landmarks indicating the region of complete coalescence of developmental lobes. Normally, such grooves and fossae are not susceptible to caries because they are not niches for biofilm and frequently are cleansed by the rubbing action of food during mastication. Conversely, occlusal fissures and pits are deep, tight crevices or holes in enamel, where the lobes failed to coalesce partially or completely. Fissures and pits are detected visually.
As noted earlier, sharp explorers were used to diagnose fissure caries. However, numerous studies have found that the use of a sharp explorer for this purpose did not increase diagnostic validity compared with visual inspection alone.5–8 The use of the dental explorer for this purpose was found to fracture enamel and serve as a source for transferring pathogenic bacteria among various teeth.9,10 Therefore, the use of a sharp explorer in diagnosing pit-and-fissure caries is contraindicated as part of the detection process.
An occlusal surface is examined visually and radiographically.11,12 The visual examination is conducted in a dry, well-illuminated field. Through direct vision and reflecting light through the occlusal surface of the tooth, the occlusal surface is diagnosed as diseased if chalkiness or apparent softening or cavitation of tooth structure, forming the fissure or pit, is seen or a brown-gray discoloration, radiating peripherally from the fissure or pit, is present. In contrast, a nondiseased occlusal surface has either grooves or fossae that have shallow tight fissures, which exhibit superficial staining with no radiographic evidence of caries. The superficial staining is extrinsic and occurs over several years of oral exposure in a person with low caries risk. Pre-carious or carious pits are occasionally present on cusp tips (see Fig. 3-3, A). Typically, these are the result of developmental enamel defects or following loss of enamel from tooth due to erosion or abrasion. Carious pits and fissures also occur on the occlusal two thirds of the facial or lingual surface of posterior teeth and on the lingual surface of maxillary incisors. Occlusal enamel can be evaluated for loss of translucency and changes in color, which may be characteristic of a caries lesion (see Fig. 3-3, B). The color change can be dark gray and should not be confused with the noncarious fissures and pits that often become merely stained over time. These visual techniques of examining teeth are then translated into the codes used in the International Caries Detection and Assessment System (ICDAS).
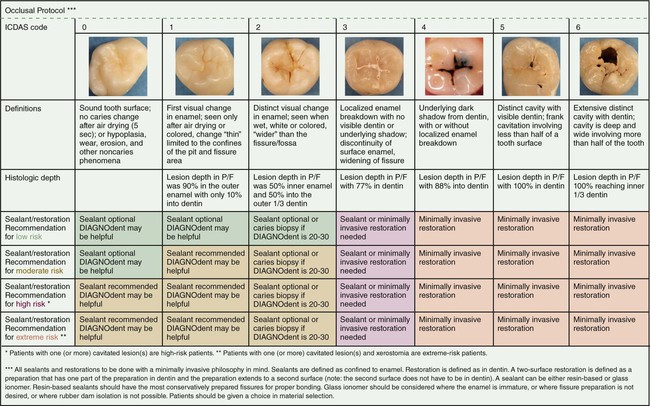
Clinical caries lesion detection has been found lacking and improvement is needed.13 One means of addressing these concerns has been the development of a visual system for caries lesion detection and classification. The ICDAS was developed to serve as a guide for standardized visual caries assessment that could be used for clinical practice, clinical research, education, and epidemiology (Fig. 3-4). In the United States, the Caries Management by Risk Assessment (CAMBRA) movement, as discussed in Chapter 2 on cariology, embraces the principles of the ICDAS for visual examination and assessment of caries lesions.
The clinical examination for detecting caries lesions is aided by an assessment of the patient’s overall caries risk, along with the patient’s patterns of susceptibility. The patient’s medical history, dental history, oral hygiene, diet, and age, among other caries risk factors and indicators, can suggest a prediction of current and future caries activity. For example, caries lesions also tend to occur bilaterally and on adjacent proximal surfaces (see Fig. 3-3). During the clinical examination, every accessible surface of each tooth must be inspected for localized changes in color, texture, and translucency, as described in the ICDAS codes. This requires two minimum conditions for the examination to be properly conducted: (1)Teeth must be sufficiently air-dried so that the changes can be seen properly, and (2) biofilm or plaque must be thoroughly removed from teeth prior to the examination. The ICDAS uses a two-stage process to record the status of the caries lesion. The first is a code for the restorative status of the tooth, and the second is for the severity of the caries lesion. The status of the caries severity is determined visually on a scale of 0 to 6:
1 = first visual change in enamel
2 = distinct visual change in enamel
3 = enamel breakdown, no dentin visible
4 = dentinal shadow (not cavitated into dentin)
This severity code is paired with a restorative/sealant code 0 to 8:
3 = sealant, full; tooth-colored restoration
5 = stainless steel restoration
6 = ceramic, gold, PFM (porcelain-fused-to-metal) crown or veneer
See Fig. 3-4 for the ICDAS for examples of coding for restorative status and caries severity. The details of this system for detection and training to use the system with an online tutorial are available at www.icdas.org.
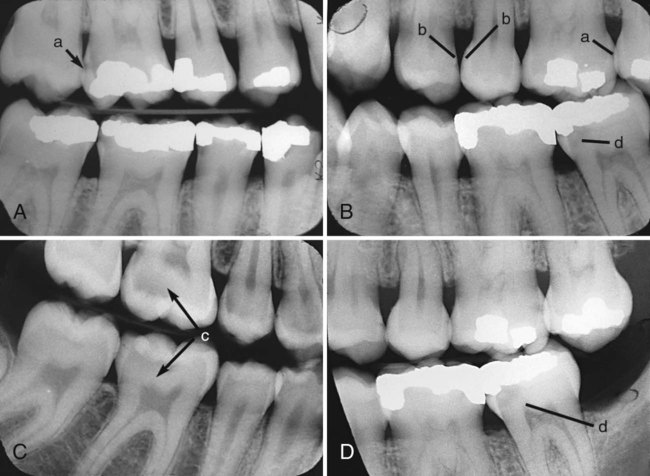
Proximal surface caries, one form of smooth-surface caries, is usually diagnosed radiographically (Fig. 3-5, A). It also can be detected by careful visual examination after tooth separation or through fiberoptic transillumination.14 When caries has invaded proximal surface enamel and has demineralized dentin, a white chalky appearance or a shadow under the marginal ridge may become evident (see Fig. 3-5, C). Careful probing with an explorer on the proximal surface may detect cavitation, which is defined as a break in the surface contour of enamel. The use of all examination methods is helpful in arriving at a final diagnosis.
Another form of smooth-surface caries can occur on the facial and lingual surfaces of the teeth of patients with high caries activity, particularly in the cervical areas that are less accessible for cleaning. The earliest clinical evidence of early enamel lesions on these surfaces is a white spot that is visually different from the adjacent translucent enamel and partially or totally disappears with wetting. Drying again causes it to reappear. This disappearing–reappearing phenomenon distinguishes the smooth-surface early enamel lesion from the white spot resulting from nonhereditary enamel hypocalcification (see section on clinical examination for additional defects). Both types of white spots are undetectable tactilely because the surface is intact, smooth, and hard. For white spot lesions, nonsurgical remineralization therapies (discussed in Chapter 2) should be instituted to promote remineralization.
In patients with attachment loss, extra care must be taken to inspect for root-surface caries. A combination of root exposure, dietary changes, systemic diseases, and medications that affect the amount and character of saliva can predispose a patient, especially an older individual, to root-surface caries. Lesions are often found at the cementoenamel junction (CEJ) or more apically on cementum or exposed dentin in older patients or in patients who have undergone periodontal surgery (see Fig. 3-3, F). Early in its development, root caries appears as a well-defined, discolored area adjacent to the gingival margin, typically near the CEJ. Root caries is softer than the adjacent tissue, and typically lesions spread laterally around the CEJ. Although no clinical criteria are universally accepted for the diagnosis of root caries, it is generally agreed that softened cemental or dental tooth structure compared with the surrounding surface is characteristic.15 Active root caries is detected by the presence of softening and cavitation.16,17 Although root-surface caries may be detected on radiographic examination, a careful, thorough clinical examination is crucial. A difficult diagnostic challenge is a patient who has attachment loss with no gingival recession, limiting accessibility for clinical inspection. These rapidly progressing lesions are best diagnosed using vertical bitewing radiographs. Differentiation of a caries lesion from cervical burnout radiolucency is, however, essential.18
In addition to the traditional methods of caries detection, several new technologies have emerged and show promising results for the clinical detection and diagnosis of caries lesions. These devices may have the potential to replace the tactile portion of caries detection, where explorers are used to try to estimate the depth of the caries lesions into the pits and fissures. These devices have two limitations. The first is that they are only indicated for use on unrestored pits and fissures. The second is that their diagnostic accuracy has not been firmly established. The technologies currently approved by the U.S. Food and Drug Administration (FDA) include laser-induced fluorescence, light-induced fluorescence, and AC impedance spectroscopy.11,19
The DIAGNOdent device (KaVo Dental Corporation, Charlotte, NC) uses laser fluorescence technology, with the intention of detecting and measuring bacterial products and changes in the tooth structure in a caries lesion. This compact and portable device, which requires a clean, dry occlusal surface, yields a numerical score from 0 to 99. The manufacturer has recommended threshold scores that represent the presence and extent of a lesion. A systematic review found that the “device is clearly more sensitive than traditional diagnostic methods, but the increased likelihood of false-positive diagnoses limits its usefulness as a principal diagnostic method.”20
Clinical Examination of Amalgam Restorations
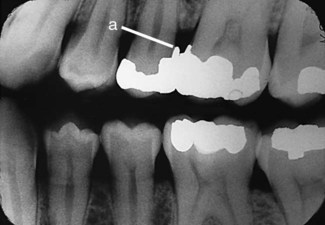
Proximal overhangs are diagnosed visually, tactilely, and radiographically (Fig. 3-6). The amalgam–tooth junction is evaluated by moving the explorer back and forth across it. If the explorer stops at the junction and then moves outwardly onto the amalgam, an overhang is present. Overhangs also can be confirmed by the catching or tearing of dental floss. Such an overhang can provide an obstacle to good oral hygiene and result in inflammation of adjacent soft tissue. If it causes problems, an overhang should be corrected, and this often indicates the need for restoration replacement.
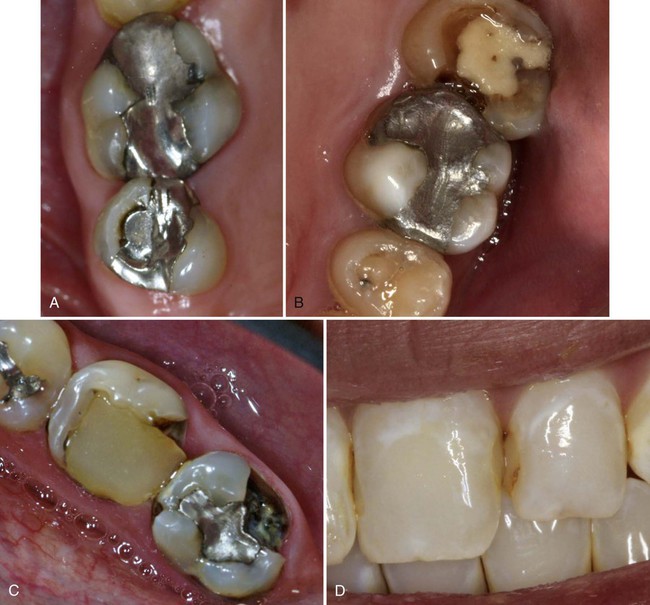
Marginal gap or ditching is the deterioration of the amalgam–tooth interface as a result of wear, fracture, or improper tooth preparation (Fig. 3-7, A). It can be diagnosed visually or by the explorer dropping into an opening as it crosses the margin. Shallow ditching less than 0.5 mm deep usually is not a reason for restoration replacement because such a restoration usually looks worse than it really is.21 The eventual self-sealing property of amalgam allows the restoration to continue serving adequately if it can be satisfactorily cleaned and maintained. If the ditch is too deep to be cleaned or jeopardizes the integrity of the remaining restoration or tooth structure, the restoration should be replaced.12 In addition, secondary caries is frequently found around marginal gaps near the gingival wall and warrants replacement.22
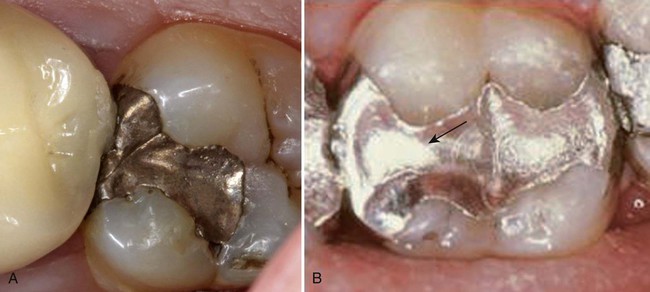
A careful clinical examination detects any fracture line across the occlusal portion of an amalgam restoration. A line that occurs in the isthmus region generally indicates fractured amalgam, and the defective restoration that must be replaced (Fig. 3-8, A). Care must be taken to correctly evaluate any such line, however, especially if it is in the mid-occlusal area because this may be an interface line, a manifestation of two abutted restorations accomplished at separate appointments (see Fig. 3-8, B). If other aspects of the abutted restorations are satisfactory, replacement is unnecessary.
Amalgam restorations should duplicate the normal anatomic contours of teeth. Restorations that impinge on soft tissue, have inadequate embrasure form or proximal contact, or prevent the use of dental floss should be classified as defective, indicating recontouring or replacement (see Fig. 3-7, B).
Stay updated, free dental videos. Join our Telegram channel

VIDEdental - Online dental courses


