Direct Gold Restorations
Direct Golds and Principles of Manipulation
Pure gold has been in use in dentistry in the United States for more than 100 years.1–6 Various techniques have been advanced for its use in the restoration of teeth. It is generally agreed that this noble metal is a superior restorative material for treatment of many small lesions and defects in teeth, given sound pulpal and periodontal health. Success is achieved with direct gold restorations if meticulous care is given to an exacting technique in tooth preparation design and material manipulation. Direct gold restorations can last for a lifetime if attention is paid to details of restorative technique and to proper home care. The longevity of direct gold restorations is a result of the superb biocompatibility of gold with the oral environment and its excellent marginal integrity.
Materials and Manufacture
Several physical types of direct-filling gold have been produced.7 All are “compactable” in that they are inserted into tooth preparations under force and compacted or condensed into preparation line and point angles and against preparation walls.
Pellets of gold foil are generally rolled from  -inch,
  -inch,
  -inch, or
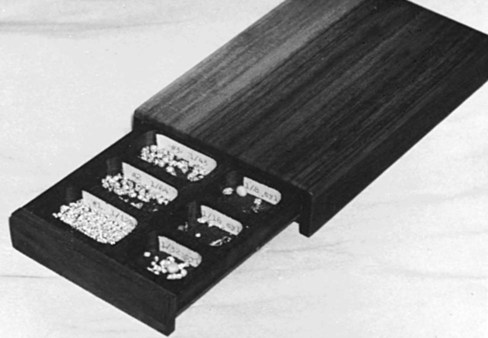
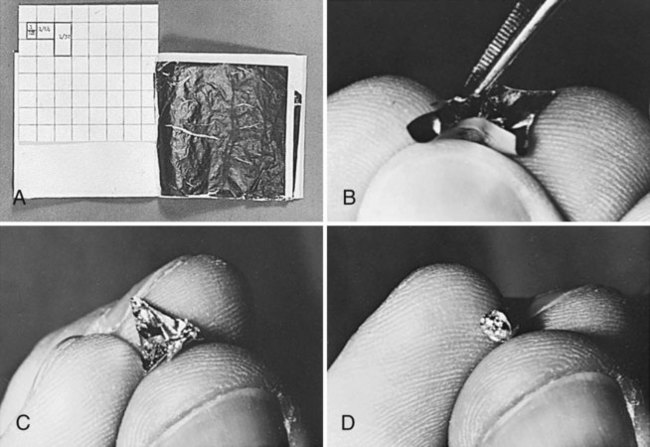
  -inch sections cut from a No. 4 sheet of foil. The book of foil is marked and cut into squares or rectangles (Online Fig. 22-1, A). Each piece is placed on clean fingertips, and the corners are tucked into the center (see Online Fig. 22-1, B and C), and then the foil is lightly rolled into pellet form (see Online Fig. 22-1, D). In addition, cylinders of gold foil may be rolled from the segments of a sheet (see Online Fig. 22-1, A). After pellets of gold are rolled, they may be conveniently stored in a gold foil box (Online Fig. 22-2), which is divided into labeled sections for various sizes of pellets. Cylinders of foil and selected sizes of other types of gold also may be stored in the box. Preferential contamination is suggested by placing a damp cotton pellet dipped into 18% ammonia into each section of the box. This serves to prevent deleterious oxides from forming on the gold until it is used.
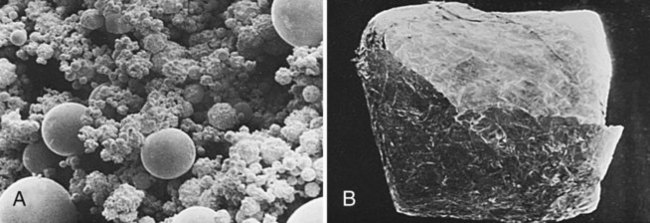
Powdered gold is made by a combination of chemical precipitation and atomization, with an average particle size of 15 mm (Online Fig. 22-3, A).8 The atomized particles are mixed together in wax, cut into pieces, and wrapped in No. 4 or No. 3 foil (see Online Fig. 22-3, B). Several sizes of these pellets are available. This product is marketed as Williams E-Z Gold (Ivoclar-Williams, Amherst, NY).
Cohesion and Degassing
Direct gold is inserted into tooth preparations under force. The purpose of the force is to weld the gold into restorations containing minimal porosity or internal void spaces.9–11 Welding occurs because pure gold with an absolutely clean surface coheres as a result of metallic bonding. As the gold is forced and compressed into a tooth preparation, succeeding increments cohere to those previously placed. For successful welding to occur during restoration, the gold must be in a cohesive state before compaction, and a suitable, biologically compatible compacting force must be delivered.
Because gold attracts gases that render it noncohesive, such gases must be removed from the surface of the gold before dental compaction. This process usually is referred to as degassing or annealing and is accomplished by application of heat. The term degassing is preferable because the desired result is to remove residual surface contamination (although further annealing, resulting in additional internal stress relief or recrystallization, also may occur in this process). All direct-filling gold products are degassed immediately before use except when noncohesive foil is specifically desired. Under-heating during degassing should be avoided because it fails to render the gold surface pure. Over-heating also should be avoided because it may cause the gold to become brittle or melt and render it unusable. Degassing is accomplished by heating the gold foil on a mica tray over a flame or on an electric annealer or by heating each piece of gold over a pure ethanol flame (Online Fig. 22-4).
Principles of Compaction
Direct-filling gold must be compacted during insertion into tooth preparations.12 With the exception of E-Z Gold, the compaction takes the form of malleting forces that are delivered either by a hand mallet used by the assistant or by an Electro-Mallet (McShirley Products, Glendale, CA) or a pneumatic mallet used by the dentist. E-Z Gold, because of its powdered form, may be compacted by heavy hand pressure delivered in a rocking motion with specially designed hand condensers.13,14 Successful malleting of the gold foil may be achieved with any of the currently available equipment. Some operators prefer the Electro-Mallet or the pneumatic mallet because a dental assistant is not required for the procedure.
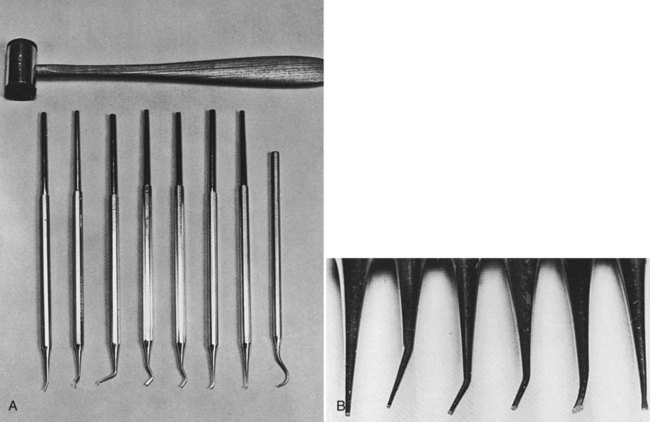
A technique preferred by many clinicians uses a hand mallet to deliver light blows to a condenser held by the dentist (Online Fig. 22-5, A). This technique allows great control of malleting forces when variations are called for, and it allows for rapid change in condenser nibs, or tips, when a multitude of condensers is required. In any case, a suitable condenser must be stepped over the gold systematically to achieve a dense, well-compacted restoration (see Online Fig. 22-8).
Condenser nibs are available in several shapes and sizes (see Online Fig. 22-5, B). All have pyramidal serrations on the nib faces to prevent slipping on the gold. Condensers described in this chapter are (1) the round condensers, 0.4 to 0.55 mm in diameter; (2) the Varney foot condenser, which has a rectangular face that is approximately 1 to 1.3 mm, and (3) the parallelogram condensers, which are used only for hand pressure compaction and have nib faces that measure approximately 0.5 to 1 mm.
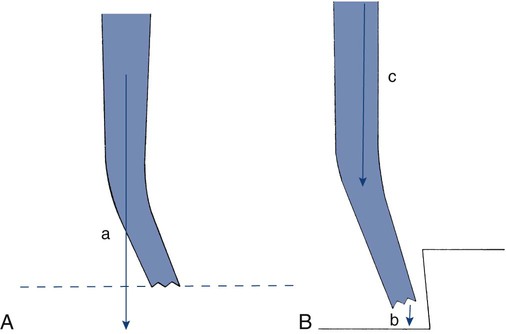
Condenser shanks may be straight, monangled, or offset, and their nib faces may be cut perpendicular to the long axis of the handle or perpendicular to the end portion of the shank (Online Fig. 22-6). The smaller the nib face size (i.e., area), the greater the pounds per square inch delivered (given a constant malleting force). If the nib diameter is reduced by half, the effective compaction force in pounds per square inch is four times greater (because the area of a circle is proportional to the square of the diameter). For most gold, the 0.4- to 0.55-mm diameter nibs are suitable. Smaller condensers tend to punch holes in the gold, whereas larger ones are less effective in forcing the gold into angles in the tooth preparation.
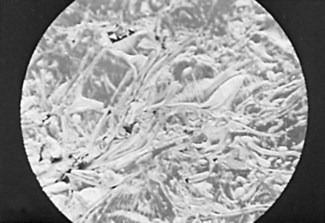
Two fundamental principles involved in compaction of cohesive gold are to (1) weld the gold into a cohesive mass and (2) wedge as much gold as possible into the tooth preparation.15 Welding takes place primarily as a result of the coherence of the noble metal to itself. Wedging results from careful compacting technique. Regardless of the technique used, some bridging occurs, resulting in void spaces not only in the compacted gold but also along the preparation walls. Success depends on minimizing these voids, particularly on the surface of the restoration and at the cavosurface interface, where leakage to the internal aspects of the restoration may begin. Gold foil compacts readily because of its thin form and produces a mass with isolated linear channels of microporosity (Online Fig. 22-7). Because the thin folds of the gold pellet weld to each other, the remaining channels of microporosity do not appear to be entirely confluent with one another.
Compaction Technique for Gold Foil
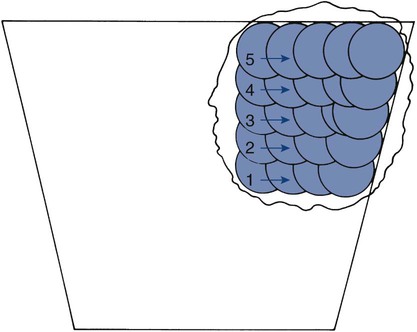
Compaction begins when a piece of gold is placed in a tooth preparation. The gold is first pressed into place by hand, then a condenser of suitable size is used to begin malleting in the center of the mass (often this is done while this first increment is held in position with a holding instrument). Each succeeding step of the condenser overlaps (by half) the previous one as the condenser is moved toward the periphery (Online Fig. 22-8). The gold moves under the nib face of the condenser, effecting compaction as malleting proceeds.
The most efficient compaction occurs directly under the nib face.15 Some compaction also occurs by lateral movement of the gold against surrounding preparation walls. The result of compaction is to remove most of the void space from within each increment of gold, to compact the gold into line and point angles and against walls, and to attach it to any previously placed gold via the process of cohesion.16
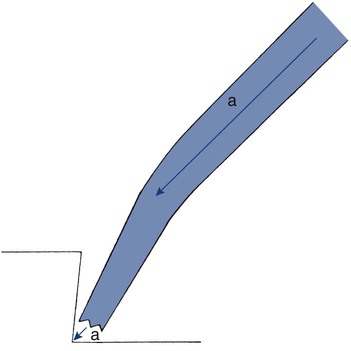
The line of force is important when any gold is compacted. The line of force is the direction through which the force is delivered (i.e., the direction in which the condenser is aimed) (Online Fig. 22-9). Specific instructions regarding line of force are given in subsequent sections as they relate to the restorations.
Research has shown that a biologically acceptable pulpal response occurs after proper direct gold procedures.17 Care is required when condensing forces are applied to preclude pulpal irritation. The Electro-Mallet is an acceptable condenser if the manufacturer’s instructions for mallet intensity are followed. Correct hand-malleting technique requires a light, bouncing application of the mallet to the condenser, rather than delivery of heavy blows.
Tooth Preparations and Restorations
Class I Tooth Preparation and Restoration
Tooth Preparation Design
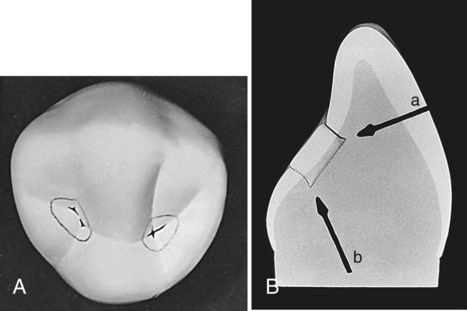
The marginal outline form for the Class I tooth preparation for compacted gold is extended to include the lesion on the tooth surface treated and any fissured enamel. The preparation outline may be a simple circular design for a pit defect, or it may be oblong, triangular, or a more extensive form (if needed to treat a defective fissure) (Online Fig. 22-10, A). Preparation margins are placed beyond the extent of pits and fissures. All noncoalesced enamel and structural defects are removed; the outline is kept as small as possible, consistent with provision of suitable access for instrumentation and for manipulation of gold.
For Class I tooth preparations, the external walls of the preparation are parallel to each other. In extensive occlusal preparations, the mesial or distal wall (or both) may diverge slightly occlusally, however, to avoid undermining and weakening marginal ridges. The pulpal wall is of uniform depth, parallel with the plane of the surface treated, and established at 0.5 mm into dentin. The pulpal wall meets the external walls at a slightly rounded angle created by the shape of the bur. Small undercuts may be placed in dentin if additional retentive features are required to provide convenience form in beginning the compaction of gold (see Online Fig. 22-10, B). Undercuts, when desired, are placed facially and lingually in posterior teeth (or incisally and gingivally on the lingual surface of incisors) at the level of the ideal pulpal floor position. These undercut line angles must not undermine marginal ridges. A slight cavosurface bevel may be placed to (1) create a 30- to 40-degree metal margin for ease in finishing the gold and (2) remove remaining rough enamel. The bevel is not greater than 0.2 mm in width and is placed with a white rotary stone or suitable finishing bur.
Instrumentation
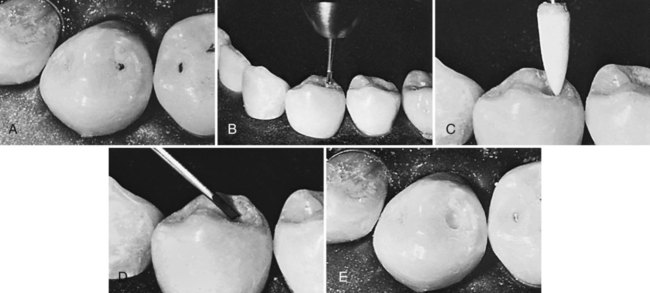
For description and illustration, the preparation of a carious pit on the mandibular first premolar is presented (Online Fig. 22-11, A). By use of a high-speed handpiece with air-water spray, the No. 330 or No. 329 bur is aligned, and the outline form (which includes the limited initial depth) is established (see Online Fig. 22-11, B). When the preparation is extensive because of the inclusion of fissured enamel, a small hoe ( –
– –9) may be used to complete the desired degree of flatness of the pulpal wall. With a No.
  bur at low speed, small retentive undercuts are prepared into the dentinal portion of the external walls at the initial pulpal wall depth; these also may be prepared using a
  -(90)-
 -9 angle-former chisel. Round burs of suitable size are used to remove any infected carious dentin that remains on the pulpal wall. The preparation is completed by finishing the cavosurface with an angle former, a small finishing bur (e.g., No. 7802), or a flame-shaped white stone (see Online Fig. 22-11, C through E).
Restoration
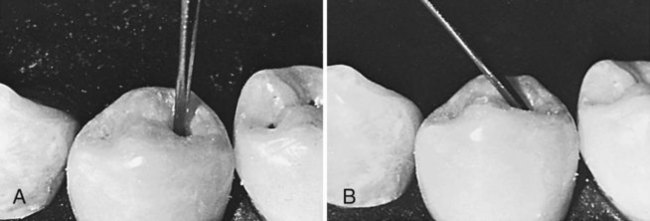
The restorative phase begins with the insertion of a pellet of E-Z Gold or gold foil. The gold is first degassed in the alcohol flame, cooled in air for a few moments, and inserted into the preparation with the passing instrument. The gold is pressed into place with the nib of a small round condenser. In larger preparations, a pair of condensers is used for this initial stabilization of the gold. Next, compaction of the gold begins with a line of force directed against the pulpal wall (Online Fig. 22-12, A). Hand pressure is used for E-Z Gold; malleting is used for gold foil. The gold is compacted into the pulpal line angles and against the external walls, and the line of force is changed to a 45-degree angle to the pulpal and respective external walls (to compact the gold best against the internal walls) (see Online Fig. 22-12, B). Additional increments of gold are added, and the procedure is repeated until the preparation is about three quarters full of compacted gold. If E-Z Gold is to be the final restoration surface, compaction is continued until the restoration is slightly overfilled.
Stay updated, free dental videos. Join our Telegram channel

VIDEdental - Online dental courses


 oz or
oz or  oz of gold. The sheet of foil that weighs 4 g is termed No. 4 foil; the sheet weighing 3 g is termed No. 3 foil; and the sheet weighing 2 g is termed No. 2 foil. Because the 4 × 4 inch sheets are too large to be used in restorative procedures, they are rolled into cylinders or pellets before insertion into tooth preparations. (The gold foil referred to in the restorative sections of this chapter is in pellet form.)
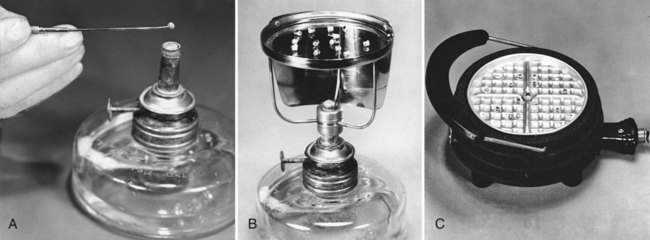
 to 1 inch above the ethanol flame until a bright flame occurs (caused by ignition of the wax) and the pellet becomes dull red for 2 to 3 seconds, then it is withdrawn from above the flame.