Medical Emergencies
General Considerations
1. A medical emergency means a client experiencing an unforeseen, immediate, health-related difficulty that is potentially life threatening
2. Medical emergencies require prompt recognition and action by the dentist and the dental hygienist to maintain the client’s health and, at times, life
B Dental hygienist’s legal responsibility
1. To provide quality care according to the standards of practice
a. According to the established standards of care, dental hygienists may be held liable if they are inadequately prepared for medical emergencies within the oral health care environment
b. Standards require current training in medical emergency management and CPR
2. To maintain complete records of medical emergencies in the health care setting
a. Complete records describe the onset and management of the emergency, the client’s vital signs, type of and response to treatment performed, type and dose of drugs administered, and time treatment is rendered
b. Complete records document the incident and protect the oral health care team in the event of legal action
C Preventing medical emergencies
1. A thorough health history reveals conditions that predispose a client to medical complications; the health history is taken at the first appointment and updated at each subsequent appointment
2. Information obtained from the health history is used to modify the client’s care plan and reduce the likelihood of the client experiencing a medical complication or emergency in the oral health care setting
3. If more information regarding the client’s health status is needed, the dentist or the dental hygienist should consult the client’s general physician
4. The assessment and documentation of the client’s vital signs (generally blood pressure, body temperature, pulse, respiration rate) provide information regarding the client’s health status
5. The probability of a stress-induced medical emergency in the oral health care environment may be reduced by careful appointment planning, stress management protocol, good client rapport, and stress reducing premedication
D Preparing for medical emergencies
1. Every health care setting should maintain a basic medical emergency kit that is accessible to all treatment areas; staff should be familiar with the kit’s contents and location
2. Basic medical emergency kit (Table 21-1)
TABLE 21-1
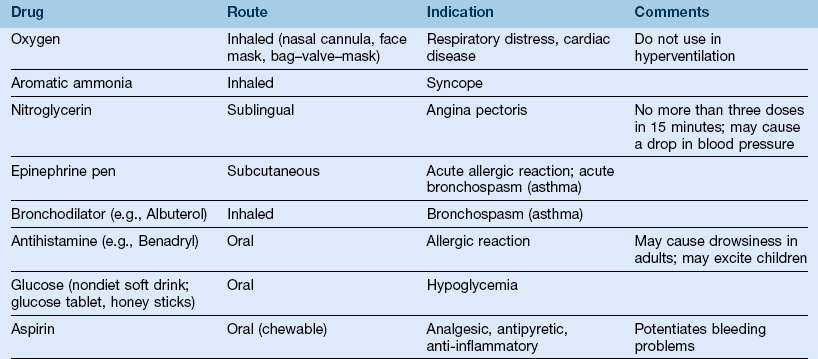
*The drugs and equipment available in the dental office should reflect the training of the dentist and the staff. Only drugs and equipment that the dentist, the dental hygienist, and the staff are trained to use should be included in the medical emergency kit.
a. Emergency drugs and equipment available in the oral health care setting should reflect the training of the dentist and the staff
b. Drugs and equipment that the dentist, the dental hygienist, and the staff are not trained to use should be excluded from the medical emergency kit contents
3. Each member of the dental staff should be currently certified in basic life support (BLS) and the recognition and management of common medical emergencies
4. Certain states may require dental hygienists to have successfully completed and to be current in BLS for license eligibility
5. Each oral health care team member should have delegated responsibilities in the event of a medical emergency; periodic staff drills are essential
Vital Signs
Basic Concepts
A Vital signs—the numerical values given to blood pressure, body temperature, pulse rate, respiration rate, and body height and weight
B Vital signs and health history are used to determine a client’s fitness to undergo oral health care
C Abnormal values and significant findings should be brought to the attention of the dentist, the client, and the client’s physician
D Vital sign values (blood pressure, body temperature, pulse rate, respiration rate) should be recorded on the client’s chart at each dental visit
E Dental hygienists should explain the purpose of and the method for measuring vital signs to the client before initiating these procedures
Blood Pressure
A Definition—force exerted by the blood on the walls of the blood vessels during the contraction and relaxation of the heart
1. Systolic pressure—force exerted during ventricular contraction (heart beat); the highest pressure in the cardiac cycle
2. Diastolic pressure—resting pressure; occurs during ventricular relaxation (heart rest) and is the lowest pressure of the cardiac cycle
3. Pulse pressure—value obtained when diastolic pressure is subtracted from systolic pressure
B Factors that affect blood pressure values
1. Blood pressure depends on the heart’s contractile force, peripheral vascular resistance, and vascular volume
2. Blood pressure may increase with age or in response to exercise, stress, certain medications, smoking, and illness
C Normal values for adults and children
1. The client’s blood pressure should be measured at each dental visit and recorded on the chart
2. Blood pressure is recorded as millimeters of mercury (mm Hg), with the systolic pressure over the diastolic pressure; systolic (mm Hg)/diastolic (mm Hg)
3. Properly calibrated and validated equipment should be used, with the client seated quietly for at least 5 minutes in a chair and the arm supported at chest level
4. Normal systolic values for adults are <120 mm Hg;
5. Normal diastolic values for adults are <80 mm Hg; older adults (≥70) may have normal values up to 90 mm Hg
6. Normal blood pressure values for children should also be <120 mm Hg systolic and <80 mm Hg; the values are adjusted for age, height, and gender
D Abnormal values for adults and children
1. Prehypertension—values of 120 to 139 mm Hg (systolic) and 80 to 89 mm Hg (diastolic) are considered prehypertension; lifestyle changes that promote health are recommended; routine dental and dental hygiene care can proceed after assessment
2. Stage I hypertension—a systolic reading of 140 to 159 mm Hg, diastolic reading of 90 to 99 mm Hg, or both; should be rechecked at three consecutive appointments; if readings at all three appointments remain elevated, the client should be referred to a physician for further medical evaluation; dental and dental hygiene care can proceed after assessment or if the treatment is only routine
3. Stage II hypertension—a systolic reading of ≥160 mm Hg, a diastolic reading ≥100 mm Hg, or both; should be rechecked in 5 minutes; the decision to proceed with routine dental and dental hygiene care can be made based on this re-evaluation; stress-reduction protocol should be used; the client should be referred to a physician for further evaluation
4. Hypertensive crisis (emergency care needed) a systolic reading ≥180 mm Hg, a diastolic reading ≥110 mm Hg, or both; should be rechecked in 5 minutes; if still elevated, do not treat the patient. An immediate medical evaluation is recommended to assess for possible organ damage; activate the EMS if the person is experiencing chest pain, shortness of breath, back pain, numbness/weakness, changes in vision or difficulty speaking.
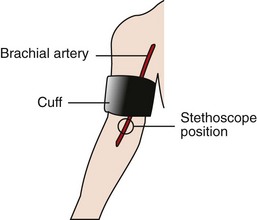
a. Sphygmomanometer—device used to measure blood pressure; consists of an inflatable cuff (available in different sizes), a central bladder, pressure gauge, tubing, bulb, and valve
b. Cuff width should be 20% greater than the diameter of the upper arm (a cuff that is too small will result in an artificially elevated blood pressure)
c. Stethoscope is used to listen to the sounds of the blood as it passes through the brachial artery (Figure 21-1)
2. Technique—palpatory–auscultatory method
a. The client is seated upright with an arm (palm up) at chest level and with legs uncrossed
b. The cuff is placed snugly around the upper arm so that it is one inch above the antecubital fossa; the bladder of the sphygmomanometer is placed around the upper arm and thus on the brachial artery
c. The radial artery is palpated, and the cuff is inflated until the radial pulse disappears; the cuff is then inflated by an additional 30 mm Hg
d. The cuff is deflated at a rate of 2 to 3 mm Hg per second until the radial pulse returns; this value is the palpatory systolic pressure
e. The diaphragm of the stethoscope is placed over the brachial artery; the stethoscope’s earpieces are turned forward
f. The cuff is inflated again to a level 30 mm Hg above the palpatory systolic pressure
g. The cuff is deflated at a rate of 2 to 3 mm Hg per second
h. The first sound heard through the stethoscope is the systolic blood pressure; Korotkoff sounds, which are vibrations of an artery under pressure, are heard through the stethoscope; the sound intensity decreases as the cuff pressure decreases
i. The last distinct sound heard is the diastolic blood pressure
j. Blood pressure is recorded as a fraction—systolic/diastolic; on the right or left arm; with the client standing or sitting
Body Temperature
1. Body temperature should be measured orally in the oral health care setting
2. Body temperature of 99.5°F (orally measured) is considered elevated and may suggest the presence of infection or disease
3. A client with an elevated temperature should see the dentist or the physician for further evaluation
B Factors that affect body temperature
1. Body temperature elevation may be caused by exercise, ingestion of hot food or drink, smoking, or a pathologic condition
2. Body temperature may be decreased because of starvation or shock
1. Normal oral temperature for an adult is 96.0° to 99.5°F (35.5° to 37.5°C); rectal temperature is approximately 0.5° to 0.7°F (0.27° to 0.38°C) higher than oral temperature; axillary temperature is 1.0°F less than oral temperature
2. Values higher than 101°F may indicate an active disease process; values 99.5°F indicate a fever
1. Several different types of thermometers exist; most common are oral, rectal, and external thermometers; mercury, electronic, and chemical thermometers are available; disposable barriers decrease the risk of cross-contamination
2. Oral thermometers are contraindicated for small children and unconscious or unstable clients
E Technique for measuring body temperature with a mercury-column thermometer
1. The thermometer should be shaken until the mercury level is below the mark indicating 96°F
2. If the client has been eating, smoking, or drinking recently, the temperature should not be measured for 15 minutes
3. The thermometer bulb is placed under the client’s tongue for 3 minutes
4. Temperature scale measurements are given at 0.2 (two tenths) of a degree; the highest temperature reading should be recorded
Pulse
1. Pulse is the force of the blood through an artery created by the heart’s contraction; each contraction creates a wave of blood that can be felt by gently pressing a superficial artery against underlying tissue
2. Pulse is evaluated by rate (fast, slow), rhythm (regular, irregular), and quality (full or strong, thready or weak)
3. Pulse rate is measured as the number of heart beats per minute
B Factors that affect the pulse rate
1. Pulse rate may increase because of exercise, certain drugs, anxiety, heat, eating, or disease
2. Pulse rate may decrease because of sleep, certain drugs, fasting, or disease
C Normal resting heart rate ranges
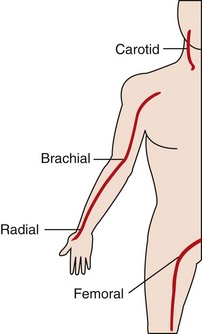
FIGURE 21-2 Location of pulse points.
a. Brachial pulse—located on the medial aspect of the antecubital fossa of the elbow
b. Radial pulse—located on the lateral aspect of the wrist (thumb side) on the ventral surface
c. Carotid pulse—located in the neck groove, just anterior to the sternocleidomastoid muscle
d. Femoral pulse—located on the medial aspect of the upper thigh
2. In nonemergency situations, the brachial or radial pulse is monitored; in emergency situations, the carotid pulse (which indicates that blood is flowing to the brain) is monitored; care is required in carotid palpation because vagal stimulation may occur, resulting in a decrease in blood pressure or syncope; also, it is important not to palpate the carotid arteries simultaneously as one or both may be partially occluded
Respiration Rate
1. Respiration is inspiration and expiration of air by the body
2. Respiration rate is the number of breaths per minute
3. Evaluate the depth (shallow, deep), rhythm (regular, irregular), rate, quality (labored, easy), breathing sounds (wet/noisy, clear), and client position during respiration
B Factors that affect respiration
1. Respiration rate may be increased as a result of exercise, pain, certain drugs, anxiety, shock, or disease
2. Respiration rate may be decreased as a result of sleep, certain drugs, or disease
Emergency Cardiac Care
Definition
A Emergency cardiac care (ECC)—includes recognition, prevention, reassurance, and the ability to monitor and treat a person in need of BLS, advanced cardiac life support, and the transferring of the stabilized person to a medical care facility for definitive treatment
B Basic life support (BLS)—maintains an individual’s heart and lung functions through prompt recognition, intervention, CPR, or all of these actions
C Advanced cardiac life support (ACLS)—BLS with use of additional equipment; an intravenous access; administration of fluids or medications, or both; defibrillation; arrhythmia control; and continued care following resuscitation
D Cardiopulmonary resuscitation (CPR)—a basic life support technique with the goal of providing oxygen to the brain, heart, and other vital organs until definitive medical treatment can be given; CPR requires assessment and basic skills in the management of the airway, breathing, and circulation
E Emergency medical system (EMS)—a coordinated community system that uses communication, transportation, prevention, education, trained personnel, emergency medical facilities, and other elements in providing emergency medical care
F “Successful” completion of an American Heart Association (AHA) or other approved course in CPR, BLS, or ACLS may be required for dental hygiene licensure in some states
G Advances in scientific knowledge and clinical research have resulted in frequent changes in the ECC technique and protocol; therefore, the most current literature should be consulted for up-to-date information
Basic Concepts
C Circulation—assess and provide cardiac support by external cardiac compressions
A Airway—assess and establish a clear air passage
B Breathing—assess and provide respiration through rescue breathing
B Respiratory arrest—a sudden cessation of breathing
C Cardiac arrest—a sudden, unexpected cessation of the heart and circulation
D Clinical death—cessation of the heart and breathing; may be reversible through life support measures, especially if initiated within 4 to 6 minutes, or it may progress to biologic death
E Biologic death—permanent cellular damage, particularly of the oxygen-sensitive brain cells, resulting from an inadequate supply of oxygen
Cardiopulmonary Resuscitation by the Health Care Provider
Single-Rescuer Cardiopulmonary Resuscitation
1. Determine the victim’s level of consciousness by gently shaking the shoulder and shouting, “Are you okay?” At the same time the health care provider should determine if there is no breathing or no normal breathing (agonal gasps which sometimes sound like a snore or snort may be present)
2. Activate the EMS if the victim does not respond; dial or direct a bystander to dial 9-1-1; give the location of the emergency, the phone number you are calling from, what happened, how many persons need help, the condition of victim(s), and what is being done for the victim(s)
3. Obtain an automated external defibrillator (AED), if one is available; send a second rescuer to do this if possible
4. Carefully place the person in the supine position. Roll the body as a unit, avoiding any twisting motion; caution is needed if you suspect a back or neck injury. If the victim is not on a firm surface, place the spine board under the victim or move the victim to a firm surface
B Check for a pulse, taking no longer than 10 seconds; use the carotid artery for adults; use the carotid or the femoral artery for children ages 1 to puberty; use the brachial artery for infants (child and infant CPR guidelines)
1. If no pulse is present, begin performing cardiac compressions at a rate of at least 100 compressions per minute pushing hard and fast; compress the sternum at least 2 inches with each compression and allow the chest to completely recoil between compressions
2. To perform external cardiac compressions, place the heel of one of your hands on the center of the victim’s chest between the nipples
3. Place the heel of one hand on top of the other hand; fingers may be extended or interlaced
4. Use both hands to alternately depress the sternum at least 2 inches; push hard and fast; fully release pressure on the sternum and allow the chest to recoil after each compression
5. The compression rate is at least 100 per minute with a count of “one and two and three and …” and so on
6. Continue the cycle for a compression : ventilation ratio of 30 : 2
7. Administer two breaths (about 1 second each) after every thirtieth compression; refer to rescue breathing techniques following the AED section
8. Check the pulse after four cycles and every few minutes thereafter; if a pulse is evident, continue rescue breathing at 10 to 12 breaths per minute; if no pulse is evident, continue the CPR
9. To perform cardiac compressions on a child, (age 1 year to puberty) depress the lower half of the sternum at least 1/3 the depth of the chest or about 2 inches with the heel of one or both hands; the compression : ventilation ratio is 30 : 2, with a rate of at least 100 compressions per minute; if you did not witness the arrest and you are alone, give 2 minutes of CPR before leaving to call the EMS
10. To perform cardiac compressions on an infant, use two fingers placed just below the infant’s nipple line; compress the chest at least 1/3 the depth of the chest or about 1  inches, using a ratio of 30 : 2 and a rate of at least 100 per minute; if you did not witness the arrest and you are alone, give 2 minutes of CPR before leaving to call the EMS
11. Because early defibrillation and ACLS measures increase the chance of survival, it is important to emphasize activation of the EMS system by calling 9-1-1 as soon as possible
Two-Rescuer Cardiopulmonary Resuscitation
A The rescuers kneel on either side of the victim, one at the victim’s head to perform ventilations, the other at the victim’s chest to perform compressions
B One rescuer provides compressions at a rate of at least 100 per minute with a count of “one and two and three and …” and so on
C The second rescuer administers two breaths (about 1 second each) after every thirtieth compression; breaths should take no longer than 5 seconds
D The cycle is continued for a compression : ventilation ratio of 30 : 2
E The rescuers should switch positions every 2 minutes, limiting the switch to <5 seconds; pulse rate should be checked every few minutes and at every rescuer switch
F The rescuer performing ventilations should monitor the effectiveness of the CPR by assessing the carotid pulse and air exchange
G If an advanced airway has been placed, two rescuers deliver compressions at a rate of at least 100 per minute without pausing for breaths; the person providing breaths administers 8 to 10 per minute, avoiding excessive ventilations
H For children (ages 1 year to puberty) and infants, two rescuers working together use a compression to ventilation ratio of 15 : 2; compressions for infants are performed with the thumbs placed over the infant’s chest just below the nipple line and the hands encircling the infant’s chest
Automated External Defibrillators
A Computerized devices that analyze cardiac rhythms and deliver an electric shock when appropriate; if an AED is available, they should be used as soon as possible in the CPR sequence, since early defibrillation increases the chances of survival for victims of sudden cardiac arrest
B AEDs are available in a variety of models; if an AED is present in the office, the dental hygienist should become familiar with its operation (by studying the manufacturer’s instructions) and follow current recommended CPR/AED techniques; standard AEDs may be used on children >8 years and adults
C Universal steps in AED operation (victim is unresponsive, without pulse, and not breathing)
2. Attach the electrode pads to the victim’s chest (the pads may or may not already be connected to the cables, the machine, or both)
3. “Clear” the victim by ensuring that no one is touching the victim
5. “Clear” the victim and allow the machine to “Analyze” the rhythm; make sure that no one is touching the victim, and press the shock button if a shock is indicated by the machine; once the shock has been delivered, resume CPR by starting with chest compressions; the AED will provide additional prompts
6. If no shock is indicated, resume CPR; the AED will provide additional prompts
1. AEDs may be used on infants and children ages 1 to 8
2. Child pads and a pediatric-capable AED should be used for children (1 to 8 years); if the child becomes pulseless suddenly and the emergency event has been witnessed, activate the EMS and begin CPR; an AED should be attached and used as soon as possible; if the collapse of the child who has no pulse has not been witnessed, about 2 minutes of CPR should be performed before using an AED; if an AED with child capability is not available, a standard AED may be used; take care that the pads do not touch each other
3. Manual defibrillators are preferred for use on infants; if neither a manual defibrillator nor a pediatric-capable AED is available, a standard AED may be used; take care that the pads do not touch each other
4. The victim should be kept dry
5. The defibrillator pads should not be placed over implanted pacemakers; the pads should be placed at least 1 inch to the side
6. The defibrillator pads should not be placed over transdermal medication patches (remove the medication patch, wipe the area, and attach the AED pad)
Rescue Breathing Technique
A Determine the need for rescue breathing
1. Follow the steps used for CPR to determine consciousness and presence of adequate breathing
2. After notifying the EMS and obtaining an AED, check for a pulse
3. If a pulse is present, the victim is breathing adequately, and no spinal injury is suspected, place the victim on his or her side, monitor vital signs until help arrives
4. If a pulse is present and the person is not breathing or not breathing adequately, open the airway and give 2 breaths, continue with 1 breath every 5 to 6 seconds (10 to 12 breaths per minute); recheck for a pulse every 2 minutes
5. If a pulse is not present, follow the guidelines presented in the CPR section
6. The basic technique for opening the airway is the head-tilt-chin lift; use a jaw-thrust in the trauma victim with suspected neck injury
a. The head-tilt is performed by placing one palm on the forehead of the victim and pressing backward to gently tilt the head back
b. The chin-lift is achieved by placing the fingers of the other hand under the victim’s mandible near the chin and raising the chin gently forward; care is required to avoid pressing into soft tissue and to avoid using the thumb to lift the chin
c. The jaw-thrust is used for extra forward displacement of the mandible; it may be the safest method for opening the airway in a victim with a suspected neck injury; to perform the jaw-thrust, use both hands (one on each side), gently grasp the angles of the mandible, and carefully lift to move the jaw forward; the rescuer may need to provide support for the victim’s head to avoid head movement
B Performing rescue breathing for an adult
1. The rescuer’s position is at the victim’s shoulders
2. Open airway or maintain open airway by using the head-tilt-chin-lift (or in the case of a neck injury, use the jaw-thrust)
3. Rescue-breathing techniques—because disease transmission is a concern, mouth-to-mouth resuscitation should be performed, when possible, using ventilation devices such as pocket masks with one-way valves or resuscitation bags; however, the value of ventilation devices rather than mouth-to-mouth resuscitation in the prevention of disease transmission is unknown; rescue breathing should not be delayed while waiting for adjunct ventilation or oxygen delivery devices. Current American Heart Association CPR guidelines note that although the risk of transmissions of infection during CPR is considered very low, OSHA requires the use of Standard Precautions for healthcare workers providing CPR in the workplace
a. Mouth-to-mask—a transparent mask with mouthpiece and one-way valve may be used for assisted ventilation; the technique includes placing the mask around the victim’s mouth and nose, placing the heel and thumb of each hand on the borders of the mask to firmly seal the margins; grasping the mandible with the index, middle, and ring fingers with gentle pressure upward; and ventilating through the mouthpiece
b. Mouth-to-mouth—uses the rescuer’s exhaled air to inflate the victim’s lungs; an airtight seal is created by pinching the victim’s nostrils closed (use the thumb and index finger of the hand involved in the head-tilt) and by placing the mouth around the victim’s mouth after taking a breath; the rescuer then breathes into the victim’s mouth
c. Mouth-to-nose—may be needed if it is not possible to ventilate through the victim’s mouth; the victim’s mouth should be closed; the rescuer takes a deep breath and places his or her mouth around the victim’s nose and exhales; the rescuer must remove his or her mouth from the victim’s nose after each exhalation to allow the victim to exhale; periodic opening of the victim’s lips may be necessary if nasal blockage occurs
d. Mouth-to-stoma technique—used in a person who has undergone laryngectomy and has a stoma (opening at the base of the neck connecting to the trachea); assess for breathing at the stoma site; after taking a breath, place your mouth over the stoma, exhale, and remove your mouth to allow the victim to exhale after each breath
4. Give two breaths into the victim’s mouth (nose or stoma)
5. Watch for chest to rise; allow 1 second per breath to provide visible chest expansion and to decrease the possibility of gastric distention
6. Take a normal breath after each ventilation; adequate volume produces visible chest rise
7. If ventilations are unsuccessful, reassess and reposition the victim’s head; repeat the attempt to ventilate
8. Rescue breathing is performed at 12 to 20 breaths per minute for adults, one breath every 5 or 6 seconds
C Performing rescue breathing for a child or infant—the following modifications must be made:
1. Seal the child’s mouthpiece or mouth (and nose) with your mouth, inflate the lungs with less force and volume than in the case of an adult, and give two breaths (1 second per inflation) with a pause between breaths
2. Rescue breathing is performed at 12 to 20 breaths per minute, approximately one breath every 3 to 5 seconds
Basic Life Support in Late Pregnancy
A Oxygen intake progressively increases during pregnancy (averages 20% to 30% higher) to meet the needs of the fetus, the uterus, and the increased demands on the respiratory and circulatory systems of the mother; the functional residual capacity of the lungs is decreased because of the upward displacement of the diaphragm; the oxygen reserve is further compromised when the pregnant woman is in the supine position; also, in this position, the enlarged uterus may compress the abdominal aorta and the inferior vena cava, resulting in hypotension and reduced cardiac output by as much as 25%
B To help alleviate the effects of the supine position on circulation (as during CPR), the uterus should be shifted toward the left side by placing a folded towel or wedge under the right hip
C Aspiration caused by delayed gastric emptying is also a concern, because of the enlarged uterus compressing the stomach and possibly a decrease in the tone of the lower part of the esophagus
D Chest compressions for CPR should be performed higher on the sternum, just above the center of the sternum to accommodate the upward displacement of the diaphragm
E For severe foreign-body airway obstruction in a conscious woman in her last trimester of pregnancy, chest thrusts rather than abdominal thrusts are recommended. For severe foreign-body airway obstruction in an unconscious pregnant woman, the EMS should be activated and CPR started (see the section on “Management of an obstructed airway” below)
Management of an Obstructed Airway
1. Obstructed airway occurs when an object or foreign body prevents exchange of air during breathing
2. Foreign-body obstruction may occur when eating, when unconscious (the tongue may block the pharynx), during resuscitation (aspiration of vomitus or blood), or during other events
B Recognizing an obstructed airway in a conscious client
1. Mild airway obstruction with good air exchange—the victim can cough forcefully; encourage spontaneous coughing and deep breathing
2. Severe airway obstruction with poor air exchange—the victim has a weak cough, may be cyanotic, makes high-pitched noises, has increased difficulty breathing, is unable to speak or breathe, and may clutch at the neck
C Treating an obstructed airway in a conscious client
1. Determine if the victim has a severe airway obstruction by asking victim, “Are you choking?” If the person indicates otherwise, do not interfere with the person’s own attempts to dislodge the object but remain with client until it is dislodged, or summon help
2. Subdiaphragmatic abdominal thrusts (the Heimlich maneuver) are recommended to manage severe foreign-body airway obstruction; in a conscious victim who is standing or sitting, the rescuer stands behind the victim, wraps an arm around the victim’s waist, places the thumb side of the fist between the victim’s xiphoid process and navel, supports the fist with the other hand, and presses the fist into the victim’s abdomen with a brisk inward and upward motion; each motion should be distinct and repeated until the foreign body is removed or the victim loses consciousness; for conscious infants (<1 year old) with severe airway obstruction, the rescuer holds the infant’s body so that the infant is face down (supporting the infant’s body with forearm and thigh) and performs five back blows; the rescuer rotates the infant (still supporting the infant’s body) and performs five chest thrusts; this sequence is continued until the object is removed or the infant becomes unconscious
3. In an obese or pregnant victim with severe airway obstruction, the rescuer stands behind the victim with arms wrapped around the victim’s chest; the thumb side of the fist is centered on the midsternum; the other hand is used to support the fist, and backward motions (chest thrusts) are administered until the foreign body is expelled or the victim loses consciousness
D Treating an obstructed airway in an unconscious client
1. If a choking victim becomes unconscious, activate the EMS, carefully lower the victim to the ground, and begin CPR starting with chest compressions
2. If an object is observed when giving rescue breaths, and can be easily removed, remove it
3. If the obstruction has been removed, ventilate the lungs twice, and continue BLS, as indicated
4. If a choking child becomes unconscious follow the same procedure as for an adult; begin CPR, look into the child’s mouth each time the airway is opened for rescue breaths; do not perform blind finger-sweeps, but observe for an object and finger-sweep only if the object can be visualized
5. If a choking infant becomes unconscious, call for someone to activate the EMS, and begin CPR; look into the infant’s mouth each time the airway is opened for rescue breaths, and finger-sweep only if a foreign body can be visualized; if the EMS has not been activated after 2 minutes of CPR, do so
6. Do not perform blind finger-sweeps on an unconscious person of any age
7. If an unconscious victim is found and it is not known if the v/>
Stay updated, free dental videos. Join our Telegram channel
VIDEdental - Online dental courses


