CHAPTER 18 Restorative Dentistry
The Reference Manual of the American Academy of Pediatric Dentistry (AAPD) includes a Guideline on Pediatric Restorative Dentistry (revised in 1998 and in 2001) that states in part1:
1. The developmental status of the dentition
4. Anticipated parental compliance and likelihood of timely recall
STATUS OF COMMON RESTORATIVE MATERIALS
Recent advances in the development of improved biomaterials for dental restorations have been rapid, and they continue to occur at a fast pace. This fact creates a significant challenge for dentists striving to remain at the cutting edge of dental technology. The more common restorative materials used in pediatric dentistry are composite and other resin systems, glass ionomers, silver amalgam alloys, and stainless steel alloys. Porcelain and cast metal alloy materials are also used in pediatric restorative dentistry but less frequently than those listed in the previous sentence.
Composite resins, glass ionomers, or some combination of the two are being used progressively more and silver amalgam progressively less in pediatric restorative dentistry. Many pediatric dentistry practices do not use silver amalgam at all; instead, some form of composite resin and/or glass ionomer is used. These materials have bonding capability. Glass ionomers may be considered pharmacologically therapeutic because they release fluoride over time; they also have minimal shrinkage during setting. Composite resins possess durability and superior esthetic qualities. When managed properly, both materials are capable of providing superior marginal sealing at the tooth–restorative material interface. The manufacturers of these materials have also combined them in an effort to join the primary advantages of each type of material. Berg has suggested that we think of these materials and their combinations on a continuum, with glass ionomer on the left, composite resin on the right, and the combined materials somewhere in between depending on the relative amounts of each material in the mix. Two major categories on the continuum are described as “resin-modified glass ionomer” (or “hybrid ionomer” or “light-cured glass ionomer”) and “compomers” (or “polyacid-modified composite resin” or “glass ionomer–modified composite resin”). A fifth formulation has been added on the right side of the continuum in the form of “flowable composite resin.” Berg points out that knowing the particular strengths and weaknesses of each type of material on the continuum will enhance the clinician’s ability to make the best choices for each individual restorative situation.2 Use of any of these restorative materials generally requires more effort and time than corresponding conventional amalgam restorations.
Despite its declining use, silver amalgam remains one of the most durable and cost-effective restorative materials. Success in using this filling material depends on adherence to certain principles of cavity preparation that do not always apply when materials on the glass ionomer–composite resin continuum are used. Some renewed interest in silver amalgam has occurred because of the development of “bonded amalgams.” Bonded amalgams are silver amalgam restorations that have been condensed into etched cavity preparations lined with a dentin-bonding agent and some material on the glass ionomer–composite resin continuum. Bonded amalgams require considerable extra effort and expense to place compared with conventional amalgam restorations. The improvements in tooth support and marginal integrity gained with these restorations have been demonstrated in many studies. Some longer-term studies, however, suggest that the advantages of bonded amalgams may be transient and relatively short-lived, possibly 1 year or less.3,4 In general, the use of bonded amalgams seems difficult to justify for the routine restoration of primary teeth because traditional silver amalgam should provide comparable quality more efficiently and cost effectively in most situations.
MAINTENANCE OF A CLEAN FIELD
ARMAMENTARIUM FOR RUBBER DAM PLACEMENT
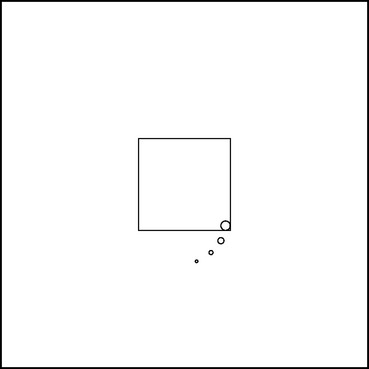
The armamentarium consists of 5- × 5-inch sheets of medium latex, a rubber dam punch, clamp forceps, a selection of clamps, a flat-blade instrument, dental floss, and a rubber dam frame. If one visualizes an approximately 1¼-inch square in the center of a sheet of rubber dam, each corner of the square indicates where the punch holes for the clamp-bearing tooth in each of the four quadrants of the mouth are to be made (Fig. 18-1). As experience is gained in applying the dam, the dentist and assistant will soon learn the proper location for punching the holes. If the holes are punched too far apart, the dam will not readily fit between the contact areas. In addition, the greater bulk of material between the teeth will greatly increase the possibility that the rubber will become a barrier to proximal surface preparation. Conversely, if the holes are punched too close together, salivary leakage will contaminate the operating field. In general, the holes should be punched the same distance apart as the holes on the cutting table of the rubber dam punch.
SELECTION OF A CLAMP
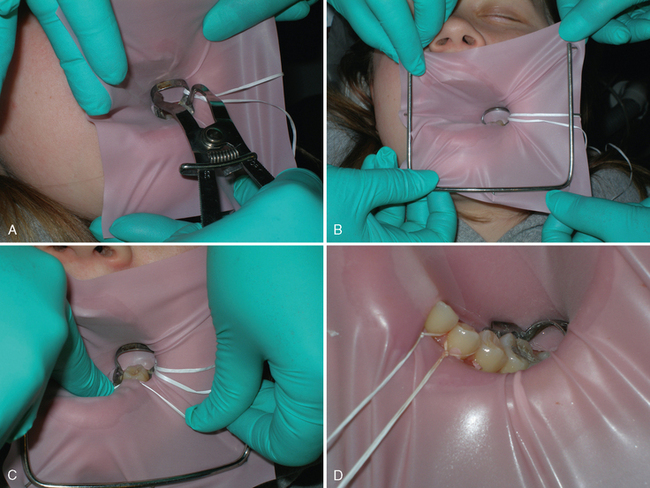
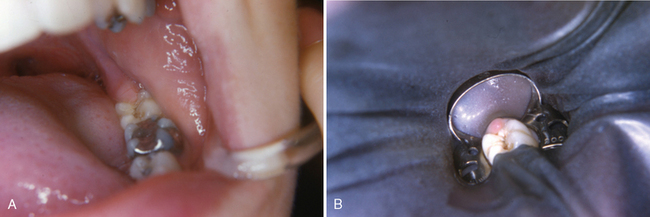
The operator will soon develop a personal preference for which clamps to use to secure the dam in isolating different areas in the mouth. Unless the clamp is firmly anchored to the tooth, the tension of the stretched rubber will easily dislodge it. Therefore the proper selection of a clamp is of utmost importance. It is recommended that the clamp be tried on the tooth before the rubber dam is placed to ascertain that the clamp can be securely seated and will not be easily dislodged by the probing tongue, lip, or cheek musculature. An 18-inch length of dental floss should be doubled and securely fastened to the bow of the clamp. The floss will facilitate retrieval in the unlikely event that the clamp slips and falls toward the pharynx (Fig. 18-2).
The following procedure is recommended for rubber dam application (Fig. 18-3). The previously selected and ligated clamp is placed in the rubber dam. The dentist grasps the clamp forceps with the clamp engaged. The assistant, seated to the left of the patient (the dentist is right-handed in this example), grasps the upper corners of the dam with the right hand and the lower left corner between the left thumb and index finger. The dam is moved toward the patient’s face as the dentist carries the clamp to the tooth while holding the lower right portion of the dam. After securing the clamp on the tooth, the dentist transfers the clamp forceps to the assistant, who receives it while continuing to hold the upper corners of the dam with the right hand. The dentist then places the frame over the rubber dam. Together the assistant and dentist attach the corners of the dam to the frame. The flat blade of a plastic instrument or a right-angle explorer may be used to remove the rubber dam material from the wings of the clamp and to complete the seal around the clamped tooth. If necessary, light finger pressure may seat the clamp securely by moving it cervically on the tooth. If additional teeth are to be isolated, the rubber is stretched over them, and the excess rubber between the punched holes is placed between the contact areas with the aid of dental floss. The most anterior tooth and others if necessary are ligated to aid in the retention of the dam and the prevention of cervical leakage. The free ends of the floss are allowed to remain, because they may aid in the further retraction of the gingival tissue or the patient’s lip during the operative procedure. At the end of the operative procedure, the length of floss will also aid in removing the ligature.
When a quadrant of restorations in the primary dentition is planned and no pulp therapy is anticipated, Croll recommends the “slit-dam method.”6 One long opening is made in the dam, and the entire quadrant is isolated without interseptal dam material between the teeth.
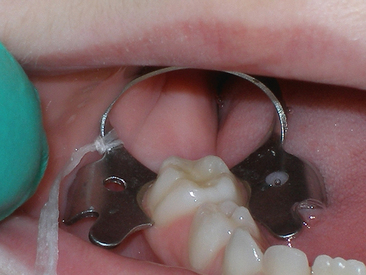
It is unwise to include more teeth in the rubber dam than are necessary to isolate the working area adequately. If the first or second permanent molar is the only tooth in the quadrant that is carious and if it requires only an occlusal preparation, it is often desirable to punch only one hole in the dam and to isolate the single tooth (Fig. 18-4). This procedure will require only seconds and will save many minutes.
BASIC PRINCIPLES IN THE PREPARATION OF CAVITIES IN PRIMARY TEETH
Although the traditional class I cavity preparation and restoration may occasionally be the most practical treatment for a tooth in certain circumstances, such treatment is currently obsolete for most class I lesions. The traditional treatment has been replaced, for the most part, by conservative caries excavation and restoration using a combination of bonding restorative and sealant materials (see Chapter 17).
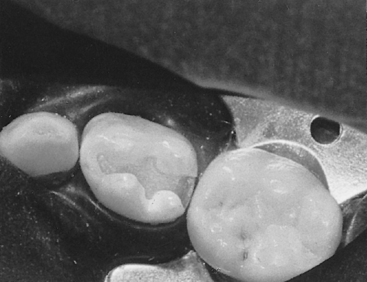
Likewise, the traditional class II cavity preparation and restoration, although not yet considered obsolete, is currently used less frequently as steadily improving restorative materials with therapeutic and bonding capability are developed. In the traditional class II cavity preparation for amalgam, the buccal and lingual extensions should be carried to self-cleansing areas. The cavity design should have greater buccal and lingual extension at the cervical area of the preparation to clear contact with the adjacent tooth. This divergent pattern is necessary because of the broad, flat contact areas of the primary molars and because of the distinct buccal bulge in the gingival third. Ideally, the width of the preparation at the isthmus should be approximately one-third the intercuspal dimension (Fig. 18-5). The axiopulpal line angle should be beveled or grooved to reduce the concentration of stresses and to provide greater bulk of material in this area, which is vulnerable to fracture.
CAVITY PREPARATION IN PRIMARY TEETH
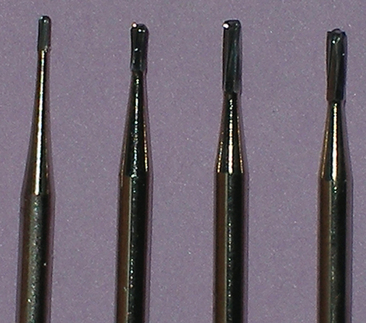
The steps in the preparation of a cavity in a primary tooth are not difficult but do require precise operator control. Many authorities advocate the use of small, rounded-end carbide burs in the high-speed handpiece to establish the cavity outline and perform the gross preparation. For efficiency and convenience, all necessary high-speed instrumentation for a given preparation may be completed with a single bur in most situations. Therefore the dentist should select the bur that is best designed to accomplish all the high-speed cutting required for the procedure being planned. Fig. 18-6 illustrates four high-speed carbide burs designed to cut efficiently and yet allow conservative cavity preparations with rounded line angles and point angles. Alternatively, cavity preparations may be made with aluminum oxide air abrasion systems or with laser systems approved for hard-tissue procedures, when indications allow.
PIT OR FISSURE CLASS I CAVITY
The preparation and restoration of a pit or fissure class I cavity are discussed in the section on preventive resin restoration in Chapter 17.
Stay updated, free dental videos. Join our Telegram channel
VIDEdental - Online dental courses


