Chapter 16
Posterior Mandible
Introduction
The posterior mandible will be considered to be the region extending distal to the mental foramina through which the inferior alveolar nerve runs. This nerve enters the mandible on the lingual aspect of the ramus through the mandibular foramen and runs through the body of the mandible, emerging through the mental foramen on the buccal aspect of the mandible with a varying pattern of emergence.243–245
The intraosseous course of the inferior alveolar neurovascular bundle varies both in its superior/inferior position and in its bucco-lingual position along its course.246 The accurate location of this nerve at any given point is important if damage to the structure is to be avoided. The radiographic image will depend on the density of the trabecular bone, which enables the differential density to be detected by the imaging technique. The magnification associated with the imaging technique must be known and accurately calculated for each region to allow for variation from one site to the other.
The amount of available bone, both in terms of height and ridge width, needs to be assessed. The nature of the bone with respect to the cortical thickness and trabecular density provides valuable additional information to enable the timescales to be determined. The inclination of the jaw and the space available for the prosthetic restoration form a part of the assessment process, which is outlined below.
During the assessment, a number of additional considerations need to be taken into account. These relate to the functional and parafunctional load, the nature of the implant surface, the design and surface area of the implant and the moment of force.
Ideally a minimum length of 11 mm or more should be used. However, where the conditions are favourable, implants as short as 8 mm may be used, particularly where multiple implants are splinted, a wider diameter implant is used, good quality bone is present and occlusal load is favourable. The clinician should bear in mind the poor survival rate of implants of smaller dimensions, as these tend to fail in the short and medium term (approximately five to eight years).247–249
Assessment
Radiographic Assessment
Dental Panoramic Tomograph
The DPT varies in its magnification considerably depending upon the machine and the position of the patient with respect to tube and film. The magnification may be calculated by means of radiopaque objects inserted into a template worn during the examination. However, the objects (e.g. a 5-mm ball) are relatively small, and any error in measurement results in a significantly increased deviation from reality. It is considered more accurate to measure the height of the mandible on each side using specific landmarks, such as adjacent teeth. Measurements should be made in the same plane as the tooth, both clinically and on the radiograph. A Vernier caliper may be used in the patient’s mouth and on the radiograph to record the height of the mandible. A simple calculation to estimate the ratios can then be easily carried out (Fig 16-1).
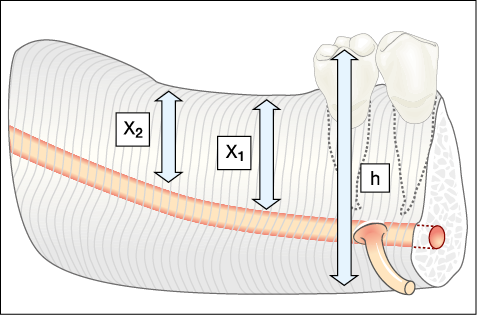
Fig 16-1 The ratio between the mandibular height (h), measured clinically and on the radiograph, provides the magnification, which can be applied to the height of available bone measured on the radiograph. The mesial distal positioning of the site should also be addressed because of the variation in the height of available bone, as depicted by X1 and X2. The following formula can be used to calculate the length of implant required:
The bone height calculated less 2 mm provides the working depth that will allow sufficient clearance above the inferior alveolar canal.
Care should also be taken to relate the mesiodistal position of the site accurately, as the height of available bone may vary considerably from one site to another. The horizontal magnification should, therefore, also be taken into consideration.
The mandibular canal may be difficult to visualise where there is very little difference in the density between the surrounding tissues and the nerve. Visualisation of the nerve may not be improved with other forms of imaging. Where there is a significant difference in density between the cortical plate and the trabecular bone, a similar effect may be noted.
Conventional and Cone Beam Computerised Tomography
Both cone beam CT and CT scans based on axial slices and their related cross-sectional, panoral and 3D reconstructions provide excellent diagnostic information. Using these methods, accurate ridge measurements and ridge orientation can be obtained and the thickness of the cortical plate can be easily determined.
Interactive CT scans enable bone density to be measured in Hounsfield units. Furthermore, it is possible to trace an elusive alveolar canal on a reformatted panoral section, enabling its position to be transferred to the oblique cross-sections where it would otherwise be difficult to visualise the canal. This also assists in differentiating between the canal and other radiolucencies (Figs 16-2 to 16-17).
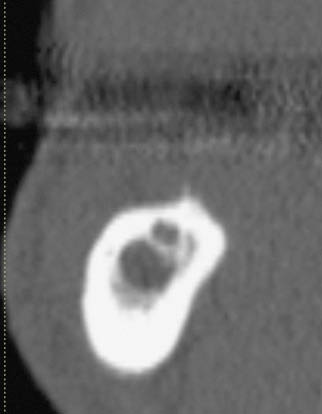
Fig 16-2 (left) Cross-sectional CT image showing multiple translucent areas without any clear indication of the position of the inferior alveolar nerve, requiring the inferior dental canal to be identified in the panoramic view.
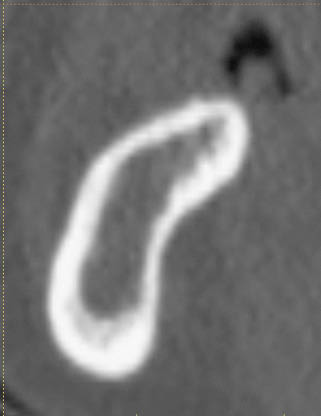
Fig 16-3 (right) Cross-sectional CT image of the posterior mandible with low trabecular density and no indication of the position of the inferior alveolar canal.
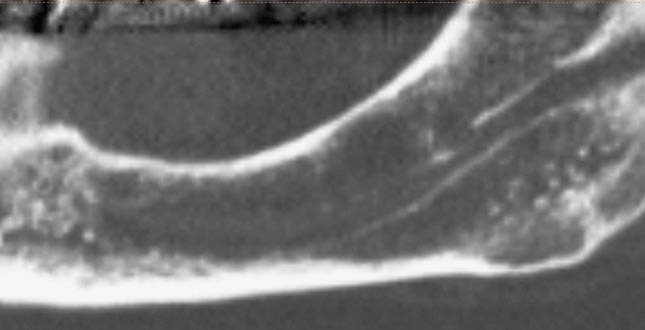
Fig 16-4 Panoramic CT view of the patient in Fig 16-3 showing a faint indication of the position of the inferior alveolar canal.
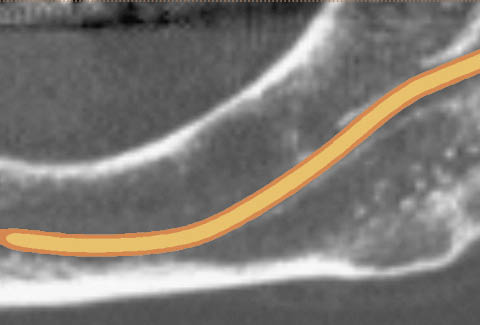
Fig 16-5 The inferior alveolar canal has been traced in the panoramic image using the Simplant software.
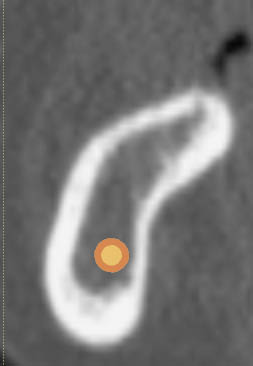
Fig 16-6 The inferior alveolar canal can be identified clearly in the cross-sectional image. The low trabecular density will need to be addressed during surgery by judiciously preparing the osteotomy in order to establish adequate primary stability.
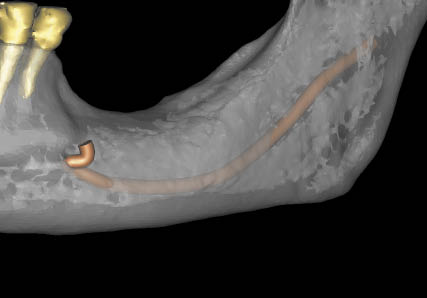
Fig 16-7 Three-dimensional view of the mandible rendered translucent, with the position of the inferior alveolar canal visible.
Fig 16-8 CT image of the mandible in occlusal view showing the resorption that has taken place on the labial aspect. This is typical and will result in the implants being positioned lingually, with the potential for food collection on the labial aspect that patients should be informed about.
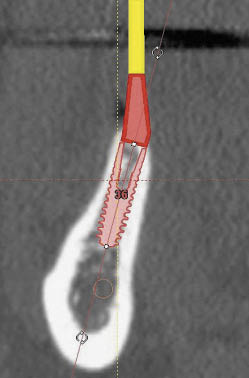
Fig 16-9 Cross-sectional CT image in the premolar region with an implant positioned interactively with the abutment selected (7.5 degrees). Note the orientation of the ridge in the premolar region has a minimal inclination.
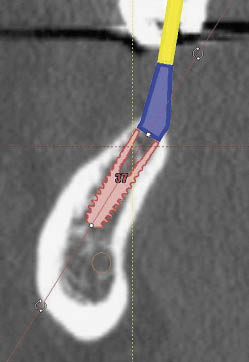
Fig 16-10 Cross-sectional CT image of an implant inserted in the molar region at a greater angle because of the inclination of the ridge, requiring a greater angular correction for the abutment (22.5 degrees).
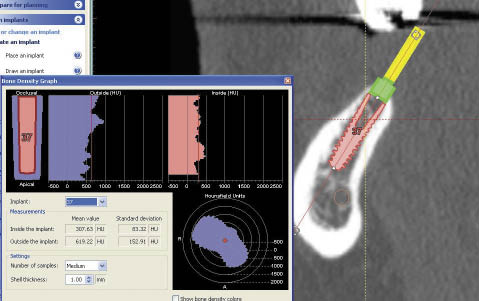
Fig 16-11 The bone density is calculated to assist in refining the osteotomy preparation to establish adequate primary stability for the implant.
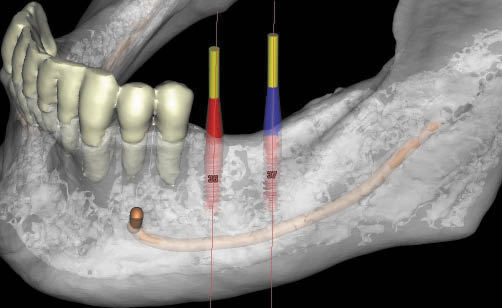
Fig 16-12 Three-dimensional CT image (with the mandible translucent) permitting the visualisation of the implants and abutments, as well as the inferior alveolar canal.
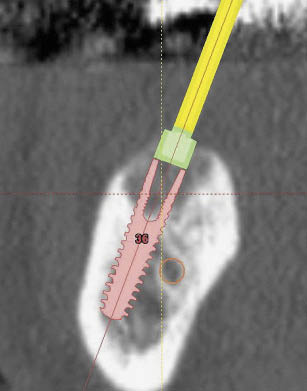
Fig 16-13 (left) Cross-sectional CT image of the posterior mandible showing insufficient height above the inferior alveolar canal but adequate mandibular width. The planning for the positioning of an implant beside the nerve can be seen. Care must be taken while executing such a procedure to ensure that the osteotomy bur is not deflected off the labial cortical plate of the mandible. Alternatively, computer-guided surgery may be indicated if there is adequate access.
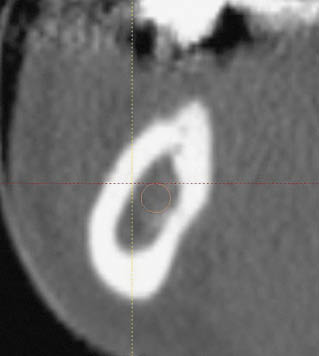
Fig 16-14 (right) Cross-sectional CT image of the posterior mandible with the inferior alveolar canal not visible; it will require tracing in the panoramic view to permit visualisation.
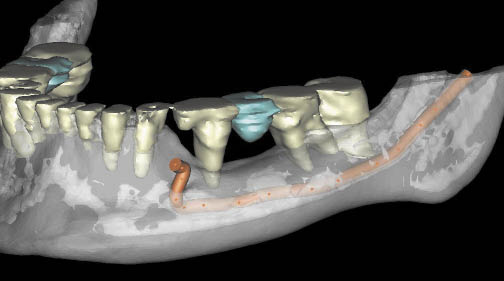
Fig 16-15 Three-dimensional CT image (rendered translucent) showing the inferior alveolar canal clearly. Its proximity to the superior surface of the mandible is indicative of a need to reposition the inferior alveolar nerve. The management of patients with low trabecular density is generally easier and requires the position to be identified by tracing back from the mental foramen.
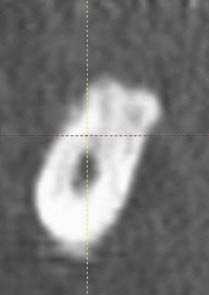
Fig 16-16 Cross-sectional image of the posterior mandible showing very dense bone and clearly identifiable inferior alveolar canal. The management of such cases for repositioning the neurovascular bundle is more exacting.
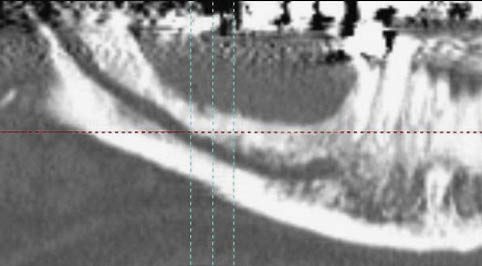
Fig 16-17 Panoramic CT image with very clearly identifiable inferior alveolar canal.
In conjunction with a radiodistinct (radiopaque or radiolucent) diagnostic template outlining the prosthetic envelope, the angle of the required abutment can also be measured as the implant dimensions are calculated on the interactive program.
Periapical Radiography
Periapical radiographs provide additional useful information about a specific site, indicating whether there might be residual roots or pathology present. Using a long-cone paralleling technique, a minimally distorted image can be obtained for verification of available bone height. Intraoperative imaging using guide pins within the osteotomy will provide useful confirmation of the progress of the osteotomy.
Laboratory: Study Casts
Mounted study casts can assist in determining the tooth position and the amount of space available. Overeruption of the opposing arch can be estimated more accurately using study casts. Construction of templates for assistance during the surgical phase or for transfer of information to the diagnostic image may also be carried out.
Clinical Assessment
Assessment of the nature of the soft tissues provides an indication about the peri-implant tissues and the ability to close the wound. Access to the operative site can be assessed based on the space available on opening, the tightness of the circumoral tissues as well as the activity of the tongue. Care should be taken where the patient has previously undergone plastic surgery.
Surgical Protocol: Adequate Bone
Access to the posterior mandible is the most difficult to achieve and is compounded by the lingual inclination of the ridge and the presence of the tongue. A crestal incision is most commonly advised, particularly when immediate loading or a transmucosal approach are being considered. A remote buccal incision may be used when adequate attached tissues are present, in the absence of muscle attachments, for a two-stage approach (Fig 16-18).
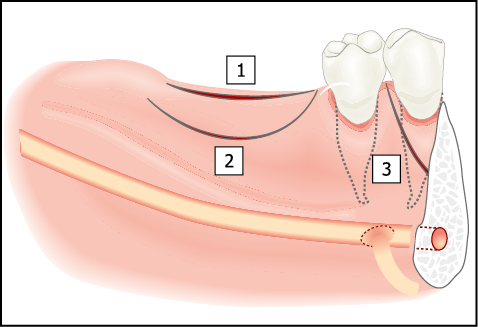
Fig 16-18 Access to the alveolar ridge can be gained by either a crestal (1) or a remote buccal incision (2). A crestal incision (bisecting the attached tissue) may be used in situations where immediate loading is contemplated or where there is a limited amount of attached tissue with muscle attachments in the region of the planned incision. Remote incisions are indicated where delayed loading is planned and where adequate non-mobile attached tissue is present. Vertical release incisions (3) may be used in situations where the mental foramen needs to be exposed. Care needs to be taken to ensure that none of the fibres of the mental nerve is severed.
Reflection of the periosteum to expose the mental foramen may be carried out to assist in the precise location of the neurovascular bundle.
Bone of Normal Density
Site selection is most effectively carried out using a small round bur in a speed-increasing handpiece. The pilot bur is used to specific predetermined depth and serves the additional purposes of determining bone density and direction of osteotomy. The depth of the osteotomy is estimated to allow a 2 mm clearance above the inferior alveolar canal, and all drilling is carried out using accurately calibrated drills to the predetermined depth. Measurements must be performed from the edge of the ridge crest, preferably from the mesial aspect, to guarantee good visibility. Measurements should not be made from the buccal aspect as scalloping of the osteotomy will result from curved or paraboloid ridge forms. This would lead to miscalculation and osteotomy preparation to an excessive depth, resulting in possible damage to the inferior alveolar canal.
The osteotomy is enlarged in diameter to utilise the entire width of available bone. It, therefore, often engages the labial and lingual cortical plates. Consequently, it is advisable to use the full sequence of instruments, including bone taps, prior to insertion of the implant. This cautionary note is relevant because the clinician may initially assess the bone density to be low in poorly trabeculated bone as assessed from the pilot osteotomy. The incremental enlargement of the osteotomy may not provide feedback relating to the lateral engagement of the cortical plates.
Access is often gained from the palatal aspect of the opposing maxillary teeth (Fig 16-19). Consistency of the angulation of the drill can be achieved by noting the position of the handpiece in relation to the opposing maxillary teeth when the mouth is propped open at a particular height. The same angle can then be used for subsequent instrumentation.
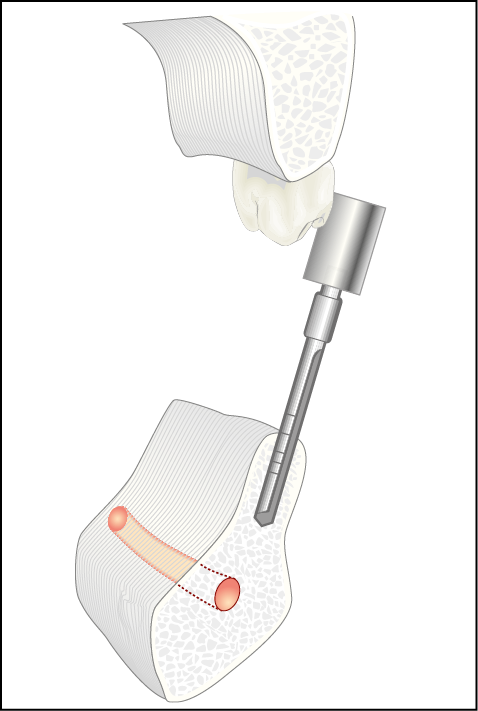
Fig 16-19 Inclination of a drill from the palatal aspect of an maxillary molar to overcome the problem of access and ridge angulation.
Immediate Loading
The definitive abutment may be attached and an acrylic resin transitional restoration fitted for immediate loading where conditions are suitable.
Transmucosal Approach
A transmucosal approach can be achieved by the attachment of a sulcus former, which eliminates the need for second-stage surgery. This approach is particularly suitable when the patient does not wear a removable prosthesis.
Bone of Low Density
In low-density bone, procedures to carry out bone condensation using a range of instruments may be utilised when access permits. Some ridge widening may also be carried out, using bone spreaders. Self-tapping protocols for implants may be suitable, and a transmucosal approach or early incremental loading (bone training) rather than immediate loading is advisable.
Insufficient Bone: Treatment Options
Assessment of the amount of bone available should be carried out using the diagnostic tools described above. Based on the type of deficiency, a treatment protocol specific to that deficiency should be employed. This is summarised in Flowchart 16-1 at the end of this chapter.
Bone Graft: Insufficient Bone Width
A lack of bone width is ideally treated using onlay bone grafts, provided that the bone height is adequate (greater than 10 mm). The grafts can be harvested from the symphysis, ramus or an extraoral donor site (Figs 16-20–16-22). A limited increase in bone height can also be achieved using this technique (Figs 16-23 and 16-24). Sufficient interocclusal space should be available, as well as adequate soft tissues, to allow closure over the graft. A crestal incision is used, which bisects the attached tissue. The periosteum is reflected on the lingual aspect but not beyond the mylohyoid ridge. The clinican should be mindful of the risk to the lingual nerve, which may be in contact with the periosteum. On the buccal aspect, the mental foramen is exposed. V/>
Stay updated, free dental videos. Join our Telegram channel
VIDEdental - Online dental courses


