Chapter 15
Posterior Maxilla
Introduction
Several features characterise the posterior maxilla, namely bone quality, sinus size, ridge width and alveolar height.
- • Bone quality. Bone in the posterior maxilla is most commonly of low density, consisting of a thin cortical bone with sparsely trabeculated cancellous bone. In the region of the premolar teeth, medium density bone may occasionally be encountered.
- • Sinus extent. The enlargement of the maxillary sinus is the most significant factor restricting the amount of bone available in the posterior maxilla.
- • Ridge width. The width of the ridge is usually adequate in the region of the molar teeth although some narrowing may be observed in the region of the premolar teeth.
- • Alveolar height. Loss of alveolar height is occasionally a consequence of periodontal disease or other pathological conditions. It rarely needs correcting (Fig 15-1) because the aesthetics are not often compromised and substantial height can be gained by subantral augmentation (sinus lift). Onlay grafts are sometimes indicated to improve biomechanics, hygiene, aesthetics and function by placing the abutment more labially and coronally to allow proper positioning of teeth for occlusion (Fig 15-2).
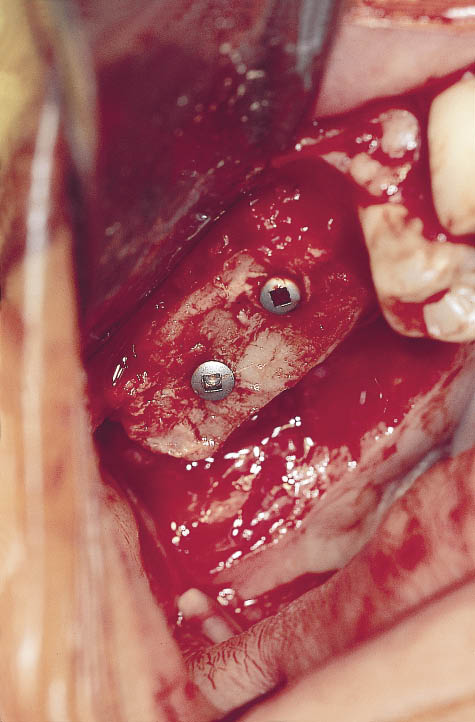
Fig 15-1 Intraoral view of an onlay graft being used in conjunction with a sinus lift to increase the ridge height in a case where alveolar bone loss has taken place.
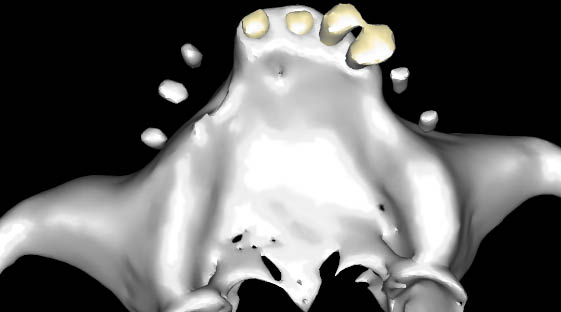
Fig 15-2 Three-dimensional view of a CT scan indicating the discrepancy between the radiopaque markers and the deficient ridge requiring augmentation to enable the implants to be positioned within the prosthetic envelope.
Anatomy
Development
The maxillary sinus develops in the 12th week of intrauterine life as a small bud from the middle meatus of the lateral wall of the nose. At birth, it is approximately 1 cm3 in size and develops as the mid-face height increases until adulthood. It is associated with the eruption of the permanent teeth, and progressive pneumatisation of the sinus continues throughout adulthood, supposedly as a result of the increased atmospheric pressure within the sinus.
Physiology
The sinuses are part of the respiratory system and the lining consists of a layer of loose connective tissue, a surface layer of ciliated columnar cells, and subepithelial mucous-secreting serous cells. The sinus lining is poorly vascularised and has not been shown to have osteogenic potential, although it does contain osteoclasts, which contribute to the pneumatisation.
Anatomical Relationship
A working knowledge of the anatomy of the sinuses is critical for the safe perioperative management of surgery in this region. Surgery must not be carried out in this region without proper training. Some salient features of the maxillary sinus are outlined below.219,220 The maxillary sinus lies in close proximity to several midfacial structures.
The anterior wall of the sinus often coincides with the canine fossa distal to the root of the canine tooth. This is in close proximity to the neurovascular structures that emerge from the infraorbital foramen. It is in this region that the overlying bone is quite thin and from where the sinus is accessed for the traditional Caldwell–Luc procedure. The posterior wall of the sinus often coincides with the pterygoid plates, the pterygoid venous plexus and the numerous neurovascular structures that are in close proximity. The lateral extension of the sinus extends to the zygomatic arch and may excavate into the zygomatic bone. The medial wall coincides with the lateral wall of the nose, which may be very thin. The sinus may extend under the nose, creating an apex in this region. The superior border of the sinus forms the base of the orbit. The floor of the sinus may wrap itself around the roots of the teeth. The sinus may be multichambered with septa of different heights and orientations. These surface characteristics of the floor of the sinus will have a considerable influence on the manner in which any surgery designed to augment the floor of the sinus is carried out.
The maxillary sinus communicates with the nasal cavity via the ostio-meatal complex. This consists of the ostium on the medial wall of the sinus, which opens into the nasal cavity via the semilunar opening positioned under the middle concha. It is, therefore, normally positioned above the level to which any augmentation will need to be carried out. The ostio-meatal opening is close to the junction communicating with the anterior, sphenoid and ethmoid sinus cavities.
Although the sinus lining itself is poorly vascularised, the maxilla has an excellent blood supply, which is provided by several branches of the maxillary artery – the infraorbital, the superior alveolar, the paranasal and the greater palatine arteries. There is also a contribution from the transverse facial (branch of the superior temporal) and the facial arteries. There are numerous anastomoses providing excellent collateral circulation. With the pneumatisation of the sinuses, some of these blood vessels may be found lying within grooves on the surface of the bony walls of the sinus.
Assessment of Available Bone and the Maxillary Sinus
Dental Panoramic Tomograph
The DPT taken for the diagnostic assessment of the maxillary sinus gives the best results when the head is tilted forward and the Frankfurt plane is at approximately 25 degrees to the horizontal. This will result in the dense radiopaque shadow of the hard palate to be displaced and dispersed away from the region of interest in most patients (Figs 15-3 and 15-4). This type of investigation provides an excellent overview and is valuable for planning treatment and surgery with respect to incisions and bony access to the maxillary sinus.
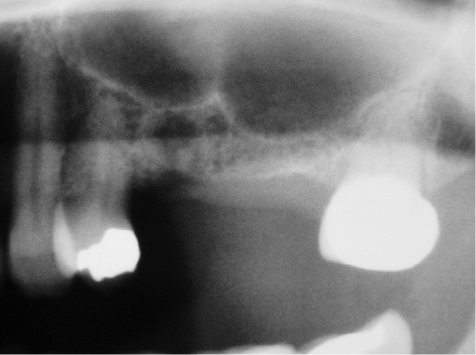
Fig 15-3 Preoperative panoramic tomograph showing the floor of the sinus and the septum. The radiograph is taken with the Frankfurt plane at 25 degrees to the horizontal during exposure to deflect the shadow of the palate.
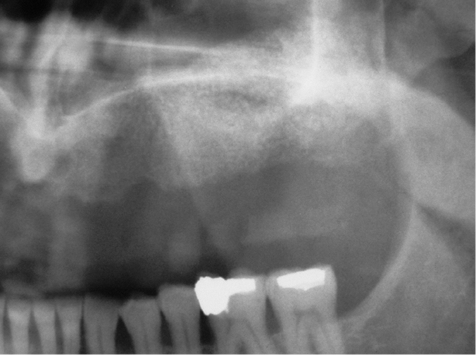
Fig 15-4 Preoperative panoramic tomograph (taken with the Frankfurt plane at 25 degrees to the horizontal, to deflect the shadow of the palate) of the left-hand side showing an enlarged maxillary sinus and a limited amount of alveolar bone available in the posterior maxilla. The panoramic tomography is a valuable preliminary examination but a limited amount of diagnostic information can be obtained because of the superimposition of several anatomical structures.
Computed Tomography
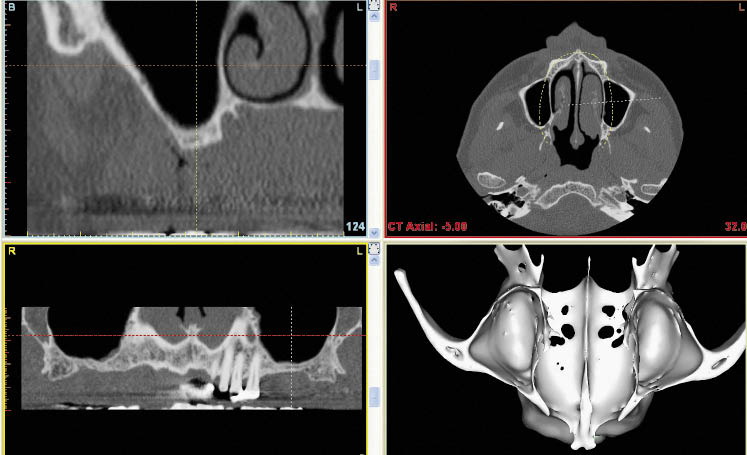
CT scans taken in the axial plane using multiple panoral and cross-sectional reformations will provide the information required for the volumetric assessment of this region (Figs 15-5–15-7). Interactive programs will provide an assessment of the bone density. The information that can be gained from this investigation include:
- • height of bone
- • width of bone
- • orientation and position of alveolar ridge
- • nature of the cortical and cancellous bone
- • density of bone in Hounsfield units
- • thickness of the sinus lining
- • pathology within the alveolar bone and within the sinus
- • surface topography of sinus floor
- • size, position and orientation of septa
- • sinus floor contours in proximity to tooth roots
- • blood vessels within the lateral wall of the maxilla
- • proximity of the greater palatine foramen
- • extensions of sinus: subnasal, anterior and zygomatic
- • thickness of the walls of the sinus.
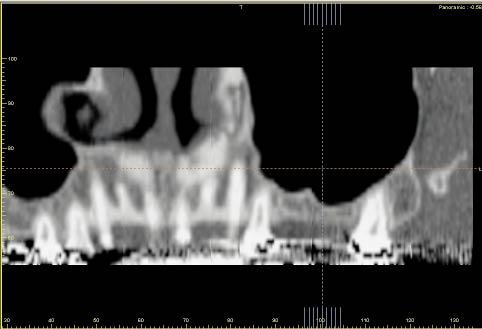
Fig 15-5 Panoramic reconstruction of the maxilla. The plane selected for the reconstruction passes through the roots of the maxillary teeth, the conchi of the nose and the sinus showing the septum (same patient as in Fig 15-3).

Fig 15-6 Oblique cross-sectional reconstruction of the left maxillary sinus. The depicted sections are referenced to the lines on the panoramic section (Fig 15-5). The lateral wall of the sinus is visible on the right-hand side of the image, and the thickness of the wall can be assessed. The medial wall coincides with the lateral wall of the nose, and the contours of this region are valuable landmarks during elevation of the sinus lining. The varying amount of remaining alveolar bone is also visible.
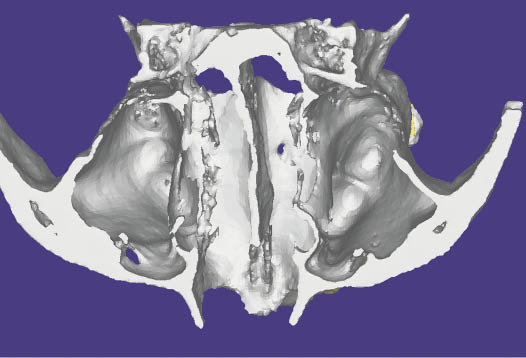
Fig 15-7 Three-dimensional reconstruction of CT scan viewed from the superior aspect, showing the internal anatomy of the floor of the nose and the sinus. The vomer, the pterygoid plates and the zygomatic process are also visible. A small septum can be observed in the left sinus (same patient as Fig 15-5).
The considerable information that can be gathered from these investigations must be used to the maximum in planning and executing treatment. It is clear that the information gained from CT is crucial for both planning surgery and minimising the risks during the surgical procedures. The information gained from CT is, therefore, considered to be of vital importance, particularly for sinus lift procedures.221
Additional imaging techniques, such as MRI and conventional tomography, can also be used. CT scans taken in the coronal plane are used for investigation of sinus pathology, as it enables other sinuses to be investigated. Specific views using conventional radiography (Waters view) are used for investigating fluid levels.
Assessment of Pathology
Acute sinusitis should be treated prior to augmentation. No elective procedure should be carried out in the presence of any acute pathological process. Appropriate therapy (antibiotic, anti-inflammatory and decongestant) should be implemented to treat the condition, and augmentation of the sinus should be undertaken only once the symptoms have resolved.
A CT scan is very valuable for determining the nature of the hard and soft tissues in the maxilla and the sinuses (Figs 15-8–15-10). Although MRI may be used for soft tissue imaging, the range of software available for CT provides an excellent ability to visualise any pathology of dental or respiratory system origin. Other findings discovered using modern imaging techniques should be addressed according to the guidelines outlined below. Consultation with ENT surgeons regarding the pathology of the sinuses is recommended.
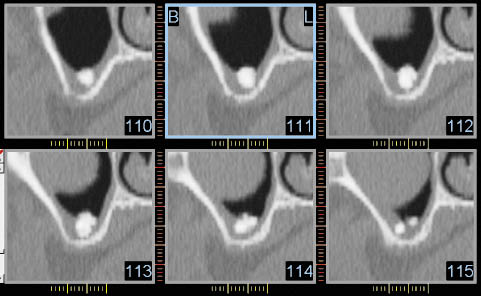
Fig 15-8 Oblique cross-sectional reconstruction of maxillary sinus. An object of high radiopacity can be seen within the thickened sinus lining. In addition, the edge of a rounded object with a density corresponding to soft tissues can be seen. These were unrelated and were discovered to be an odontome and a mucocele, respectively, on histopathological examination.
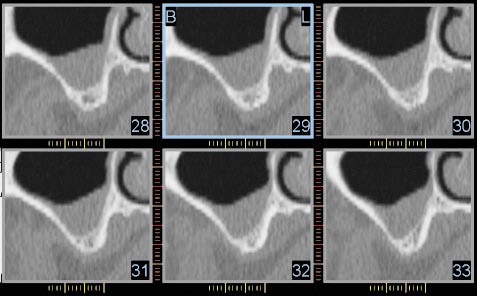
Fig 15-9 Cross-sectional CT scan reconstruction of the left maxillary sinus, showing a thickened sinus lining and a limited amount of residual alveolar bone. The lateral wall of the maxilla and the thickness of the cortical bone can be seen. This will assist in the design of the window. The buccal side is on the left of each image, and the palate and the nasal structures can be seen on the right. A greater amount of information can be obtained by this imaging technique than with the panoramic tomography (Fig 15-4).
Fig 15-10 The four panels of the Simplant program are essential for planning. The top left panel shows the branch of the maxillary artery in the lateral wall, which can also be seen in the bottom right panel as a groove.
Assessment of Sinus Lining: Pathology
Thin Lining
Thin linings are healthy and are not visible on a CT scan.
Thick Lining
A thick lining is visible on the CT scan but does not contraindicate treatment. A thickened lining may have several causes, for example allergy, smoking or other conditions that lead to a generalised inflammatory response.
A localised thickening of the lining may be of dental origin, which will need to be addressed prior to proceeding.
Polyp or Mucocele
A polyp or mucocele has a distinct appearance. Differential diagnosis based on a CT scan is difficult and treatment will depend upon the size of the polyp or mucocele. Large obstructive lesions are generally better removed prior to or during augmentation. Mucoceles can be drained during the grafting operation. Polyps, however, will need to be removed and the augmentation carried out at a later stage.
Generalised Obstructive Radiopacity in the Sinus
A generalised radiopacity requires investigation to determine the cause, which is most effectively carried out by an ENT surgeon. CT scans using coronal sections enable the other sinuses to be visualised for the diagnosis of pansinusitis.
Endoscopic examination of the sinuses may be coupled with endoscopic removal of pathology and greatly facilitates healing. The Caldwell–Luc procedure coupled with a nasal antrostomy should be avoided if possible to facilitate access for the sinus lift procedure at a later stage.
Removal of Diseased Tissues and Foreign Bodies
Should an intraoral approach to the removal of pathology or foreign bodies be decided upon, the Caldwell–Luc approach with a high access should be used. The position of the access window should be accurately noted on the charts to facilitate re-entry, which may be carried out three months later.
Assessment of Load
The potential load on the implants should be assessed by considering:
- • occlusal wear
- • parafunctional activity
- • opposing dentition
- • hypertrophy of masticatory muscles
- • dietary habits.
It would be advisable to consider implants of larger dimensions both in length and diameter for patients with higher functional and parafunctional loads. Consideration should also be given to the implant surface and design of the implant. This will clearly influence the planning and timing of treatment as well as the type of augmentation that will be required. This will be discussed in a later section.
Planning Treatment
Flowchart 15-1 (see pp. 308–309) provides the clinician with a guide to selecting a procedure that might be suitable for the patient. The focus must be the thorough assessment of the patient and the selection of a procedure that will produce a predictable outcome with a minimal risk of complications.
The aim is to deliver an implant of minimum length of 11 mm, under ideal conditions of good bone density and low occlusal loads, and preferably 15 mm in length, particularly when adverse conditions, such as high load and poor-quality bone, are present.
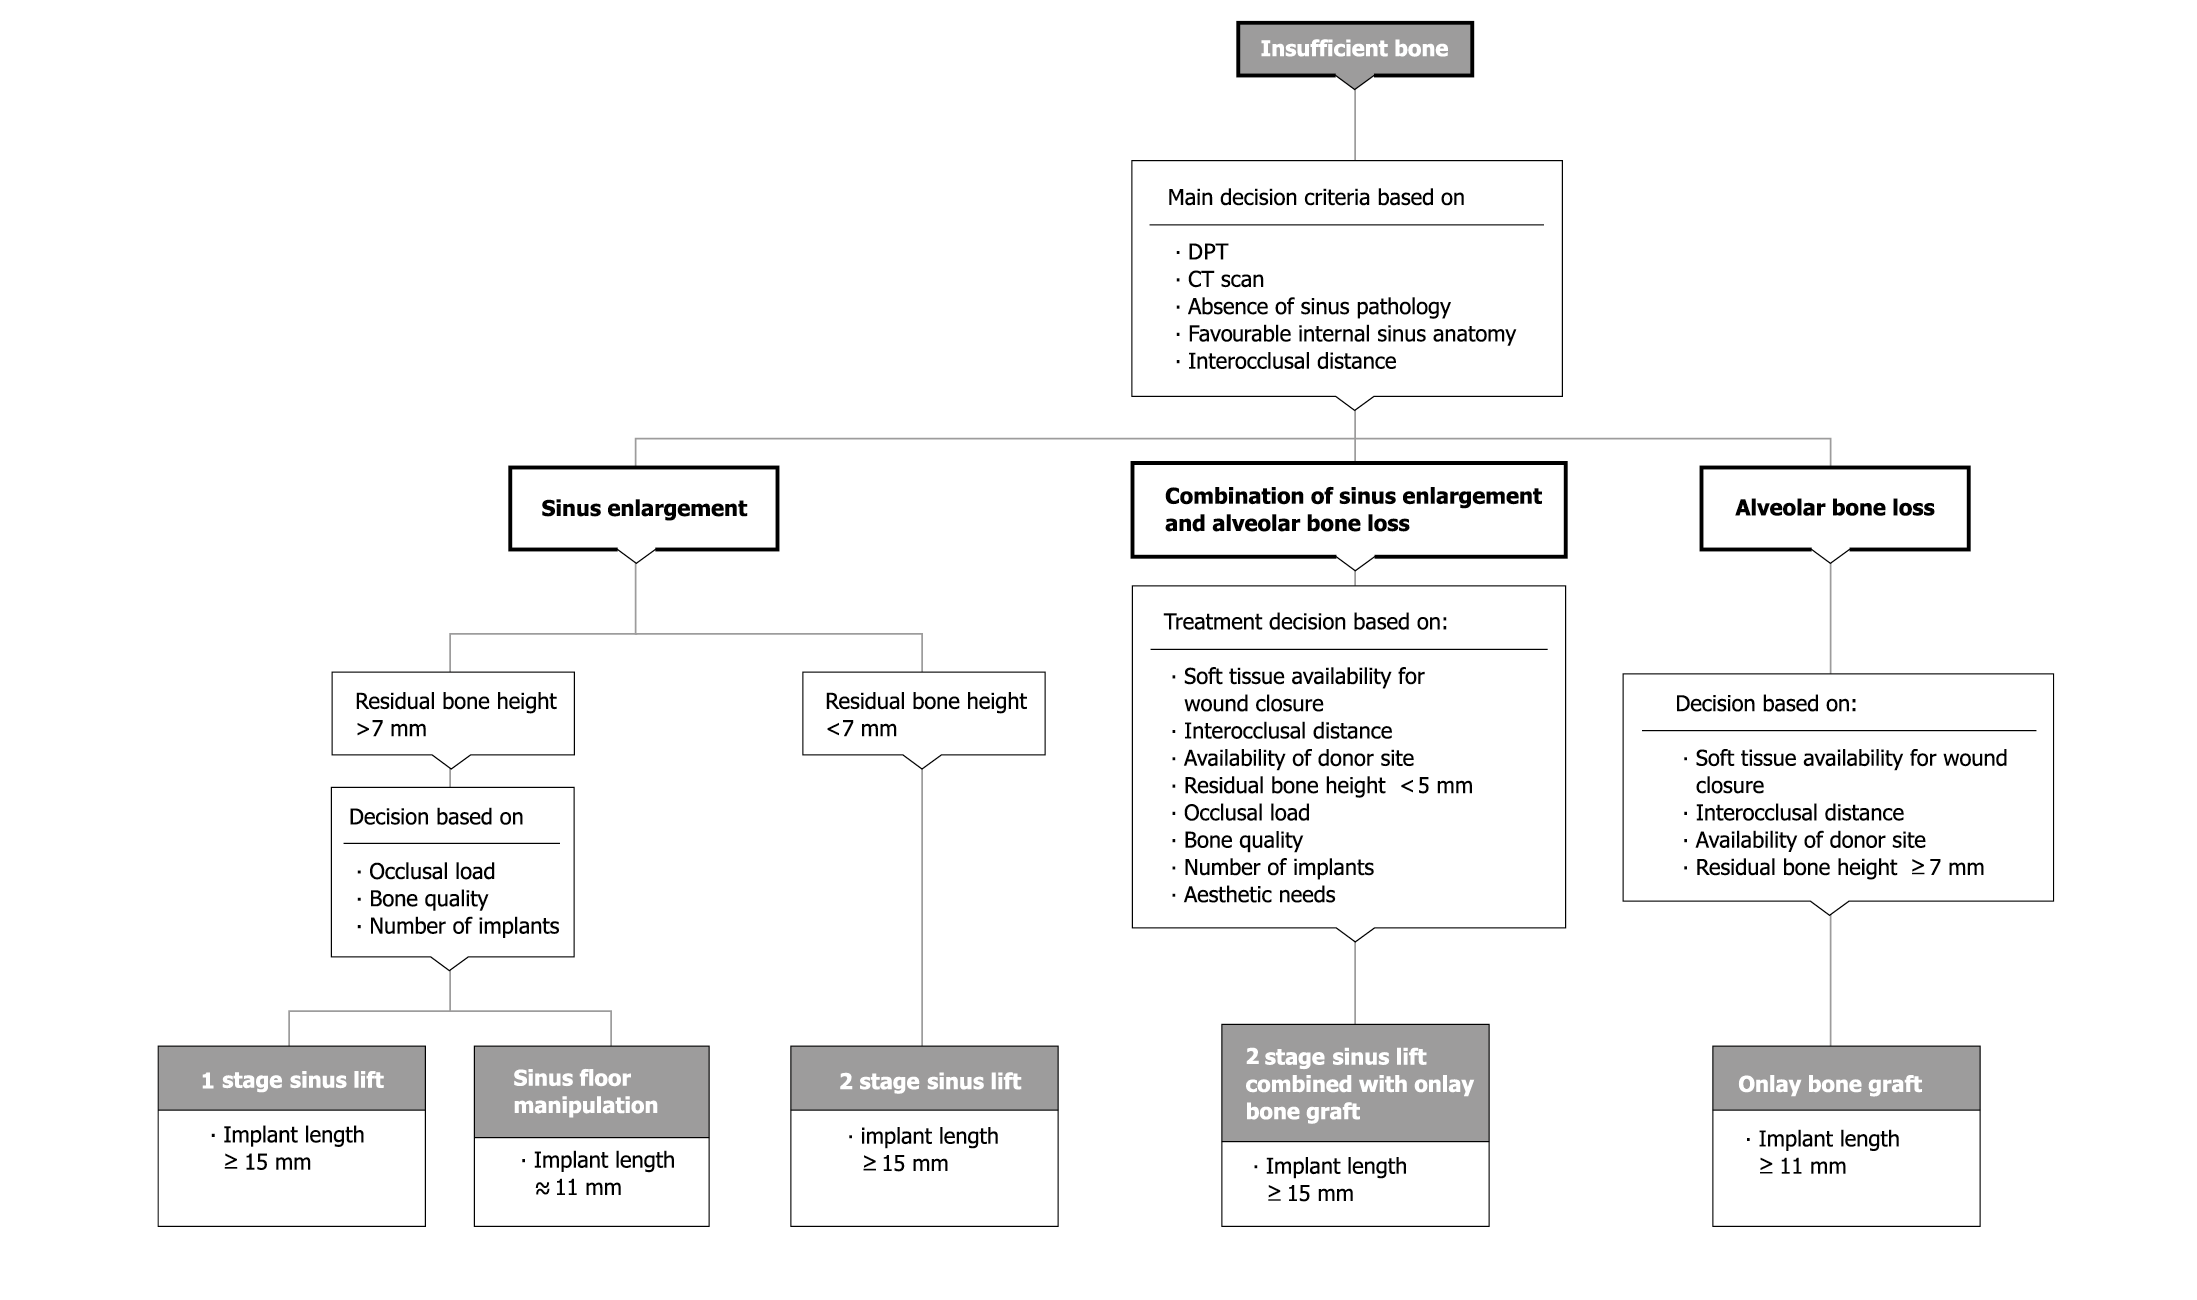
Flowchart 15-1 Assessment for sinus lift procedure and sinus manipulation.
Informed Consent
The patient will need to be involved in the discussions regarding the biomaterials that may be used for augmentation. The clinician needs to be aware of the efficacy and safety of the material proposed for use. The patient should be informed of the type of material, its origin and efficacy. Consent should be obtained from the patient before proceeding. A pragmatic and practical approach addressing benefits, risks, costs and severity of the surgery should be considered. The overall treatment plan should be borne in mind as well as the health of the patient. For example, patients requiring general anaesthesia for augmentation of the premaxilla with autogenous bone from the iliac crest are obviously better treated with autogenous bone harvested for the sinuses at the same time (preferably in combination with stabilising biomaterial). By comparison, the augmentation of a sinus for the replacement for a single tooth may not warrant a general anaesthesia for procurement of bone from the iliac crest.
Clinical Protocols
The clinical protocols for managing the posterior maxilla and the specific morphological and anatomical features of this region are described in the sections below. They address the management of structural deficiencies of the maxillary bone as well as volumetric deficiencies.
Using Available Bone
The protocol for the use of the available bone must follow sound guidelines to enable a functional restoration to be constructed.
The tooth position must be identified where the abutment must emerge to enable a restoration to be constructed, meeting aesthetic and functional needs. The available bone must be identified, ensuring that the implant can be placed within this bone without any surgical compromises. Three techniques have been described: pterygoid implants, zygomatic implants and angled implants.
Pterygoid Implants
Pterygoid implants are designed to use the plates of the pterygoid bone to anchor implants placed in the posterior maxilla.133,222–225 Clinicians must be aware of the likelihood of the poor position of the abutment and the risks associated with the insertion of implants in this region.
Zygomatic Implants
The procedure for inserting zygomatic implants has been described and is designed to engage the zygomatic bone traversing the maxillary sinus from the region of the first molar.226–230 Clinicians should be aware of the possible palatal malpositioning of the abutments and the risk to the normal anatomical structures in this region (Fig 15-11).231–233
Furthermore, a minimal bone loss at the permucosal site (opening into the maxillary sinus) would lead to an oroantral communication, which would prove to be very difficult to manage. To minimise this risk, a procedure to avoid perforating the sinus has been advocated.234
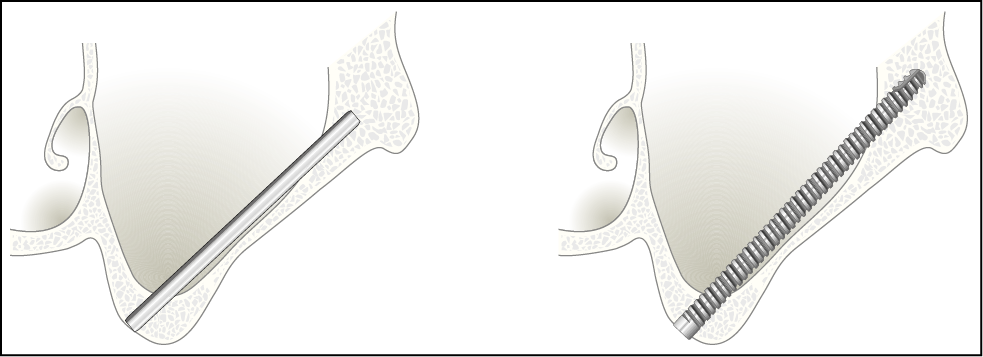
Fig 15-11 Insertion of a zygomatic implant, which traverses from the ridge to the zygomatic bone, gaining anchorage at both ends. Long implants specifically manufactured for this application are required.
Angled Implants
Implants may be placed to avoid the maxillary sinus, which invades the alveolar bone locally in a particular area. The implants may be inclined mesially or distally, or towards the palate, to avoid perforation of the maxillary sinus (Figs 15-12 and 15-13).7,134 The use of bone condensers reduces the risk of perforating the floor of the sinus.
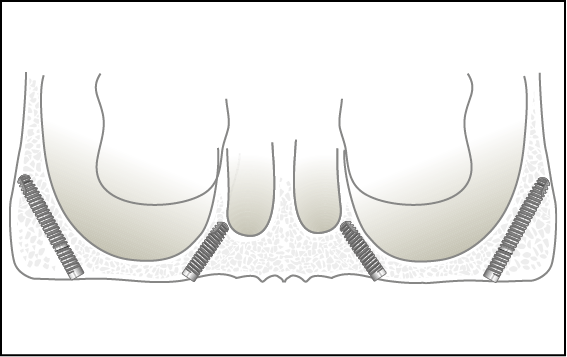
Fig 15-12 Use of angled implants inclined mesially and distally to avoid the sinus. Care should be taken not to extend the implant beyond the pterygoid plates.
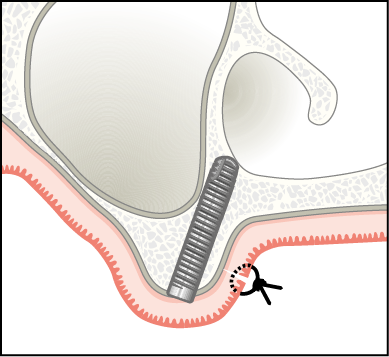
Fig 15-13 Inclination of an implant towards the palate to make use of available bone in this region. The use of angled abutments is obviously necessary to bring implants placed at angles into function.
The technique involves selecting the implant site using a radiopaque marker to transfer the ideal future tooth position to the CT scan or radiographic image. The trajectory of the implant is planned to avoid sinus and any associated structures. The use of an angulated abutment becomes necessary to be able to restore the implant.
Manipulating Bone of Low Density
Maxillary bone in the posterior area is particularly sparsely trabeculated. Techniques for osteotomy preparation that involve the removal of what little bone is present have poor success rates.235,236 Osteotomy preparation using instruments to increase the trabecular density is recommended.237
Manual Manipulation
Bone Spreaders
Bone spreaders are sharp-tipped rounded blades available in incrementally increasing diameter (Dentsply Friadent). They are recommended for use following the initial preparation of the osteotomy with a pilot bur to establish the direction and depth. The instruments are inserted into the osteotomy and rotated clockwise and anti-clockwise through 180 degrees along the long axis of the instrument. Bone spreaders are not designed to increase the depth of the osteotomy and are, therefore, inserted only to the predetermined depth. Subsequent instruments increase the diameter of the osteotomy to enable the implant to be inserted.9,238
Percussion
Bone Condensers
Bone condensers are a series of instruments that are round in cross-section and designed to incrementally increase the osteotomy until the implant can be inserted (Dentsply Friadent). The series consists of a site marker, which enables a site to be selected and the direction of the osteotomy to be established. The pilot bone condenser is used to enlarge the osteotomy to enable the first bone condenser to be inserted. Subsequent bone condensers are matched to implant diameter and length. They enable the entire osteotomy to be prepared to enable the implant to be inserted.
These instruments may be used by hand, using a rotational motion along the long axis of the instrument or with the use of a mallet, which offers more control during insertion of the instruments. The condensers matched to implant diameter may be used to increase the depth to which the osteotomy is prepared by manipulating the nasal or sinus floors.
Increasing the Available Bone
Sinus Floor Manipulation
Sinus floor manipulation is designed to increase the height of available bone by manipulating the sinus floor through the osteotomy.239 A 4 mm increase in height can predictably be achieved by the technique outlined below. The minimum level of bone that should be available is 7 mm below the sinus floor to allow an 11 mm implant to be inserted. Ideally sufficient width should be available for at least a 4.5 mm diameter implant, although an implant with a diameter of 3.5 mm is acceptable if favourable conditions prevail.
Surgical Technique
- • Incision. A remote or crestal incision may be used, depending on whether loading is going to be immediate or delayed. The criteria used for making this decision have been described in Chapter 7.
- • Osteotomy. The osteotomy is prepared to a point 1 mm short of the sinus (Fig 15-14). Conventional osteotomy burs are used in bone of medium density, while bone condensers are used in poor-density bone.
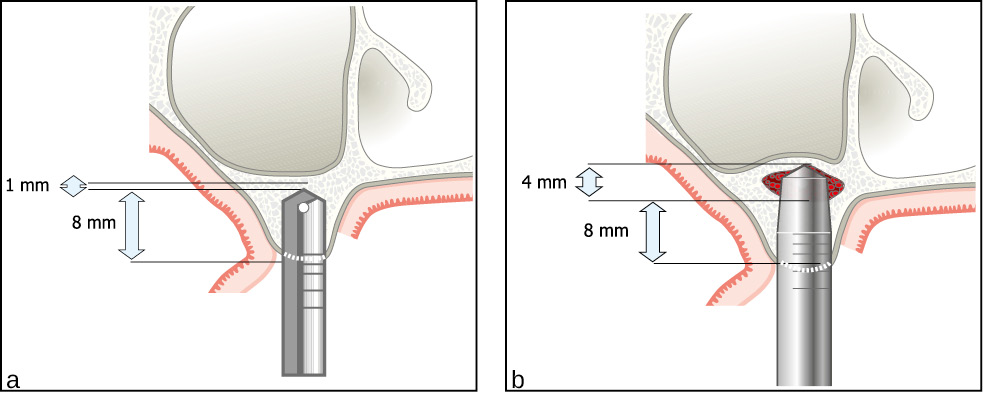
Fig 15-14 The principles behind sinus floor manipulation. (a) Exposure of a maxillary ridge via a remote palatal incision for delayed loading. An osteotomy is prepared using an internally irrigated osteotomy bur to a point 1 mm short of the cortical plate. In bone of poor density, the opening through the cortical plate is made with an osteotomy bur and the rest of the osteotomy is prepared using bone condensers. (b) The sinus floor, consisting of the intact sinus lining, the cortical bone and the cancellous bone, which has been compacted, are manipulated superiorly by 4 mm. A blood clot, some displaced cancellous bone and some particulate material contained within the cutting flutes of the implant fills the void created by the manipulation. Additional particulate biomaterials are not used in order to reduce the perceived risk of perforation of the lining and displacement of the particles into the sinus.
- • Bone condensers. The bone condenser of the correct diameter is then inserted into the base of the osteotomy (Figs 15-15 and 15-16). A mallet is used to insert the condenser, using controlled force until a fracture to the sinus floor takes place. Careful observation of the markings on the condenser is used to detect the fracture of the sinus floor. This is coupled with acoustic feedback, which results in a duller sound when the instrument fractures the bone.
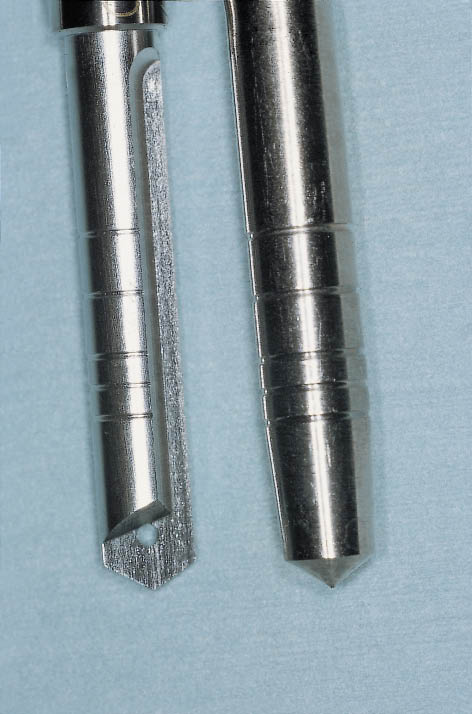
Fig 15-15 An osteotomy bur and a corresponding bone condenser. The angle at the tip of the osteotomy bur and the bone condenser correspond to 120 degrees. The bone condenser, therefore, fits perfectly into the floor of the osteotomy created with the bur. This enables even pressure to be transmitted to the floor enabling it to be manipulated.
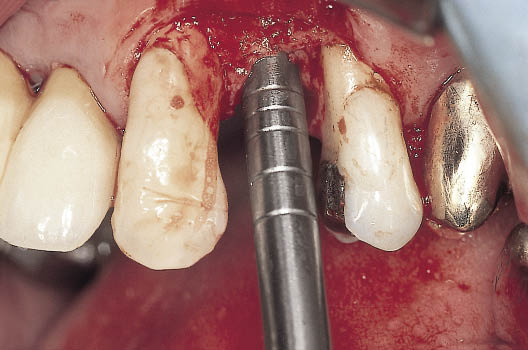
Fig 15-16 Clinical view of the bone condenser, which has been inserted to the floor of the osteotomy at approximately 7 mm.
- • Assessment of sinus floor. The bone condenser is removed and the patient is asked to exhale through the nose with the nares pinched. Any perforations can be detected by the expiration of air through the osteotomy. The instrument is reinserted and the sinus floor manipulated to the desired height (Fig 15-17). The integrity of the sinus floor is reconfirmed at this stage. A bone tap may be used in denser bone, particularly when wide-diameter implants are to be used.
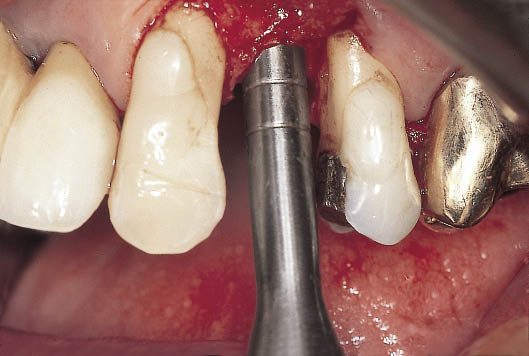
Fig 15-17 The bone condenser can be seen inserted to 11 mm. The sinus floor is manipulated with the aid of a mallet until an increase in depth of 4 mm is achieved (see Fig 15-14).
- • Implant insertion. Assuming that no perforations have been made in the sinus the implant is then inserted to the required depth (Figs 15-18 and 15-19). Biomater/>
Stay updated, free dental videos. Join our Telegram channel
VIDEdental - Online dental courses


