Chapter 15 Impression materials
Learning Objectives
From this chapter, the reader will:
• Be aware of the different types of impression material available to the restorative dentist
• Understand the properties of each type of impression material
• Be able to correctly select an impression material for a given situation
• Know how to correctly manipulate these materials to achieve the desired result
• Be aware of the materials used to retract the gingival tissues from around the preparation to expose the margins, should this be required
• Know the names of currently available commercial products.
Introduction
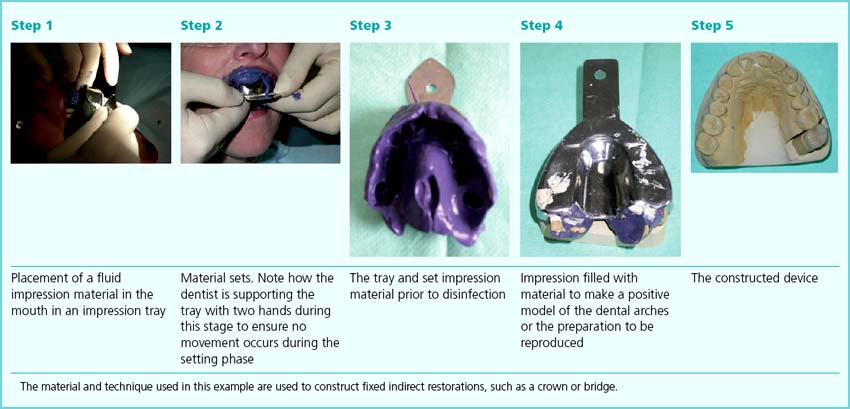
For the construction of an indirect restoration or dental appliance (e.g. a fixed restoration such as crown or bridge and removable appliances such as an orthodontic appliance or an occlusal splint), accurate information about the oral cavity or the dental arches needs to be given to the dental technician. This information is usually gathered by making (recording or taking) an impression, which involves placing a material into the mouth in an unset or fluid state and which then hardens (Box 15.1). This impression is then cast, so creating a model of the dental or oral structures. More recently, techniques have been developed which use computer-operated optical imaging to create the impression, and the cast is constructed from this information. The impression is a negative, with the model or cast being the positive, and the technician constructs the device/restoration using this cast.
Desirable Properties of an Impression Material
• Have no adverse effects on the patient
• Easily removable from the mouth especially from undercut areas
• Be able to be adequately disinfected
All the impression materials which are available to the dentist have various degrees of accuracy and the indication of the material will depend on the need for detail on the working cast. All of these impression materials require to be supported in an impression tray and be retained there until after casting.
Impression Trays and Tray Selection
Stock trays
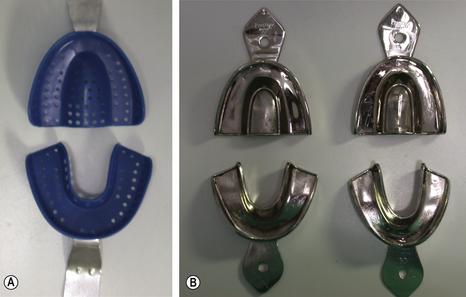
Stock trays are supplied in a range of average sizes and shapes of arch form. They may be made of plastic or metal (Figure 15.1). To obtain a satisfactory impression, a stock tray must:
• Be rigid and non-flexible under load when taking the impression
• Extend sufficiently to support the impression material in the region being reproduced
• Fit loosely around the dental arch and not touch the soft tissues
• Have adequate means of retaining the impression material in the tray
• Have a robust (integral) handle
• Be able to be adequately disinfected (if not meant for single use).
Plastic stock trays
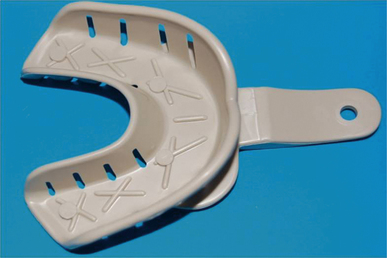
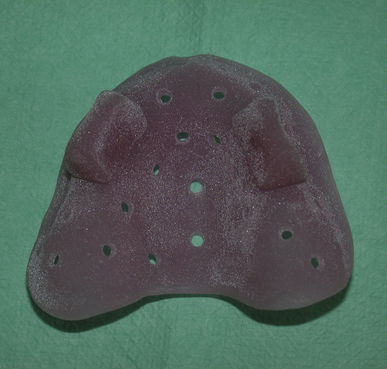
Plastic impression trays are frequently injection moulded from a high-impact styrene. Good trays have a moulded periphery, which takes account of the anatomy of the mouth. They may be either dentate or edentulous and perforated or non-perforated (Figure 15.2). Perforations aid in the retention of the impression material.
Adequate extension
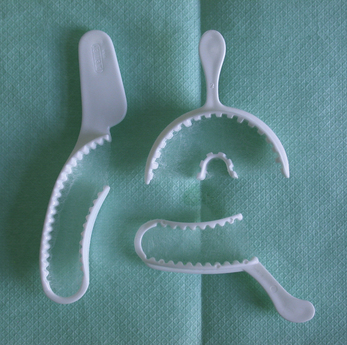
It is important that the stock tray is extended adequately to support the impression material, otherwise distortions are likely in any unsupported regions. Figure 15.3 shows a poorly extended stock tray that would be inadequate if a full sulcular impression is required.
Correct size and shape of the dental arch
The tray also needs to approximate to the size and shape of the dental arch. If the tray selection is incorrect, the ill-fitting tray will be unable to support the impression material properly, leading to inaccuracies in the impression (Figure 15.4).
Importance of rigidity
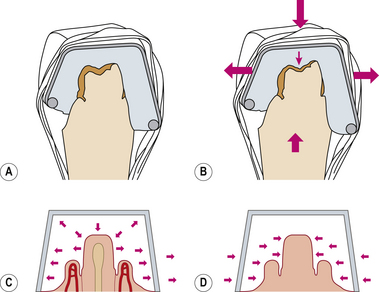
It is very important that the tray is strong enough to withstand the force of the impression material being placed in the mouth. It must not flex, as this will result in stresses being formed within the impression material, and the clinician will be unaware of this. Flexure of the tray under load causes the tray to distort and the impression to flex. The sides of the impression tray will bow out in the mouth (Figure 15.5). Once the pressure is released as the impression is removed, the tray will return to its original shape. This will mean that the impression will be narrower buccolingually than the actual buccolingual width in the oral cavity.
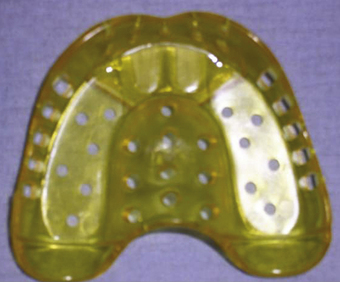
Tray distortion during impression making will then lead to the cast model being inaccurate and finally the constructed prosthesis not fitting in the mouth. This is seen especially with the higher viscosity impression materials, such as the putty presentation (see p. 261). Some plastic stock trays have strengthening features to maintain rigidity (Figure 15.6).
Triple Tray
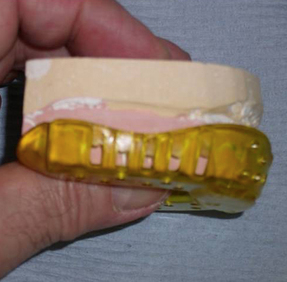
One type of plastic tray available is called the Triple Tray (Figure 15.7). This tray system is used when the double arch or dual bite impression technique is being employed to record an impression for a crown. This technique uses an accurate (usually elastomer) impression material to record both the tooth preparation and the opposing teeth. Although this is a popular technique in North America and can provide good results, its success depends on the patient’s ability to close their teeth together without any interference by the tray; thus it can only be used in specific indications. By definition, this technique cannot reproduce the complete dental arch, which can lead to serious occlusal discrepancies. The details of the technique are beyond the scope of this text and the reader is referred to an operative dentistry text for further information.

Special trays
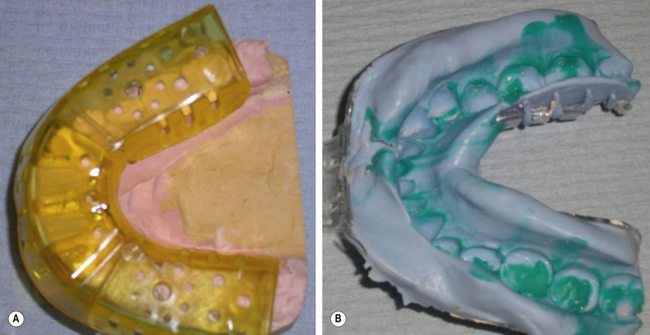
A special or customized tray is one which is made specifically for one patient. A preliminary impression (using a stock tray) is made and sent to the dental laboratory. A model is cast and wax is laid down on the model, the thickness of which corresponds to specific spacing. This spacing is determined by the impression material to be used in the final impression. The equal thickness of the impression material used means that dimensional change will theoretically be the same in all directions, so decreasing inaccuracies in the impression. Special trays are usually constructed from polymethylmethacrylate (Figure 15.8).
Tray Adhesives
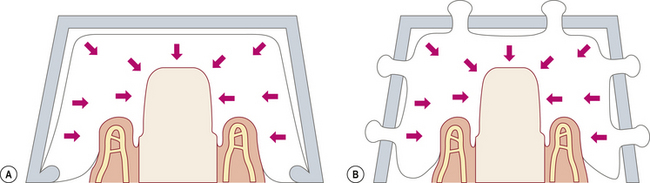
It is very important that the impression material is retained securely in the tray. This may be done mechanically through perforations as described earlier or by the use of an adhesive. Ideally both these means should be used together as the use of each type alone can lead to failure. For example, the addition of a tray adhesive is helpful where the mechanical retention is not so effective. Figure 15.9 shows the modes of failure of a rim-lock tray and of a perforated tray where no adhesive is used. These discrepancies can potentially lead to distortion of the impression material and failure of fit of the prosthesis. The addition of a tray adhesive will reduce this as it addresses the area where the mechanical retention is not so effective.
All tray adhesives are based on contact adhesive technology. This means that they should be applied to the tray and allowed to dry in advance of the impression being taken. Failure to let the material dry will adversely affect the union between the tray, adhesive and impression material. The adhesive should be applied sparingly to the internal surface of the tray and extended just over the margin of the tray to the external surface to ensure that the periphery of the impression material remains attached to the tray. Pooling of excess adhesive is undesirable as the solution will not dry and will weaken the bond between the impression material and the tray. For the most effective use, two thin coats should be applied with the first coat being allowed to dry before the application of the second. None of the available adhesives is particularly effective and it is unwise to rely on adhesive alone in the tray.
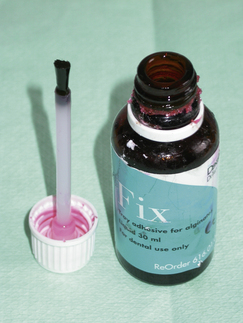
Most tray adhesives are provided in screw-top bottles with a brush affixed to the lid (Figure 15.10). Invariably, as the adhesive lasts for long periods of time, the excess adhesive from each application gets deposited around the neck of the bottle. This means that the seal on the lid becomes less secure with time, leading to evaporation of the solvent and the consequent thickening of the adhesive. Application of adhesive to the tray thus becomes more difficult and the adhesive layer deposited is thicker than desired, leading to reduced performance.

• A paint-on presentation of tray adhesive is preferable to the spray-on presentation. Spraying on the adhesive will result in pooling of the adhesive, which will not dry so decreasing its ability to bond. However, from a cross-contamination perspective, the dental nurse should not dip the brush back into the adhesive if it has been applied to a tray which has been tried into a patient’s mouth. Decanting some adhesive into a dappen dish and using a cotton bud will circumvent this consideration.
• The tray adhesive should not be applied in a thick layer as it is unlikely to set prior to impression placement. Multiple thin coats may be used but each should be dry before the next is applied.
• The tray adhesive should be dry before the unset impression material is placed into it. To facilitate this, it is wise to select the impression tray at the start of the appointment. The tray adhesive may then be coated onto the tray. While the preparation is being done, the tray adhesive will dry.
Types of tray adhesive
Most tray adhesives are specific to each generic group of impression materials (Table 15.1). It is important that the correct type of tray adhesive should be used with its corresponding impression material. All adhesives contain a solvent, which evaporates leaving a film of adhesive which will then bond to the impression material.
Table 15.1 Chemical constituents of tray adhesives with their corresponding impression materials
| Adhesive | Impression material |
|---|---|
| Butyl rubber or styrene acrylonitrile dissolved in chloroform or a ketone | Polysulphide |
| Ethyl acetate in propanol or acetone | Polyether |
| Poly dimethyl silicone to react with the impression material and ethyl silicate to bond physically to the tray. Ethyl acetate and naphtha are frequently included | Addition silicone |
| Poly dimethyl silicone to react with the impression material and ethyl silicate to bond physically to the tray | Condensation silicone |
| 10–12% toluene in 45–50% isopropanol (isopropyl alcohol acts as a volatile solvent) | Alginate |
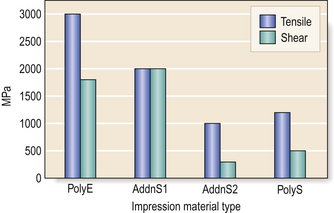
While the adhesives are adequate in holding the impression materials firmly in the tray the bond between the tray and the impression material varies with the material used. Figure 15.11 shows the bond strengths between the tray and impression material for the four common elastomeric impression materials. The strongest bond is achieved with the polyether adhesive.

Types of Impression Material
There are a number of types of impression material. They may be broadly divided into non-rigid and rigid. The former group consists of the reversible and irreversible hydrocolloids and the elastomeric materials (which are synthetic rubbers). The rigid impression materials include impression plaster, impression compound (compo) and zinc oxide and eugenol-based impression paste. These are generally restricted in use to record those areas where no undercuts are present, and mainly in the construction of removable dentures.
Non-Rigid Impression Materials
Hydrocolloids
Reversible hydrocolloid
Chemical constituents
Agar is a mixture of polysaccharides, agarose and agaropectin, which are subunits of the sugar galactose. These components are extracted from certain types of seaweed, specifically some red algae. The material used as a dental impression material also has other chemicals added to improve the properties and handling of the material. A generic formulation for these materials is set out in Table 15.2.
Table 15.2 Chemical constituents of agar impression materials
| Constituent | Purpose | Per cent of composition |
|---|---|---|
| Agar* | Disperse phase of the colloid | 13–17 |
| Potassium sulphate | To counter adverse effect of borax on setting reaction of model plaster | 1.0–2.2 |
| Borax or borates | To strengthen the gel | 0.2–0.6 |
| Alkyl benzoate | To prevent mould growth in impression during storage | 0.1–0.2 |
| Wax | Filler | 0.5–1.0 |
| Thixotropic materials | Viscosity regulators and thickeners | 0.2–0.4 |
| Colours and flavouring | To enhance the taste and appearance of the material | <0.1 |
| Water* | Provides the continuous phase of the colloid. The amount present determines the flow properties of the sol and the physical properties of the gel phases | 79–85 |
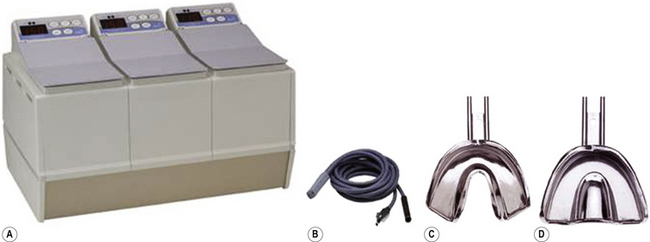
Setting
The process requires a number of pieces of hardware, namely a hydrocolloid bath and metal trays incorporating water cooling coils (Figure 15.12). There must also be facilities to pour the models as soon as possible after the impression has been taken. This is because the dimensional stability of the agar is determined by the relative humidity and temperature at the point of pouring the plaster cast. The agar impression material is presented in tubes or cartridges for use in a syringe (Figure 15.13).


Irreversible hydrocolloid
Chemical constituents
The active ingredients are sodium and potassium salts of alginic acid. Alginic acid was first derived from the mucus that exudes from brown seaweed (Figure 15.14). It is now manufactured from synthetic components. A typical alginate powder formulation is shown in Table 15.3.
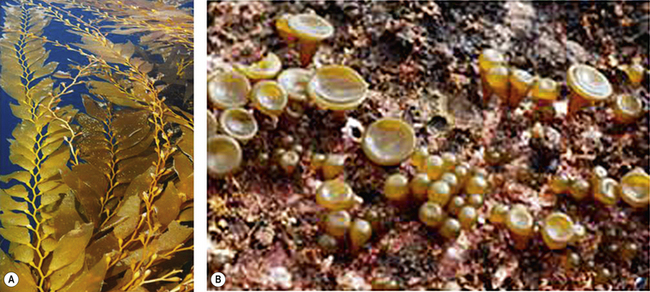
Fig. 15.14A,B Two species of seaweed from which alginic salts may be derived. (Photos courtesy of Michael D. Guiry, The Seaweed Site) http://www.seaweed.ie/ Seaweed Site from Michael Guiry.
Table 15.3 Typical chemical constituents of an alginate impression material
| Constituents | Weight percentage (%) | Function |
|---|---|---|
| Potassium alginate* Sodium alginate* | 18 | Dissolves in water to form a hydrogel with calcium |
| Calcium sulphate dihydrate* | 14 | Reacts with soluble alginate to form insoluble calcium alginate |
| Potassium sulphate, silicate or borate | 7–10 | Reduces inhibition of setting of plaster in poured model |
| Sodium phosphate | 2 | Acts as a retarder by preferentially reacting with calcium ions. This provides the working time. The material sets once the phosphate ions have been used up |
| Filler (diatomaceous earth or silicate powder) | 56 | Filler controlling consistency and flexibility of the set material |
| Sodium silicofluoride | 0–3 | Controls the pH of the material. Usually included at the expense of the potassium sulphate fraction |
| Organic glycols | Small traces | Reduces dustiness of the powder |
| Oil of Wintergreen, peppermint and pigments | Small traces | Provides pleasant taste and colour |

Properties

Permanent deformation
Any impression will be compressed in certain areas during the removal from the mouth as it is removed from undercuts. Once removed, the impression should ideally return to its original shape with no distortion. However, most impression materials do not recover completely. A standard requirement for an alginate impression material is that if it is compressed by 20% for 5 seconds, the percentage recovery from this deformation should be in excess of 95%. This means that it could have a permanent deformation of 5%. Most commercial alginate impression materials have a recovery from deformation of about 98.5%. Permanent deformation of the impression material will only occur in areas where it was stressed. This, in turn, means that some parts of the cast produced from the impression will be more accurate representations of the mouth than other parts. Permanent deformation may be minimized by:
• Reducing the amount of compression: Increasing the bulk of impression material between the tray and the teeth will reduce the bulk deformation as there will be more material available to be compressed.
• Reducing the time the impression is under compression: This may be done by snap removal from the mouth rather than easing the impression out.
• Allowing longer time for recovery by not pouring the model immediately: However, to avoid inaccuracies caused by syneresis and imbibition, the model should be made ideally within a hour of the impression being taken.
Strength
• Variation in water volume: Any reduction in the powder/liquid ratio will weaken the gel.
• Insufficient spatulation: This will result in the ingredients not being dissolved sufficiently, leading to the chemical reaction being inconsistent.
• Over-spatulation: This leads to disruption of the forming calcium alginate gel and reduces the strength.
Advantages and disadvantages
The advantages and disadvantages of alginate impression materials are shown in Table 15.4.
Table 15.4 Advantages and disadvantages of alginate impression materials
| Advantages | Disadvantages |
|---|---|
| Easy flow | Poor dimensional stability |
| Reproduction of detail adequate | Poor tear strength |
| Fast set | Distorts if unsupported |
| Minimal tissue displacement | 3 mm minimum thickness required – otherwise distortion occurs where thin sections are found, such as interproximally |
| Cheap | |
| Patient tolerance good | Easy to include air |

• Too much or too little water weakens the alginate gel.
• Insufficient spatulation results in an uneven set as all the powder does not dissolve.
• Over-spatulation breaks up and weakens the gel.
• Sufficient bulk of material is required for success (minimum of 3 mm).
• Strength of the gel increases with time (doubles in the first 4 minutes) making the material stiffer to remove.
• Retention to tray is poor so use perforated or rim-lock trays ± adhesive.
Indications and contraindications
Mixing
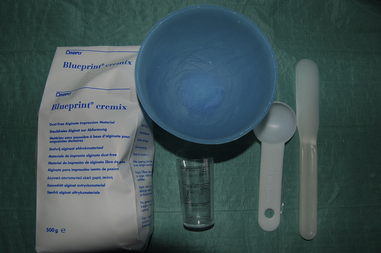
Manufacturers usually provide dispensing measures for both the water and powder. These are most commonly a measuring cylinder and scoop, respectively (Figure 15.16) and will ensure that the correct volume of water and powder is used. Box 15.2 demonstrates the correct mixing procedure for an alginate impression material by hand. An alterative method involves using a bespoke alginate mixing machine. However, the powder and water should still be handled as directed in steps 1 to 4 in Box 15.2.
Box 15.2 The correct mixing procedure for an alginate impression material, using Blueprint cremix (Dentsply)
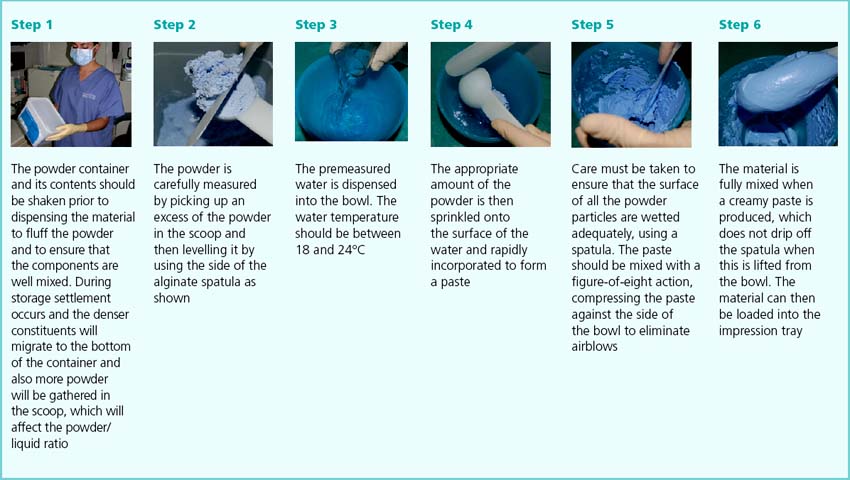

• It is important to exercise care when opening the container as the particulate material creates dust, which if inhaled potentially has adverse side effects. This is because a proportion of the particles are of a similar dimension to asbestos fibres, which may lead to pulmonary fibrogenesis.
• The container containing the alginate powder should have a hermetic seal and should not be left open to the atmosphere for any length of time. Water vapour in the air will affect the powder and therefore the properties of the set material.
• It is unwise to vary the stated proportions between the water and the powder as a small variation can adversely affect the properties. A change of only 15% in proportion of powder to water will markedly change both the setting time and the consistency, although some clinicians prefer a slightly runnier mix when making an impression for construction of a denture.
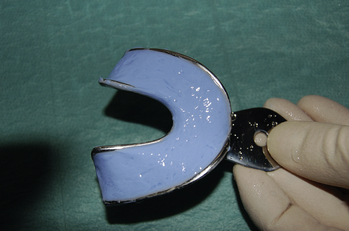
Once the alginate has been mixed, it is loaded into the impression tray. This should be done without delay as the material will be entering its setting phase. A smooth surface should be achieved, which results in better surface reproduction in the impression (Figure 15.17). Some clinicians like to smear some of the alginate over the surfaces of the teeth using their finger to ensure that the material is properly adapted to the tooth surfaces. In patients with a high palatal vault, the dentist may also place a blob of material in this region prior to the insertion of the tray to ensure that it is recorded properly.


Disinfection
Disinfection of all impression materials is an essential part of prevention of cross-contamination (Box 15.3). Each impression should be subjected to a disinfection regime before it leaves the surgery. Many dental laboratories will also disinfect all impressions on arrival at the laboratory.
Box 15.3 Suggested protocol for the treatment of all impressions
1. Immediately after removal from the mouth, the impression should be thoroughly rinsed in cold running tap water.
2. The impression tray (including the handle) and material should be immersed in a bath of a suitable water-based disinfecting solution prepared according to the manufacturer’s instructions for the recommended period of time.
3. The impression should then be rinsed gently with tap water. The dental nurse should not forget the impression in the bath otherwise unwanted dimensional change may occur.
4. The impression should then be wrapped in moist tissue/napkin and placed in a polythene bag and sent to the dental laboratory for casting.
A number of commercial disinfectants are available specifically for this purpose. They/>
Stay updated, free dental videos. Join our Telegram channel
VIDEdental - Online dental courses


