13
The Edgewise Fixed Appliance
Introduction
A fixed appliance is attached to the teeth unlike a removable appliance. Because a fixed appliance cannot be easily removed or altered by a patient, treatment progress is usually dependable. In many patients who require limited orthodontic treatment, the malocclusion can be treated more quickly with a fixed appliance than with a removable appliance. The greatest disadvantage of the multibracketed fixed appliance compared to removable appliances is the difficulty some patients experience with poor oral hygiene and cariogenic diets that expose them to the development of enamel white spot lesions during treatment.
The Edgewise Appliance
E. H. Angle (1928, 1929) invented the edgewise appliance near the end of his life. Angle invented several other fixed appliances earlier, but he thought that the edgewise appliance had the greatest promise. Angle invented brackets with rectangular slots and tubes with 22 × 28-mil dimensions. His appliance was made of nickel alloys. He used rectangular arch wires to move a tooth in all three planes of space with the edgewise appliance.
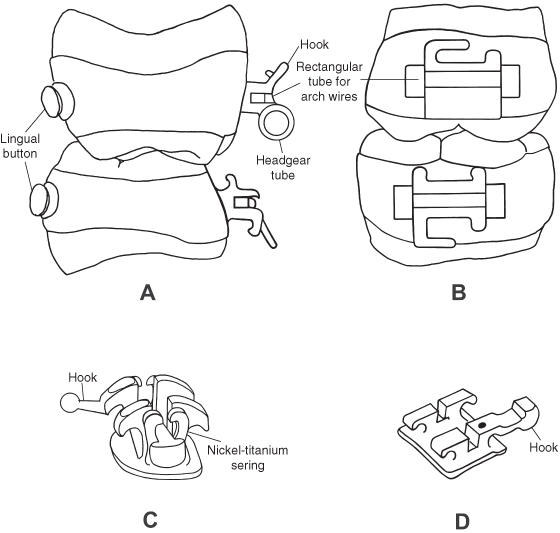
Since its invention, the edgewise appliance has undergone numerous modifications in the design of brackets, tubes, arch wires, and auxiliary devices. Examples of modern bands and brackets are illustrated in Figure 13.1. The appliance has rectangular tubes on the most distal teeth in each arch, usually the first or second molars, and brackets on the other teeth. Arch wires with ideal arch form are put into the appliance to align the teeth. Arch wires are made from wire having two basic cross sections: cylindrical (round) and rectangular. The arch wire is held in each bracket slot with a small-diameter (10 mil) annealed stainless steel wire or an elastomeric (plastic) module. A variety of edgewise appliances not requiring arch wire ligation have been developed (Fig. 13.1C). Arch wires generate forces that move the teeth. Teeth also move mesially and distally along an arch wire in response to impressed forces from latex modules (rubber bands), plastic modules, coil springs, and extraoral devices such as headgear.
Figure 13.1. The modern edgewise appliance: (A) the left first molar bands viewed from the mesial surface, (B) the left molar bands viewed from the buccal surface, (C) a self-ligating bracket with a power arm, and (D) a premolar bracket with a power arm. (Drawn from the appliance, 3M Unitek Corporation, Monrovia, CA.)
Arch Wires
In the 1930s, manufacturers began making arch wires with stainless steel, a less costly material than gold. Stainless steel arch wires were much stiffer than similar sized gold wires. Smaller stainless steel wires with reduced stiffness were made for the initial alignment of the teeth. A smaller slot and tube appliance (18 × 25) was introduced to use smaller steel wires and deliver less force to the teeth. Woven arch wires composed of several small-diameter steel wires bound together were developed to increase the flexibility of steel wire for the initial alignment of teeth. Andreasen and Morrow (1978) pioneered a major advance in orthodontic treatment when they introduced nickel-titanium alloy arch wires that had great flexibility, spring back, and delivery of lower forces. Burstone and Goldberg (1980) introduced titanium-molybdenum alloy arch wires with flexibility intermediate between nickel-titanium and stainless steel that further enhanced the use of the edgewise appliance. The larger stainless steel wires are still used in the 22 × 26-mil slot to level the curve of Spee and torque teeth in the latter stages of treatment. The larger wires deliver the forces needed to level arches and torque teeth.
Bands
Stainless steel bands were initially custom made by clinicians for each tooth. The band material was “pinched” on each tooth, removed, and welded before cementation. Manufacturers developed preformed bands for all of the teeth, with a variety of sizes for each tooth group. Banding of all the teeth occurred from the 1930s through the 1970s. Since then the bonding of brackets has replaced the banding of all the teeth except the first molars. Bands on molars have tubes for headgear to resist the forces delivered by the headgear. The first molars are also bonded in many patients.
Separators
Separators must be placed in most patients before bands can be fitted. Several types of separators are used, the most common being plastic rings. Special pliers stretch the plastic ring and help to push it through the contact point. Plastic rings separate the teeth in a few days after which they may loosen and be lost. Before fitting the band, a clinician must remove the separator from the embrasure. When the separator is missing, the clinician must check to see if it slipped subgingivally, and if it did, he or she must remove it.
Fitting a Band
The interproximal spaces created by the separators enable the clinician to fit a band properly. Before banding and bonding, the teeth must be cleaned. Teeth vary in size and shape, which makes the fitting with preformed bands a challenge for some teeth. A large cusp of Carabelli complicates the fitting of maxillary molar bands. The smallest band that fits the crown is best. The mesial and distal edges of the band should be located at the height of the marginal ridges. This position will usually place the molar buccal tube at the middle of the buccal surface. The molar buccal tube must be centered on the buccal surface of the crown when viewed from the occlusal surface. If a first molar is bonded, the tube should be directed toward the middle of the central incisor crowns.
When fitting a band on a tooth, ask the patient to push it down onto the tooth by biting on a plastic band- seater. Bands have a tendency to slip down too far on the mesial surface of a tooth crown. Begin by pushing the band down more on the distal half of the crown. Later on, push the band down fully on the mesial surface. The band is also pushed down on the buccal and lingual sides of the tooth crown. After the band is fully seated, the occlusal edges of the band are adapted to the grooves and crown contours with a metal instrument called a burnisher. Do not adapt the gingival end of the band to the tooth crown, because that would make removal of the band difficult. In younger patients who have not experienced sufficient passive eruption, a clinician may trim the gingival edge of a band with curved crown and bridge scissors to keep the band from injuring the gingival tissues (Guymon 2010). A cut edge is sharp and should be ground smooth to avoid injury to the gingival tissues. If a preformed band is trimmed too much, it will not have enough contact with the tooth crown to stay cemented very long. All bands irritate the gingival tissues; the goal is to minimize this irritation as much as possible.
Cementing a Band
After adapting the band, remove it from the tooth with band removal pliers. Clean and dry the band and tooth crown. Mix enough cement to either fill the band or liberally cover the inner surface of the band. Seat the band fully on the tooth and clean off excess cement from the crown and gingival tissues. Light cure the cement.
Band Cements
Bands are cemented on teeth with glass ionomer and hybrid-glass ionomer cements because the fluoride released from these materials protects the enamel from caries. The glass ionomer cements fail more frequently at the band-cement interface than at the cement-enamel interface, leaving the cement attached to and protecting the enamel (Norris et al. 1986). The glass ionomer cements disintegrate in saliva at a low rate, making them suitable for the longer treatment times encountered in orthodontic patients (Phillips et al. 1987). The glass ionomer cements can reduce enamel demineralization at orthodontic band margins (Donly et al. 1995). A failure rate for bands cemented with glass ionomer cement on 1,424 first permanent molars in 513 orthodontic patients was 15.6% (Millett and Gordon 1992). The mean survival time was 33.1 months. Treatment mechanics significantly influenced survival time, with extraction cases and Begg mechanics being associated with the shortest survival times.
Removal of Bands
Bands are removed after treatment with band removal pliers. The pliers have one beak that grips the band and another beak covered by a plastic pad that rests on the occlusal and incisal surfaces of the crown. In removing upper molar bands, the bond between the tooth and the band is broken by placing the gripper beak first on the lingual part of the band and then placing the pliers on the buccal part of the band. When the upper molar band is removed, the gripper beak is placed on the palatal side of the band to roll the band off the lingual crown surface. In removing lower molar bands, the bond between the band and tooth is broken first by placing the gripper beak on the buccal part of the band and then on the lingual part of the band.
Bonding of Brackets
The bonding of orthodontic brackets began in the 1960s after the discovery by Buonoco/>
Stay updated, free dental videos. Join our Telegram channel
VIDEdental - Online dental courses


