13 IMPLANT-SUPPORTED FIXED PROSTHESES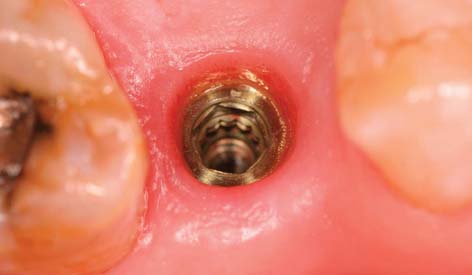
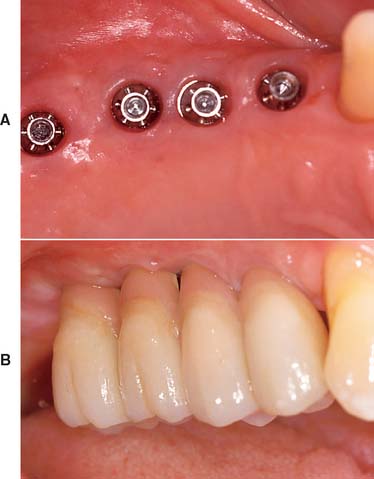
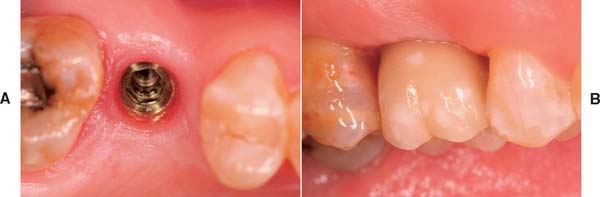
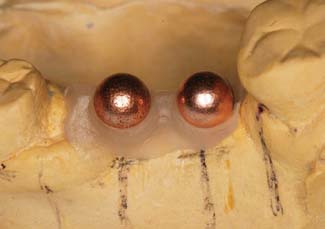
Today the continued high rate of success achieved with osseous integrated dental implants allows a greater number of patients to enjoy the benefits of fixed rather than removable dental prostheses.1–3 The main indications for implant-supported restorations in the partially edentulous patient are the free-end distal extension, in which no posterior abutment is available (Fig. 13-1), and the long edentulous span. In both these situations, the conventional dental treatment plan would include a partial removable dental prosthesis. However, with the advent of dental implants, the patient can benefit from fixed restorations. In addition, in the short edentulous span, the single dental implant is a popular option (Fig. 13-2).
IMPLANT TYPES
There are three major subgroups of dental implants: subperiosteal, transosteal, and endosteal (Fig. 13-3). The first two, subperiosteal and transosteal, are designed primarily to anchor dentures in the completely edentulous patient, and thus they are outside the scope of this chapter. The third, endosteal dental implants, are surgically placed within alveolar or basal bone and are most commonly used for the treatment of partially edentulous patients, either singly or in multiples. They can be further subdivided by shape into blade form (plate form) and root form. Blades are wedge-shaped or rectangular in cross-section and are generally 2.5 mm wide, 8 to 15 mm deep, and 15 to 30 mm long. Root forms are 3 to 6 mm in diameter and 8 to 20 mm long, often with external threads (Fig. 13-4). Endosteal dental implants are also categorized as one-stage or two-stage. The one-stage dental implant is designed to be placed in the bone and to immediately project through mucosa into the oral cavity. The two-stage dental implant requires two surgical procedures. First, the implant is placed in bone to the level of the cortical plate and the oral mucosa is sutured over it; this is left for a prescribed healing period (usually 3 months in the mandible and 6 months in the maxilla), depending on the quality of bone. Then, in a second surgery, the mucosa is reflected from the superior surface of the implant, and an extension collar or abutment that projects into the oral cavity is fastened to the implant. Some authors have suggested shortening the time before implant loading, but the long-term consequences of this are still being investigated.4,5
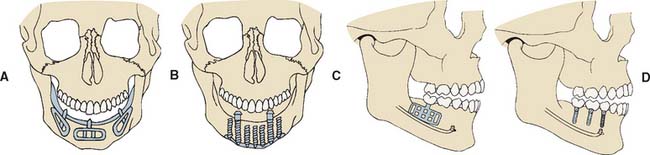
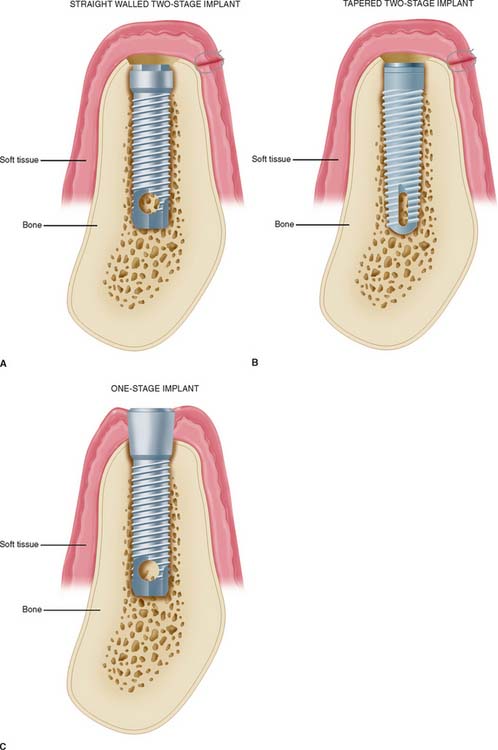
Plate Implants (Blades)
Blades were the first endosteal dental implant to be used with reasonable success in a large number of patients. In all the original studies on blades, the researchers used one-stage systems, but the success rates were considerably lower than those of current root-form implants. It has been suggested6 that many of the problems of blade implants can be traced to the high temperature at which the bone sites were prepared and the routine immediate loading of this type of implant. Both these practices have been linked to the fibrous encapsulation that occurred with many of the original blade implants. Consequently, submersible titanium blades are now available, and in more recent blade studies,7 investigators have reported success rates above 80% for 5 years. However, the drawbacks to blade implants remain: difficulty of preparing precision slots for blade placement in comparison with placing holes accurately for root-form implants and the disastrously large circumferential area of the jaw that can be affected when a blade fails.
Root-Form Implants
Root-form endosteal dental implants are considered to be state-of-the-art implant dentistry. Advantages include adaptability to multiple intraoral locations, uniformly precise implant site preparation, and comparatively low adverse consequences similar to those experienced when a tooth is lost. Most root forms are made of titanium or titanium alloy with or without hydroxyapatite coating; these materials are perceived to have the highest biofunctionality. Both threaded and nonthreaded designs are available and are quite popular. Today many of the titanium implants are grit blasted or acid etched to roughen the surface and increase the area for bone contact. Even the theaded dental implants can be further subdivided into “straight” and “tapered” (see Fig. 13-4).
In the National Institutes of Health (NIH) Consensus Conference1 in 1988, root-form implants were reported to have already constituted 78% of the dental implant market. This trend is credited to the Brånemark system, which set the precedent for surgical techniques and restorative procedures that result in predictably successful implants. Two of the most important additions from the Swedish research team, led by P. I. Brånemark, were atraumatic implant placement and delayed implant loading. These factors contributed to a remarkably increased degree of implant predictability. The original Brånemark success rate of 91% in the mandible over 15 years2 has become the standard against which other implant systems are judged.8 Many of the other root-form implant systems are also believed to have reached or exceeded this high level of long-term success.
TREATMENT PLANNING FOR THE IMPLANT PATIENT
Implant success reported from major research institutions is quite high. However, meticulous attention to the procedures of patient selection, diagnosis, and treatment planning is necessary to duplicate this success. Indications for dental implant treatment in the partially edentulous patient are provided in Box 13-1.
Local and systemic contraindications that threaten long-term implant retention must also be evaluated. Implants may be contraindicated in patients with abnormal bone metabolism, poor oral hygiene, and previous irradiation of the implant site. Most potential implant placement patients became edentulous or partially edentulous from caries or periodontal disease resulting from poor oral hygiene. Suspicion that inadequate hygiene will continue is a relative contraindication to implant placement. Patients must be motivated and educated in oral hygiene techniques as part of their preparation for implants. Some individuals, such as those suffering from paralysis of the arms, debilitating arthritis, cerebral palsy, and severe mental retardation, may not be able to improve their hygiene. Implants are contraindicated in these patients unless adequate oral hygiene will be provided by caregivers. A summary of contraindications to implant placement is presented in Box 13-2.
Box 13-2 Contraindications to Implant Placement (National Institutes of Health Consensus Conference)
Radiographic Evaluation
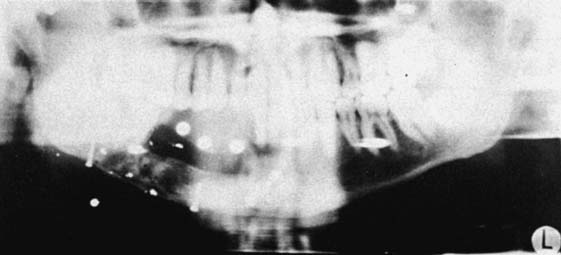
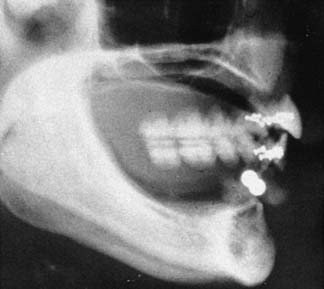
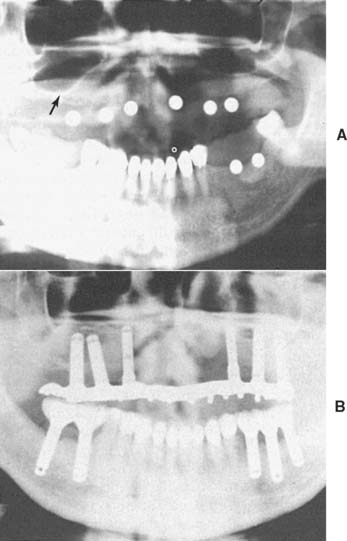
Radiographic evaluation is also necessary. The best initial film is the panoramic view. However, there can be variations in magnification (5% to 35%); a small radiopaque reference object should therefore be placed near the proposed implant placement site during the exposure (Fig. 13-5). Measurement of this image on the actual radiograph enables the practitioner to correct for any magnification error (Fig. 13-6). A ball bearing placed in wax on a denture baseplate or in polyvinyl siloxane impression putty works well. Some new panoramic radiography machines have standardized enlargement ratios, which makes correction markers less necessary.
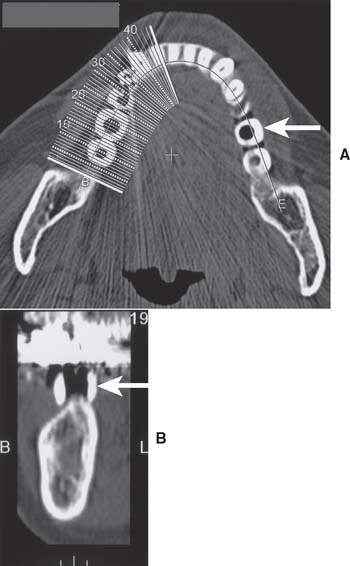
The widths of the posterior mandible and maxilla are determined primarily by clinical examination. Bone width not revealed on a panoramic film can be evaluated in the anterior maxilla and mandible with a cephalometric film (Fig. 13-7). The location of the inferior alveolar canal and maxillary sinus can be determined by specialized computed tomography (CT) scans (Fig. 13-8), although high radiation exposure and considerable expense may limit their routine use. However, significant advances being made in this technology may change this trend.
Diagnostic Casts
Accurately mounted diagnostic casts (see Chapter 2) are essential for treatment planning. They are used to study the remaining dentition, evaluate the residual bone, and analyze maxillomandibular relationships. They can be helpful to the surgeon for fixture placement. A diagnostic waxing is performed on the cast or on a duplicate. Proposed fixture installation sites are checked for proper alignment, direction, location, and relation to the remaining dentition. The waxing helps determine the most esthetic placement of the teeth to be restored and the potential for functional speech disturbances. After adjustments and the diagnostic waxing are completed, a resin template can be made from the cast to guide the surgeon during implant placement (Fig. 13-9). Diagnostic waxings and surgical templates are essential when implants are planned as part of a full-mouth reconstruction or when the anterior esthetic zone is restored (Fig. 13-10).
PRINCIPLES OF IMPLANT LOCATION
Anatomic Limitations
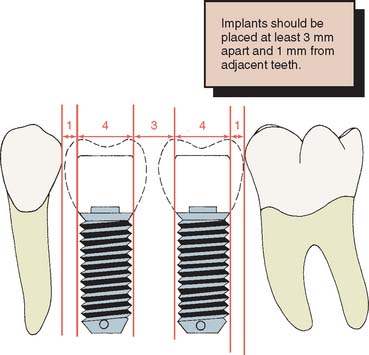
To maximize the chance of success, the implant should be placed entirely within bone and away from significant anatomic structures (e.g., the inferior alveolar canal). Ideally, 10 mm of vertical bone dimension and 6 mm of horizontal should be available for implant placement. Placement at these dimensions prevents encroachment on anatomic structures and allows 1.0 mm of bone on both the lingual and the facial aspects of the implant. There should also be adequate space between adjacent implants. The minimum recommended distance varies slightly among implant systems but is generally accepted as 3.0 mm (Fig. 13-11). This space is needed to ensure bone viability between the implants and to allow adequate oral hygiene once the restorative dentistry is complete. Specific limitations resulting from anatomic variations among different areas of the jaws also must be considered. These include implant length, diameter, proximity to adjacent structures, and time required for integration.
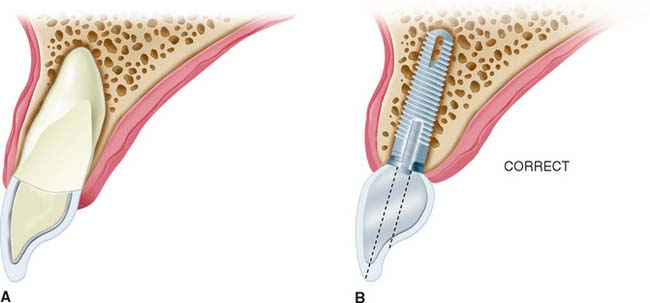
After tooth loss, resorption of the ridge follows a pattern that results in crestal bone thinning and a change in angulation of the residual ridge. These sequelae most often cause problems in the anterior mandible and maxilla. The irregular anatomy of the residual ridge may lead to problems with achieving ideal implant angulation or adequate bone thickness along the labial aspect of the implant. Techniques for the management of these problems during surgery are discussed in this chapter, but they must be anticipated in the preoperative phase.
Posterior maxilla
The second concern is that the maxillary sinus is close to the edentulous ridge in the posterior maxilla. Frequently, because of the resorption of bone and increased pneumatization of the sinus, only a few millimeters of bone remain between the ridge and the sinus (Fig. 13-12A). In treatment planning for implants in the posterior maxilla, the surgeon should leave 1.0 mm of bone between the floor of the sinus and the implant so the implant can be anchored apically into cortical bone of the sinus floor. Adequate bone height for implant stability can usually be found between the nasal cavity and the maxillary sinus. If there is not adequate bone for implant placement and support, bony augmentation through the sinus should be considered (see Fig. 13-12).
Anterior mandible
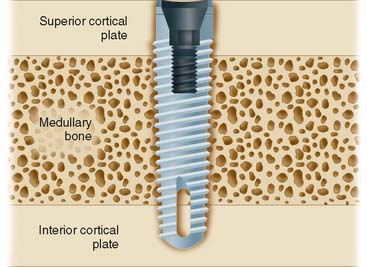
When possible, an implant in the anterior mandible should be placed through the entire cancellous bone so that the apex of the implant engages the cortex of the inferior mandibular border (Fig. 13-13). In the premolar area, care must be taken that the implant does not impinge on the inferior dental nerve. Because this nerve courses as much as 3.0 mm anterior to the mental foramen before turning posteriorly and superiorly to exit at the foramen, an implant should be at least 5.0 mm anterior to the foramen.
Posterior mandible
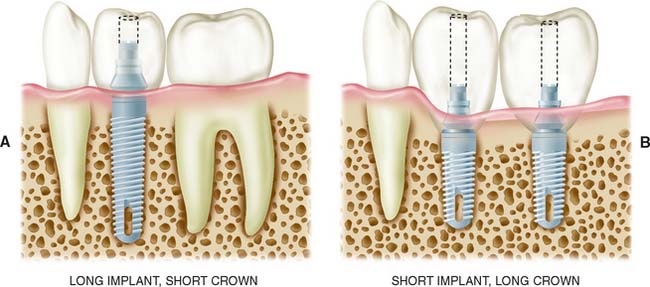
Implants placed in the posterior mandible are usually shorter, do not engage cortical bone inferiorly, and must support increased biomechanical occlusal forces once they are loaded, because of their location in the posterior area. Consequently, allowing slightly more time for integration may be beneficial. In addition, if short implants (8 to 10 mm) are used, “overengineering” and placing more implants than usual to withstand the occlusal load is recommended. Short implants are often necessary because of bone resorption, which thus increase the crown/implant ratio when the normal plane of occlusion is reestablished (Fig. 13-14).
The width of the residual ridge must be carefully evaluated in the posterior mandible. Attachments of the mylohyoid muscle maintain it along the superior aspect of the ridge, and a deep (lingual) depression exists immediately below it. This area should be palpated at the time of evaluation and examined at the time of surgery.
Restorative Considerations
Implant placement
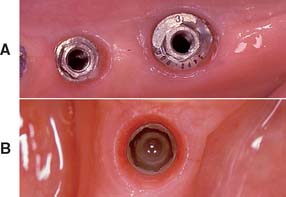
Implant placement is crucial in the design of the restoration. Thus, the treatment-planning aspects of implant placement must begin with a restorative dentistry consultation. Implant placement dictates the appearance, contour, and long-term function of the prosthesis. To prevent damage, staying at least 1.0 mm away from the adjacent natural tooth is essential, but staying as close to the natural tooth as possible is also important; therefore, acceptable contours can be created by the restorative dentist. For proper access during oral hygiene procedures, a minimum of 3.0 mm should be left between implants. In addition, implants must not encroach on the embrasure spaces or be angled so that screw access is necessary through the facial surfaces of the completed restoration (Fig. 13-15).
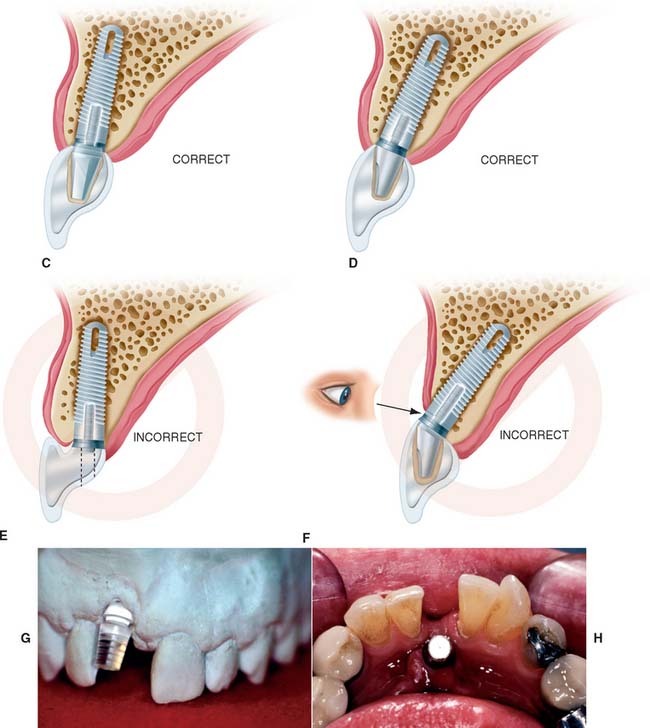
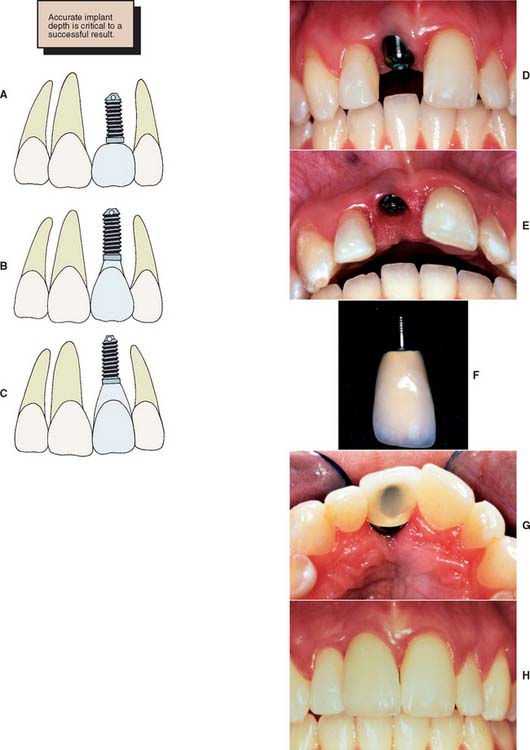
To minimize harmful lateral forces, the long axis of the implant should be positioned in the central fossa of the restoration. This dictates placing the implant accurately in all three planes of space. Superoinferior placement is important to ensure the optimal emergence profile of the restoration. Ideally, the superior surface of the implant should be 2.5 to 3.0 mm directly inferior to the emergence position of the planned restoration, particularly when the restoration is to be located in the anterior esthetic zone (Fig. 13-16).
Implant and restoration size
The choice of implant and its superoinferior placement location are modified by the diameter of the intended restoration and can be adjusted for different sizes of teeth. For example, the typical root diameter of a maxillary central incisor is 8.0 mm; the average implant diameter is 4.0 mm. Therefore, a distance of 2.5 to 3.0 mm is needed to make the transition gradually from 4.0 to 8.0 mm. If this is done over too short a distance, the restoration will be overcontoured or look unnatural. In contrast, many mandibular central and lateral incisors are smaller than 4.0 mm at the cementoenamel junction. Therefore, an esthetic restoration on a 4.0-mm implant is impossible. Smaller-diameter implants (about 3.0 mm) are available to allow esthetic restoration in these areas. It is also possible to use a larger implant (5.0 to 6.0 mm) for molar restorations in patients with adequate bone (Fig. 13-17).

Single tooth implant
Treatment planning for the single tooth restoration, particularly in the anterior esthetic zone, is one of the most challenging problems faced by the implant restorative dentist. Placement of the implant for both esthetics and biomechanical loading (to minimize screw loosening) is especially crucial. In addition, at the treatment planning stage, the decision to place an implant with an antirotational feature built into the system (e.g., a spline or a hexagon) is essential (Fig. 13-18).
Soft tissue contours
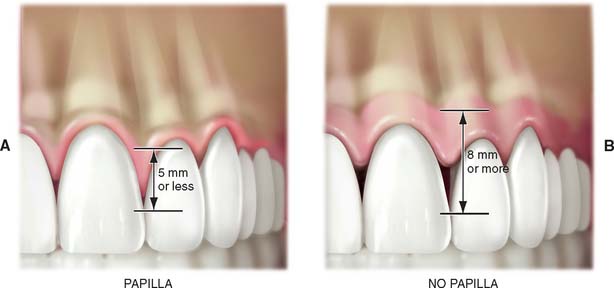
For implant treatment planning in the anterior esthetic zone, it is important to look closely at the soft tissues that will frame the restoration. It can be challenging to achieve a completely formed papilla between the implant restoration and the adjacent teeth in the final outcome. If the interdental tissue and underlying bone have already been lost before implant placement, it may not be possible to achieve ideal papillary contours. The literature contains guidelines that help in predicting whether adequate soft tissue contour can be maintained. As diagrammed (Fig. 13-19), the relationship of interdental bone to the interproximal contact seems to predict whether an interdental papilla will be present or not. If the distances between the bone and the contact is short (∼5 mm), a papilla is usually present. If the distance is long ∼8 mm), a papilla would not normally be present without additional soft tissue grafting.9,10
SURGICAL GUIDE
The coordination of surgical and prosthetic procedures through proper treatment planning is one of the more crucial factors in obtaining ideal esthetic results for the implant restoration. A surgical guide template is extremely useful for anterior implants because slight variations in angulation can significantly affect the appearance of the final restoration. Fabrication of the surgical guide template has become a requirement in patients in whom it is necessary to optimize fixed replacement and ensure correct emergence profiles. Surgical templates can also be beneficial in areas where esthetics is less important. The objectives for using a surgical template in partially edentulous patients are as follows: (1) delineate the embrasures, (2) locate the implant within the restoration contour, (3) align implants with the long axis of the completed restoration, and (4) identify the level of the cementoenamel junction or tooth emergence from the soft tissue.
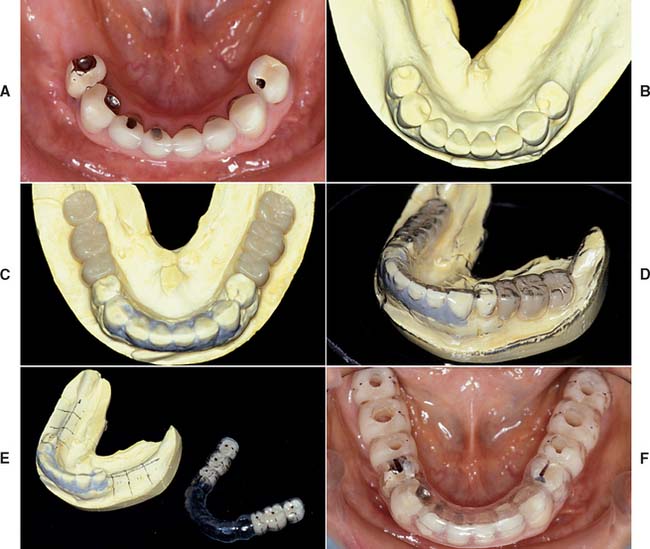
A clear resin facial veneer template is recommended for anterior implant placement to allow the surgeon access to the osseous receptor site and an unimpeded view of the frontal and sagittal angulations as the site is being prepared. This type of template is fabricated from a diagnostic waxing or denture tooth arrangement on a mounted cast. The waxing is duplicated with alginate or polyvinyl siloxane and poured in quick-setting stone. Then 1.5-mm (0.060-inch)–thick of vacuum-formed matrix material is adapted to the replicated cast. For accurate orientation, the vacuum-formed matrix should be trimmed to extend over the full facial surface of the teeth being restored and about a third of the facial surface of the remaining dentition. This template is removed from the duplicate cast and returned to the original cast. A 2-mm thickness of autopolymerizing resin is added to the lingual surface to compensate for the space occupied by the porcelain on the implant restoration (Fig. 13-20). (The total thick-ness, including an additional millimeter from the vacuum-formed matrix, is about 3.0 mm.) To make surgical guides appear radiopaque, barium powder is often added to the resin during its fabrication (see Fig. 13-8). The surgeon must stay as close as possible to this guide during implant placement, which allows maximum flexibility in selecting an implant site without violating the facial surface or forcing screw access holes to be located inappropriately in the facial surface of the restoration. Following this guide enables the surgeon to place a fixture in the best location with minimum undesirable sagittal angulation. If a cement-retained restoration is desired, the orientation of the implant can be slightly more facial.
IMPLANT SURGERY
A complete description of the surgical procedures involved in implant placement can be found in one of the current standard texts.11,12
Implant Placement
Placement procedures for all implant systems require atraumatic preparation of the recipient site. Thermal injury to bone is minimized by using a low-speed, high-torque handpiece, along with copious irrigation. The irrigation is either externally or internally applied and directed through channels in the drill. Manufacturer recommendations relating to the type of irrigation and speed of the drilling equipment should be followed. Threaded implants often require final thread preparation in the bone at very low speeds.
At this point, a final determination is made regarding the adequacy of the recipient site for implant placement. Although implant placement is a surgical procedure, it is influenced by critical restorative parameters. The template communicates the range of acceptable implant positions and angulations. At this step, if it is apparent that supporting bone will not allow proper positioning of the implant, further osseous augmentation may be necessary, either simultaneously with implant placement or as a separate procedure with implant placement delayed until proper osseous support is available.
Implant Uncovering
When the abutment is placed, the superstructure must be completely seated on the implant body without gaps or intervening tissue. In systems with antirotational facets in the implant (see Fig. 13-18), these features must be aligned to allow complete seating of the abutment. Thesuperstructure–implant body interface should be evaluated radiographically immediately after the uncovering. If a gap is present, the superstructure must be repositioned.
IMPLANT RESTORATIONS
Osseous integrated implants are generally designed to support screw- or cement-retained dental prostheses. These implant systems offer many advantages over conventional dental restorations and one-stage implants (Box 13-3).
Fabrication of screw-retained prostheses requires a number of components unique to implant dentistry. For less experienced clinicians, the large number of parts included within one system might create problems. This section describes in generic terms the component parts typically needed to restore an osseous integrated implant. There are many dental implant systems, and although all the major components are available for each system, many differ slightly in specific design and materials. The basic steps for implant restoration fabrication are described in Figure 13-21.
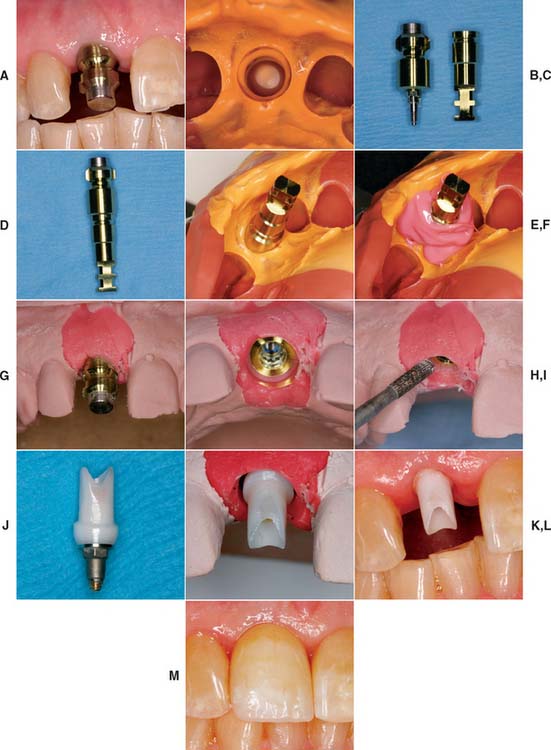
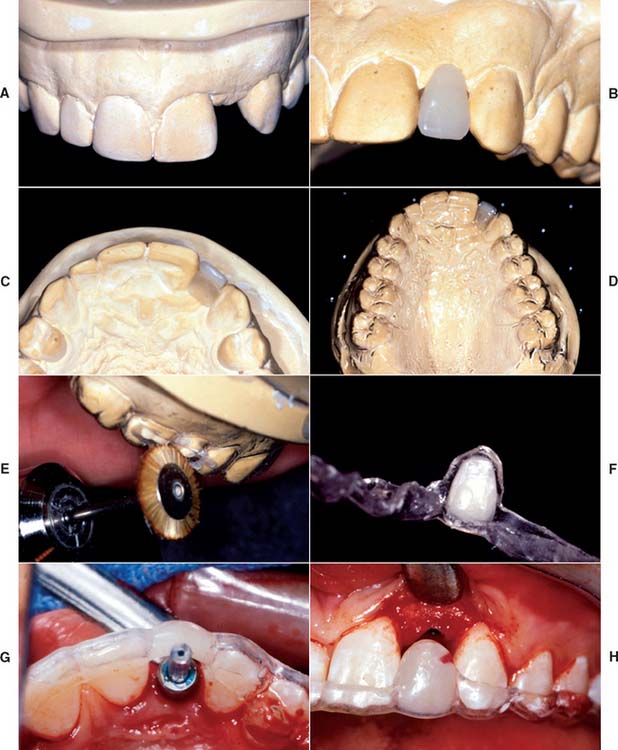
Fig. 13-21 A, A single-unit implant-supported prosthesis will replace the maxillary right central incisor. The impression post is tightened into the implant. B, A closed tray impression of the impression coping. C, Impression coping removed from the mouth. Pictured adjacent to implant analog. D, Impression coping attached to implant analog and inserted into impression (E). F, Polyether soft tissue cast material (Permadyne, 3M-ESPE North America, St. Paul, Minnesota) injected around analog before pouring. G, Poured cast. After an impression is made, the impression post is removed from the mouth and attached to the implant analog. Impression coping and analog are relocated in the impression before pouring. H, The impression coping locates the analog in the same position on the cast as the implant is in the mouth. I, Soft tissue cast material can be contoured to mimic adjacent tooth emergence profile. J, Abutment for cement-retained restoration selected. K, Zirconia abutment seated on the cast and ready for fabrication of all-ceramic restoration (see Chapter 25). L, Zirconia abutment seated in the mouth. M, All-ceramic restoration.
Stay updated, free dental videos. Join our Telegram channel
VIDEdental - Online dental courses


