Chapter 10. Surgical endodontics
J.L. Gutmann and J.D. Regan
CHAPTER CONTENTS
Summary159
Introduction160
Treatment choices160
Indications for periradicular surgery160
Preoperative assessment161
Surgical technique162
Tissue anaesthesia and haemostasis162
Soft tissue incision and reflection164
Osseous entry and root identification168
Removal of diseased soft tissue (periradicular curettage)169
Biopsy169
Root-end resection170
Root-end cavity preparation173
Root-end cavity filling174
Root-end filling materials176
Treatment of the root face179
Closure of the surgical site179
Postoperative radiological assessment180
Postoperative patient instructions181
Postoperative examination and review183
Repair of perforation185
Replantation/transplantation186
Treatment outcome – aetiology and evaluation188
Retreatment of surgical procedures189
Learning outcomes190
References190
SUMMARY
For more than a century surgical endodontics has been a mainstay for the retention of teeth that cannot be treated with nonsurgical endodontic procedures alone. However, recent advances in surgical techniques, based on better scientific understanding of the periradicular disease process, have enabled more predictable outcomes in treatment. Empirical decision-making of the past has been replaced by evidence-based principles. Coupled with the introduction of new instruments and magnification, refined principles of soft and hard tissue management, use of tissue regenerative techniques and materials, surgical endodontics has become a highly predictable procedure when practised by well-trained clinicians. Whilst there are a variety of endodontic surgical procedures, the primary procedure is periradicular surgery, which includes curettage, root-end resection, root-end cavity preparation and root-end filling. This chapter will focus on the scientific basis for surgical endodontics, to provide a better understanding of the rationale for their application and to achieve predictable results in clinical practice.
INTRODUCTION
Research studies indicate that the outcome of non-surgical endodontic therapy is highly favourable with success rates of ninety percent or more being reported in recent decades. 1,2 However, despite these impressive statistics, occasionally, surgery may be indicated in order to achieve what was not possible with root canal treatment alone or to secure a biopsy for histological examination.
In recent years, advances in surgical techniques based on better scientific understanding of the periradicular disease process have facilitated greater success rates in endodontic surgical procedures. 3 Empirical decision-making in the past has been replaced by evidence-based principles. Coupled with the introduction of new instruments and magnification, 4 refined principles of soft and hard tissue management, 5 use of tissue regenerative techniques and materials6 and enhanced principles of wound closure, 7 surgical endodontics has become a highly predictable procedure when practised by well-trained clinicians. The application of these principles and techniques by the endodontic specialist will ensure the retention of many teeth that may otherwise be considered non-salvageable.
The most common endodontic surgical procedure is periradicular surgery consisting of periradicular curettage, root-end resection, root-end preparation and root-end filling. Other procedures include perforation repair, root and tooth resection, crown-lengthening, intentional replantation, regenerative techniques, incision and drainage, and cortical trephination. This chapter will focus primarily on the essentials of periradicular surgery.
TREATMENT CHOICES
It is incumbent on the clinician to empower the patient to make the best decision based on sound scientific evidence. In order to provide for optimal treatment planning, an accurate assessment of the likely outcome of any potential treatment modality (non-surgical endodontic treatment, surgical endodontic treatment or extraction of the tooth followed by implant placement) is required. 8 Failure to fully understand the aetiology of the disease process will result in impaired clinical decision-making detrimental to the overall well being of the patient.
The best decision can be made when all available evidence is considered. A hierarchy of evidence exists with randomized-controlled trials at the peak of the evidence pyramid and case reports and personal opinions at the base. The adoption of evidence-based decision-making has greatly advanced clinical treatment planning in dentistry.
INDICATIONS FOR PERIRADICULAR SURGERY
Historically, most texts on endodontic surgery list multiple, ‘cook-book’ type indications for surgical intervention. 9,10 These often include instrument separation, apical fracture, inadequate root canal filling, and presence of a cyst. Advances in the understanding of the disease process involved in the development of apical periodontitis and in clinical techniques have eliminated most of these indications for surgery. Outcome studies of non-surgical root canal treatment versus surgical treatment have clearly shown a higher success rate with high quality non-surgical root canal treatment procedures using contemporary techniques. Unfortunately, most of the teeth referred to the specialist for surgical endodontic treatment would more appropriately have been treated non-surgically. 11 Periradicular tissues usually heal following removal of infection originating from the root canal system combined with the prevention of further contamination. 12,13 The main cause of failure following both non-surgical and surgical treatment is inadequate cleaning, shaping and filling of the root canal system. 14 Therefore, the routine selection of surgery without full case assessment, in particular the status of the root canal system, is unwarranted as is selection of surgery for the convenience of the clinician. Consequently, many of these types of cases would benefit tremendously from specialist assessment and management.
The indications for surgery must always be in the best interest of the patient and within the realm of the clinician’s understanding and expertise. 15 These include the following; first, if failure has resulted from root canal treatment, and retreatment is impossible or would not achieve a better result, surgery may be indicated, e.g. non-negotiable canal, perforation or ledge with signs and/or symptoms. Secondly, if there is a strong possibility of failure with root canal treatment, surgery may be indicated, e.g. calcified canal with concomitant patient signs and/or symptoms. Thirdly, if a biopsy is necessary then again surgery is indicated. Contraindications to surgery are few and far between and are usually limited to patient (psychological and systemic), clinician (experience and expertise), and anatomical factors or complete lack of surgical access.
PREOPERATIVE ASSESSMENT
The prognosis following surgery is dependent on careful patient assessment, evidence-based diagnosis and appropriate treatment planning. 16 Contraindications involving the patient’s psychological or systemic conditions must be identified. Patient acceptance of, and cooperation with, the anticipated surgical procedure must be forthcoming. Procedures to minimize stress for patients who are particularly susceptible to pain and anxiety may be required. 5 General systemic factors, which usually require medical consultation, are listed in Table 10.1. As a general rule, no special precautions need to be taken when surgery is planned other than those that normally apply to routine dental procedures. 5
|
Hypertension
Stable angina
|
Coronary atherosclerotic disease
Myocardial infarction
Chronic obstructive pulmonary disease
|
| Anti-coagulant therapy | Cerebrovascular accident |
| Epilepsy | Diabetes |
| Adrenal insufficiency | Steroid therapy |
| Organ transplant | Impaired hepatic or renal function |
Local factors are related to the management of both soft and hard tissues. These factors include the possible need to remove previous dental restorations that are failing and the need to revise the root filling beforehand as part of overall management of the case. If the quality of the existing root filling is doubtful, more favourable results have been obtained when the root canal system is retreated prior to surgical management. 17 The tooth must also be assessed for restorability, and its place in the overall treatment plan determined.
Radiological examination is essential, including assessment of previous radiographs, if available. 16 Radiographs from different angles should be taken, identifying the number, curvature and angle of the roots requiring surgery and the position of the apices relative to adjacent structures. Anatomical structures that may impair surgical or visual access to the surgical site must be identified. These include the mental foramen, zygomatic process, anterior nasal spine and external oblique ridge. The following factors are particularly important in a radiological assessment:
• relation of the apices to the inferior dental canal, mental foramen, the maxillary sinus or adjacent roots
• number of, and access to, the roots
• approximate length of the roots; this may sometimes be ascertained from the patient’s records if non-surgical endodontic treatment had been performed
• approximate extent of any visible lesion.
Whilst traditional radiographic techniques provide the clinician with the necessary information needed to assess the surgical site adequately, occasionally, newer techniques such as computed tomography (CT) may be necessary. Computed tomography can be divided into two main categories based on acquisition X-ray beam geometry, fan beam CT and cone beam CT. With the newer cone beam CT, the entire volume of data is collected in a single rotation of a cone shaped X-ray source and sophisticated software is used to generate three-dimensional images at substantially lower radiation doses than traditional CT scanners. The three-dimensional images are invaluable in allowing the clinician to define the precise extent and location of a lesion that otherwise might be impossible to determine.
Communication with the patient concerning the need for surgery, outline of the procedure, anticipated difficulties and problems, the prognosis, preoperative medication or mouth rinses, postoperative care and long-term assessment is essential. 5 Provision of written information and instructions is beneficial and can help to allay some of the patient’s fears.
The following pre-treatment regimens are recommended:
• A periodontal examination must be performed prior to surgery to assess for periodontal pockets and/or sinus tracts. Scaling and/or root planing may be required. The patient’s oral hygiene practices should be assessed and good oral hygiene reinforced.
• Patients should be placed on chlorhexidine (0.12–0.2%) rinses in an attempt to reduce the oral microorganisms. These rinses should be performed one day prior to surgery, immediately before surgery and should continue for at least 2 to 3 days afterwards. 5
• Patients can begin taking, if tolerated, non-steroidal anti-inflammatory medication one day prior to surgery, or at the latest one hour before treatment.
• Patients should be advised to refrain from smoking.
• If sedation (enteral or parenteral) is to be used, the patient must bring an accompanying person, who will be responsible for escorting the patient home and for compliance with postoperative instructions.
SURGICAL KIT
A plethora of instruments are available for endodontic surgical procedures. The dental industry has formed an effective partnership with clinicians allowing for the development of numerous new instruments. Many of these have been developed specifically for use by clinicians operating with a microscope; these include miniature surgical blades and mirrors, rear-venting surgical handpieces, ultrasonically energized root-end preparation tips and root-end pluggers (see later). Specific instruments should be chosen that facilitate the procedure according to the individual operator’s requirements. Instruments must be sterile, sharp, undamaged and should enable the surgeon to maintain total control of the surgical site. A basic kit should contain the most commonly used instruments and should be readily supplemented with any other instrument considered necessary. Key instruments and their general uses are listed in Table 10.2 and illustrated in Figure 10.1.
| Presurgical assessment |
|
Mirror & curved explorer
Straight & curved periodontal probes
|
| Soft tissue incision, elevation & reflection |
|
Sharp scalpels – Nos 15, 15c, 11, & 12
Micro scalpels
Broad-based periosteal elevator
Broad-based periosteal retractor
Tissue forceps
Surgical aspirator
Irrigating syringes & needles
|
| Periradicular curettage |
|
Straight & angled bone curettes
Small endodontic spoon curette
Periodontal curettes
Fine, curved mosquito forceps
Small, curved surgical scissors
|
| Bone removal & root-end resection |
|
Surgical length round and tapered fissure burs
Straight & angled bone curettes
Rear-venting high-speed handpiece
Contra-angle slow-speed handpiece
|
| Root-end preparation/placement of root-end filling/finishing of resected root end |
|
Ultrasonic or sonic unit with appropriate root-end preparation tips
Root-end filling material
Haemostatic agent (avoid bone wax)
Miniature material carriers & condensers
Small ball-ended burnisher
Paper points or fine aspirator tip
Small, fine explorer
|
| Suturing and soft tissue closure |
|
Surgical scissors
Haemostat or fine needle holders
Various suture types & sizes (USP 3-0 to 6-0)
Sterile gauze for soft tissue compression
|
| Miscellaneous (or readily available) |
|
Adequate aspiration equipment
Additional light source – Magnification
Root canal filling materials
Anaesthetic syringes, needles & local anaesthetic solution
Biopsy bottle containing transport medium
|
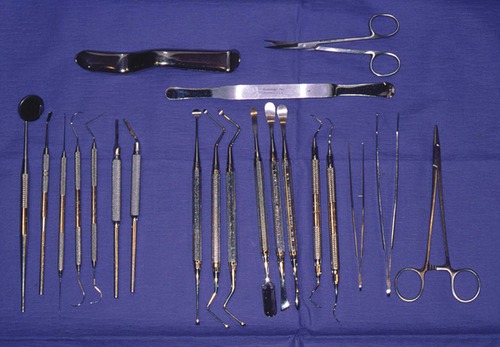 |
| Figure 10.1
Basic instruments for periradicular surgery (see Table 10.2 for details).
|
Magnification and illumination in endodontic surgery
Visual aids such as loupes and the operating microscope provide the operator with excellent lighting and magnification. 18 The development of operating microscopes specifically for endodontics has been a recent advance that greatly enhances the operator’s view of the surgical site. However, there is a steep learning curve associated with the use of the operating microscope and proficiency demands regular and continuous use. The enhanced vision facilitates the location of a multitude of anatomical features not easily visible to the naked eye. These include isthmuses, fins, and additional or accessory canals. In addition, fractures, perforations and resorptive defects are more easily identified and managed.
SURGICAL TECHNIQUE
Tissue anaesthesia and haemostasis
The ability to achieve profound anaesthesia and tissue haemostasis in the surgical site is essential. Profound anaesthesia will minimize or eliminate patient discomfort during the procedure and for a significant period thereafter, whilst good haemostasis will improve vision at the surgical site, improve root-end cavity preparation and filling, minimize surgical time, and reduce surgical blood loss, postsurgical haemorrhage and postsurgical swelling. 5 An anaesthetic solution containing a vasoconstrictor is indicated to achieve these objectives. 19
The choice of the anaesthetic-vasoconstrictor combination is dependent on the health status of the patient and surgical needs. Lidocaine (lignocaine) with adrenaline (epinephrine) has long been recognized as an excellent anaesthetic agent for periradicular surgery because of its clinical success in producing profound and prolonged analgesia. 20 Although several studies support the efficacy of 2% lidocaine with 1 : 200000 to 1 : 100000 concentrations of adrenaline for profound anaesthesia, 21 clinical evidence suggests that a 1 : 50000 concentration provides better haemostasis. 22 The prolonged postoperative pain relief is due to the inhibition of peripheral neuronal discharges, which in turn, helps reduce the subsequent development of central sensitization. 23
Assessment of the patient’s systemic status is essential prior to the use of 2% lidocaine with adrenaline, especially 1 : 50000 adrenaline. This is important because lidocaine with adrenaline can elevate systemic plasma levels of the vasoconstrictor24 although the haemodynamic response to this increase is still controversial. 25 The potential rise in adrenaline concentration suggests that high-risk patients should be carefully monitored. Great care should be taken during injection to prevent intravascular placement of the solution. 19 When an anaesthetic with 1 : 50000 adrenaline is unavailable, 1 : 80000 is clinically acceptable. While 2% lidocaine with 1 : 100000 adrenaline is recommended for regional nerve blocks prior to endodontic surgery, this level of vasoconstrictor does not suffice for local haemostasis at the surgical site. Haemostasis must also be established at the surgical site26 by additional injections supraperiosteally using 2% lidocaine with 1 : 50000 adrenaline. 27
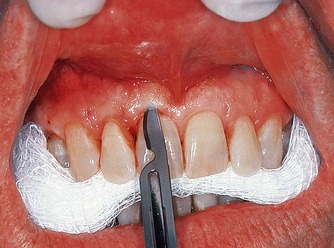
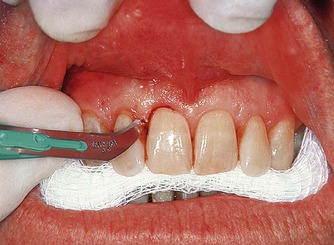
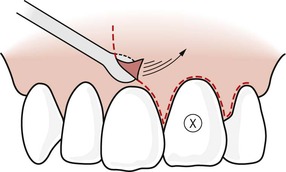
In healthy patients a dose of 2–4 ml is recommended. In the maxilla, achievement of both anaesthesia and haemostasis can be accomplished simultaneously. This requires multiple injections, depositing the solution throughout the entire submucosa superficial to the periosteum at the level of the root apices in the surgical site. The needle, with the bevel toward the bone, is advanced to the target site and, following aspiration, 0.5 ml of solution is deposited slowly (Fig. 10.2). The needle may be moved peripherally and similar, small amounts of solution deposited. Additional injections can be made to ensure that the entire surgical field has been covered. Slow, peripheral supraperiosteal infiltration into the submucosa promotes maximum diffusion (Fig. 10.3). In the mandible the anaesthetic–vasoconstrictor solution is injected slowly adjacent to the root apices, in addition to the block injection of the inferior alveolar nerve. Incisions that are made in alignment with the long axis of the supporting supraperiosteal vasculature coupled with careful elevation and reflection of the tissues, will minimize haemorrhage at the surgical site. 5
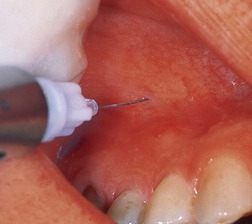 |
| Figure 10.2
Placement of anaesthetic solution around the root apex of the tooth to be treated surgically.
|
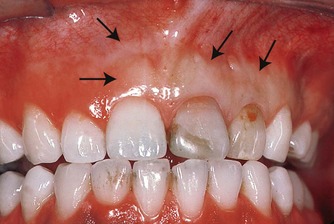 |
| Figure 10.3
Slow and careful infiltration of the anaesthetic solution provides widespread and effective tissue haemostasis (delineated by arrows) for treatment of left maxillary central incisor.
|
The amount of anaesthetic solution containing 1 : 50000 adrenaline that is necessary to achieve anaesthesia and haemostasis is dependent on the surgical site, but 2.0 to 3.0 ml will usually suffice. The rate of injection can also influence the degree of haemostasis and anaesthesia obtained, with a rate of 1 to 2 ml/min recommended. 28 Injecting at higher rates will lead to localized pooling of solution, delaying and limiting diffusion into the adjacent tissues resulting in less than optimal anaesthesia and haemostasis. Predictable anaesthesia and haemostasis should be achieved prior to any incisions. Later attempts during surgery to improve anaesthesia and haemostasis are less successful. Following administration of the local anaesthetic, sufficient time must elapse prior to the initial incision (5–10 mins), to allow for proper vascular constriction throughout the surgical site. Other adjunctive agents are available to enhance the haemostasis during treatment. These will be discussed later in this chapter.
Soft tissue incision and reflection
Good surgical access requires predetermined, meticulous tissue flap design followed by the incision and elevation of the soft tissue from the underlying bone. The design of the tissue flap is crucial not only to surgical entry and management of the root structure, but also to healing of the surgical wound. The design of soft tissue flaps has received wide and varied attention. For years, the semilunar flap (Partsch incision) in the apical loose alveolar mucosa was recommended but this has now been largely superseded. Various flap designs have been advocated based on a biological approach to tissue management and wound healing. The range of contemporary surgical flap designs5 is outlined in Table 10.3. There are strong biological reasons to consider the use of full mucoperiosteal tissue flaps whenever possible (Table 10.3). Figure 10.4, Figure 10.5, Figure 10.6, Figure 10.7, Figure 10.8 and Figure 10.9 detail diagrammatically each design, whilst the subsequent text gives a brief description of their application.
| Type of tissue flap | Advantages/Disadvantages |
|---|---|
| Full mucoperiosteal | |
| Triangular | Maintains intact vertical blood supply. |
| Rectangular | Minimizes haemorrhage. |
| Trapezoidal | Primary wound closure & rapid healing. |
| Horizontal (envelope) |
Allows survey of bone and root structure.
Excellent surgical orientation.
Minimal postoperative sequelae.
May have loss of tissue attachment.
May have loss of crestal bone height.
Possibility of tissue flap dislodgement.
Possible loss of interdental papilla integrity.
|
| Limited mucoperiosteal | |
| Submarginal curved (semilunar) | Marginal & interdental papilla intact. Scarring. |
| Submarginal retangular (Luebke-Ochsenbein) |
Unaltered soft tissue attachment.
Adequate surgical access – may be compromised in posterior cases or cases with lateral root defects.
Good healing potential.
Disruption of blood supply.
Possibility of tissue shrinkage.
Delayed secondary healing/scarring.
Limited orientation to apical region.
Very limited in posterior surgery.
|
| Papilla-base incision |
Newer technique & relatively limited data.
May interrupt blood supply leading to delayed healing.
Difficult to perform.
Good healing potential.
|
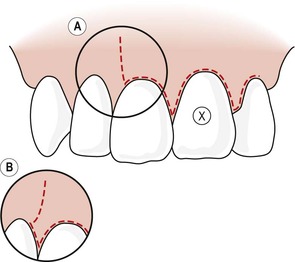 |
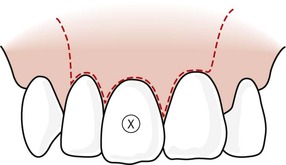
| Figure 10.4
Triangular tissue flap design with single vertical releasing incision. The vertical releasing incision can be performed in different ways. Either (A) the incision leaves the interdental papilla intact or (B; insert) the incision includes the interdental papilla. In either case the incision line should meet the tooth at 90°.
|
 |
| Figure 10.5
Rectangular tissue flap design with double vertical releasing incisions. As with the triangular flap design, variations can be used with the vertical incisions (A and B); a description has been included in Figure 10.4.
|
 |
| Figure 10.6
Trapezoidal tissue flap design. Note vertical releasing incisions are angled towards the base of the flap.
|
 |
| Figure 10.7
Horizontal tissue flap design. No vertical releasing incisions are used initially but they can be added later to enhance surgical access if necessary.
|
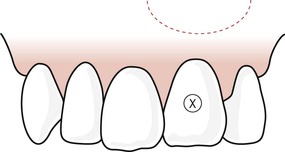 |
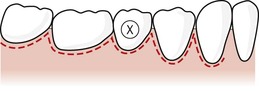
| Figure 10.8
Semilunar tissue flap design. Note that the scope of this flap limits extension if necessary.
|
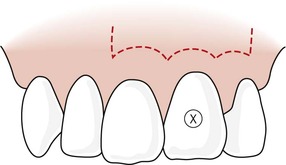 |
| Figure 10.9
Luebke-Ochsenbein (submarginal) tissue flap design. This flap may have one or two vertical releasing incisions, or may be limited to a horizontal incision, only if sufficient surgical and visual access can be obtained.
|
Full mucoperiosteal tissue flap
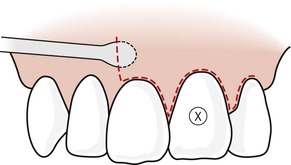
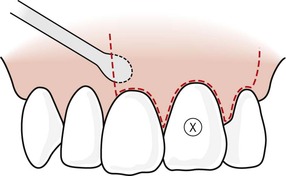
The horizontal incision begins in the gingival sulcus, extending through the gingival fibres to the crestal bone. The scalpel blade is held in a near vertical position (Fig. 10.10). In the interdental region, the incision should pass through the mid-col area, separating the buccal and lingual papillae, and severing the gingival fibres to the depth of the interdental crestal bone (Fig. 10.11). This is critical to prevent sloughing of the papillae due to a compromised blood supply. Because of the shape of the embrasure space, it may be necessary to use a curved scalpel blade or a miniature surgical blade to follow the interproximal tooth contours (Fig. 10.11).
 |
| Figure 10.10
Intrasulcular incision with a no. 15 scalpel blade. Note the vertical position of the scalpel as it cuts through and releases the crestal fibres.
|
 |
| Figure 10.11
Use of a no. 12 scalpel blade to release the fibres of the interdental papilla. Note the depth and angulation of the blade.
|
Vertical (releasing) incisions are used in the triangular and rectangular flap designs (Figs 10.4& 10.5), and are vertically oriented passing between the roots of adjacent teeth and coursing parallel to the long axes of the roots. The incision should be over intact bone and to the depth of the bone. Vertical incisions should terminate at the mesial or distal line angles of teeth, and never in papillae or in the mid-root area. Incisions should be positioned to ensure that at closure, the re-apposed soft tissue will overlie solid bone.
The trapezoidal flap design (Fig. 10.6) incorporates angled releasing incisions and is not considered biologically acceptable for periradicular surgery because it cuts across the vertically positioned supraperiosteal vasculature and tissue-supportive collagen fibres. The horizontal or envelope flap design (Fig. 10.7) is often used for maxillary or mandibular molars, or as palatal flaps. However, some type of releasing incision is generally incorporated, albeit not as long as that used with triangular or rectangular flaps.
Tissue reflection always begins in the attached gingiva of the vertical incision. The periosteal elevator is positioned to apply reflective forces in a lateral direction against the cortical bone while elevating the tougher fibrous-based tissue of the gingiva (Fig. 10.12). This also elevates the periosteum and its superficial tissues from the cortical plate. Subsequently, the elevator is directed coronally (Fig. 10.13) to elevate the marginal and interdental gingiva with minimal traumatic force (Fig. 10.14). All reflective forces should be applied to the bone and periosteum, with minimal forces on the gingival elements; this is referred to as undermining elevation. 5 After tissue reflection, bleeding tissue tags are often seen on the cortical surface in the crestal region and between root eminences (Fig. 10.15). These tissue tags play an important role in healing so they should not be removed during surgery.
 |
| Figure 10.12
The periosteum is initially elevated by applying force against the cortical bone in the region of the attached tissues.
|
 |
| Figure 10.13
The periosteal elevator is subsequently moved coronally to elevate the marginal tissues.
|
 |
| Figure 10.14
The entire tissue flap is elevated with minimal force being directed on the marginal and interdental gingival tissues.
|
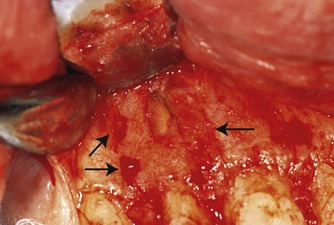 |
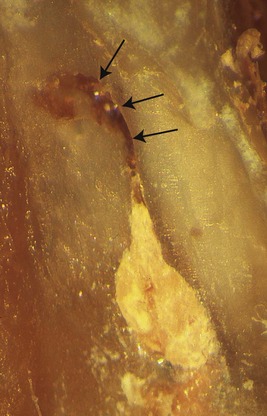
| Figure 10.15
Tissue tags remain on the cortical bone after flap elevation (arrowed).
|
Adequate retraction of the tissue flap is necessary for surgical access to the periradicular tissues. The retractor must always rest on sound bone with light but firm pressure. Pinching of the soft tissue flap with the retractor must be avoided to minimize tissue damage and untoward postsurgical sequelae (Fig. 10.16). If this is not possible the reflected tissue must be elevated further or the tissue flap extended to release its attachment from the bone.
 |
| Figure 10.16
Pinching of the mucosal tissue with the periosteal retractor should be avoided during surgery.
|
Limited mucoperiosteal tissue flap
These tissue flaps do not include the marginal and interdental gingiva. The horizontal incision of these flaps should be in the attached gingiva with the vertical incisions involving both the attached gingiva and alveolar mucosa. An absolute minimum of 2 mm of attached gingiva from the depth of the gingival sulcus must be present before this flap design is chosen. However, there is a very narrow limit for safe incision between the sulcular depth and the mucogingival junction in most patients, especially in the mandible. 29
The rectangular submarginal flap design (Luebke-Ochsenbein flap) is formed by a scalloped horizontal incision in the attached gingiva and two vertical releasing incisions (Fig. 10.9). Scalloping reflects the contour of the marginal gingivae and provides an adequate distance from the depths of the gingival sulci. Here also, the vasculature and collagen fibres are severed. It may be used in maxillary anterior or posterior teeth in which reflection of marginal and interdental gingival is contraindicated because of tissue inflammation or aesthetic concerns with extensive fixed prostheses. Often, anatomical factors negate the use of a limited mucoperiosteal flap design.
Papilla-base flap
The papilla-base flap has been suggested30 to prevent recession of the papilla. It consists of two releasing vertical incisions, connected by the papilla-base incision and intrasulcular incision in the cervical area of the tooth. A microsurgical blade that does not exceed 2.5 mm in width should be used, as intricate, minute movement of the surgical blade within the small dimensions of the interproximal space is crucial.
Two different incisions are made at the base of the papilla. An initial shallow incision severs the epithelium and connective tissue to the depth of 1.5 mm from the surface of the gingiva. The path is a curved line, connecting one side of the papilla to the other. The incision begins and ends perpendicular to the gingival margin. In the second step, the scalpel retraces the base of the previously created incision while inclined vertically, towards the crestal bone margin. The second incision, results in a split thickness flap in the apical third of the base of the papilla. From this point on moving apically, a full thickness mucoperiosteal flap is elevated. Whilst the papilla-base flap can result in predictable healing results, this technique is challenging to perform. Atraumatic handling of the soft tissues is of utmost importance in order to obtain rapid healing through primary intention. The epithelium of the partial thickness flap has to be supported by underlying connective tissue; otherwise, it will necrose and lead to scar formation. On the other hand, excessive thickness of the connective tissue layer of the split flap portion could compromise the survival of the buccal papilla left in place. 7
Osseous entry and root identification
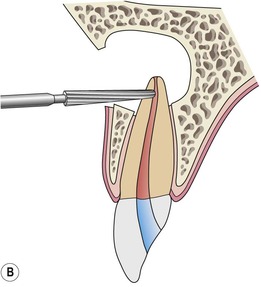
Prior to root-end resection and removal of any diseased soft tissue surrounding the root, bone may need to be removed to gain visual access to the surgical site. Removal of the bone is usually accomplished with a large round bur (ISO size 018 or 024), using a low- or high-speed handpiece. The bone is removed in a brush-stroke fashion with copious irrigation, creating a window over the root apex. Adherence to this technique will reduce the heat produced during the osteotomy procedure, thereby minimizing the potential for damage to the living bone tissue. In many cases, the osteotomy may need to be started from a coronal position, moving apically once the root structure has been identified. Care should be taken to avoid removing cementum from the root surface in order to prevent resorption at a later date. Entry as close to the apex, however, is recommended, with the angle of entry facilitating visibility and surgical access. Measuring the approximate length of the root on the bone, as estimated from the preoperative radiological assessment, facilitates location of the root apex (Fig. 10.17).
 |
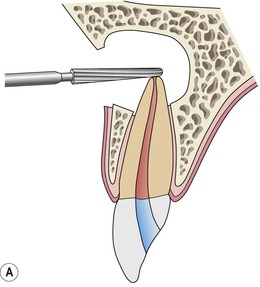
| Figure 10.17
Placement of a calibrated periodontal probe to determine the approximate position of the root apex.
|
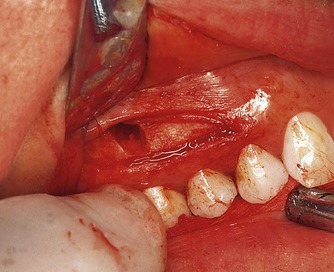
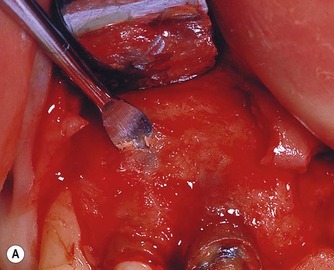
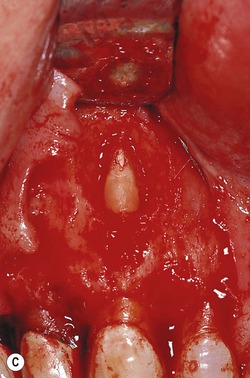
The apex may also be identified during osseous palpation after soft tissue reflection. Where the bone is thin, or the root apex is prominent, a straight bone curette can be used in a rotating motion to penetrate the cortical plate and identify the root structure (Fig. 10.18). In cases with large periradicular lesions, the loss of the cortical plate of bone may directly expose the root apex. Once exposed, the bur can be used to create a larger window to outline the root apex. In those cases where the bone is thick and location of the apex is difficult, the same type of initial osseous penetration can be made and a sterile radiopaque object placed in the hole. A radiograph will then provide additional information on the location of the root apex.
 |
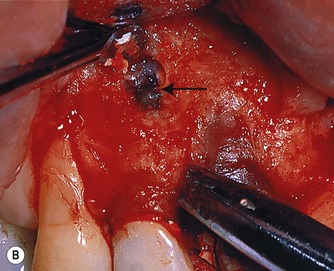 |
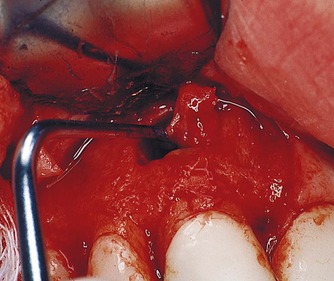
| Figure 10.18
(A) Use of a straight curette to peel away the surface cortical bone. (B) Penetration through the bone with a curette alone to expose the root (arrowed). Note bone chips on curette.
|
Root structure can be differentiated from surrounding bone by texture (smooth and hard), lack of bleeding upon probing, outline (presence of periodontal ligament), and colour (yellowish). The perimeter of the root and its periodontal ligament may also be identified by painting 1% methylene blue dye on the surface. 31
Removal of diseased soft tissue (periradicular curettage)
This procedure can often be performed prior to, or in conjunction with, root-end resection. The purpose is to remove the reactive tissue. 32 Contrary to previous belief, every remnant of this soft reactive tissue need not be removed to avoid failure, as the tissue elements in the periphery of these lesions usually contain fibroblasts, vascular buds, new collagen and bone matrix. In cases where the soft tissue mass is exposed upon flap reflection or initial bone removal, curettage can proceed prior to root-end resection. In other cases, resection is necessary to gain access to most of the tissue.
Curettage is accomplished with straight or angled surgical bone curettes and periodontal curettes (Fig. 10.19). Initially the bone curettes are used to peel the soft tissue from the lateral borders of the bony crypt. This is performed with the concave surface of the curette facing the bony wall, applying pressure only against the bone (Fig. 10.20). 33 It is desirable to avoid penetration of the soft tissue as this may sever the vascular network, and increase local haemorrhage. Once the tissue is freed along the lateral margins, the bone curettes can be turned round and used in a scraping fashion along the deep walls of the crypt. This will detach the soft tissue from its lingual or palatal base. Once loosened, tissue forceps are used to grasp the tissue gently as it is teased from its position with a bone curette. The tissue sample is placed directly into a bottle of neutral buffered formalin or transport medium for biopsy. In cases requiring root-end resection prior to curettage, the root structure must be exposed sufficiently to minimize shredding of the soft tissues during resection. Despite profound anaesthesia at the surgical site as a whole, it is often found that the centre of the periradicular lesion remains sensitive. This is explained by the proliferation of neural endings stimulated by inflammatory mediators. 34 Infiltration of local anaesthetic into the reactive tissue will invariably eliminate any residual sensation.
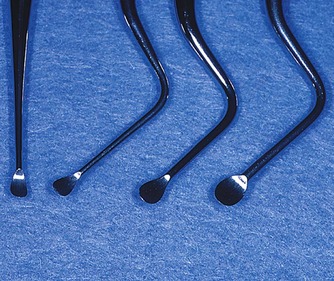 |
| Figure 10.19
Straight and angled bone curettes are useful to manage the wide variety of challenges encountered in bone and soft tissue removal.
|
 |
| Figure 10.20
Use of the bone curette to peel the soft tissue lesion from the bone cavity.
|
In the presence of large lesions, care must be exercised during curettage of the lateral surfaces of the bony crypt to avoid damage to adjacent roots and their pulpal vasculature. Presurgical radiographs should warn of this possibility, and tissue in these areas may need to be left in position. Caution is necessary to prevent damage to vital structures when operating close to the maxillary antrum, mental foramen, or mandibular canal. When soft tissue is adherent, either lingually to the root, or in the furcation region, periodontal curettes facilitate its removal. Periradicular curettage is normally performed in conjunction with resection of the root-end. 35
Biopsy
It is evident from the literature that the vast majority of periradicular lesions are granulomas. However, a small percentage (0.7–5%) are reported to be different based on histological examination. 36 These ‘other’ lesions include odontogenic cysts (odontogenic keratocyst, dentigerous cysts,), non-odontogenic cysts (globulomaxillary cyst, nasopalatine cyst), ossifying fibroma, Pindborg tumour, Langerhans cell disease, or osteoblastoma to mention just a few. More seriously, however, are lesions that might be neoplastic. Many reports exist in the literature documenting cases of misdiagnosis.37.38. and 39. Considering the potential gravity of this situation, it is widely agreed that tissue excised during surgical endodontic procedures should be sent for histological examination. 40
Root-end resection
The term root-end resection refers specifically to the removal of the apical portion of the root. There are many indications for resection of the root-end during periradicular surgery, each designed to eliminate aetiological factors.
Historically, the technique of root-end resection involved the creation of a bevel on the root face, to improve surgical access and visibility.35.41.42. and 43. The angle of resection was determined by the root inclination and curvature, number of roots, thickness of bone and position of the root in the bone. Current evidence indicates that reducing the angle of the bevel will reduce dentinal tubule exposure. 44 Based on the number of dentinal tubules communicating between the root canal and the resected root face, the angle of the bevel should be kept to a minimum. 44 A significant increase in leakage from the root canal system has been demonstrated as the bevel increased. 45 Ultrasonic instruments have been developed that greatly facilitate preparation along the long axis of the root and, therefore eliminate the need for extensive bevelling of the root face.
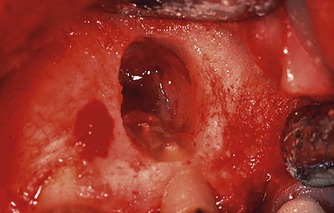
The root-end can be resected in one of two ways. First, after the root-end has been exposed, the bur (narrow straight fissure) is positioned at the desired angle and the root is shaved away, beginning from the apex, cutting coronally (Fig. 10.21). The bur is moved from mesial to distal, shaving the root to a smooth and flat finish until the entire canal system and root outline is exposed. As mentioned earlier, the root outline can be more easily visualized by staining the periodontal ligament with 1% methylene blue dye. 41 This approach allows for continual observation of the root-end during cutting. The second technique of resection is to predetermine the amount of root-end to be resected. The bur and handpiece are positioned, and the apex is resected by cutting through the root from mesial to distal (Fig. 10.21). Once the apex is removed, the root face is gently shaved with the bur to smooth the surface and ensure complete resection and visibility of the root face. This technique works well when an apical biopsy is desired, or to gain access to significant amounts of soft tissue located lingual to the root. It is also the technique of choice in cases where the root-end is located in close proximity to structures such as the mental foramen or the inferior alveolar canal. The disadvantage however, is that this approach may remove more root structure than necessary.
 |
 |
 |
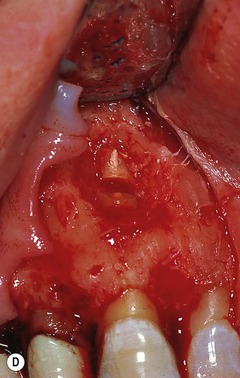 |
| Figure 10.21
Diagrammatic representation of (A) root-end resection from the apex to coronal; (B) root-end resection when the amount of root to be resected has been determined. (C) Clinical case of root-end resection in which the amount of the root to be resected has been predetermined. (D) Resection of the root apex.
|
The appearance of the root face following root-end resection will vary depending on the type of bur used, the external root anatomy, the anatomy of the canal system exposed at the particular angle of resection, and the nature and density of the root canal filling material. Various types of burs have been recommended for root-end resection; 5 each will leave a characteristic imprint on the root face, from rough-grooved and gouged to smooth. 46 To date, no study has determined the advantages of one type of bur over another, although for years clinical practice has favoured a smooth flat root surface. 47
The level to which the root-end should be resected will be dictated by the following factors: 5
• access and visibility to the surgical site
• position and anatomy of the root within the alveolar bone
• presence and position of additional roots, e.g. an additional palatal or lingual root
• anatomy of the cut root surface relative to the number of canals and their configuration
• need to place a root-end filling
• presence and location of a perforation
• presence of an intra-alveolar root fracture
• anatomical considerations, e.g. proximity of adjacent teeth, mental foramen or inferior dental canal, level of remaining crestal bone
• presence of significant accessory canals, which may dictate a more extensive resection.
Regardless of the rationale for the extent of root-end removal, there is no reason to resect the root to the base of a large periradicular lesion as was previously advised. Likewise, resection to the point where little (<1 mm) or no crestal bone remains covering the buccal aspect of the root may very well doom the tooth to failure (Fig. 10.22). On the other hand, omitting to remove sufficient root structure to be able to inspect the resected root face and place a root-end filling may also contribute to failure. Root canals or anastomoses may be missed, or may be improperly managed in confined spaces.
 |
| Figure 10.22
Severely angled resections, often coupled with large periradicular lesions, compromise the amount of remaining crestal bone.
|
The complete root face must be identified and examined after resection. This is inspected, preferably under high magnification and good illumination, with a fine, sharp probe guided around the periphery of the root and the root canal. The external root anatomy will determine the ultimate shape of the cut root-end, such as oval, round, dumb-bell shaped, kidney-bean shaped, or tear-drop shaped (Fig. 10.23). The outline of the resected root-end will vary depending on the tooth, angle of any bevel and position of the cut on the root. However, the entire surface must be visible. If visibility is impaired, or the root has an unusual cross-section, 1% methylene blue dye can be placed on the root face for 5 to 10 seconds using a sterile sponge applicator and rinsed off with a stream of sterile water or saline. Cotton pellets should not be used as remnants of cotton fibres left in the surgical site have been shown to induce a foreign-body reaction in healing tissues. 5 The dye will stain the periodontal ligament dark blue, highlighting the root outline. 41 The shape of the exposed canal system will vary depending on the angle of the bevel and the canal anatomy at that level. Canal systems will generally assume a more elongated and accentuated shape with increasing angles of bevel (Fig. 10.24).
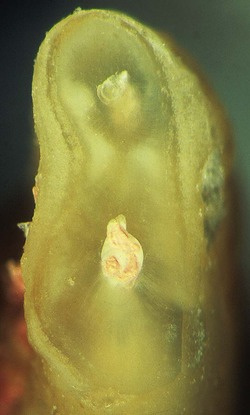 |
| Figure 10.23
Resected root outline. Note the kidney bean shape along with position of the canals. No canal anastomosis is visible.
|
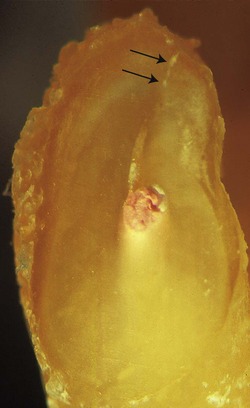 |
| Figure 10.24
Angled resection reveals an extended canal space. Removal of additional root palatally will be necessary to manage the uppermost part of the canal system (arrowed).
|
Also visible on most resected root-ends is the presence of root canal filling material and the interface between the filling material and the root dentine. Variations in quality of the filling will be seen in both the type of filling material and the nature of the filling technique (Fig. 10.25). Furthermore, the different burs used for resection will create discrepancies in the surface of the filling material and its adaptation to the canal walls. For example, coarse diamond burs will tend to rip and tear at the gutta-percha root canal filling, spreading the gutta-percha over the edge of the canal aperture and onto the resected root face (Fig. 10.26). Surface finishing with an ultra-fine diamond is recommended (Fig. 10.27) (Ultrafine no. 862-012 diamond bur, Brasseler, Savannah, GA, USA).
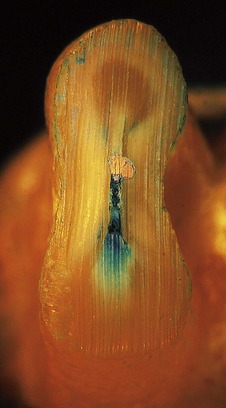 |
| Figure 10.25
Root-end resection reveals a poorly compacted gutta-percha filling. Voids filled with sealer are present between the gutta-percha cones and an anastomosis is present that is filled with tissue remnants (bluish colour).
|
 |
| Figure 10.26
Rough surface of resected root after being cut with a coarse diamond. Note the gutta-percha has been dragged across the surface of the root (arrowed).
|
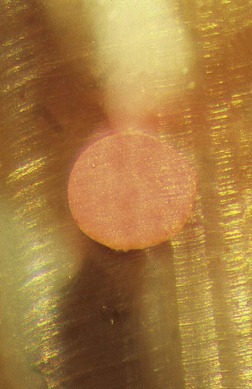 |
| Figure 10.27
Smooth surface of resected root and root filling created with an ultrafine diamond and waterspray. Note the adaptation of the root filling material to the outline of the canal.
|
The presence of additional canals, anastomoses, fracture lines, and the quality of the apical adaptation of the root canal filling must be checked on the resected root surface (Fig. 10.28). If methylene blue dye has been used, it will also stain the periphery of the canal system and highlight fracture lines. A fibre-optic light can be aimed at, or behind, the root-end to enhance visibility. 9 Sometimes, it may be necessary to remove additional root structure to identify the canal system or, in the case of a fracture line, to observe its direction and extent.
 |
| Figure 10.28
Resected root end. The main canal has been filled but the canal extension contains necrotic debris (arrowed). A root-end preparation and filling must be performed.
|
A major area of concern following root-end resection and dentinal tubule exposure is the possibility that these tubules may serve as a direct source of contamination from the uncleaned root canal system into the periradicular tissues. Root-ends resected from 45° to 60° have as many as 28000 tubules/mm2 immediately adjacent to the canal. 44 At the dentino-cemental junction, areas that may communicate with the root canal even in the presence of a root-end filling 13000 tubules/mm2 are found. Likewise, due to angular changes in the tubules at the apex, there could be patent communication with the main canal if the depth of the root-end preparation in the buccal aspect of the cavity is insufficient. 48,49 Root-end resections in older teeth have shown less leakage than that seen in teeth from younger patients; 50 this corroborates with the findings of sclerosis and reduced patency in apical dentinal tubules. 51
Another concern following root-end resection is the formation of a contaminated smear layer over the resected root-end (Fig. 10.29). This may serve as a />
Stay updated, free dental videos. Join our Telegram channel
VIDEdental - Online dental courses


