Chapter 10
Restorative Phase: Prosthetic Protocols
Introduction
There are many mechanisms of varying accuracy for transferring information from the mouth to the dental laboratory.147,150–158 There are also numerous materials that can be used for the fabrication of a prosthetic restoration. Furthermore, the means by which the restoration is attached to the abutment and retained will influence the clinical protocol and the components used (Figs 10-1–10-3).
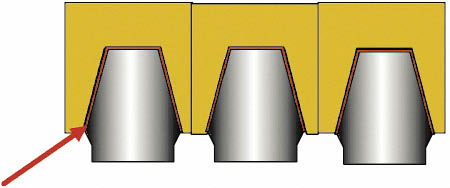
Fig 10-1 Three abutments in alignment with a cement-retained superstructure. Alignment of the abutments without undercut is essential to provide a common path of insertion. A luting cement is used to retain the prosthesis, and the type of cement will influence the retrievability as well as the security of the prosthesis. Retention and resistance form, as well as the precision of the fit, are fundamental to the stability of the prosthesis. A space for the luting cement between 25 and 100 µm is desirable. The space for the luting cement will influence the type of cement used, in conjunction with the factors addressed above. This makes the fabrication of the prosthesis less exacting. Furthermore, no access holes are required, which are typically needed for screw-retained prostheses.
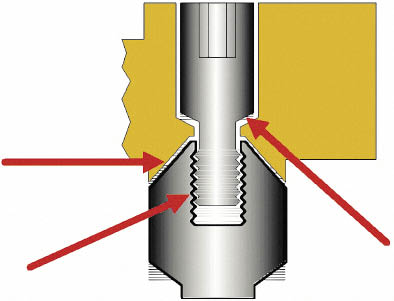
Fig 10-2 The point of contact between the various component parts of a screw-retained prosthesis. Contact between the various components is depicted by red arrows. These are contacts between the fixation screw and the abutment, between the prosthesis and the abutment and, finally, between the retaining screw and the prosthesis. Transfer of information from the clinical situation to the laboratory needs to be carried out with tremendous accuracy. Inaccuracies of 10 µm can be detected by patients, which makes the construction of the prosthesis to the necessary tolerances very exacting.18
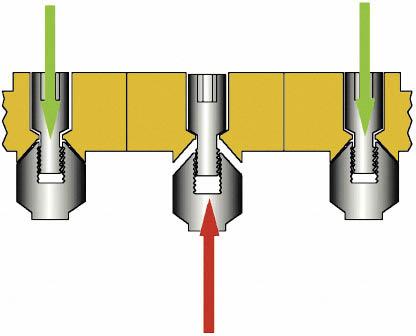
Fig 10-3 The effect of discrepancies in the fit of a screw-retained prosthesis. Inaccuracies cause considerable forces to be transmitted to the abutments as the screws holding the prosthesis are tightened. Risks to all component parts, including the implants, are increased by parafunctional forces.
The natural tooth form can most easily be created if there are no large screws (required for direct retention) passing through the occlusal, labial or lingual surface of the prostheses. Consequently, mainly fixed cement-retained prostheses will be described. Supplementary retention with lateral fixation screws will be addressed where indicated (Figs 10-4 and 10-5). The approach to prosthetic reconstruction will take into account the effort required to construct a restoration by the clinician and the dental technician versus the benefit that is derived by the patient.

Fig 10-4 The principle and mechanism of a lateral fixation screw. The lateral fixation screw can be seen incorporated into the prosthetic superstructure. The screw housing may be soldered or cast into the superstructure. The lateral fixation screw can be seen within the housing and is used to engage a recess within the abutment. This is suitable for the retention of smaller restorations because of its ease of fabrication. For multiple-unit restorations gold copings that are permanently cemented onto the abutment may be fabricated with a recess to receive the unthreaded part of the lateral fixation screw. The use of the gold coping enables the recess to be positioned interstitially.
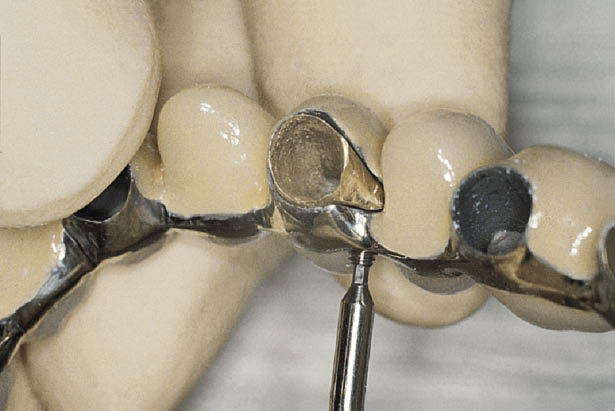
Fig 10-5 A temporary luting cement is used as a biological seal and for the even distribution of forces; it, therefore, requires a space. Definitive and positive retention is obtained from the lateral fixation screw. Factors influencing conventional cement retention, such as alignment of abutments, resistance and retention form as well as the accuracy of fit, are also critical when using lateral fixation screws.
The restorative phase starts when the soft tissues surrounding the exposed implant have matured, except where impressions were taken during implant insertion and the construction of the prostheses had started prior to implant exposure. The information that must be supplied to the laboratory can be categorised into the following broad groups:
- • position of implant, abutment and metalwork and its relationship to the soft tissue contour
- • jaw relations
- • tooth form, position and colour.
Impressions at First-stage Surgery
This protocol starts during the surgical placement phase and can be carried out using a number of available techniques as described above. However, the preferred techniques are outlined in Figs 10-6 to 10-8. The restorative steps are summarised in Flowchart 10-1. The abutment will have been prepared to the desired shape by the dental technician based on clinical information sent by the clinician in advance of implant exposure. The acrylic resin transitional crown should also be ready to be fitted.
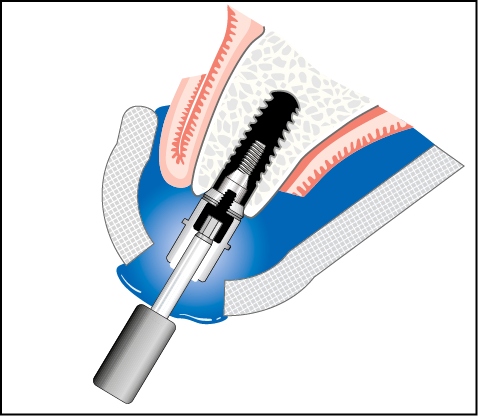
Fig 10-6 Impressions at first-stage surgery using implant carrier with an open tray. This is particularly suitable for implant systems that are presented with the carrier of suitable shape attached to the implant (e.g. Ankylos system). The stages for this procedure are as follows.
1. Take impression with screwdriver inserted into implant carrier emerging through an open tray.
2 Unscrew and disengage implant carrier with driver once the impression material has set.
3. Remove impression with implant carrier.
4. Insert cover screw into implant analogue, if cover screw comes pre-inserted within implant.
5. Attach analogue to implant carrier and cast impression.
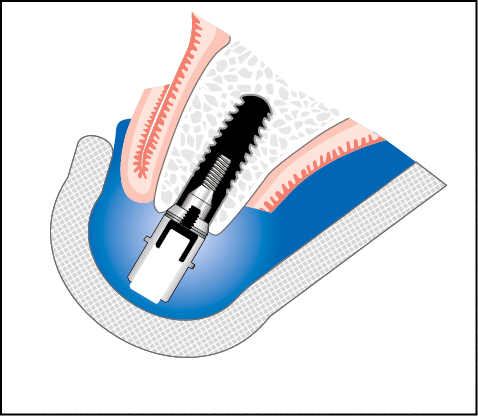
Fig 10-7 Closed tray technique using implant carrier for first-stage surgery impression.
1. Take impression (soft material, for example Provil Monophase) of implant carrier and remove impression when set.
2. Remove implant carrier from the implant.
3. Insert cover screw into implant analogue, if cover screw comes pre-inserted within implant.
4. Attach analogue to implant carrier.
5. Reinsert implant carrier into impression and cast impression.
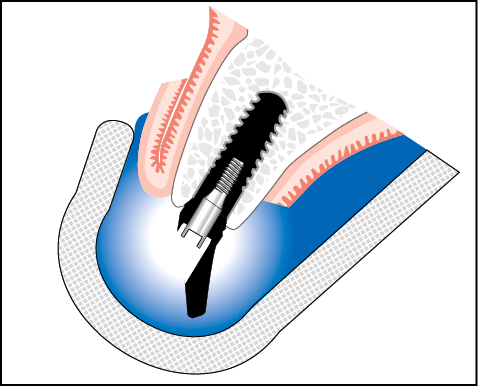
Fig 10-8 Impressions at first-stage surgery using abutment and closed tray.
1. Select abutment using direction indicator following the insertion of implant and removal of carrier, if appropriate.
2. Remove cover screw if cover screw comes pre-inserted within implant and insert selected abutment.
3. Take impression and remove on setting.
4. Attach abutment to implant analogue or use abutment analogue, insert into impression and make cast (if immediate loading is carried out, a second abutment or an abutment analogue is used).
5. Insert cover screw into implant.
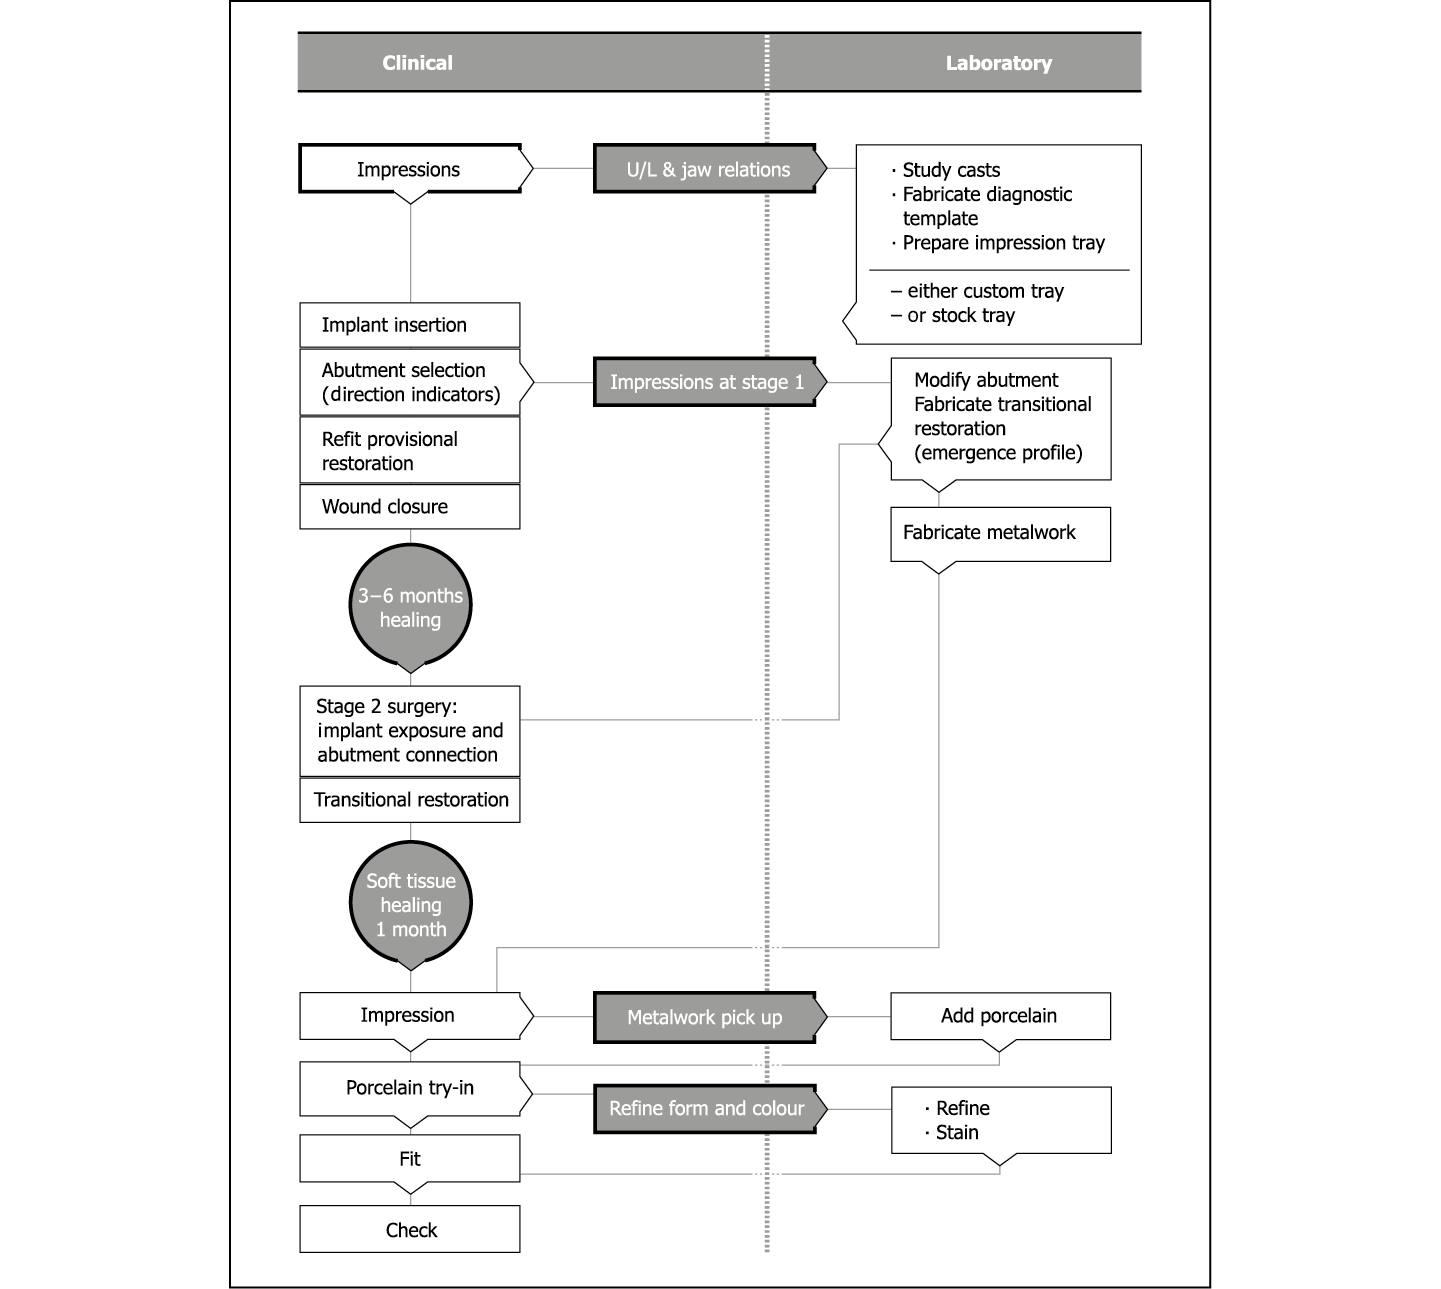
Flowchart 10-1 Impressions at first-stage surgery: restorative phase.
The framework of the definitive restoration can also be prepared by this stage (Figs 10-9–10-12).
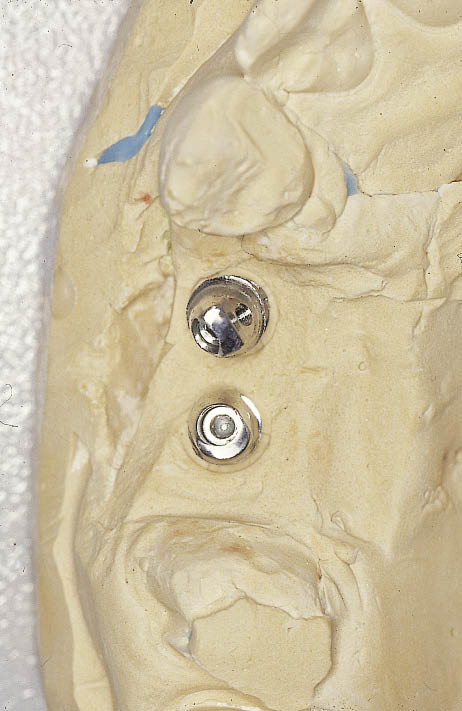
Fig 10-9 Occlusal view of a cast constructed from an impression taken at first-stage surgery. Two abutments can be seen attached to the implant analogues.
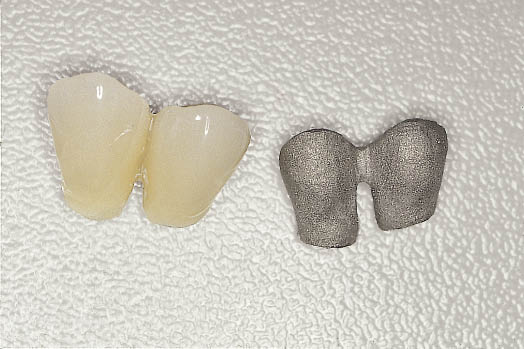
Fig 10-10 Splinted metalwork has been fabricated directly on the two abutments. In addition two splinted acrylic resin transitional restorations have also been fabricated, which will be fitted at the time of implant exposure.
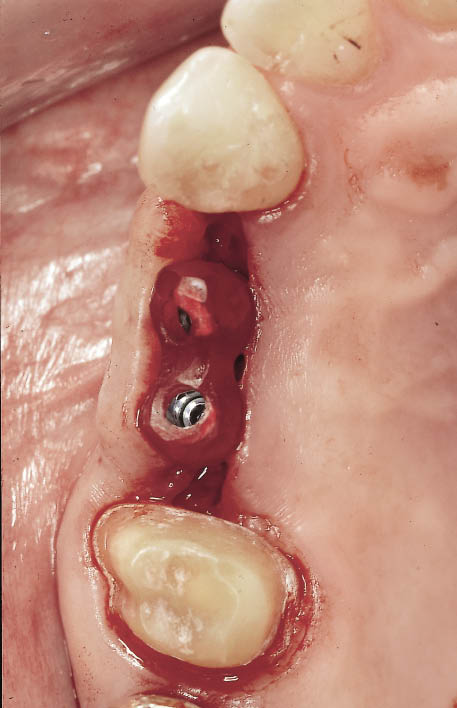
Fig 10-11 Occlusal view of the implants exposed with the two abutments attached using an acrylic resin orientation jig. A full-thickness flap has been used to expose the implants.
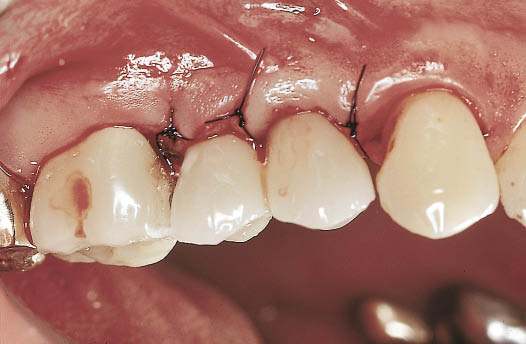
Fig 10-12 Labial view of the abutments with the transitional restorations fitted. Soft tissue closure has been carried out using ‘S’-shaped incisions.
This enables the framework to be fabricated directly onto the abutment, eliminating any potential discrepancies in the adaptation of the framework to the abutment. It will be assumed, however, that the implant will integrate and that no modifications to the abutment will be needed.
This technique is particularly useful for single or multiple unsplinted crowns in the areas of aesthetic importance and is, therefore, considered to be the technique of choice. Where there are more than two splinted crowns, the framework may need to be sectioned in order to achieve a satisfactory fit.
Impression Taking
The transitional restoration is removed from the abutment and any excess cement removed (Figs 10-13 and 10-14). The framework is tried into place and its fit confirmed (Fig 10-15). The occlusal relationship is checked and recorded. While preparations for the impressions are made, the transitional restoration is cleaned and reseated in order to maintain the gingival contour.
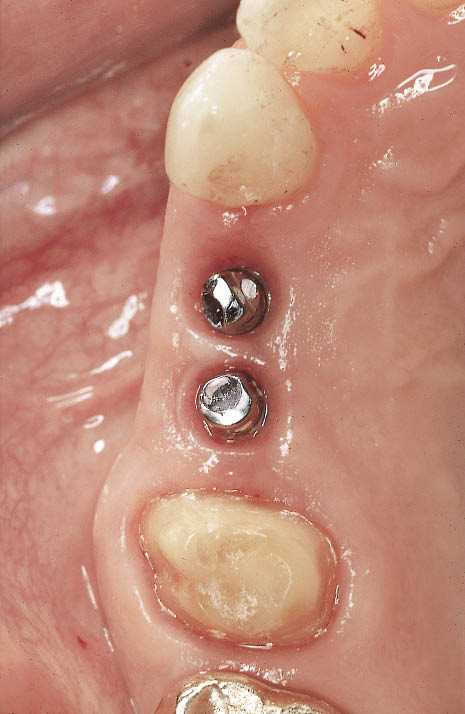
Fig 10-13 Occlusal view of the healed soft tissues around the abutments. Note the contours around the abutments.
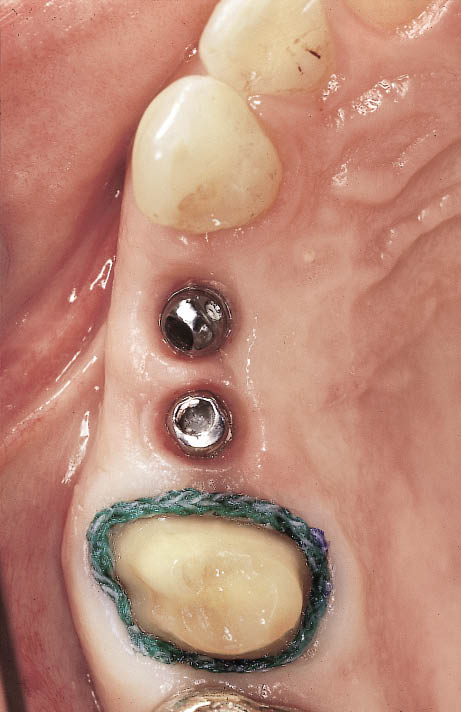
Fig 10-14 Occlusal view of the quadrant prior to impression taking. The molar tooth has been prepared and retraction cord is in situ.
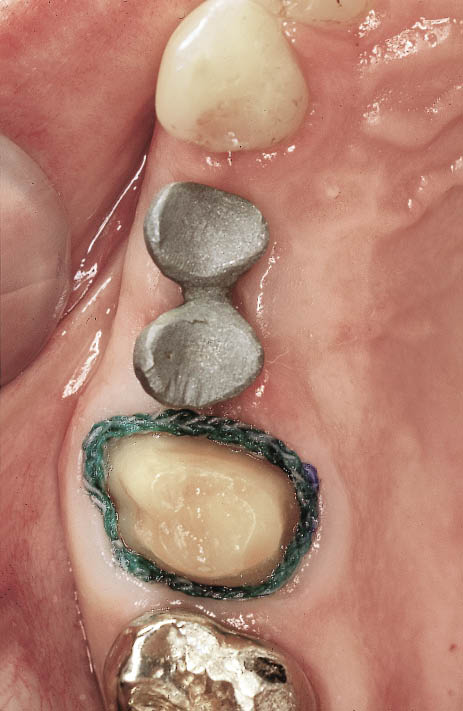
Fig 10-15 Occlusal view showing the metalwork in situ on top of the abutments ready for pick-up using addition-cured silicone impression material.
The transitional restoration is removed and the framework seated on the abutment immediately before light-bodied impression material is injected into the gap between the soft tissue and framework in order to record this relationship. The medium-bodied impression material, loaded into the tray, is then inserted into the mouth to provide an overall impression relating the position of the framework to the teeth and the soft tissues (Fig 10-16). Additional information that may prove to be useful to the technician in the form of an impression of the apical area of the transitional crown can be recorded with a putty material and passed on to the laboratory. The shade of the tooth should be recorded in detail and supplemented with photographs. Alternatively, the shade can be taken directly by the dental technician.

Fig 10-16 The metalwork has been picked up with the impression material and the soft tissue contours around the implants recorded. At the same time, an impression of the prepared molar tooth with accurate recording of the margins has been taken.
Try-in of the Unglazed Restoration
To confirm colour, form and occlusion, the definitive restoration in its unglazed state is tried in. Any modifications to the restoration are prescribed at this stage. Major changes in the shade may require the crown to be remade; minor changes can be achieved at the glazing stage. Changes to the form are transferred by adding composite to the restoration. The technician can then incorporate these.
Fit of restoration
The final restoration (Fig 10-17) is fitted using temporary cement (e.g. Temp Bond; Kerr, Orange, CA, USA) (Figs 10-18 and 10-19). It is essential that the minimum amount of cement is used in order to reduce the chances of excess cement being extruded into the soft tissues. Application of Vaseline (petroleum jelly) to the outer surface of the definitive restoration facilitates removal of excess cement. Venting by holding aside the palatal soft tissue and using dental floss ensures that all of the cement has been removed. A periapical radiograph taken at this stage provides information regarding the level of the bone and the complete removal of the cement.
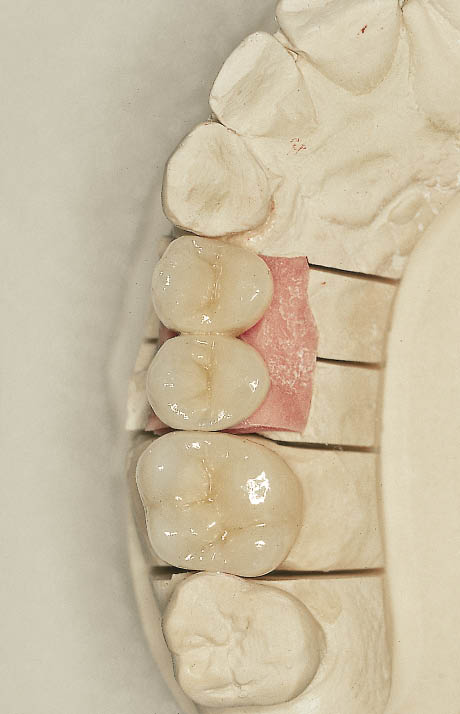
Fig 10-17 Occlusal view of the laboratory cast showing the two implant-supported splinted restorations replacing the premolar teeth. The soft tissue reproduction has been carried out using silicone material. The metal-ceramic restoration for the molar tooth is also visible.
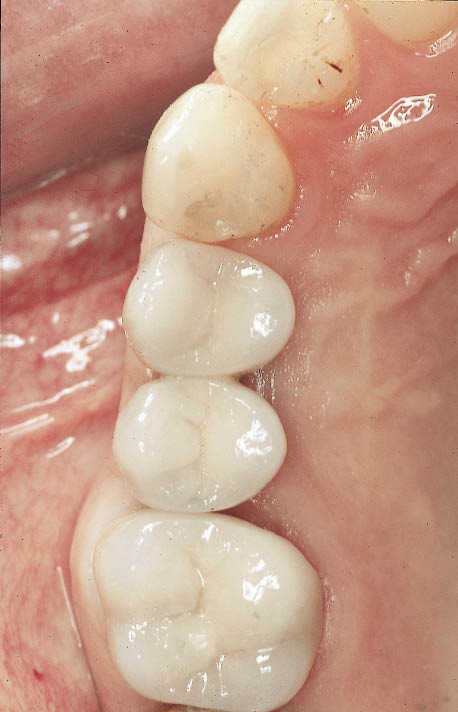
Fig 10-18 Intraoral occlusal view of the three restorations fitted and showing excellent occlusal form (same patient as in Fig 8-45).
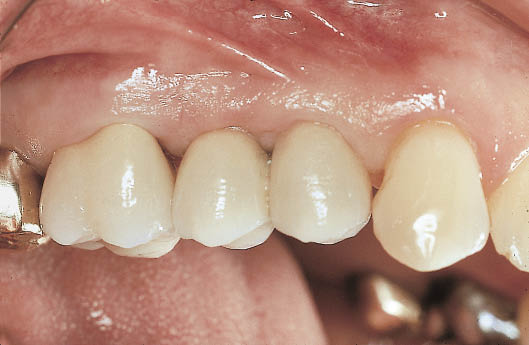
Fig 10-19 Labial view of the splinted restorations on the premolars and the molar showing excellent soft tissue contours and tooth form. (Laboratory work carried out by master dental technician Mr J. Braunwarth, Stuttgart, Germany).
Conventional Direct Impressions of the Abutment
This technique is the one the general dental practitioner is most familiar with in the construction of conventional crown and bridge work. This technique allows minor modifications of the abutment, if required, the development of the soft tissue contours and the transfer of this information to the laboratory.
This technique is not suitable for patients with very thin labial gingiva around the abutment, where recession is likely to occur. It is, however, most suited to the construction of multiple splinted units and full mouth reconstruction. The clinical and laboratory stages for restorations with single crowns and short-span bridges, as well as larger restorations involving alterations of the occlusal vertical dimension, are outlined in Flowchart 10-2.
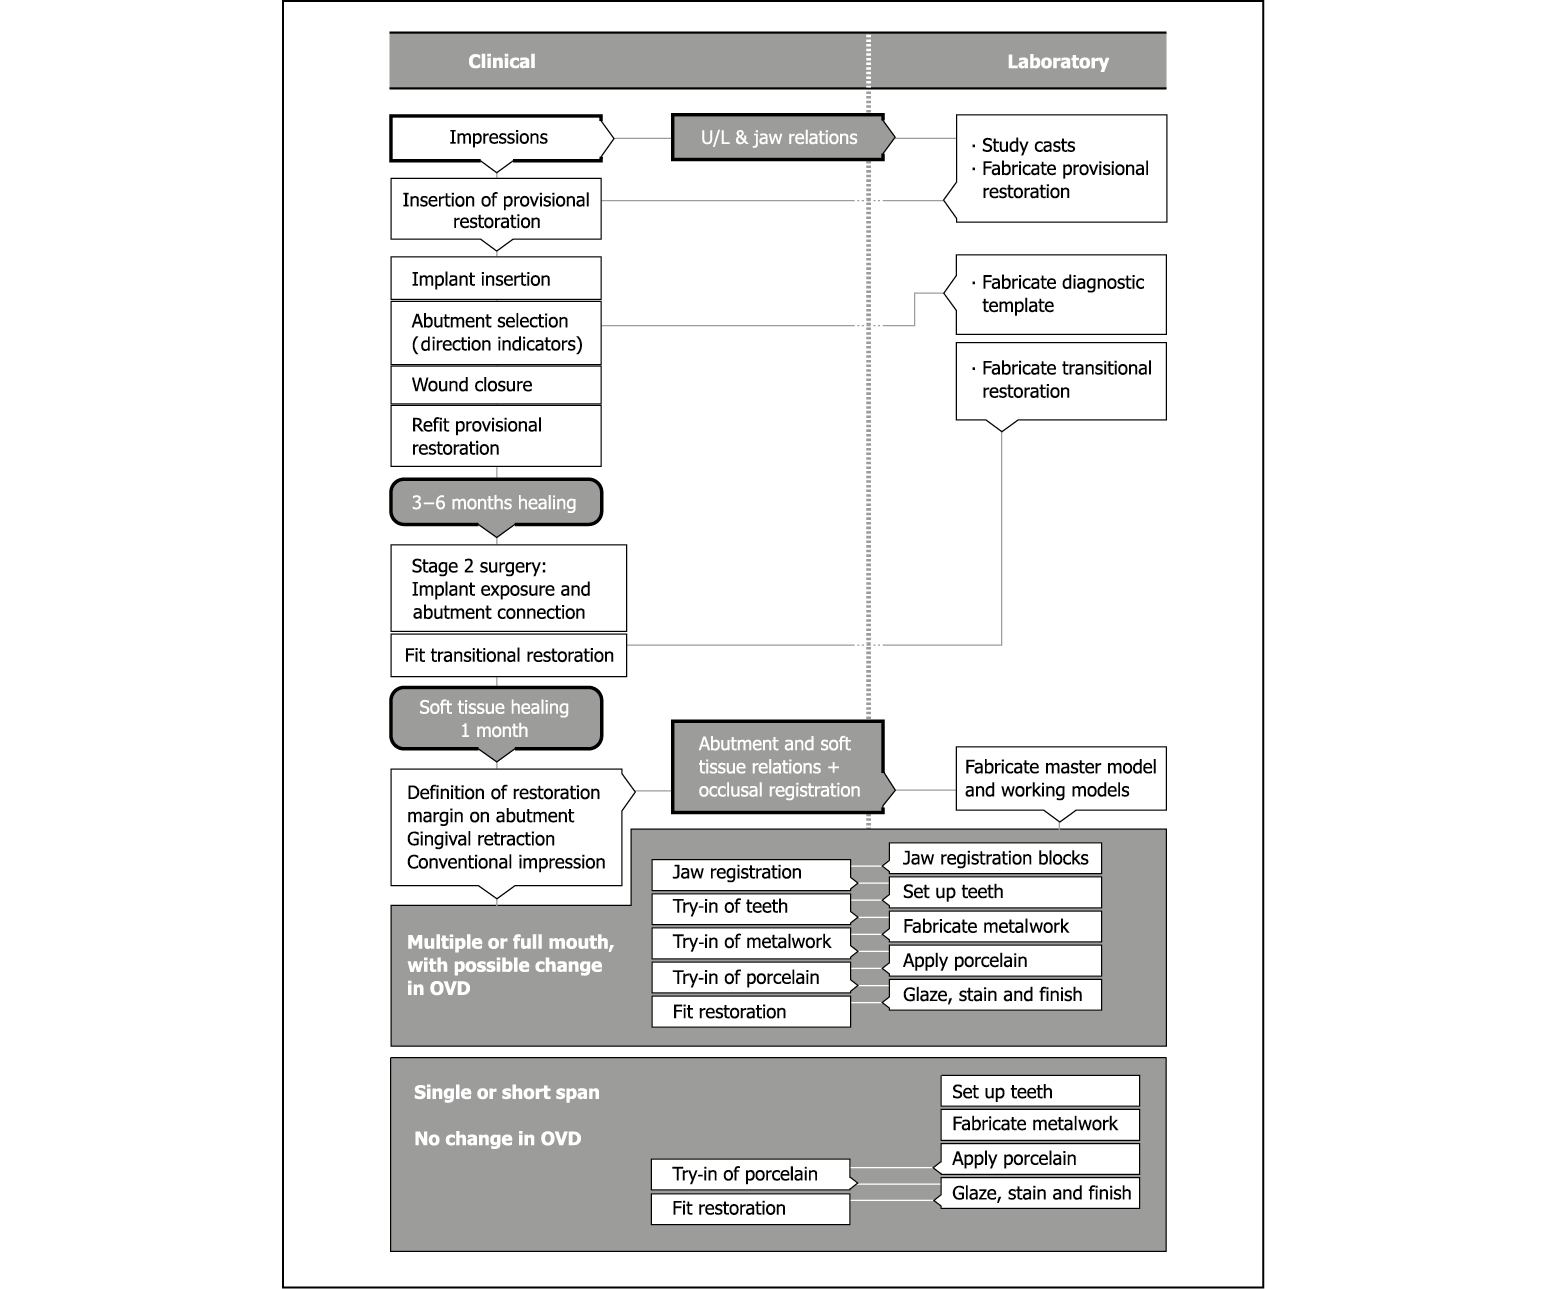
Flowchart 10-2 Conventional impressions: restorative phase. OVD, overdenture.
It has already been stated that the information that needs to be transferred can be categorised into certain groups. This categorisation, which is outlined more specifically below, enables the clinician to focus on precisely which information should be transferred, based on the complexity of the proposed treatment. Table 10-1 summarises the procedures and sequences for the restorative phase.
Table 10-1 Procedures and sequences for restorative phase
|
Procedures and steps |
Single tooth |
Multiple units |
Full arch reconstruction |
|
Impression (shape and position of abutments) |
Appointment 1 |
Appointment 1 |
Appointment 1: |
|
Intermaxillary registration |
Appointment 1: intercuspal position |
Appointment 1: intercuspal position |
Appointment 2: |
|
Diagnostic preview (confirm form, colour, occlusion) |
Transfer from original preview |
Transfer from original preview |
Appointment 3: |
|
Metalwork or framework try-in (accuracy and passivity of fit, relate soft tissue to framework) |
Not usually necessary |
Appointment 2 |
Appointment 4: |
|
Further try-in of metalwork (confirm accuracy and passivity of fit) |
Not necessary |
If required |
If required; if sections located intraorally at Appointment 4 |
|
Try-in of unglazed porcelain |
Appointment 2 |
Appointment 3 |
Appointment 5 |
|
Fit (soft cement) |
Appointment 3 |
Appointment 4 |
Appointment 6 |
|
Check and baseline records |
Appointment 4 |
Appointment 5 |
Appointment 7 |
Impression Taking
The transitional restoration, which is often undercontoured at the gingival margin, is removed. Gingival retraction using a proprietary retractor (e.g. LM-Gingival Retractor, LM-Instruments Oy, Parainen, Finland) provides access to the abutment up to approximately 2 mm below the gingival margin. A 12-fluted tungsten carbide bur in a high-speed handpiece with copious irrigation is used to modify the abutment. This produces a chamfer, which is approximately 0.5 mm deep. The aim is to create a margin that can be used by the dental technician to define the future crown margin. The subgingival depth to which the preparation is carried out will depend on a variety of local factors, such as:
- • margin of the adjacent teeth
- • thickness of gingival tissues
- • diameter of the abutment
- • position of the access hole for the fixation screw.
This procedure is carried out under local anaesthesia. Retraction cord of the appropriate thickness is used with a haemostyptic agent.
Impressions are taken using a light-bodied addition-cured material that is soft enough to allow a die stone model to be cast. Multiple abutments will require an epoxy resin cast. The light-bodied impression material is injected into the sulcus on removal of the retraction cord. Medium-bodied impression material is used in a metal-rimmed tray to perform a single-phased impression. The impression is checked to ensure marginal integrity and the absence of drags or voids.
Care should be taken not to leave any impression material behind in the subgingival tissues. The impression provides the laboratory with the precise details of the shape of the abutment in relation to the soft tissues that have been prepared and the gingival margins of the adjacent teeth (see Figs 7-74–7-77, p. 71). This will guide the dental technician with regard to the contours of the crown. The protocol used for multiple units is covered in greater detail in the appropriate section.
Development of Soft Tissue Contours
The transitional restoration is cleaned with a round bur, removing the acrylic resin from the fit surface and the margin, which may have been contaminated with the temporary cement. The restoration is filled with autopolymerising acrylic resin and carefully seated on the abutment in the correct position. It must be removed from the mouth when it enters the elastic phase. Any residual acrylic resin is removed from the sulcus. The polymerisation reaction is accelerated by using hot water. The acrylic resin that extends beyond the prepared margin of the abutment is removed to prevent undercuts and overextension of the crown. The margins are polished and the restoration checked in situ to confirm that the correct gingival contours have been established. Any modifications can be made before cementing the transitional restoration with temporary cement.
Try-in of Framework
The framework is always fabricated in accordance with a matrix produced from the original diagnostic try-in. Ideally, this would have been reconfirmed through the stages of the provisional and transitional restoration. Aesthetic and functional factors would also have been taken into account.
Single Units
Single units do not usually require a try-in of the framework, as the fit can be achieved predictably and adjustment of the soft tissue in relation to the framework can be carried out directly from the impressions of the abutment. However, should the need arise, there is no reason why the framework cannot be tried in, particularly when the development of the soft tissue contours requires several modifications of the transitional restoration.
Multiple Units
Multiple units require the metalwork to be tried in to confirm the accurate and passive fit of the restoration. In the event of the framework not fitting down to the margin or if there is a rock, the metalwork will need to be sectioned and located together using acrylic resin and plaster. On completion of the soldering the metalwork is tried in again to confirm the fit and is picked up in an acrylic resin stock impression tray, thus producing a cast of the relationship of the metalwork to the soft tissues for the addition of the porcelain to create the desired contours.
Try-in of the Unglazed Restoration
The colour, form and occlusion of the restoration must be thoroughly checked at this stage. Particular attention should be paid to the relationship of the restoration to the soft tissues, particularly if there have been changes in the contours generated by the provisional restoration.
Fit of Restoration
The restoration is fitted with soft cement following any minor adjustments. Excess cement must always be vented by gently retracting the gingival margin by means of a fine flat plastic instrument or a periodontal probe and must not be extruded subgingivally. Additional retention and security can be achieved by the use of a lateral fixation screw. This may be engaged directly into the abutment or into a gold coping permanently cemented onto the abutment.
Special Considerations for Multiple Units and Full Mouth Reconstruction
Large restorations, where changes in the tooth position and in the intermaxillary relationship are proposed, require special consideration. Data established during the diagnostic phase will need to be reconfirmed during the surgical phase and finally at the restorative phase. This is accentuated by the fact that implant-supported restorations have to be made with greater accuracy than conventional tooth-supported restorations. However, the bulk of the material being replaced is far greater than merely the tooth tissues that require replacement in conventional crown and bridgework. Therefore, protocols derived from restorative and prosthodontic disciplines need to be merged to satisfy the required parameters.
Recording the Intermaxillary Relationship
The information is brought forward from the diagnostic phase in a number of well-defined and predictable steps.
- • Diagnostic preview. During the diagnostic preview, the teeth will be arranged in their ideal position and with the correct intermaxillary relationship. The accuracy of the positioning can be confirmed using accepted guidelines such as speech, facial profile and visual appearance. This will be carried out at the try-in stage as for removable prostheses.
- • Provisional restoration. The transfer of the information into a provisional restoration will achieve aesthetic and functional verification of the above data. Fixed provisional restorations are particularly effective at refining both aesthetic and functional design as they allow input from the patient as well as the patient‘s social and professional environment.
- • Diagnostic template. The data, as verified above, are converted into the hollow prosthetic envelope (diagnostic template), which is used to identify implant position and select the abutments that fit within the envelope.
- • Transitional restoration. The transitional restoration is fabricated as a hollow restoration according to the data established in the stages described above. It is designed to fit over the abutments selected during first-stage surgery and fitted during second-stage surgery. These abutments are fitted within the prosthetic envelope and are aligned with each other. The transitional restoration is then relined within the patient‘s mouth to the correct intermaxillary relationship.
- • Jaw registration blocks. Transfer of the data from the transitional restoration to the jaw registration blocks is carried out when impressions are taken. The transitional restoration is cut in half so that the relationship between the abutments on one side of the mouth can be recorded, using a rigid registration material. This is repeated on the other side of the mouth to provide details of the relationship of the jaws to one another; this information can then be passed on to the laboratory. The position of a tooth can be transposed to the working die cast by means of a matrix produced from an impression of the transitional restoration. An acrylic resin framework is constructed to fit over the abutments on the cast, and wax is added to the framework in the matrix. This can then be used in the mouth to refine the intermaxillary distance and tooth position, size and form.
Confirming Tooth Form and Position as Established in the Original Preview
Inherent discrepancies may become incorporated during the adaptation of the transitional restoration to the abutments at exposure. These may be in the transfer of the vertical dimension or the labio-palatal pos/>
Stay updated, free dental videos. Join our Telegram channel
VIDEdental - Online dental courses


