Fig. 7.1
(a) Custom occlusal metal key forms occlusal screw access channel with wax replica of screw channel pattern. (b) Custom metal key placed in the premolar waxing, forming occlusal screw access channel pattern seen in molar
Wax replicas of the key (Geo, Renfert, Hilzingen, Germany) were produced by placing the shank of the key in a putty matrix for a mold, then injecting with molten wax. The wax key replica was inserted and contoured (Fig. 7.2a, b) to form the wax plug.
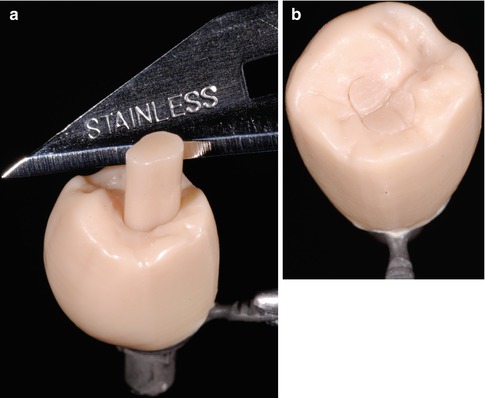
Fig. 7.2
(a) Wax replica key pattern placed in the premolar screw access channel. (b) Wax key pattern shaped to conform to the occlusal morphology of the premolar
The contoured wax plug and crown were attached to the same sprue (Fig. 7.3a) and invested in porcelain pressing investment (Microstar HS Investment, Microstar Dental, Lawrenceville, GA, USA). The appropriate shade of ingot was selected (Pulse Press-To-Metal ingot, Jensen Industries, New Haven, CT, USA), and the pressing was made following the manufacturer’s recommendations in the pressing furnace (Vario Press 300, Zubler, Ulm, Germany). The pressed ceramic was recovered using airborne particle abrasion with the engaging surfaces of the implant crown protected with a layer of wax (Fig. 7.3b).
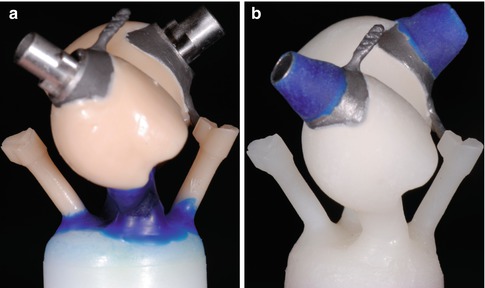
Fig. 7.3
(a) Wax crown and plug simultaneously sprued and ready to invest for pressing in porcelain. (b) Pressed crown and plug in porcelain (a layer of blue wax protects the implant-abutment interfacing surfaces during airborne particle abrasion)
The porcelain plug was opaqued on the internal aspect to prevent gray show-through of the metal screw channel. The porcelain of the crown and plug was customized with stains and glazed.
The fitting surfaces of the porcelain were prepared for adhesive bonding by etching with 9 % hydrofluoric acid (Porcelain Etch, Ultradent Products Inc., South Jordan, UT, USA) for 90 s, then rinsed for 20 s. Further cleaning with 35 % phosphoric acid (Ultra-Etch, Ultradent Products Inc., South Jordan, UT, USA) for 30 s and a 20-s rinse followed. Finally, cleaning was completed by separate immersion of the crown and plug in distilled water in an ultrasonic bath for 5 min. The bonding surfaces were silanated (Silane, Ultradent Products Inc., South Jordan, UT, USA) following thorough oil-free air drying and dried at 100 °C for 5 min in the oven.
To avoid saliva contamination of the fitting surfaces of the abutment crown, rubber dam isolation was used. After radiographic confirmation of complete seating, the screw was tightened to the appropriate torque (35 Ncm). A small pellet of sterilized polytetrafluoroethylene (PTFE) tape (Oatey Co, Cleveland, OH, USA) was placed over the screwhead, and the previously etched and silanated porcelain surfaces were then coated with adhesive resin (Prime and Bond, Dentsply, York, PA, USA) followed by the application of resin luting agent (Ultra Bond Plus, DenMat, Santa Maria, CA, USA). The plug was seated and held in place for light polymerization. The final ICAP was cleaned of excess resin, occlusion evaluated and adjusted, and the crown polished with porcelain polishing points; the results of which are shown in Fig. 7.4 (Dialite, Brasseler USA, Savannah, GA, USA).
Fig. 7.4
Clinical view ICAP of the molar and premolar case shown after seating and bonding in the pressed porcelain plug
Clinical Report: Case 2
A 64-year-old female presented with an osseointegrated implant in the lower left first premolar region. The implant (Endopore, Sybron, Orange, CA, USA) was previously restored with a cement-retained single crown that was causing some soft tissue irritation as a result of excess cement extrusion into the peri-implant tissues (Fig. 7.5a). Due to the lingual inclination of the implant, traditional filling of the screw access channel would result in an unsightly and difficult restoration. The ICAP was used to overcome these issues. The crown’s metal substructure was casted and opaque applied. A full contour waxing was made (Fig. 7.5b), and in this instance due to the complexity of the case, the pressed ceramic porcelain fused to metal crown was fabricated prior to the ceramic plug.

Fig. 7.5
(a) Implant position. Note lingual inclination. (b) Full contour waxing prior to pressing in porcelain (metal framework within and screw access shown)
Once fabricated, the internal aspect of the ceramic plug was opaqued (Fig. 7.6a, b), and the bonding surfaces were etched and silanated to allow for adhesive resin bonding as described earlier (Fig. 7.7a, b). The crown was delivered and screwed to the appropriate torque, with rubber dam placed for isolation and the porcelain plug cemented.
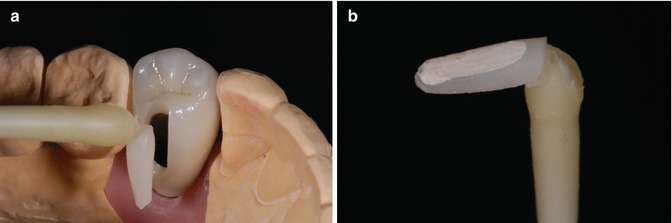
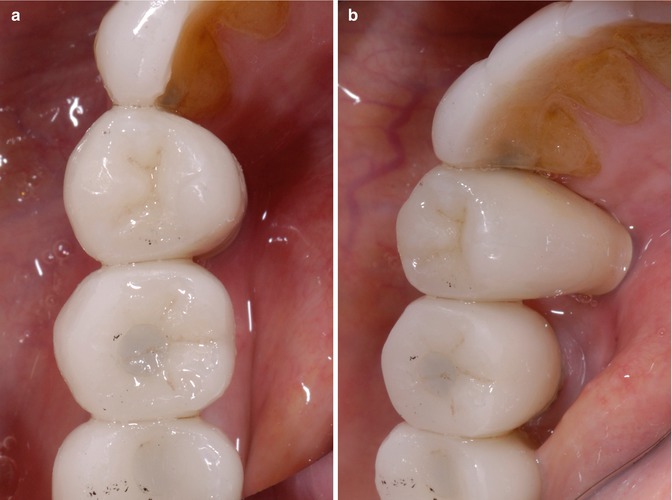
Fig. 7.6
(a) Pressed ceramic crown with pressed porcelain screw access channel plug. (b) Porcelain pressed porcelain plug; note opaque on intaglio surface of plug to prevent metal show-through
Fig. 7.7
(a, b) Clinical views of the ICAP—occlusal and lingual of lower left first premolar with lingual plug
The ICAP is a restoration that has three major advantages, which include improved esthetics, controlled occlusion, and the elimination of potential cement-induced peri-implant disease. It is a durable, esthetic restoration that can be economically made with moderate skills in the dental laboratory. This type of restoration can also be used for fixed bridges, with the inlay providing both an esthetic and occlusal contact advantage over simply filling of the occlusal screw access with materials such as composite resin.
The Cement-Screw Restoration
The recent introduction of the cement-screw-retained restoration has been described, which combines some features from both the cement- and screw-retained restorations. The system consists of the crown with occlusal opening, which is cemented on prepared standard abutment or special retentive metal base on the working model. The cement excess is cleaned and restoration is screwed to the implant in the mouth. This approach assures passive fit of the restoration, as cement layer is present between crown and abutment. Consequently, occlusal opening for connection to the implant makes it similar to screw-retained restoration. This technique is very cost effective and can be used for single crowns and for short-span fixed partial dentures as well.
When the time to restore implants arrives, traditionally clinicians can choose between cemented or screw-retained restorations. We all know the advantages of the cemented approach—passive fit, esthetic, and functional occlusal surface; in short, the possibility to solve the problems with poorly positioned implants. However, the main disadvantage of cemented restorations is of course possible cement extrusion into peri-implant tissues and difficulties in removing the remnants. Problems also arise if the cemented crown becomes mobile due to abutment screw loosening, as then occlusal perforation must be made to reach the screw and tighten it back.
The other option which may be chosen is to use screw-retained restorations. It is a cement-free solution, free from remnant-associated complications. However, casting technology frequently resulted in screw loosening, fractures, and veneering porcelain fractures in the past. These complications frequently restrained clinicians from using screw-retained restorations.
Current dental technologies allow solving major problems of cemented and screw-retained restorations. It is simply to use individual abutments with margins following contours of peri-implant tissues, which will certainly reduce cement excess-related complications. Screw-retained frameworks can be milled, thus eliminating inner tension problems inherited from casting. However, these improvements come with a price—individual abutments and milling costs usually are much higher than the cost of standard solutions.
As a possible solution, a cement-screw-retained restoration is described. It consists of the crown with occlusal opening, which is cemented on a prepared standard abutment on the working model. Cement excess is cleaned, and restoration is screwed to the implant in the mouth. This construction eliminates the cement remnants, as the crown is glued to the abutment on the model and the technician can easily remove cement excess. Biomechanically this kind of restoration is cement retained; thus, passive fit is achieved due to the layer of the cement between the abutment and the crown. The use of standard abutments eliminates the need to make expensive framework milling.
Different bases can be used for retention of cement-screw-retained restorations. If the implant needs to be restored with single restoration, the clinician can choose from standard stock abutment or specially designed titanium base. If fixed partial denture is to be constructed, non-hexed titanium bases could be used for retention of the supra-structure.
This technique allows using metal-ceramic and zirconium-ceramic restorations as well. Only slight difference in metallic base treatment and cementation agent should be noticed.
Rajan and Gunaseelan described a very similar technique of cement-screw-retained restoration. They also proposed to use standard abutments and metal-ceramic restoration with occlusal opening; however, the cementation procedure was to be performed intraorally. After that, abutment-restoration complex was retrieved, cement remnants cleaned, and the restoration returned to the mouth.
Our proposed technique has several advantages. First, the cementation procedure is more controlled on the model than in the mouth, especially if the implant is placed deeply. In such a case, it is difficult to seat the crown on implant in the mouth, due to resistance of the peri-implant tissues. Secondly, less clinical time is spent, as cementation and excess cleaning procedures are done in the laboratory.
Standard Abutment
The fabrication of single cement-screw-retained implant restoration with standard abutment as a base starts with positioning the abutment in the model (Fig. 7.8). Then it is prepared for restoration. As cementation of the crown will be performed on the model, the cementation margin can be positioned at the deepest point, in this way increasing all the surface of the abutment and increasing retention of the crown (Fig. 7.9). Then the framework is waxed and casted from metal with occlusal opening for the screw (Figs. 7.10 and 7.11). The framework is veneered with ceramics and is not attached to the abutment yet (Fig. 7.12a, b). The final laboratory stage includes the cementation of the finished and glazed metal-ceramic restoration on the abutment (Fig. 7.13 and Fig. 7.14). After cement excess removal and polishing, the cement-screw-retained restoration is screwed to the implant (Fig. 7.14). The access hole is etched with hydrofluoric acid, primed, and covered with composite (Fig. 7.15a, b). The control radiographic image shows precise seating of the restoration on the integrated implant (Fig. 7.16).

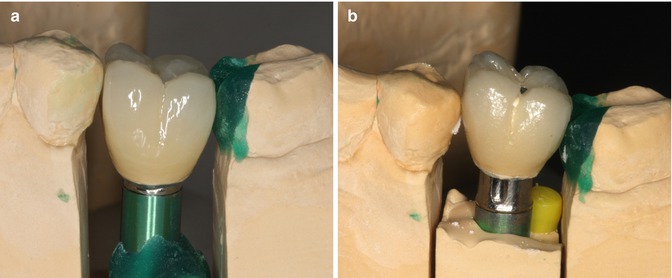
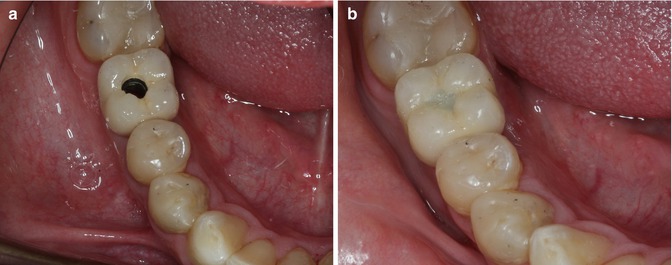
Fig. 7.8
Standard abutment
Fig. 7.9
Prepared abutment with deep cementation margins
Fig. 7.10
Waxing of the metal framework of the cement-screw-retained restoration
Fig. 7.11
Metal framework with occlusal hole
Fig. 7.12
(a, b) Ceramics are applied on metal framework
Fig. 7.13
Glazed crown is cemented on standard abutment, and cement excess is cleaned
Fig. 7.14
The completed Cemented-Screw restoration. Note: The abutment is visible within the screw access hole
Fig. 7.15
(a) Cement-screw-retained restoration is tightened to the implant, and (b) access hole is covered with composite
Fig. 7.16
Radiological image shows precise seating of the restoration in the implant
Titanium Base
Titanium base also could be used for fabrication of single cement-screw-retained restoration, when more esthetics and biocompatibility is required. In fact, these titanium bases are more designed to use zirconium-based crowns, as usually they are a bit shorter and have “metal-free window,” which is designed to reduce the shine-through of the base metal through zirconium. However, if an implant is placed deep, the base is buried under the tissues, and this becomes not so important. The sequence of the clinical and laboratory steps is similar to previously described.
In the clinical situation described, two implants (BioHorizons Tapered, Birmingham, AL, USA) are placed in the first and second mandibular molar tooth sites. Soft peri-implant tissues have been conditioned with temporary screw-retained restorations and are ready for prosthetic rehabilitation (Fig. 7.17a). Titanium bases are selected for a support of zirconium-ceramic restoration (Fig. 7.17b). An open impression is taken to register implant position and peri-implant soft tissue contour.
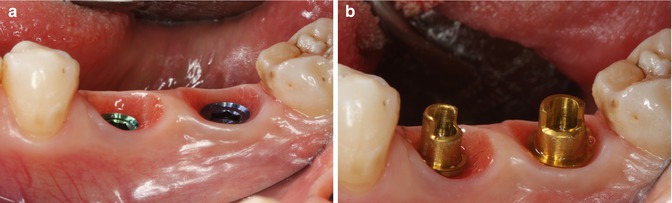
Fig. 7.17
(a) The two sites to be restored. (b) Titanium bases are tried in the sites prior to developing the wax replica
First the wax replica of the future zirconium framework is created by the technician and is scanned and milled from zirconium (Fig. 7.18a, b). The framework is temporarily cemented to titanium base and checked in the mouth (Figs. 7.19 and 7.20a, b).
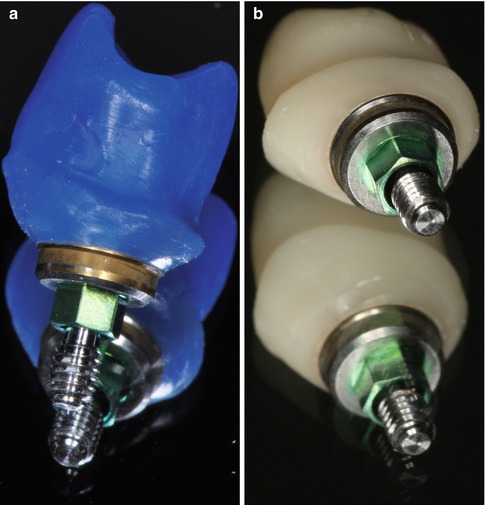

Fig. 7.18
(a) Example of a waxed abutment framework on a titanium base ready to be copy milled. (b) Final copy-milled Zirconai abutment framework
Fig. 7.19
A wax replica modeled by technician is necessary for accurate contour. Then zirconium oxide coping is milled and adapted on the titanium base
Fig. 7.20
(a, b) Zirconium coping is temporarily cemented to the titanium base and checked in the mouth
Ceramics were veneered on the zirconium frameworks, and they were cemented definitively with adhesive resin cement of titanium bases (Figs. 7.21 and 7.22a, b). Before cementation, the access entrance of the titanium base is covered with wax to protect the basal screw from cement contamination. The occlusal opening must be wide enough that the screw can be rotated without restrictions.

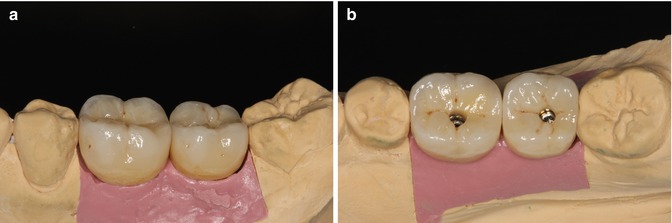
Fig. 7.21
The final restorations: these are zirconia crowns cemented onto zirconia frameworks. The zirconia framework has a titanium base
Fig. 7.22
(a, b) Zirconium oxide ceramic restorations are cemented on titanium bases. Space inside the restoration should be large enough that the basal screw can be rotated passively without restriction
The final step of cement-screw-retained restoration is delivery, where the crowns are screwed onto the implants. Temporary implant-supported crowns are removed, the internal aspect of the implants and soft peri-implant tissues is rinsed with chlorhexidine digluconate solution, and the cement-screw-retained zirconium oxide ceramic restorations are tightened to their respective implants (Fig. 7.23a, b). Radiographic examination was performed to verify the accuracy of the restoration/implant connection (Fig. 7.24
Stay updated, free dental videos. Join our Telegram channel
VIDEdental - Online dental courses


