Fig. 9.1
Fractured porcelain on this restoration necessitates removal and possible repair
If the crown can be predictably, temporarily cemented in a manner that allows for retrieval, there is no issue. However, most US dental schools surveyed in 2010 were found to cement the implant restoration definitively, with the result that when the crown needs to be removed, this may be difficult, if not impossible, to accomplish. The only solution left is to evaluate the screw access site, cut into the crown, and locate the abutment screw.
Current Methods of Recording the Implant Screw Access Site
The need to evaluate the location of the underlying screw access site has led to the development of several techniques. However, all of these (described below) have deficiencies associated with them. They all require some level of guesswork, which may result in excessive destruction of the restoration, damage to the abutment, and, in some instances, destruction to the implant itself (Fig. 9.2). Most are also considered time consuming, due to the lack of three-dimensional information given.
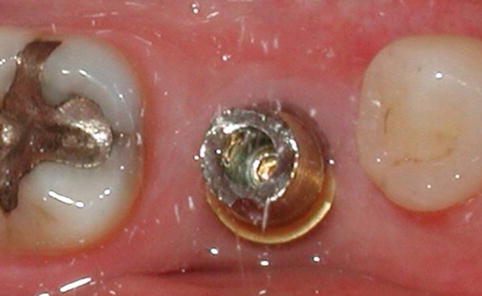
Fig. 9.2
The restoration has been removed. The underlying abutment is damaged by overpreparation of the screw access hole. The abutment required replacement, needlessly increasing the cost of the replacement restoration
The point of entry for the drill must be assessed by one of the following:
1.
Arbitrarily, that is, guesstimate. The crown provides little, if any, clue as to where the screw channel lies or even the extent and the form of the supporting abutment (Fig. 9.3).
Fig. 9.3
(a) Initial access to the screw channel is determined by “best guess” of the site and angulation. (b) Often a large area is involved. (c) More extensive destruction of the crown frequently occurs
2.
Evaluating a radiograph of the site—a technique frequently employed when accessing a pulp chamber in a natural tooth during endodontic therapy. This may provide approximate information as to mesial-distal location of the implant and may provide clues to the shape of the abutment if the crown is not extensively radiopaque (Figs. 9.4 and 9.5).
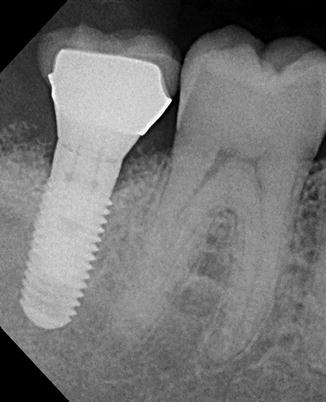
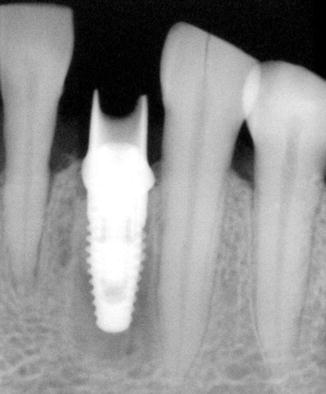
Fig. 9.4
Radiograph provides some information as to the long axis of the implant in the mesial-distal dimension but no indication of abutment form or position
Fig. 9.5
Radiograph also gives information on the supporting abutment due to radiolucent ceramic crown
3.
Pre-cementation photographic documentation—giving a two-dimensional picture of a 3D site (Fig. 9.6a–c).
Fig. 9.6
(a, b) Pre-cementation photographic documentation of the site. When the crown is seated, the mark on the photograph (c) indicates the position of the screw access channel
4.
Have the dental laboratory tattoo on the crown. However, the patient may object, especially in the anterior (Fig. 9.7).
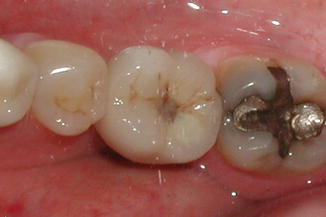
Fig. 9.7
A tattoo placed during fabrication marks the site of the screw channel. Patients may object; it has limited use in esthetic sites
5.
Make putty indexes—find the hole approximate, add wax, then index.
6.
Have the dental laboratory make individual vacuum guides. It requires special materials (vacuum former) and requires a complete cast to fabricate upon. If the adjacent dentition requires any restorative work or if teeth move, then it cannot be modified easily (Fig. 9.8).
Fig. 9.8
(a–c) Vacuum-formed template is marked directly over the access hole site. These marks provide drill hole sites. Once transfered onto the restoration these sites relate to the abutment screw access hole beneath the restoration
7.
Use computer-aided design (CAD) and computer-aided machined (CAM) technology (look at an existing digital image used to design and fabricate the abutment, then guesstimate). Limited to CAD/CAM abutments and crowns that have stored images available.
8.
Use cone-beam computed tomography (CBCT). This exposes the patient to a large amount of radiation (unless it is for some alternative reason) and is costly (Fig. 9.9).
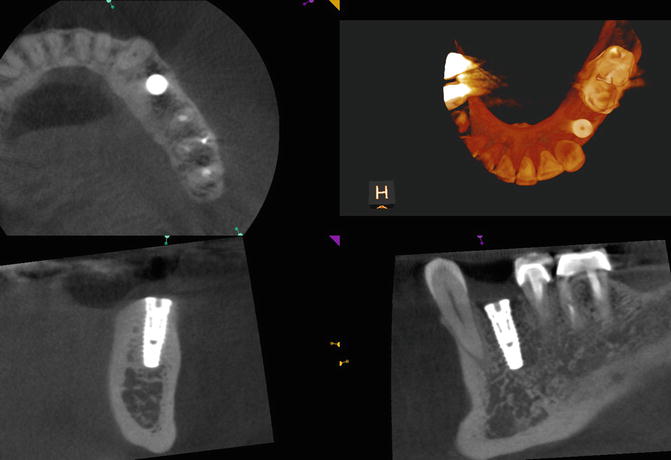
Fig. 9.9
A cone-beam computed image gives some indication of the angulation and position of the implant but still requires the clinician to “superimpose” this information by visual guessing
Novel Use of Readily Available Materials to Locate the Screw Within a Cement-Retained Implant Restoration
What follows is a series of innovative and novel devices that are inexpensive and easily made. They can be fabricated either in the dental laboratory or chairside. The first described uses a paper clip, an implant screwdriver, and bite registration material. They offer many advantages over all other methods as being precise (they are true guides), easy to use, cheap, and can be readily modified if adjacent structures change.
Blu-Mousse® and Paper Clip
-
Step 1. Start with a sterilized paper clip and bend out an arm to assist holding the clip (Fig. 9.10).
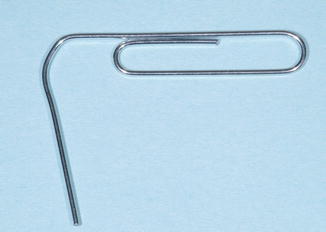 Fig. 9.10Sterilized paper clip; one arm is bent out to act as a handle
 -
Step 2. Use a new screw and an unworn driver that fits well within the screwhead. The screwdriver will then be a projection from the long axis of the screw (Fig. 9.11).
 Fig. 9.11A screwdriver (Straumann) engages the head of an implant screw. Note how the shank of the screwdriver lies in the same long axial planes, acting as an extension of the screw
Stay updated, free dental videos. Join our Telegram channel
VIDEdental - Online dental courses


