CHAPTER 9 Restorative Procedures and Materials
What is restorative dentistry?
Overview of the role of the dental nurse in restorative procedures
Dental impressions
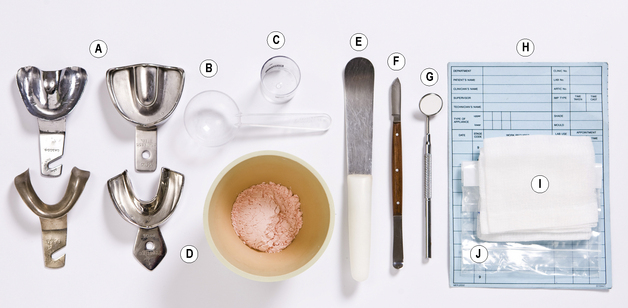
A dental impression is an accurate representation of part or all of a person’s dentition and adjacent tissue of the mouth. A dental impression is usually made by placing an impression material into the mouth, usually in an impression tray (Figure 9.2). The impression material then sets or hardens so that, when removed from the mouth, it retains the shape of the teeth and/or mouth. It forms a ‘negative’ of a person’s teeth and adjacent soft tissues, which is then used to make a cast or model (Figure 9.3) of the dentition, usually from dental plaster. The model may be used either as a record of the person’s dentition (called a study model) or by the dental technician to make:


There are several different kinds of impression materials and their properties are described in detail below and in Chapter 12. Impressions are increasingly being made using computers, the basis of CAD–CAM dentistry.
Inlay: a restoration (such as gold or porcelain) fitted into a cavity and cemented into place.
Crown: a crown is like a cap that completely or partially covers a tooth’s natural crown.
CAD-CAM dentistry: computer-aided design and computer-aided manufacturing in dentistry.
Primary and Secondary Impressions
Primary impressions, which are the initial impressions, are often taken using alginates (p. 214) in a stock impression tray (see Figure 9.4). The resulting cast is then used by the dental technician to make a special tray. Then a secondary impression is made – using a more accurate impression material such as an elastomer (p. 215) – in the special tray.
The Dental Nurse’s Role in Impression Taking
You will need to offer a range of impression trays of different sizes for the clinician to select for use. Differently shaped trays are available for people with or without natural teeth (Figure 9.4). In order that the impression material once set remains firmly in position in the tray, the trays may be perforated, rim locked and/or you may need to apply a special adhesive to the tray before use. You then mix the impression material and place it in the impression tray chosen. With suitable training, dental nurses can also take certain impressions.
BOX 9.1 Points to Remember when Disinfecting Impression Materials
Alginate Impression Material (‘Alginate’)
Alginate is one of the most commonly used impression materials. It is supplied as a powder, which is mixed with tap water to make a gelatinous mass. This mass then sets (hardens) rapidly. Alginate powder must be stored in a cool dry place in a tightly closed container to protect it from absorbing moisture from the air and from contamination. Shake the container before use to loosen the powder and then leave it for a few minutes before opening to let the dust settle. Powder and water measuring cups are provided by the manufacturer. Measure out the powder into the mixing bowl (Figure 9.4) and add a measured amount of tap water at room temperature (21°C). Alginates set fairly quickly; the best method of controlling the setting time is to slightly alter the temperature of the water used in the mix. The higher the water temperature, the faster the material will set.
Disadvantages
Elastomeric Impression Materials (Elastomers, ‘Rubber Base’)
Advantages
Uses
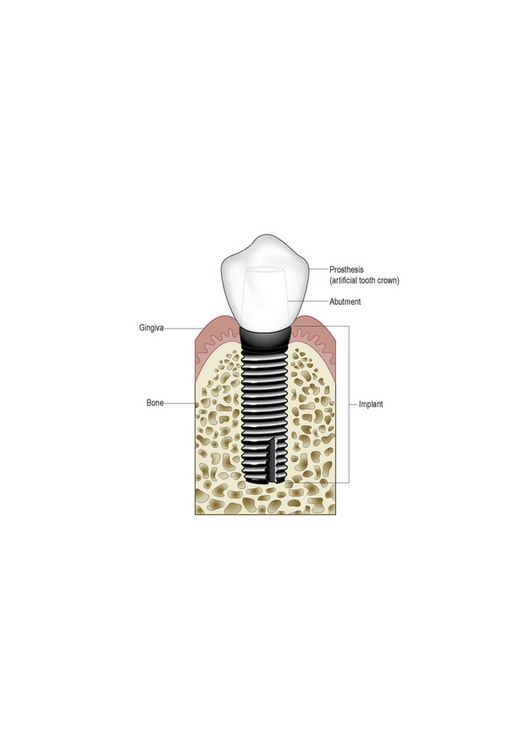
Elastomers are used for making impressions of areas containing undercuts, especially for crowns, inlays, bridges, dental implants and removable and fixed partial dentures (see p. 215).
Dental implant: an artificial tooth root (see Figure 9.24 below) that osseointegrates. Implants are made of inert materials, usually titanium, but zirconia has also begun to be used.
| Impression trays | To carry impression materials |
| Impression adhesive | For aiding adhesion of material to tray |
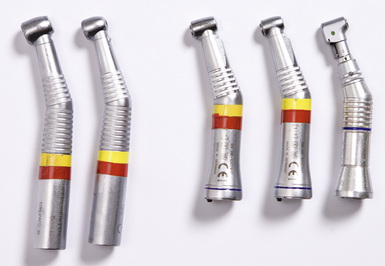
| Straight handpiece and acrylic trimmer (Figure 9.5) | For adjustment of tray if needed |
| Impression material | |
| Mixing bowl or pad | |
| Spatula | |
| Shade guide | |
| Laboratory prescription (instruction) sheet and label | For custom instruction to technician |
| Gauze swabs | For damping and placing over alginate impression |
| Self-seal plastic bag | For transporting to the laboratory |
| Mirror | For patient to view their appearance for shade selection and ensuring face is clean |
Treatment of caries
Caries prevention is discussed in Chapter 8, both the measures that the patient can take and the measures that the clinician can take (applying dental fissure sealants). Here we discuss the restoration of teeth which have been damaged by caries.

Repairing damaged or diseased teeth – making a restoration
The Dental Nurse’s Role
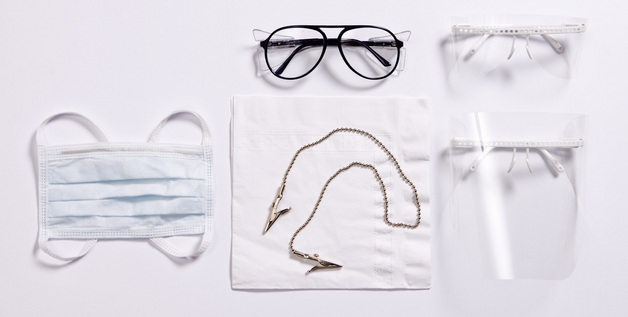
Moisture control and rubber dam
Moisture control is very important for two reasons:
TABLE 9.1 Damaging Effects of Moisture on the Setting of Restorations
| Materials | Effects of Moisture |
|---|---|
| Amalgam | Expansion of material |
| Cement | Fails to adhere to tooth structure; setting time altered |
| Composite | Fails to adhere to tooth structure |
| Glass ionomer | Fails to set properly |
Moisture control is also crucial in endodontics to prevent spread of infection.
When preparing and placing fillings there are several ways to control moisture (Box 9.2). Use of rubber dam (or dental dam, Figure 9.6) is the most effective.
BOX 9.2 Methods of Moisture Control
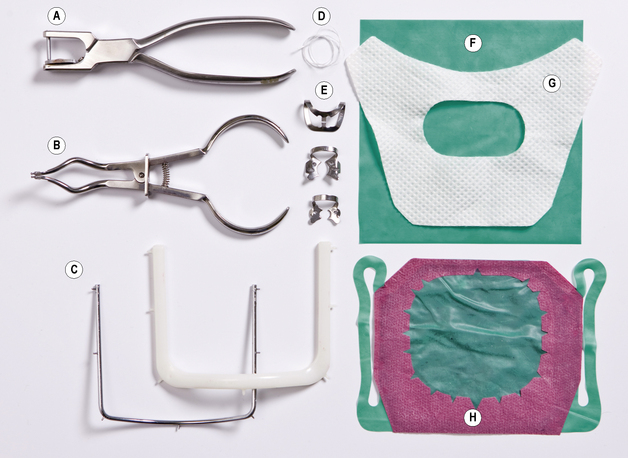
The rubber dam is a thin square of latex rubber (also available in silicone for latex-sensitive patients). To accommodate the teeth being treated, holes are made in the sheet with a rubber dam punch, and the dam is held in place on the teeth by rubber dam clamps or dental floss (Figure 9.6).
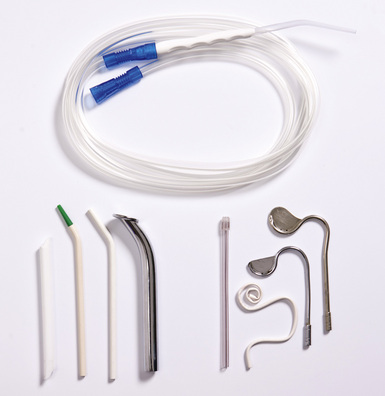
You will need to prepare the rubber dam, assist the clinician with placement and use the suction during cavity preparation or endodontics to remove debris, saliva and water. Figure 9.7 shows a selection of suction tips that can be attached to the suction machine and are placed inside mouth.
Cavity preparation
Teeth are prepared for the restoration using:
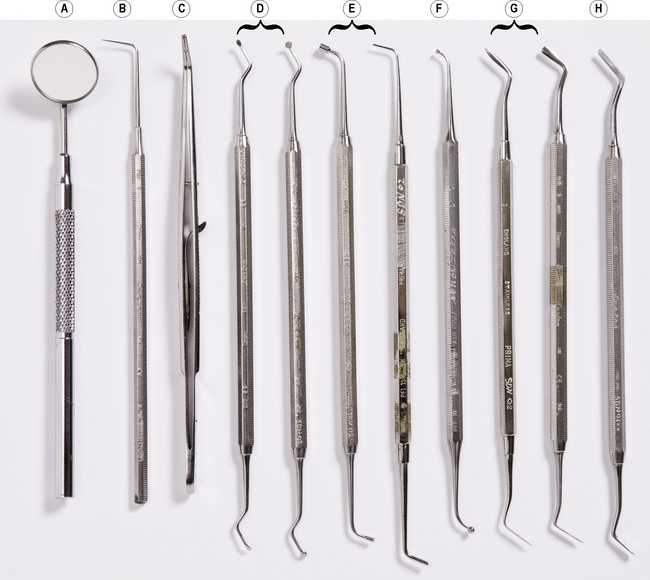
The main aim is to remove all of the decayed parts of the tooth but at the same time avoid damage to the underlying dental pulp. Once the clinician has prepared the cavity, the pulp is protected by applying a lining cement with an instrument called a ‘plastic’ (labelled H in Figure 9.10).
Dental cements
Cements are described in Chapter 12. They are usually prepared by the dental nurse. Several cements are supplied in capsules containing pre-proportioned powder and liquid. These are not only convenient but ensure consistent powder/liquid ratios and thus predictable setting times and ultimately the lining strength.
If cement is supplied in bottle form:
Stay updated, free dental videos. Join our Telegram channel
VIDEdental - Online dental courses


