and Paolo Biondi2
(1)
Aesthetic and Maxillofacial Surgery, Padova, Italy
(2)
Maxillofacial Surgery, Forlì, Italy
3.4.2 The Eleven Basic Views
3.4.3 The Five Nasal Views
3.4.5 The Seven Eye Views
3.4.6 The Four Ear Views
3.5 Final Remarks
Abstract
The photographic documentation of our patients must have the following important features: completeness, standardization, and quality. All physicians dealing with facial aesthetics need these documents for analysis, patient communication, planning, as an intraoperative tool, for early and late follow-up, for self-teaching and teaching objectives, and also for medicolegal purposes.
The pictures in this chapter are taken from the scientific poster “Views of Clinical Facial Photography,” conceived and realized by F. Meneghini in May 2003.
The photographic documentation of our patients must have the following important features: completeness, standardization, and quality. All physicians dealing with facial aesthetics need these documents for analysis, patient communication, planning, as an intraoperative tool, for early and late follow-up, for self-teaching and teaching objectives, and also for medicolegal purposes.
The previous chapter describes a personal technique used to obtain standardization and quality in lighting the face. This chapter illustrates how to position the patient’s head and which views should be taken to obtain complete photographic documentation.
3.1 Natural Head Position
The natural head position (NHP) is a standardized and reproducible orientation of the head achieved when one is looking at a distant point in front of one, at eye level. The great majority of clinical photographs and direct clinical examination steps require the NHP; in addition, patient positioning for cephalometric analysis should be the NHP. The simplest way to obtain the NHP is to instruct the patient to look straight ahead at a point at eye level on the wall in front of him [4].
Sometimes, the orientation obtained seems unnatural to the examiner, but, on asking the patient to tilt the head upward and downward and then return to looking straight ahead to the point at eye level, we have noted that the final spatial orientation is very similar to the initial one.
The NHP is of paramount importance in facial analysis due to its reproducibility and, most importantly, because it is extremely simple to obtain. In contrast, the Frankfort horizontal and the other constructed planes utilized to orient the head and based on internal skeletal landmarks are “unnatural” and difficult to obtain clinically.
3.2 How to Obtain Life-Size Photographs
Frequently, the preoperative case study needs a soft-tissue cephalometric analysis on life-size photographs. As described by Bahman Guyuron [3], I place an opaque white ruler close to the subject while shooting the images, taking care that both are perfectly focused to ensure the accuracy of the enlargement. With conventional films, the printer must be as large as the subject in order to have a final 1:1 scale in the print. With a digital camera, I now use a quick and simple method:
-
Transfer the image to the personal computer.
-
With Adobe Photoshop software, adjust contrast and brightness.
-
Save in JPEG format for storage.
-
Import the image into a Microsoft Word document and enlarge or reduce it to obtain a life-size dimension.
-
Insert the date, the name of the patient, and any useful clinical notes.
-
Print on A4 paper (210 × 297 mm) format to obtain space around the image for all future handwritten notes.
3.3 The Poster “Views of Clinical Facial Photography”
The experience acquired documenting thousands of patients and teaching on the maxillofacial surgery postgraduate course at the University of Padua convinced me to produce a poster to inform my patients and instruct my young colleagues about clinical facial photography. Its actual dimensions are 0.70 m wide and 0.50 m high. A printable full-size electronic copy is available on Springer Extra Materials.1
The background consists of a drawing of a large open left hand. On the palm, the 11 basic views taken for all patients during the initial examination and any successive postoperative checkups are illustrated, independently of the type of treatment planned. On the thumb, we see the five views added to the previous basic series in the case of nasal feature documentation; on the index finger, the five views in the case of documenting dentofacial deformities and/or orthodontic problems are added; on the middle finger, the seven views in the case of documenting orbital and lid features, and on the ring finger, the three views in the case of documenting ear features. Thus, there are a total of 31 standard facial pictures illustrated in the poster, and only four of these are not in the NHP.
The small piece of 35-mm film, on the little finger, is a reminder of the necessity to take any other useful photographs required by a particular clinical case.
I recommend hanging the poster up in the examining room, near the blue background panel utilized for facial photography. The goals obtained using this visual tool are:
-
First, strengthening the doctor’s skills, as a communicator, during the first consultation
-
Second, helping the patient to understand the necessity of complete facial documentation and to cooperate actively during the shoot
-
Third, assisting the doctor in following a rigorous method and sequence in patient documentation so that no views are forgotten or technical errors made
3.4 The Shooting of a Complete Set of Clinical Facial Photographs (Step-by-Step Description)
3.4.1 Accompanying the Patient in the Photo Area
The ideal time, during the first consultation with a new patient, for a complete set of clinical photography is described in Chap. 1. Before asking the patient to sit on the rotating stool with rollers, I illustrate the basic and specific views utilizing the poster, underlining the fact that I will take two or three shots for each view to avoid the problem of blinking. When we are both sitting face to face, I instruct him on how to obtain the NHP and then start the set, taking the 11 basic views.
3.4.2 The Eleven Basic Views
This series of pictures is fundamental and should be taken for all patients. All the basic views presented in this book are taken at a fixed subject–camera distance of 1.5 m with a digital camera (Fujifilm digital camera FinePix S1 Pro) mounted with the 105 mm Micro-Nikkor lens. Care should be taken to maintain the camera at the same height as the subject [5].
The first two or three shots are the full face frontal view (Fig. 3.1). The patient is instructed to look at the lens of the camera, which is held perfectly frontal to the subject. I do not always continue with the next view, but I prefer to review these in the monitor of the digital camera to check the exposure, the shadows, the patient positioning, and the occurrence of blinking. Setting a good full face frontal view is essential because many of the parameters do not change during the rest of the procedure.
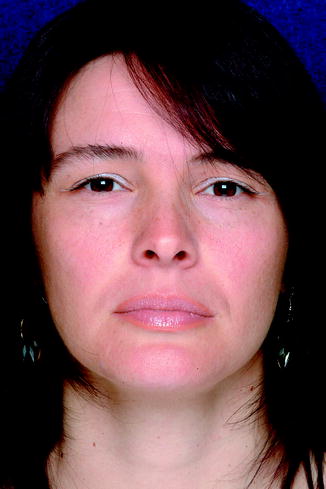
Fig. 3.1
Full face frontal view
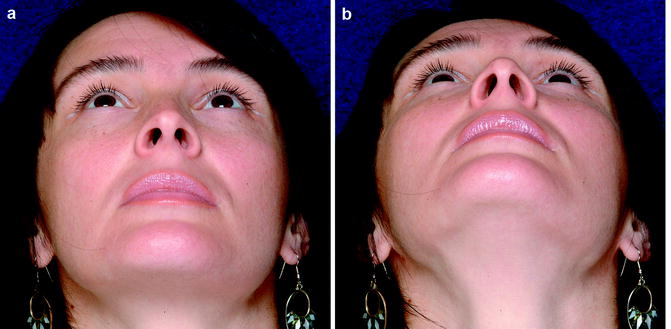
The next view is the full face basal view (Fig. 3.2). These photographs are taken with two or three small differences in the grade of head extension due to the difficulty in reproducing the same non-NHP orientation at the time of follow-up.
Stay updated, free dental videos. Join our Telegram channel
VIDEdental - Online dental courses


