Treatment of Inflammatory Periodontal Diseases
• Gingivitis
• Periodontitis
Gingivitis and periodontitis are elicited primarily by bacteria. As a consequence, the treatment must have a primarily anti-infectious nature. Reduction or elimination of the infection results for the most part from mechanical treatment of affected teeth and root surfaces as well as the gingival soft tissue. In special cases, support via topical or systemic medications may be indicated. Alterable risk factors must be eliminated as much as possible.
This section deals with the following constituents of periodontal therapy:
|
• Concepts of periodontal therapy: methods, goals, outcomes • Periodontal healing, treatment planning, course of treatment |
|
| “Phase 0” Therapy | Systemic pre-treatment |
|
• Emergency therapy |
|
| Phase-1 Therapy |
• Initial therapy 1 and 2 Anti-infectious/causal, non-surgical therapy • FMT – “full mouth therapy” |
| • Adjunctive medicinal therapy – systemic and topical | |
| Phase-2 Therapy | Surgical therapy Anti-infectious and corrective therapy • Access flap surgery • Regenerative therapy • Resective therapy • Furcation treatment |
|
• Mucogingival and plastic surgery |
|
| Phase-3 Therapy | Maintenance therapy – recall |
|
• Additional adjunctive therapy: |
|
|
|
• Functional, orthodontic and splint therapy • Perio-prosthetics 1 and 2 • “Alternative” therapy: Dental implants |
Left side:
Histologic section in polarized light; True regeneration of the periodontium following GTR (p. 338) M. Hürzeler et al. 1997
1 Dentin
2 New acellular cement, fibers
3 Periodontal fiber apparatus
Courtesy P. Schüpbach
Therapeutic Concepts and Techniques
All of the new knowledge gleaned in recent years, particularly in the areas of etiology and pathogenesis, have led to a true paradigm shift in treatment philosophy. This can be seen in many areas of practice. Following early diagnosis and early treatment, methods of and successes in prevention have become manifest. Only a few years ago, pocket elimination and freedom from plaque stood clearly in the foreground; however, today many other possibilities for combating periodontitis have entered the therapeutic larder.
Elimination/Reduction of Pathogenic Bacteria
It is impossible to achieve total freedom from plaque, either supragingivally or subgingivally. Therefore the goal of therapy is not the elimination of periodontopathic microorganisms, but rather “only” a significant reduction of the total number of microorganisms in the oral cavity. The goal is the creation of a homeostatic balance between resident bacteria and the host organism. Non-pathogenic microorganisms may be viewed as beneficial, because they often to maintain periodontopathic microorganisms in check (Fig. 444).
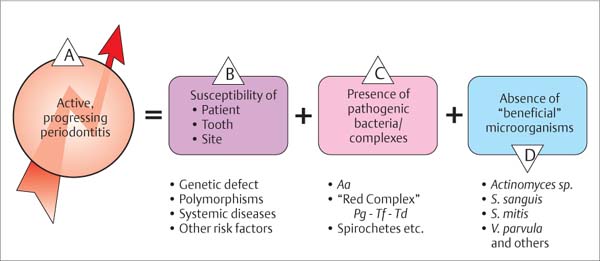
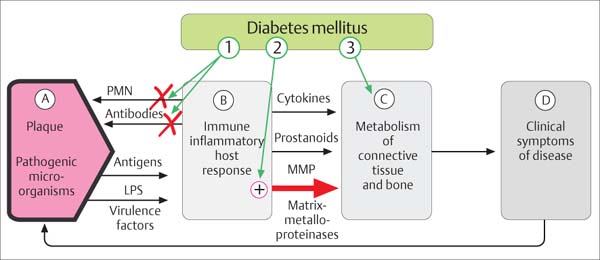
444 Etiology of Progressive Periodontitis
A The progression of periodontitis depends on various factors:
B The susceptibility of the patient (genetic defects or polymorphisms, systemic diseases, additional risk factors)
C The presence of periodontopathic bacteria and…
D … the absence of beneficial microorganisms.
Modified from Socransky & Haffajee 1993
Elimination of the Biofilm—Causal Therapy
The first step toward such homeostasis is achieved mainly by mechanical disruption of the closed community of microorganisms represented by the biofilm within the periodontal pocket, and the subsequent removal of these microbes. Disrupting the biofilm permits attack by the host defense systems and topical medicaments. This type of pocket treatment, particularly the treatment of the root surface, is performed mechanically either “closed” or “open,” using ultrasonic instruments and/or conventional hand instruments.
The traditional closed mechanical treatment is particularly effective today when used in the “full mouth therapy” method (FMT; Quirynen et al. 1995, De Soete et al. 2001, Saxer 2002a, b). In the FMT technique, the pockets are continuously rinsed with a disinfectant solution (e.g., CHX, betadine etc.) during root planing. This combined technique improves the therapeutic results significantly, especially when all four quadrants are treated within a 24-hour period of time (p. 281).
Open (surgical) treatment also has as its primary goal the elimination of periodontopathic microorganisms within the biofilm. In addition, any morphologic defects of the bony pocket can be improved or corrected.
Corrective Therapy—Treating the Bony Defects
New knowledge makes it possible to predict regeneration of damaged periodontal structures:
• Filling of hard tissue defects with bone and bone replacement materials
• Using membrane-guided tissue regeneration (or combining both methods)
• Use of signal molecules such as matrix proteins, growth factors etc.
Influencing the Host
Unavoidable (non-alterable) risk factors such as genetic defects cannot be therapeutically influenced today; systemic diseases must, however, be diagnosed and treated by the physician. Thus, for example, a well controlled diabetic can be offered periodontal therapy with a good chance of success.
The patient’s alterable risk factors (p. 54) must also be eliminated or severely reduced.
Protecting the “beneficial” Microorganisms
As mentioned, following periodontal therapy there should exist in the oral cavity an ecological homeostatic balance. In this regard, it is important that if the mechanical therapy is augmented by systemic medications, an antibiotic be selected that does not also eliminate the “useful or beneficial” microorganisms.
Therapy—Problems
The principle of periodontitis therapy is simple: Thorough cleaning of tooth and root surfaces. However, in practice it is often associated with significant problems, among them:
• The irregular contour of the base of the pocket and the remaining junctional epithelium
• The micromorphology of the roots and furcations, especially cellular cementum, cementicles, lacunae and resorptions (Schroeder & Scherle 1987)
• The macromorphology of the roots, with narrow furcations, root fusions, ridges, grooves etc.
Rarely is the bottom of a periodontal pocket identical at all sites around the tooth. Usually some areas of the tooth are more severely involved than others.
The natural root surface is rough, especially in areas with cellular cementum and in furcations. It often exhibits cementicles and enamel pearls, and even in health some lacunae are observed (Schroeder & Rateitschak-Plüss 1983; Schroeder 1986; Holton et al. 1986). Cleaning of such plaque-retentive areas by means of root planing is difficult and time-consuming!

445 Irregular Base of a Periodontal Pocket in an Actual Case—Mesial View
The left central incisor exhibits a very deep pocket on its mesial aspect. The junctional epithelium that persists at the base of the pocket is marked in red. Its course is irregular and at one location is even “undercut” in the apical region. Toward the palatal aspect (left in the SEM) intact periodontal structures can still be observed.
In the center of the picture, the wall of the pocket represented by the bacteria-coated root surface is visible. The difficulty for mechanical therapy becomes clear: On the one hand the bottom of the pocket must be achieved, and on the other hand any remaining soft tissue attachment must not be destroyed.
At the sites labeled A, B and C, the structures depicted below (Fig. 446) were observed.
Left: Radiograph. Tooth 21 was extracted. Its mesial root surface is depicted in the SEM (right).

446 Root Surface in the Area of the Pocket
|
A |
Adherent Plaque/Biofilm Upon the root surface one observes a thick layer of adherent plaque. |
|
B |
Lacuna Filled with Bacteria |
|
C |
Empty Lacuna on the Root Surface |
SEM courtesy H. Schroeder
Periodontitis—Therapeutic Goals, Therapeutic Outcomes
The first goal of periodontal therapy is the complete healing of the inflammatory condition; the next goal is the regeneration of all lost periodontal structures.
Unfortunately, such total success is only seldom achieved. The enormous amount of new knowledge that has emanated from basic and clinical research, however, targets all of us in this direction. But our long-standing “gold standard” of therapy—namely closed and open tooth and root cleaning—will have to be enhanced by measures to restore defects, such as implanting bone and bone replacement materials, the GTR technique, as well as the use of matrix proteins and growth factors in the near future.
Even though the goal of complete periodontal regeneration has not yet been achieved, we can speak of partial success when applying the success criteria that are valid today. The terms “success” or “failure” and the magnitude of “partial” success following periodontitis therapy can be interpreted in many ways and depends, of course, on the initial situation, i. e., the diagnosis of periodontitis (chronic or aggressive form).
A “healing success scale” ranging from wishful thinking to achievable treatment outcomes today includes:
| **** | Complete Regeneration |
| *** | Healing of the Pockets—Repair |
| ** | Cessation of Attachment Loss |
| * | Elimination or Reduction of Inflammation |
**** Complete restoration/regeneration of all lost tissues (“4-star healing”):
This type of regeneration is only achieved (today) following successful treatment of gingivitis (without attachment loss). The treatment of periodontitis generally does not lead to total regeneration of all diseased tissues.
*** Pocket elimination via healing/repair:
Within the marginal gingival soft tissues, this results in the formation of a long junctional epithelium and approximation of connective tissue to the root surface. In the apical regions, some regeneration of bone, cementum and periodontal ligament may occur. Following consolidation of the latter tissues, one can differentiate between “reattachment” and “new attachment.”
• “Reattachment” refers to periodontal tissues that have been partially destroyed but which are not yet infected, and which reattach to the hard structures.
• “New attachment” signifies synthesis of new periodontal tissues/structures and their attachment to a previously mechanically treated root surface. Some shrinkage of the marginal gingiva occurs and this leads to even further pocket depth reduction.
This type of “3-star healing” following periodontitis therapy can be viewed as a very favorable result.
** Cessation of attachment loss at its current position:
This amounts to stopping of the progression of attachment loss in areas where pockets were in evidence, and healing by means of a long junctional epithelium. Following this type of healing, a relatively shallow and inactive residual pocket will remain. At the same time, however, the pocket depth will be reduced due to marginal gingival shrinkage, and increased tissue resiliency may lead to pocket depth reduction. In cases of advanced periodontitis, the clinician must frequently be satisfied with this type of “2-star healing”. It requires a more frequent and regular recall interval, in order to quickly assess any new inflammatory manifestations of infection in the residual pocket. Patient compliance is especially important.
* Elimination or reduction of clinically diagnosable inflammatory processes (bleeding, BOP ):
This involves a reduction of the severity of inflammation and a certain degree of tissue shrinkage, without any periodontal tissue regeneration. Residual 4–5 mm pockets remain, but they are inactive and “dry.” This “1-star healing” must be viewed as a partial success, but the situation can descend into a failure if the residual pocket becomes re-infected and if further attachment loss occurs.
The maintenance of this type of “partial success” is only possible over the long term if the patient’s compliance is good and the recall interval is short.
In addition to these primary treatment goals of periodontal pocket therapy, additional improvements in the gingivoperiodontal structures are strived for:
|
• Improvement of gingival contour and possibly also bony architecture to render plaque control easier • Optimization of the functional and esthetic situations via surgical procedures—gingivoplasty, covering recessions, alveolar crest remodelling etc. • Functional therapy, selective occlusal adjustment: Improvement of function, morphology and esthetics • Stabilization of mobile teeth (function; temporary or permanent splinting, p. 471) • Replacement of missing teeth and restoration of morphologically defective teeth; alveolar ridge augmentation |
Periodontal Wound Healing
Repair → Reattachment → „New Attachment“ → Regeneration →Prevention
Periodontal wound healing follows the well-acknowledged biological principles (Clark 1996, Fig. 447), but it is also the “most complex healing process” in the human body (McCulloch 1993): The cells of five or more tissue types—epithelium, gingival and periodontal connective tissue, bone, root cementum—are essentially asked to create a new connection to the nonvascular and nonvital hard tissue of the root surface. Healing of the periodontal wound is also rendered more complex because it must occur in an open system, permanently contaminated and under a significant “bacterial load.” It is therefore not surprising that the healing results following all types of periodontal pocket therapy can be quite variable.
In contrast, the osseointegration of a titanium implant (p. 511) is, biologically speaking, child’s play, involving only ankylotic connection to the bone. In the case of periodontal healing, ankylosis represents a failure (root resorption)!
The most basic requirement for successful periodontal treatment is a clean, biofilm-free, decontaminated root surface. In most cases, this leads to connective tissue repair, a long junctional epithelium and usually residual pockets. Ever-more successful regenerative treatment methods must be developed to insure optimal healing results.
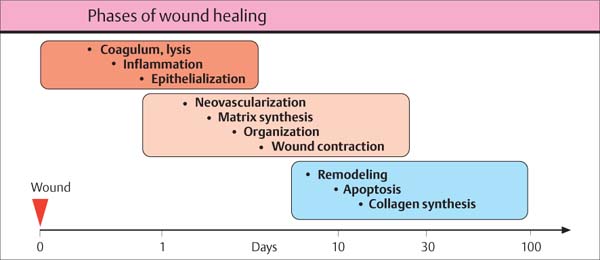
447 Principal Stages of Wound Healing
The three overlapping stages will be described. Because their temporal course is influenced by a diversity of factors, each of these stages may vary considerably in length:
• Stage of inflammation
Short duration (orange)
• Stage of proliferation
Medium duration (beige)
• Stage of maturation
Long duration (blue)
Adapted from R. Clark 1996
Regeneration of the Periodontal Defect
In addition to elimination of the tissue-destroying inflammation, true regeneration of lost tissues is one of the most important future topics in periodontology. Bony defects are filled today using autogenous or bone replacement materials; biomechanical substances (barrier membranes; GTR, p. 338) prevent the downgrowth of epithelial tissue. Thereafter, signal molecules (differentiation factors, growth factors etc.) steer migration and differentiation of pluripotent stem cells, guided by artificial or natural structures (“tissue engineering”), matrix formation and the formation of new tissue (Lynch et al. 1999).
Great progress has been made in tissue augmentation and defect filling, soon to become a standard procedure, but the more difficult task is to achieve “Regeneratio ad integrum,” namely a completely functional connection between the augmented soft tissues and especially the alveolar bone to the once infected and morphologically altered root surface (new periodontal ligament).
In all experiments to date, the formation of new cementum was only rarely identified histologically as acellular, extrinsic-fiber cementum, but more often as cellular cementum. Many authors have referred to this material as “bone-like,” which does not provide a stable connection to the root dentin.
Wound Healing and Regeneration—Possibilities
The paradigms of periodontitis therapy have changed markedly in the past two decades, due primarily to a veritable flood of new knowledge from medical specialties (McCulloch 1993, McGuire 1996, TenCate 1997, Wikesjö & Selvig 1999, Cho & Garant 2000).
New insights into the guidance and feedback mechanisms of cellular function now permit us to influence the healing processes (Bartold & Narayanan 1998, Christgau 2001, Hägewald 2002). As a result of advances in cell biology, we can better interpret the behavior of the tissues (Amar & Chung 1994, Selvig & Wikesjö 1999). For example:
• The bone-inducing capacity of demineralized bone matrix (proteins such as BMP; Jepsen 1996, Jepsen & Terheyden 2000; p. 351).
• Concepts of conditioning the nonvascular root surface (acids, Emdogain; Selvig et al. 1988, Trombelli et al. 1995, Hammarström 1997, Blomlöf et al. 2000)
• The “bioacceptability” of a formerly LPS-saturated root surface following detoxification
• The concept of tissue “compartments”; this lead to the GTR technique (p. 338), because cells colonize the surface according to the principle of “first come—first served” (Fig. 448B)
• The systemically-modulated, complex and overall active local network of growth factors and differentiation factors, signal molecules and adhesion molecules (Marx et al. 1998, Anitua 2001, Kübler & Würzler 2002)
• The existence of pluripotent stem and precursor cells within the blood stream and in the perivascular tissues.
Despite these enticing new developments and theories, periodontitis therapy today is guided by a strict anti-infectious, anti-microbial concept (Slots et al. 1999), with protocols for the individual treatment techniques. But still lacking are guidelines for the immediate postoperative period, that is during the first phase of healing, for wound care, immobilization and pharmacomechanical plaque control of the healing wound. Stabilization, especially the stabilization of the coagulum, is one of the most important measures. Stabilization mechanisms (adhesins etc.; Somerman et al. 1987, MacNeil & Somerman 1999, Somerman 2001) on the conditioned root surface prevent the downgrowth of epithelium and enhance the secure stabilization of the fibrin matrix. This serves as a natural guidance mechanism for the immigration of factor-guided future tissue cells during the second phase of wound healing.
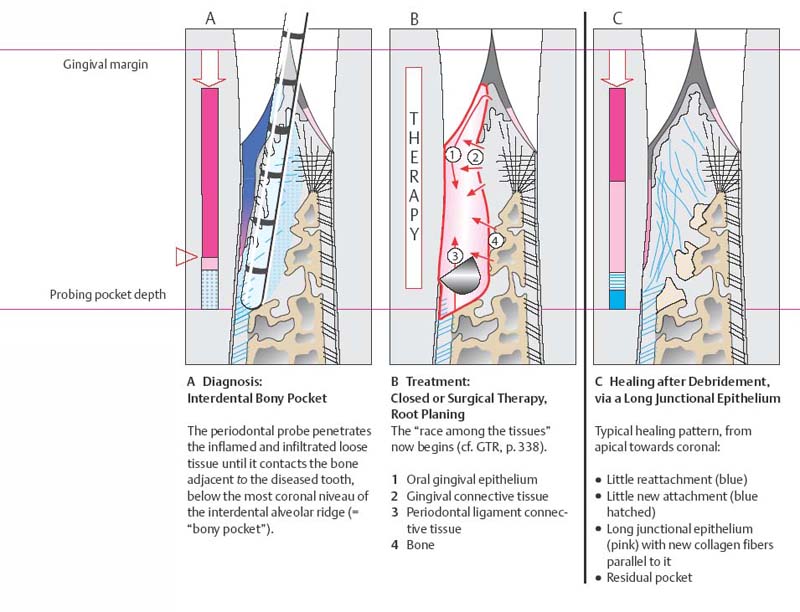
448 Possibilities for Periodontal Wound Healing
Adapted from H. Schroeder
Depicted are diagnosis (A), treatment (B) and possible therapeutic results (C—G; post-therapeutic healing) for the periodontal intraalveolar defect on the tooth shown on the left side of each illustration.
Note: The periodontal tissues of the tooth on the right side of the illustration are healthy.
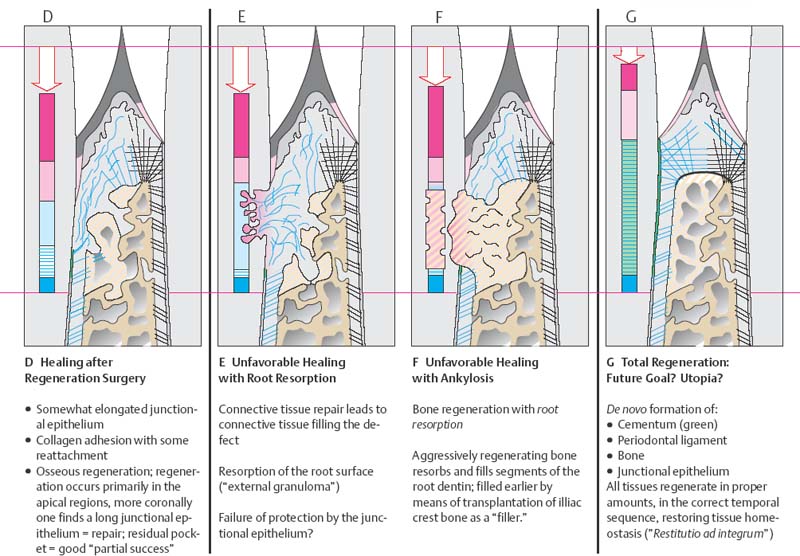
448 Further Possibilities for Healing, D–G
Periodontal Wound Healing—Definitions
Histologic studies of wound healing have clarified whether and to what extent healing of the gingival and periodontal attachment apparatus is possible in the form of re-attachment or regeneration (Schroeder 1983, Polson 1986, Karring 1988). One differentiates among:
|
• Epithelium • Epithelial regeneration |
re-attachment? “new attachment” |
|
• Connective tissue • Connective tissue regeneration |
re-attachment “new attachment” |
Histologic Terminology
Regeneration—“Restitutio ad integrum”
Complete regeneration of form and function: Gingiva with junctional epithelium and gingival connective tissue; periodontium with cementum, periodontal ligament, bone.
Repair
Restoration of the continuity in the wound or defect area, without regeneration of the originally intact tissues’ form and function: e.g., long junctional epithelial attachment.
“New attachment”
New connection of connective tissue with the formerly pathologically exposed root surface, i. e., formation of new cementum with inserted periodontal ligament fibers (also, formation of new bone with Sharpey’s fibers embedded).
Re-attachment
Re-attachment is the re-establishment of the bond between connective tissue and the remaining vital tissue components on the root surface, e.g., cementum and remnants of the periodontal ligament (usually in the deepest areas of the pocket; “dark blue” in Fig. 448).
Note: Epithelial re-attachment does not occur. Epithelium is always established by new cells from the basal cell layer.
Alveolar Bone—“bone fill”
Filling a periodontal osseous defect does not provide evidence for complete periodontal regeneration (including newly formed cementum). This can only be demonstrated histologically (Listgarten 1986).
Clinical Terminology
For precise definitions of probing depth, clinical attachment level etc., see “Diagnosis” (p. 165).
Treatment Planning—Sequence of Treatment
In principle, the course of periodontitis therapy is similar for all forms of the disease (p. 209), and is administered in stages or phases of varying duration, depending upon the extent and severity of the disease.
However the details of individual therapy may be dramatically different. These details are dependent upon the type of disease, the patient’s own desires, patient age, financial circumstances and, not least, the preference of the individual clinician! It is well known that “many roads lead to Rome”!
Pre-phase—Systemic Health, Oral Hygiene
“Phase 0” consists primarily of identifying the patient’s systemic health (general medical history, p. 167; readiness for treatment, p. 212), as well as a comprehensive data collection, the establishment of a provisional diagnosis and a case presentation (current status, necessary treatment). During Phase 0, any emergency treatment is also rendered.
The establishment of optimum oral hygiene and securing the patient’s willing compliance are extremely important for subsequent planning and the long-term result.
Professional supragingival plaque and calculus removal, the removal of iatrogenic irritants and plaque-retentive niches, as well as patient instruction in simple yet effective plaque-control will quickly improve the intraoral situation. This will convince and motivate the cooperative patient toward further and definitive participation in the comprehensive treatment program.
It must not be left unsaid that, despite optimum information and instruction, some periodontitis patients refuse “comprehensive treatment.” Such refusal must be clearly noted in the patient chart.
Phase 1—Causal, Antimicrobial, Anti-infectious
During this treatment phase, the findings, diagnosis and prognosis are verified. During the pre-phase, oral hygiene by the patient and the practitioner will have led to reductions in plaque and inflammation, therefore also to reduction of tissue swelling; it is reasonable to now establish a definitive diagnosis (and prognosis) based upon the important clinical findings (probing depths, attachment loss), and to formulate the definitive treatment plan.
While all of the pre-phase procedures are carried out with all patients, during Phase 1 the treatment modalities can differ. In some cases, closed root planing, with or without the concurrent use of medicaments (p. 287) may be performed, while in other cases the treatment moves directly into surgery (Phase 2).
In mild cases, above all with chronic periodontitis, closed therapy is frequently sufficient if the patient’s compliance is good.
In more severe cases it may be indicated to move into surgical-corrective therapy immediately after an intensive pre-phase.
In most cases, however, open therapy will follow closed therapy: As a consequence, in such cases fewer sites (in fewer sextants) will have to be treated surgically. The resultant tissue loss (papillae, marginal gingiva) will be less post-operatively.
Whether the case is treated solely closed (A), solely open (C), or initially closed and subsequently open (B; p. 209) depends not only upon the pathomorphologic situation, but also upon the practice structure. If the dentist works with a competent dental hygienist, the hygienist will generally perform the entire closed phase of therapy (p. 454).
Phase 2—Surgical, Corrective
Following Phase 1 therapy that includes closed, subgingival root debridement, a reevaluation must always be performed. If the treatment result is not satisfactory, individual root surfaces may again be treated with closed therapy (a). If deep pockets persist and if root fusion, grooves, furcation involvement etc. are present, these must be surgically addressed.
If the goal is to correct periodontal defects, following the pre-phase, surgical-corrective procedures are indicated. Tissue shrinkage should be avoided at all costs so that the surgical site will be optimally covered with gingival tissue following eventual application of restorative materials and/or membranes.
Most important is that the healing after surgical therapy must be continuously and professionally monitored, i. e., the operated area must be maintained supragingivally plaque-free as much as possible.
Phase 3—Preventive, Anti-infectious, “Life Long”
After conclusion of active periodontitis therapy—regardless of the type of treatment—check-up findings are collected 2–3 months later. If the therapy is deemed to be successful, the patient should be started on a regular recall (organized maintenance therapy; p. 449).
However, if individual sites exhibit problems (residual pockets, bleeding), the sites must be re-treated either closed (c) or surgically (b).
In such situations, the use of topical slow-release medicaments may be indicated (p. 293).
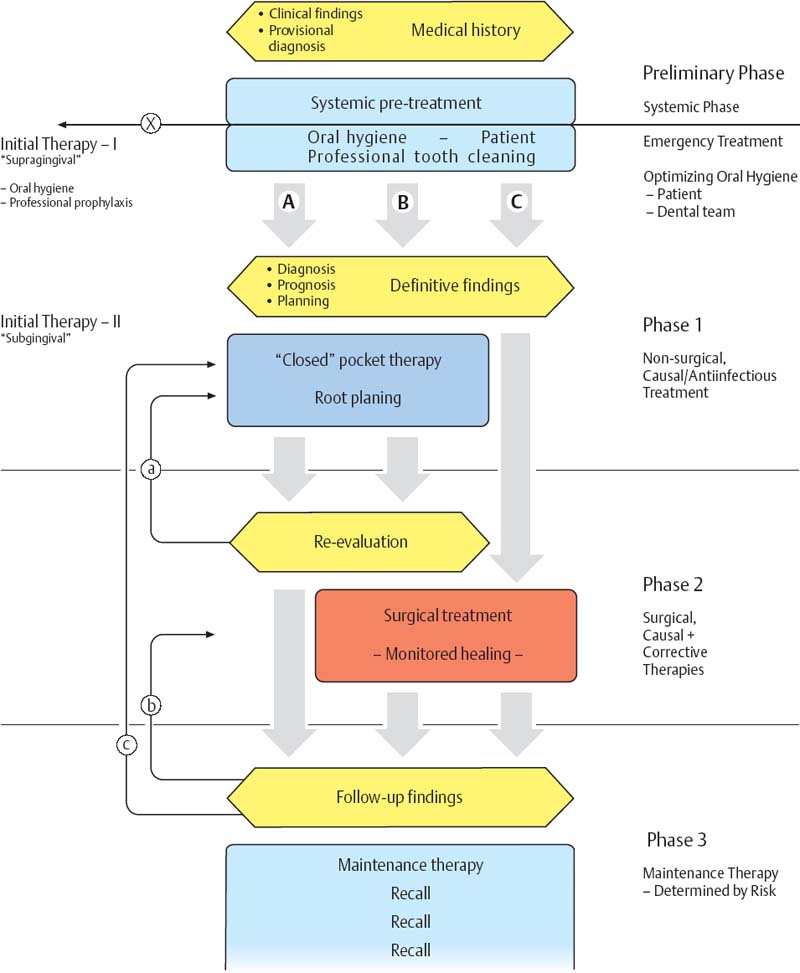
450 Course of Therapy—Three Possibilities: A, B, C
General Course of Therapy—Individual Planning
In the preceding pages the basic treatment planning and the course of therapy for patients with gingivitis and/or periodontitis were presented. In general, such treatment is performed according to the “phase” plan (phases of therapy; pp. 208–9).
Treatment, healing times and “pauses” for consideration of the patient and his/her oral hygiene will differ dramatically. Nevertheless, following each and every phase of treatment, a re-evaluation of the case must be performed: The treatment result and the planned further procedures must be reconsidered, and adapted as necessary to the new situation.
Causal therapy—Traditional Clinical Course
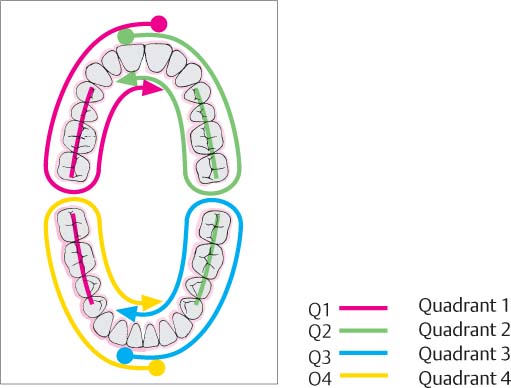
Phase 1 therapy consists of the exquisitely careful debridement of subgingival root surfaces in all periodontal pockets. For decades, this procedure has been performed quadrant-by-quadrant (Badersten et al. 1981, 1984; p. 280). The interval between individual appointments normally is one or two weeks. The quadrant scaling immediately follows the so-called “hygiene phase,” during which the patient is educated and trained to perform adequate plaque control at home.
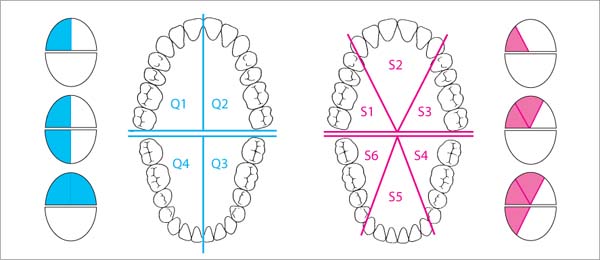
451 Quadrants—Sextants
Traditional mechanical/instrumental pocket treatment is usually performed at separate appointments for quadrants (Q1–Q4) or sextants (S1–S6); in mild cases, the left and right arch segments can be treated at one appointment.
The time required for each appointment will be determined by the severity of the case; appointments for such Phase 1 therapy are usually scheduled at 1–2 week intervals.
Causal Therapy—“Full mouth therapy” (FMT)
FMT represents an effort to synthesize all new knowledge from recent years. FMT is a consequential, anti-infectious approach, comprised of the following: Initial therapy includes an extended, systematic anti-microbial treatment, initially involving only supragingival pretreatment of the dentition (mechanical) and all oral niches (above all, the tongue). Only after achieving the prescribed clinical condition (p. 287), subgingival debridement (mechanically and with use of topical medicaments) is performed in the shortest possible time; in “extreme cases,” within a 24-hour period. This procedure is appreciated by most patients!
During this short-term but intensive treatment, disinfection agents such as chlorhexidine (CHX; p. 235), betadine or even oxidizing NaOCl (“bleach”) are used to rinse the mouth and the individual pockets. The goal is to prohibit re-colonization and re-infection of even shallow pockets (p. 256). Because significantly better results have been achieved using this type of closed periodontitis therapy (p. 285), in contrast to the traditional “quadrant-by-quadrant” technique, it is very likely that the FMT method will become more widespread. The necessity for surgical intervention may be reduced and the comprehensive treatment of even advanced cases may become financially more feasible
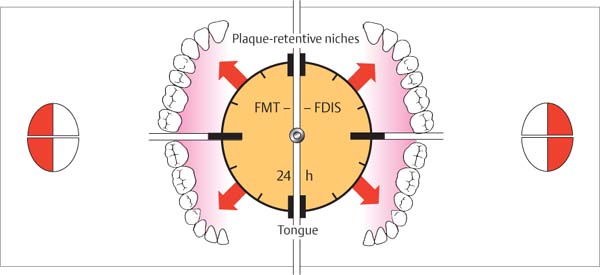
452 “Full Mouth Therapy—FMT”, “Full Mouth Disinfection—FDIS”
This new type of treatment using closed therapy is performed in the shortest possible time, preferably in only two appointments, e.g., for the left and the right sides.
Intensive pretreatment and optimum oral hygiene usually eliminate shallow pockets so that only the few remaining deeper pockets must be treated, using anesthesia (FMT, p. 281).
Systemic Pre-phase
• Systemic problems
• Systemic risks
The purpose of the systemic pre-phase is to protect both the patient and the clinician by ascertaining any general systemic risks associated with the patient.
It is critically important that infectious, above all viral diseases (Herpes, Hepatitis B and C, HIV infection) be detected and/or diagnosed: Every patient may harbor such diseases! It is therefore necessary to employ the usual hygiene measures for all dental examinations and treatments, e.g., gloves, mask and protective eyewear.
Individuals with severe systemic diseases (see ASA Classification, p. 212) can seldom be treated periodontally under the rubric “comprehensive therapy.” Usually these patients can only be treated with limited “emergency” measures, and with the participation of the patient’s physician.
Special precautionary measures are indicated with patients who suffer from multiple maladies, and most particularly with patients who are susceptible to the life-threatening danger of infectious endocarditis (Reichart & Philipsen 1999).
With non-life-threatening diseases, dental therapy should be planned in collaboration with the physician or internist, who may prescribe appropriate medications (polypharmacy); these should be checked for possible drug interactions with other agents prescribed by the dentist, as well as the possibility of undesired adverse effects (cf., gingival hyperplasia; p. 12).
Thanks to modern medicine, many of our patients lead the normal life of a healthy person. The possibility of injuring such patients during dental treatment must be ruled out (allergies, anticoagulants, hypertension, hypercholesterolemia).
Genetic and hereditary risks must be assessed, and decisions made concerning the individual patient’s treatability or non-treatability (uncontrolled Diabetes mellitus; smokers).
This chapter presents the following discussions:
|
• The patient—ASA classification • Cardiovascular diseases—“blood thinning” • Bacteremia—prevention of infectious endocarditis • Endocarditis prevention—antibiotics • Diabetes mellitus—risk factor for periodontitis • For the smoking risk factor—information, tobacco cessation program |
Evaluation—Can the Patient be Safely Treated?
Before initiating any dental treatment, the relevant medical history provided by a “new” patient must be carefully checked, regardless of whether comprehensive therapy is anticipated or only an emergency procedure. Of particular importance are serious diseases or conditions, such as:
• Cardiovascular diseases
• Pulmonary diseases
• Renal diseases
• Endocrine diseases
• Compromised immune response
• Psychological/psychiatric conditions
Acute situations should be thoroughly discussed before treatment; these include allergies, anaphylactic reactions, but also patient fear of the treatment or even fear of the injection needle.
The dental team must be systematically prepared for emergency situations. Corresponding checklists, supplies and devices must be at hand (emergency kit, materials for cardio-pulmonary resuscitation, and perhaps even a defibrillator). The classification by the American Society of Anesthesiologists (ASA) helps to establish the physical status of a diseased patient (ASA Classes I–VI; Fig. 453)
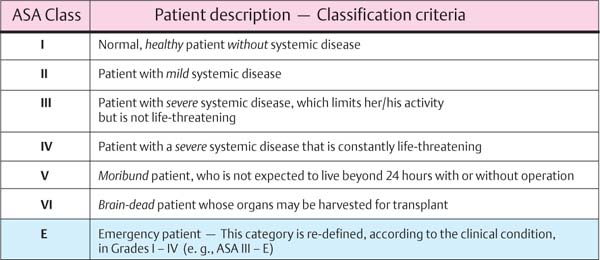
453 ASA Classification of Patients—Health Status
Normally, only patients in Classes I and II are treated in the private dental practice, and in rare cases Class III. In the latter case, active collaboration and cooperation with the patient’s treating physician is highly recommended.
Medical Risk Factor—“Blood Thinning”
Patients with cardiac and circulatory diseases (post-myocardial infarction, Angina pectoris etc.) or other conditions (e.g., post-surgical condition, dialysis patients, thrombosis prophylaxis etc.) usually take anticoagulants:
|
• Short-term therapy: |
Heparin |
|
• Long-term prophylaxis: |
Aspirin derivatives |
|
• Long-term therapy: |
Cumarin derivatives (e.g., Warfarin) |
In order to avoid life-threatening hemorrhage, the patient’s actual “Quick-time” (Cumarin) must be assessed. A Quick value of ≥ 30% usually does not affect dental or oral surgical procedures, but values between 15 and 25 % demand consultation with the treating physician.
• The effect of blood-thinning medications is enhanced by non-steroidal anti-inflammatory agents such as salicylate, mefenamine acids, tetracycline, metronidazol and sulfonamides (Scully & Wolff 2002).
• Their effects will be reduced by barbiturates, glucocorticoids, alcohol, and foodstuffs with a high vitamin-K content.
The antidote for Cumarin is vitamin K; there is no antidote for the rapidly metabolized heparin. If necessary the patient may stop taking this medication for a short period of time.
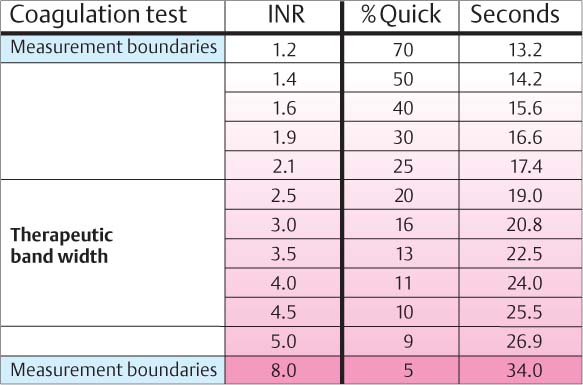
454 Coagulation—Tests of Blood Thinning
Because the results vary greatly, the old Quick-Test will be abandoned in the near future. It will be replaced by the INR blood thinning test (“International normalized ratio”) which provides constant values and ease of use by the patient!
Therapeutic bandwidth: INR values of 2.5–4.5, depending upon the risk status of the patient.
Bacteremia—Endocarditis Prophylaxis
Transient bacteremia is a natural, daily occurring situation (chewing, tooth brushing). In healthy persons, oral bacteria that enter the blood stream are efficiently eliminated by the host defense system.
Infectious endocarditis (IE) is a life-threatening disease, an infection of hemodynamically exposed defects (plaque formation on heart valves), usually elicited by oral microorganisms (streptococci).
Depending upon the virulence of the etiologic microbe and the resistance of the patient, various forms of IE can be differentiated (Müller 2001):
• Acute, infectious forms
Sepsis, fever, endocardial destruction; death in less than 6 weeks
• Acute/Subacute forms
Intermediate forms, often elicited by enterococci
• Subacute forms
Slight fever; if untreated, death between 6 weeks and 3 months
• Chronic forms
Symptoms the same as subacute; death in more than 3 months
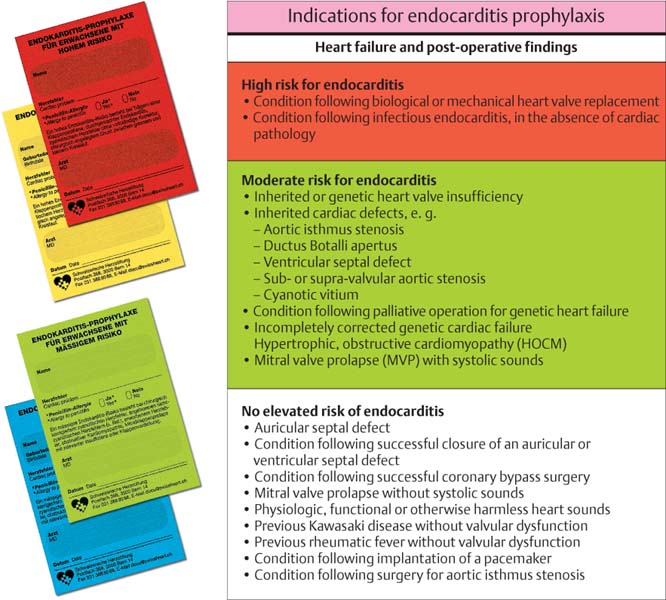
455 Heart Diseases and Cardiac Defects—Indications for Endocarditis Prophylaxis
Within the new wording of the prophylaxis program from the AHA (American Heart Association; Dajani et al. 1997) the risk structure of the heart was newly categorized in three groups:
• High risk (red)
• Moderate risk (green)
• Non-elevated risk
Of importance for the dentist is that the presence of a cardiac pacemaker is not an indication for antibiotic, pre-treatment prophylaxis (but care must be exercised when electronic instruments such as ultrasonic scalers are employed).
Left: Individual patient cards from the Swiss Heart Foundation, listing guidelines and dosages for endocarditis prophylaxis.
• High risk
|
red |
→ adults |
|
yellow |
→ children |
• Moderate risk
|
green |
→ adult |
|
blue |
→ children |
Infectious endocarditis (IE)
A wide variety of microorganisms such as bacteria, mycoplasm, fungi, rickettsia or chlamydia can elicit IE if they enter the bloodstream due to trauma or tissue manipulation. Regions of the cardiovascular system that experience slow blood circulation or a high level of turbulence are particularly susceptible to infections.
The most frequent source of microorganisms that elicit IE is the oral cavity. The primary pathogens are gram-positive streptococci (viridans type), especially Streptococcus sanguis.
In addition to S. aureus and S. epidermis, more and more often one also observes gram-negative bacteria from the oral cavity and the upper respiratory tract that elicit IE; for example, A. actinomycetemcomitans, Hemophilus ssp., Cardiobacterium ssp., Eikenella corrodens, Kingella ssp., Capnocytophaga, Neisseria ssp.
For the protection of IE-endangered patients, bacteriocidal antibiotics of the “penicillin type” (p. 214) are recommended. As early as 1983, J. Slots and others suggested that IE prophylaxis could also include metronidazol (see Medicaments, p. 287).
Endocarditis Prophylaxis with Antibiotics
According to new guidelines from AHA (Dajani et al. 1997), the prophylactic dose of standard antibiotic (Amoxicillin) was reduced to 2 grams; in addition, no follow-up dose is now recommended; not all other Heart Associations agree.
It is comforting for dentists to know that most of the, albeit rare, cases of endocarditis do not result from invasive, surgical treatments! Nevertheless: Oral, especially periodontal surgical procedures take place in a highly contaminated area. Expansive and/or deep surgical procedures have almost always been performed with antibiotic prophylaxis. For this reason, recommendations concerning which dental procedures require endocarditis prophylaxis were welcomed (Newman & Winkelhoff 2001).
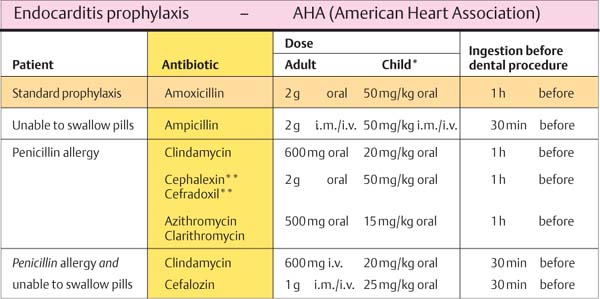
456 Endocarditis Prophylaxis
The standard antibiotic for IE prophylaxis is Amoxicillin.
For patients who are allergic to this bacteriocidal broad spectrum penicillin, and/or those who cannot swallow pills, some alternatives are provided.
* Maximum children’s dose, depending upon body weight; do not exceed the adult dose!
** Cephalosporine and penicillin must not be used with Type 1 hypersensitivity!
Dental Procedures Carrying the Risk of Bacteremia
Bacteriemia will occur following all dental procedures that elicit bleeding. The endangered patient must be premedicated with the “one-shot” prophylaxis (AHA) before:
• Tooth extraction, surgical tooth extraction
• Root tip resection
• Suture removal, dressing change
• Calculus removal
• Intraligamentous anesthesia
• Periodontal probing (Fig. 457 left).
Bacteriemias of varying frequency and severity also occur after chewing hard foodstuffs (15–50 %), during tooth brushing (5–25 %), or during oral irrigation (25–40 %; according to Neu 1994).
The percentage and number anaerobic species were approximately twice as high in patients with poor oral hygiene and advanced periodontal diseases in comparison to patients with good oral hygiene. Bacteriemia occurs in these patients also, but patients at risk for endocarditis should not abandon mechanical oral hygiene; rather, they should rinse 30 minutes beforehand with chlorhexidine.
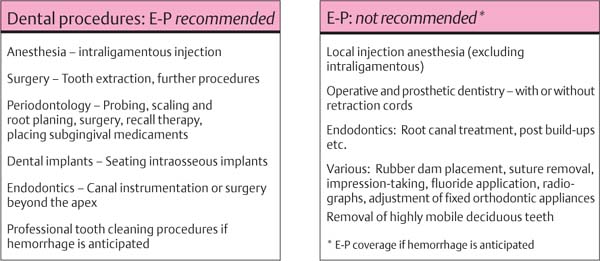
457 Dental Procedures Requiring Antibiotic Endocarditis Prophylaxis (E-P)
For single procedures the prophylaxis measures suggested above are sufficient.
If, however, an extended phase of treatment is planned, a longer-lasting (adjunctive) medication must be considered, combined with an intensive intraoral antiseptic regimen (p. 287).
Diabetes mellitus (DM)—Risk Factor for Periodontitis
A new classification for Diabetes mellitus was presented in 1997 (WHO; American Diabetes Association):
|
• Diabetes mellitus Type 1 (formerly IDDM) • Diabetes mellitus Type 2 (formerly NIDDM) • Other diabetes with known etiologies • Gestation Diabetes (pregnancy Diabetes) |
Untreated, all forms of the disease are similar in the elevated blood sugar level and alterations in carbohydrate and lipid metabolism (DGP 2002/Risk factors).
• The less common DM Type 1 occurs due to the autoimmune-elicited destruction of insulin-producing β-cells of the pancreas. The consequence is acute insulin deficiency.
• DM Type 2 diseases are not primarily insulin-dependent (over eating, sedentary lifestyle!); Type 2 Diabetes today has achieved epidemic proportions. The number of cases is increasing rapidly, and is estimated at 150,000,000 cases worldwide.
DM today is frequently one component of the “metabolic syndrome,” together with obesity, elevated blood lipid and high blood pressure (“deadly quartet”; syndrome X).
458 Risk Factor—DM
The effects of persistent hyperglycemia are many. Various target cells react inappropriately to glycosylated lipids and proteins (AGE, “advanced glycated end-products”), mediated via the specific receptor RAGE.
1 Defective PMNs and antibodies
2 Macrophages with enhanced catabolic mechanisms
3 Altered extracellular matrix
Adapted from R. Page 1998
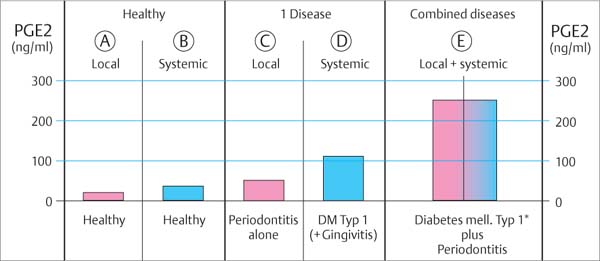
459 Differences in Host Response in Health, Type 1 Diabetes and Periodontitis Patients
The levels of the strong pro-inflammatory mediator prostaglandin E2 (PGE2; p. 49) differ massively.
In patients with Diabetes and periodontitis (E), an extreme overproduction of PGE2 is observed, which complicates the disease picture.
Adapted from G. Salvi et al. 1998
Periodontitis Therapy for Diabetes Patients
An important first step is the meticulous anti-infectious initial therapy and the establishment of an optimum blood sugar level (internist). Persistence or progression of periodontitis can lead to elevated insulin resistance, and can increase the diabetic consequences:
• Retinopathy (vascular damage, p. 133; blindness)
• Nephropathy (renal high pressure as a consequence)
• Neuropathy
• Angiopathy (atherosclerosis—peripheral, heart, brain)
• Disturbances of wound healing
• Severity of periodontitis (the “sixth complication”)
Periodontitis and Diabetes mellitus exhibit numerous reciprocal effects. Both can therefore be referred to as reciprocal risk factors. Chronic infection of the periodontal pocket (gram-negative microorganisms, lipopolysaccharide) elicit within the altered glycosylating cells of a diabetic an increase in excessive reactions of the defense cells, which is characterized by release of large amounts of pro-inflammatory, catabolic mediators (Grossi & Genco 1998). Diabetes and periodontitis should therefore be treated simultaneously, where necessary employing systemic antibiotic support (doxycycline) (Miller et al. 1992; Westfelt et al. 1996; Tervonen & Karjalainen 1997).
Smoking—An Alterable Risk Factor
Because of its numerous negative consequences for general systemic health, regular heavy smoking is one of the most dangerous addictions. It is also the most significant alterable risk factor for periodontal diseases.
In addition to nicotine, tobacco smoke contains up to 4,000 toxic, cancer-causing components. Therefore, a tumor-screening examination should be performed on all patients who smoke, including meticulous inspection of the entire oral cavity (Reichart 2002, Reichart & Philipsen 1999).
Pathogenesis: Nicotine and its by-products compromise the host response to infection, including within the periodontal tissues (Müller 2001):
• Reduced chemotaxis and phagocytosis by PMNs
• Reduced synthesis of immunoglobulins (IgG2)
• Stimulation of pro-inflammatory cytokines and additional mediators (IL-2, IL-6, PGE2)
• Elevated numbers of anaerobes in the subgingival region, including T. forsythensis, P. gingivalis, and also members of the “orange complex” (Haffajee & Socransky 2001)
• Damage to fibroblasts (gingival and periodontal)
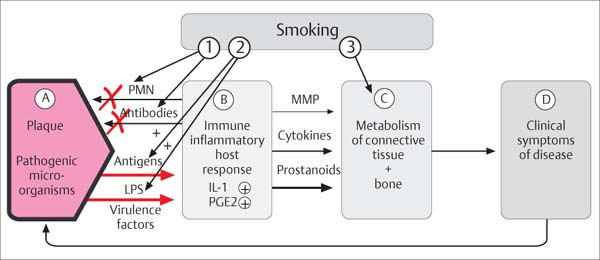
460 Risk Factor—Smoking
Where and how does tobacco smoking influence the pathogenesis of periodontal diseases?
1 Activity of PMNs, reduced secretion of immunoglobulins (IgG2)
2 Enhancement of subgingival anaerobic microorganisms
3 Influence on gingival, periodontal and osseous metabolism
Adapted from R. Page & K. Kornman 1997
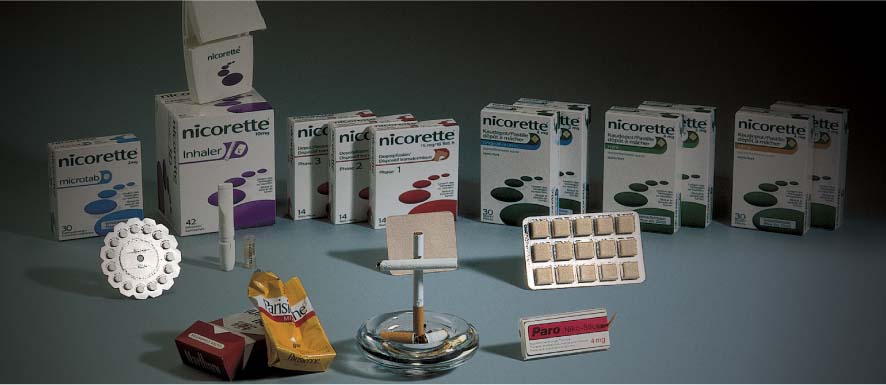
461 Smoking Cessation Using Nicotine Substitutes
“Nicorette” products; from left to right:
| • Microtabs: Sublingual tablets • Inhaler: Cartridges within a cigarette mouthpiece • Transdermal patch: For 16 hours (5, 10 and 15 mg) • Nicorette chewing gum |
The Nicorette products are available in differing concentrations and in some instances different taste formulations.
Smoking Cessation
The dental team sees the patient in recall at least twice per year and is therefore almost predestined to accompany the tobacco cessation process. Treatment results in smokers with aggressive periodontitis and poor oral hygiene are definitively poorer, on average, than in non-smokers. Caution is the watchword before regenerative procedures, e.g., filling bony defects, whether on natural teeth or dental implants. In the face of additional risk factors (oral hygiene, Diabetes, positive IL-1 polymorphism etc.) one is wise to avoid regenerative procedures of any kind (Tonetti et al. 1995, Müller et al. 2002, Jansson et al. 2002, Machtei et al. 2003). If the smoking cessation program is to be effective, the time factor, and uncompromising patience, will play major roles. Motivational discussions about smoking cessation often follow the “five A’s”: Ask, advise, assess, assist, arrange (Ramseier 2003).
Cessation programs including the various forms of nicotine replacement substances (Fig. 461) have proven effective. Without nicotine, the medicament “Zyban” (bupropion) is effective.
Emergency Treatment
Many periodontitis patients are not aware of their disease, even though it may have been progressing over many years. Only when pain and acute inflammatory symptoms appear do such patients seek out a dentist.
Such emergency cases must be treated immediately. However, to avoid life-threatening incidents, a succinct general medical history must be taken, with particular attention to any medicines the patient may be taking (anticoagulants!) and an assessment of the necessity for infection prophylaxis (endocarditis, HIV etc.), as well as allergies and previous significant incidents.
Next, a clinical and radiographic examination should be performed for emergency patients; despite the pain, this is absolutely necessary before any treatment.
Included in the category “periodontal emergency situations and treatments” are:
|
• Initial topical medicinal and mechanical treatment for acute NUG • Treatment of acute, suppurating pockets • Opening periodontal abscesses • Immediate extraction of hopelessly mobile teeth that cannot be maintained • Acute, combined endodontic-periodontal problems • Treatment of periodontal trauma following accidents |
Acute ulcerative gingivoperiodontitis (acute NUG/NUP) is painful and progresses very rapidly. Careful instrumentation and application of topical agents generally bring relief within a few hours and a reduction of the acute situation. Caution: Ulceration may be a symptom of HIV-seropositivity (opportunistic infection).
Active suppurating pockets generally are not painful if drainage is established at the gingival margin (exception: abscess). Such pockets represent an exacerbating inflammatory process, which leads to rapid attachment loss. They must be treated immediately with application of rinsing solutions or ointments; mechanical cleansing must also be initiated.
Periodontal abscesses are usually very painful. They must be drained immediately. This can usually be accomplished via probing from the gingival sulcus.
In the case of molars with deep pockets or furcation involvement, an abscess that penetrates the bone may develop subperiosteally. These cannot always be reached via the gingival margin, and must be drained by means of an incision.
Immediate extraction should be reserved for teeth that cannot be maintained or are highly mobile or which cause the patient undue discomfort. In the case of anterior teeth, for esthetic reasons, extractions should be avoided when possible, or an immediate temporary should be prepared.
Acute, endodontic/periodontal processes have a more favorable prognosis if the primary problem is of endodontic origin. The root canal should always be treated first, subsequently the pocket (pp. 445–447).
Periodontal trauma due to accident usually requires immediate splinting (following any necessary reimplantation or repositioning of the tooth).
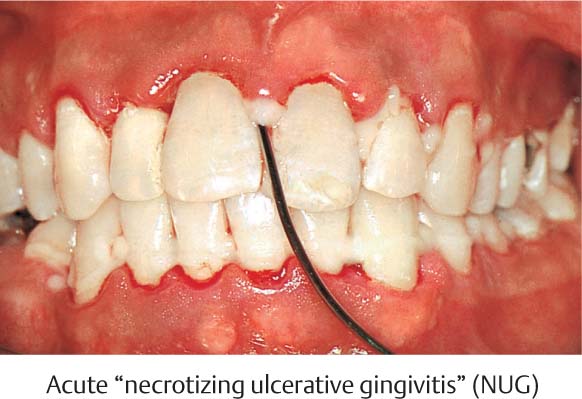
462 Emergency Situation: Acute Necrotizing Ulcerative Gingivitis (NUG)
The severe pain in the acute stage permits only a very careful peripheral attempt at cleansing. Treatment of this acute condition involved gentle debridement with 3 % hydrogen peroxide, and application of a disinfecting ointment containing anti-inflammatory and analgesic ingredients. The patient was told to rinse at home with a chlorhexidine solution.
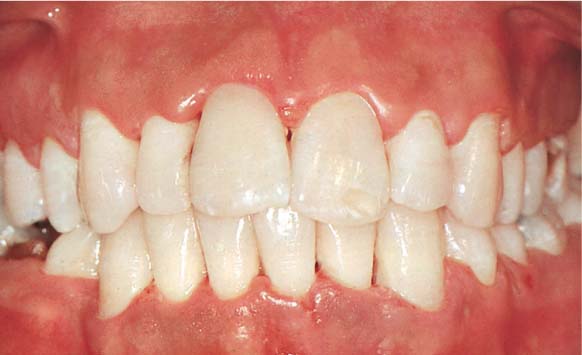
463 After Emergency Treatment—Subacute Stage
Several days after gentle topical application of the medicaments and careful mechanical debridement, the signs of active NUG—especially the pain –subsided. Treatment by means of systematic subgingival scaling can now proceed. A gingivoplasty may be indicated subsequently in the normal course of treatment.
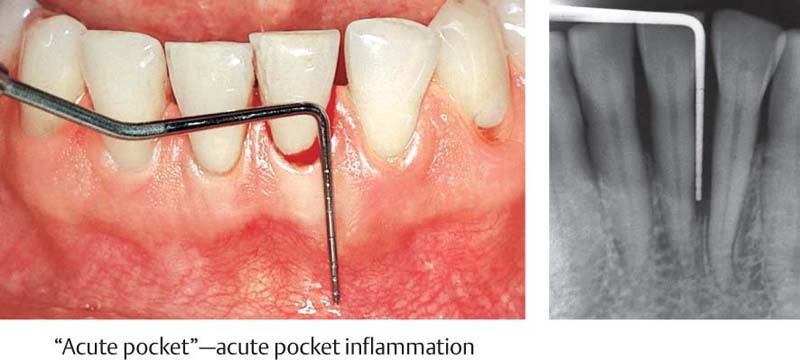
464 Emergency Situation—Localized Acute Pocket
Tooth 31 is vital and should be maintained despite the 10 mm pocket. Very little pus has formed; drainage via the gingival margin appears possible. The tooth is slightly percussion sensitive. Prior to systematic mechanical treatment, the tooth is treated on an emergency basis with topical application of a medicament, and the pocket is disinfected.
Right: Note the deep defect on the distal of tooth 31.
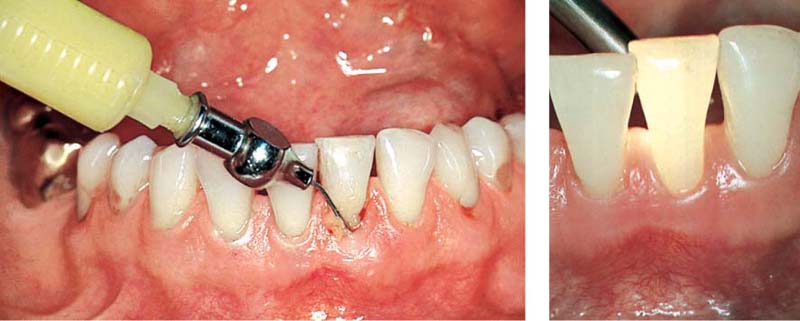
465 Emergency Treatment Using Local Medicament, and Follow-up
As an emergency measure the pocket was first rinsed thoroughly with chlorhexidine solution and then filled with achromycin ointment (3 %). Once the acute symptoms subside, a thorough root planing can be performed.
Right: Eight weeks after the emergency therapy, the gingiva has regained its resiliency and has shrunk somewhat. Probing depth is now only ca. 3 mm.

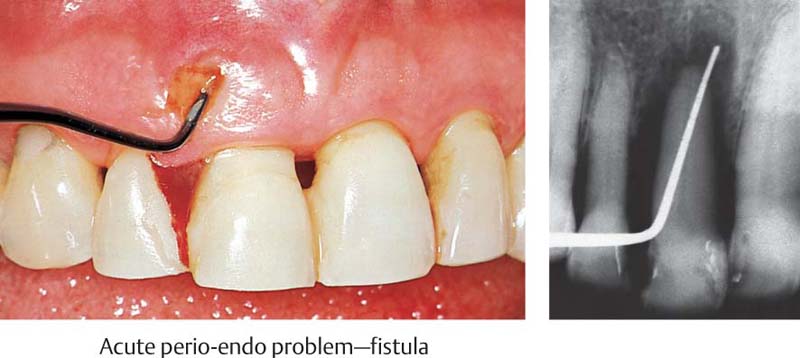
466 Emergency Situation: Pocket Abscess—Drainage after Probing From the Gingival Margin
Originating from a deep pocket mesial to tooth 11, a periodontal abscess has formed. Copious pus exudes when the pocket is probed.
Left: The radiograph depicts the periodontal probe inserted to the base of the osseous defect.
467 Emergency Treatment Using Topical Medicament—Radiographic Follow-up
The abscess has opened via the gingival margin. The pocket is first thoroughly rinsed, then filled with an antibiotic-containing ointment. Once the acute symptoms have subsided, definitive therapy can be undertaken.
Left: Radiograph 6 months after definitive therapy: New bone formation is apparent.
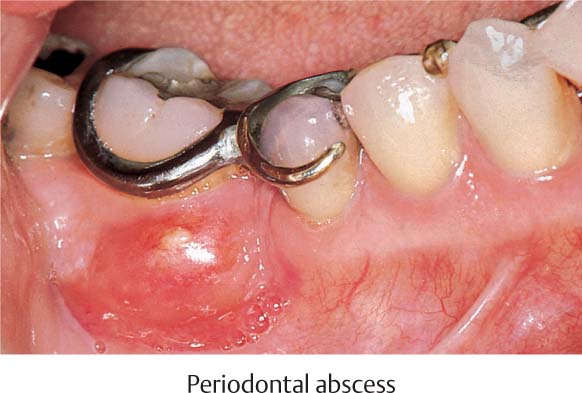
468 Emergency Situation: Periodontal Abscess Anticipates Drainage Through the Gingiva
Originating from the deep, one-wall infrabony pocket mesial to the tipped but vital tooth 47, an abscess has developed. The buccal gingiva is distended as the abscess is about to penetrate through the mucosa.
Tooth 47 is an abutment for a removable partial denture that is ill-fitting, but the patient wants to retain the partial denture.
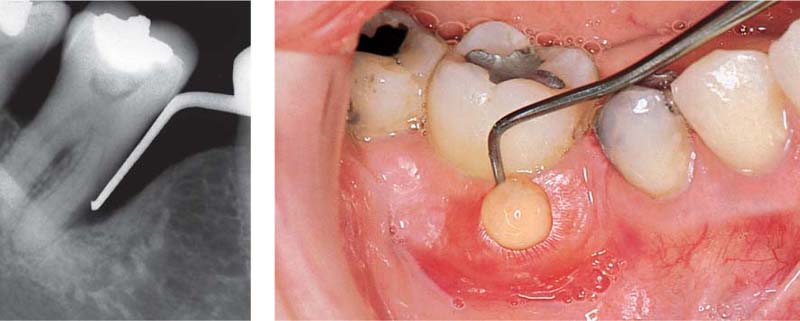
469 Abscess—Drainage
As soon as the mucosa was touched the abscess opened and copious pus exuded.
Left: In the radiograph one observes the deep mesial periodontal pocket with a hoe scaler in situ. Since the furcation appears not to be involved, it is possible to consider maintaining this tooth. The ensuing treatment included mechanical debridement and topical application of medicaments.
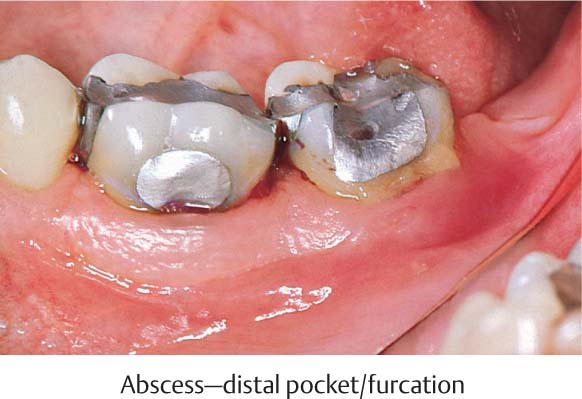
470 Emergency Situation in the Posterior Segment: Hopeless Molar (37)
Pus exudes spontaneously from the deep distal pocket and the buccal furcation of tooth 37.
The tooth is vital, highly mobile and painful to the slightest touch.
471 Radiograph of 37 Before Immediate Extraction
The periodontal probe can be inserted almost to the root apex in the deep buccal pocket. Without clinical probing, such a defect at this location would be almost impossible to detect. The shape of the furcation is very unfavorable in terms of treatment; the two roots appear to fuse apically.
Right: Highly infiltrated granulation tissue remains attached to the root after extraction.
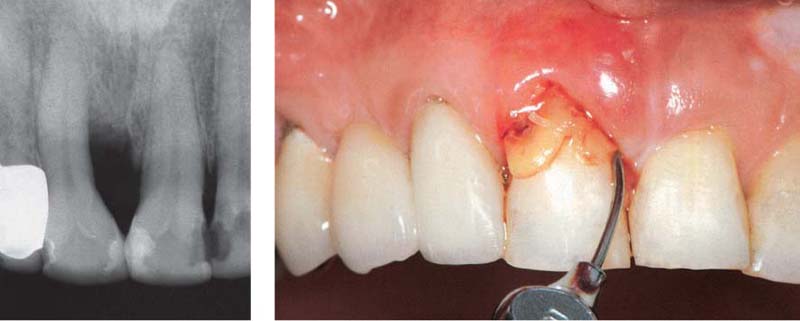
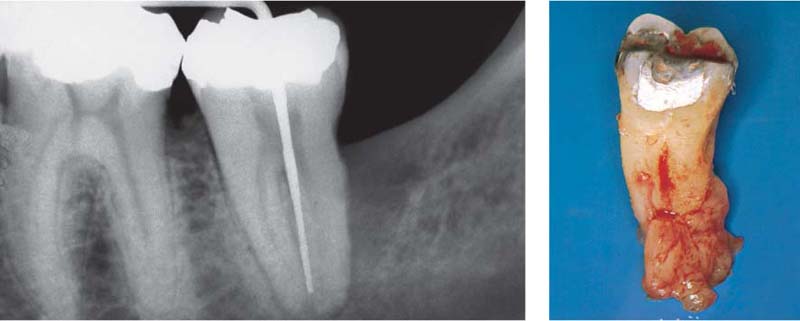
472 Emergency Situation in the Anterior Area: Painful Tooth 11 is Hopeless—Fistula
A fistula emanating from the deep pocket has developed. The non-vital tooth is highly mobile and sensitive to percussion. This tooth cannot be saved; it was extracted immediately.
Right: The radiograph reveals that a probe can be carefully inserted far beyond the apex (endo-perio problem, p. 445).
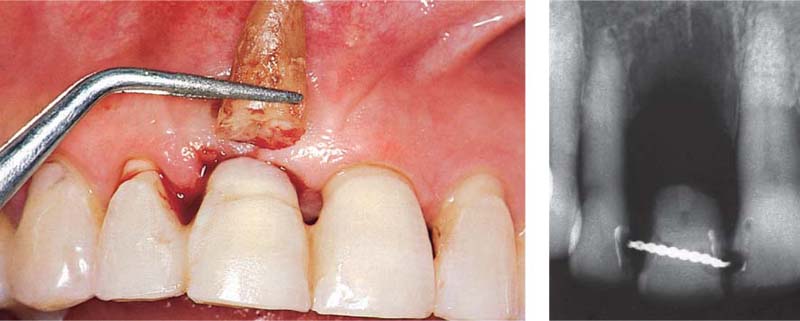
473 Immediate Extraction—Immediate Temporary
An immediate temporary is necessary for esthetics. Following extraction the root was severed and the crown was used as a temporary. A wire and acid-etched resin secured the crown to the adjacent teeth. This type of temporary can usually be maintained until definitive reconstruction.
Right: Radiographic view of the temporary replacement consisting of the patient’s own tooth crown.
Phase 1 Therapy
Causal, Antimicrobial, Non-surgical Therapy
Primary prevention— the early prevention of disease—is initially the responsibility of parents. Using simple, non-traumatic tooth brushing methods, the small child is gently guided down the path of personal hygiene and especially oral hygiene, hopefully with the support of his/her role models: Mother, father and perhaps older siblings. It should become a habit that the results of a child’s own efforts in oral hygiene be observed, lauded and, when necessary, modified.
In healthy individuals, prophylactic measures are usually short, painless and require little time. Nevertheless, they prevent dental caries and gingival diseases!
If disease occurs over the course of time, e.g., initial gingivitis in the specialty of periodontology, a brief description of the cause (bacterial biofilm), and its professional removal, as well as renewed instruction in plaque control by the patient (tooth brushing, oral hygiene), healthy conditions can be again established—secondary prevention.
If true pockets have formed and attachment has been lost, it is necessary to intervene as early as possible for such cases of early periodontitis. Using the simple measures of closed, causal therapy (debridement, root planing) such cases can be cured. Only a few years ago, predictable treatment success was only possible in pockets of 4–6 mm; but today it is possible to achieve predictable success even in pockets of 8 mm and more with the help of new and improved procedures (“After Five” curettes, disinfectants, modified timing, and other equipment innovations).
Nevertheless, anatomical relationships such as furcation involvement, grooves, narrow bony craters, and the regeneration of tissue defects oftentimes make it necessary still today to employ a multifaceted, often complicated corrective (surgical) technique with open therapy (Phase 2 therapy/surgery; p. 295) following Phase 1 (closed, subgingival) treatments.
This chapter, “Phase 1 Therapy,” will unfold as follows:
|
• Case presentation |
– Motivation toward self-help |
|
• Initial treatment 1 |
– Oral hygiene by the patient – Creation of hygienic relationships by the dental team |
|
• Initial treatment 2 |
– Traditional closed pocket treatment – FMT—“full mouth therapy” |
Case presentation—Motivation—Information
The maintenance or reinstatement of periodontal health (freedom from inflammation, full function) is possible even in terms of esthetics assuming certain prerequisites. But this can only be accomplished through the cooperative interaction between the patient and the dentist: The patient must be interested in maintaining the health of the oral cavity, and must be interested in a proposed treatment, and must be motivated to participate (compliance).
The patient should first be informed about the causal relationships that led to the disease process. The dental team has numerous possibilities to demonstrate to the patient soft tissue alterations elicited by inflammation, and the responsible etiologic factors (Roulet & Zimmer 2003).
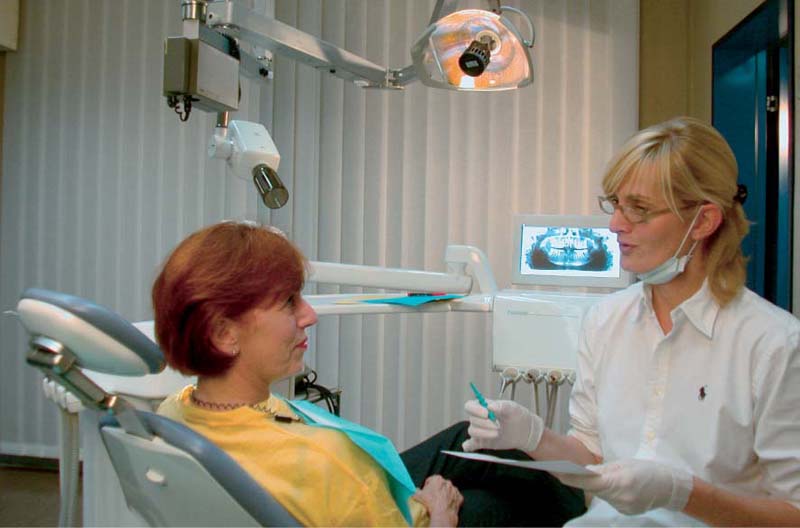
474 Motivation and Information During the Case Presentation
During the very first appointment, during the discussion of medical history and the collection of diagnostic data (here by the dental hygienist), the patient will want to be informed as much as possible about his/her oral condition.
This is an opportunity to motivate the patient and solicit compliance, because “without compliance, a good result will not be achieved.”
A primary goal of the case presentation is to convince the patient of the many possibilities for bringing the treatment to a successful conclusion.
Oral Hygiene Instruction Aids
The clinician must consider and take seriously the fact that the patient’s own case is what interests the patient most. Panoramic radiograph on the light box, easily visible clinical findings such as recession, plaque-retentive areas, bleeding on probing, gingival erythema and swelling etc. are easy to demonstrate and explain to the patient who holds a mirror.
At subsequent appointments, the interested patient can again be informed and motivated, for example through use of disclosing agents (p. 224) to visualize plaque at the gingival margin or in the interdental spaces. Dental plaque microbial “vitality” can also be used for patient motivation by means of microscopic enlargement (Plakoskope, p. 180); an inexpensive TV camera and monitor can dramatically depict plaque vitality for the patient.
Additionally, other instructional materials such as brochures, tooth models, and high-tech instruments such as digital intraoral cameras can be used to transmit to the patient the necessary information about health and disease.
It has been reported and demonstrated many times that a flood of new information often overloads or exceeds the patient’s available memory, and the patient is soon no longer capable remembering all of the details. It has therefore proven to be helpful to give the patient small but informative take-home brochures or pamphlets, to be read and studied as follow-up to the information the patient heard as he/she sat in the treatment chair.
Initial Treatment 1—Oral Hygiene by the Patient
The patient’s oral hygiene (plaque control) remains today the primary supportive pillar of periodontal prophylaxis. It also supports treatment, and has great significance for maintenance of the treatment results.
Without continuous compliance by the patient, periodontal treatment by the dentist and the dental team will be less successful and the success will be of shorter duration. Oral hygiene by the patient means, above all, reduction of the amount of plaque and pathogenic microorganisms in the oral cavity. Gingival massage with the toothbrush is of secondary importance, with perhaps some “psychological” effect.
In special indications, mechanical plaque control can be enhanced or supported for a limited period of time by topical medicaments (disinfection agents such as chlorhexidine).
This chapter will describe:
|
• Plaque disclosing agents, revealing the plaque • Manual toothbrushes • Toothbrushing techniques, systems • Electric toothbrushes • Interdental hygiene—interdental hygiene aids • Dentifrices • Chemical plaque control—CHX, additional products • Irrigators, of value? • Halitosis, bad breath—oral hygiene • Possibilities, successes and limitations of oral hygiene |
Toothbrushes of all kinds are important aids for mechanical plaque removal. They reach, however, only the facial, oral and occlusal tooth surfaces.
The initial lesions of gingivitis and periodontitis, as well as dental caries, usually occur in the interdental region. Therefore, the toothbrush must be enhanced by additional hygiene aids that can ensure cleansing of the interdental area.
There is no single oral hygiene method that is right for every patient. The type and severity of the periodontal disease, the morphological situation (crowding, spacing, gingival phenotype etc.) as well as the patient’s own manual dexterity determine the required hygiene aids and the cleaning techniques. During the course of periodontitis therapy, the techniques may have to be changed or adapted to the new morphological situation (longer teeth, open interdental spaces, exposed dentin).
The patient must be informed about his/her daily oral hygiene, its frequency, time spent and amount of force to be applied. In most cases, once per day is sufficient for a thorough and systematic plaque removal (disruption of the developing biofilm; Lang et al. 1973).
In the final analysis, though, it is not the hygiene aids, the technique or the time spent that is the determining factor, rather the result: Freedom from plaque. This parameter as well as the health of the of the gingiva (BOP) must be checked at regular intervals.
Motivation—Gingival Bleeding
Since 1980, the clinical symptom “bleeding on probing” has assumed the foreground in patient motivation, replacing plaque disclosure. The profession realized that it is not the amount or expanse of plaque or its depiction in a microscope that was most meaningful to patients, rather it was the reaction of the patient’s own tissues to the microbial irritation that held the highest motivational value.
Each person exhibits very different individual reactions to the biofilm, its constituents and especially the microbial metabolites. Thus, even with identical amounts of plaque, quite different levels of pathogenic danger may be present.
Using the PBI (Saxer & Mühlemann 1975, Mühlemann 1978) or BOP (Ainamo & Bay 1975, p. 69) the severity of gingival inflammation can be numerically portrayed. If the gingival bleeding index decreases during initial treatment (1), as depicted by repeated clinical recording of the index, this provides visible evidence of success while simultaneously giving further motivation to the patient.
Bleeding on Probing as a Motivating Factor
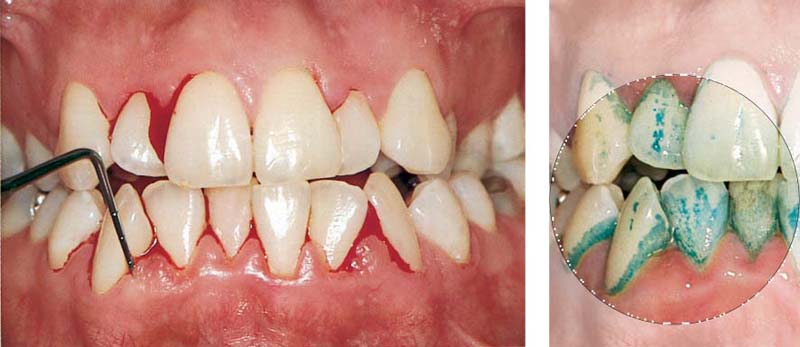
475 Initial Condition: Moderate Periodontitis
The patient can clearly see the severe hemorrhage as the clinician performs the bleeding index (PBI or BOP).
Right: As a second step, disclosing the plaque reveals the cause of the disease. The next steps include initial oral hygiene instruction and professional, supragingival prophylaxis.
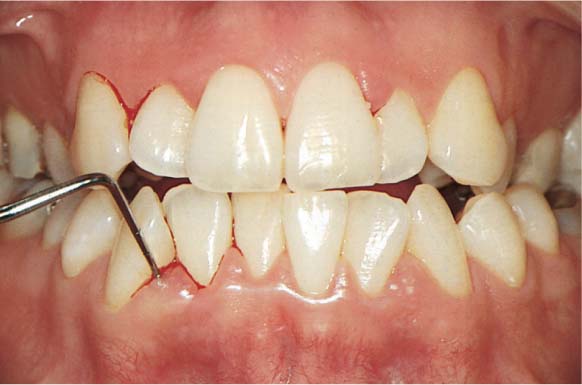
476 Clinical Situation: Two Weeks Later
Following professional prophylaxis and repeated OHI, the patient can readily see the return to health as indicated by the minimal bleeding during recording of the PBI data.
The patient is motivated by this success to further intensive cooperation and compliance.
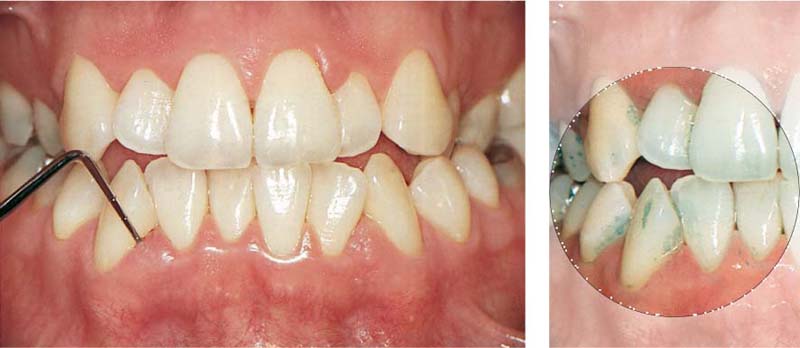
477 Clinical View at 4 Weeks
The virtual absence of bleeding (inflammation) and the dramatic plaque reduction convinces the patient definitively of the logic of this treatment.
Right: The minimum plaque accumulations demonstrate the correlation: Less plaque = less gingivitis.
Additional oral hygiene instruction is now targeted toward those sites that are not completely plaque-free, e.g., interdental areas.
Plaque Disclosing Agents
Frequently during the case presentation, when motivation is being emphasized using the bleeding index, the patient will pose questions concerning the cause of periodontal disease. Now—right now!—is the prime time for demonstration of microbial plaque, the most important etiologic factor in gingivitis and periodontitis.
Using non-toxic food coloring agents, the adherent plaque on tooth surfaces and gingiva can be selectively stained. The patient watches in a mirror as the clearly visible plaque is revealed and then scraped off using a probe.
Patients are further impressed to hear that only 0.001 grams of plaque contain ca. 300,000,000 bacteria. The necessity and possibility for plaque removal via oral hygiene measures becomes visible to the patient, and the initial toothbrushing instruction session falls on fertile soil.
One disadvantage of plaque disclosing agents that remain in the mouth for some time can be avoided by using the Plaklite system (Fig. 480). A solution that is virtually invisible in daylight clearly reveals accumulated plaque bacteria when illuminated with blue or UV light.
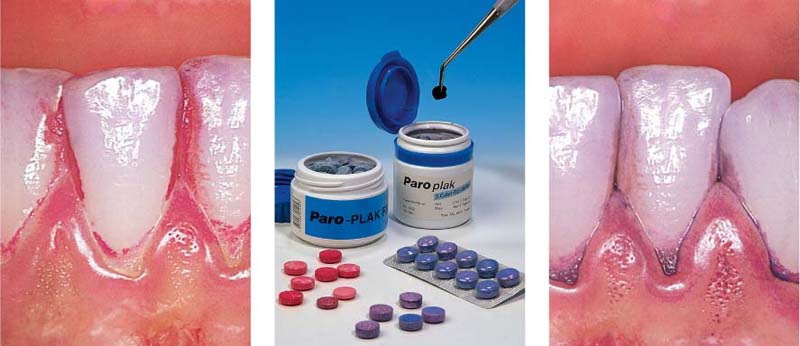
478 Red and Violet Disclosing Agents
Left: Classic red staining by erythrosin. This procedure is still permitted by the FDA.
Middle: Plaque disclosing agents for the patient (tablets) and for the clinician (solutions, pellets).
Right: Differential disclosing agents that stain “fresh” plaque light violet, and old, “mature,” plaque a darker violet color.
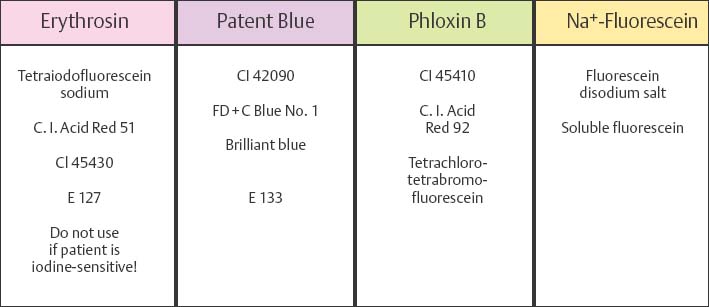
479 Details of Four Plaque Disclosing Agents (adapted from Roulet & Zimmer 2003)
Older, deeply-staining agents such as basic fuschsin, malachite green and other “histologic stains,” which are depicted in some illustrations in this Atlas, are no longer used in clinical practice because of their potentially injurious side effects or toxicity.
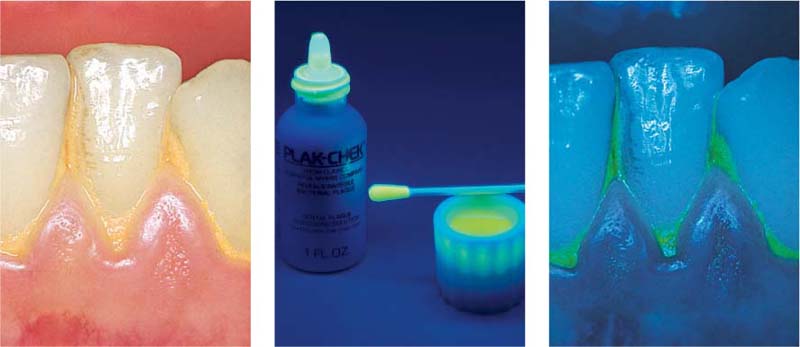
480 Fluorescent Disclosing Agents, Blue or UV Light
In normal room lighting, plaque disclosed with 0.75 % Na-fluorescein solution appears light yellow (left), but glows intensively yellow-green under blue light (right).
The disclosing products are available from Vivadent, Lactona, Clairol and Intern. Pharmaceutical Co. (IPC) and others.
A disadvantage of this technique is the requirement of a special light source or a filter mirror.
Toothbrushes
For centuries, the toothbrush has served to remove of food debris and plaque from all facial, oral and occlusal tooth surfaces. Today the toothbrush remains indispensable, but it does not provide adequate interdental hygiene. In addition, when used with excessive force it has the potential to injure even healthy gingiva.
There is no ideal toothbrush (shape, size, handle) but in periodontics more and more brushes with softer, flexible bristles have found acceptance. Rounded bristle tips are the standard today.
Worthy of consideration also is the fact that toothbrushes are always used with toothpastes (p. 234). It seems only reasonable that these two components should be “synchronized” for each individual patient (König 2002) and this must be accomplished by the dental team. This should replace the often wildly extravagant commercial claims with facts, and permit targeted recommendations for each individual patient.
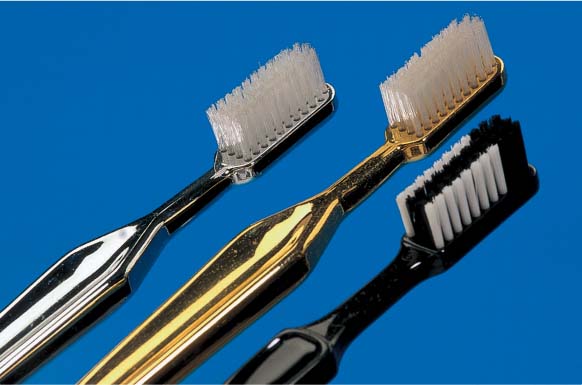
481 “The Best Brush”
Patients always ask: “What’s the best toothbrush”? Who wins gold, silver or nothing?
Fact: There is no “best” brush!
For the dental team it is important to know the commercially available brushes, but more important to know the needs of the individual patient, in order to properly advise.
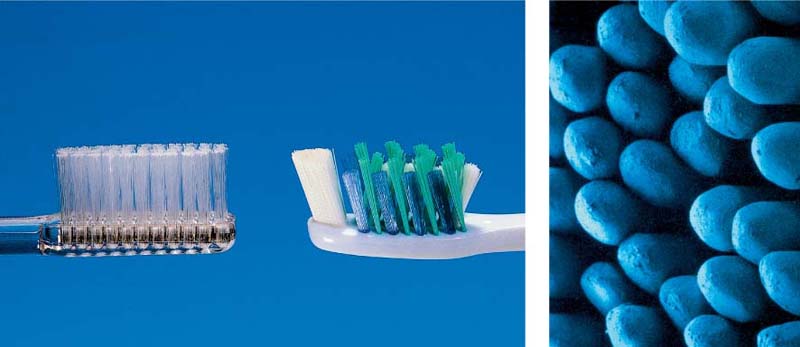
482 ADA Type and New Trends
New brushes and their efficacy are standardized according to ADA guidelines after in vitro testing. Clinical tests with human subjects are more costly and provide limited data. The ADA “norm” (left) is a four-row brush, multi-tufted. At right today’s trend, the Oral-B “Cross Action.”
Right: Rounded bristle tips are today’s standard.

483 Toothpaste and Toothbrush: One Goal
The role of the toothbrush is generally overvalued! Only in combination with a dentifrice is it effective; the toothbrush is really only a carrier. Its positive effects (gingival massage?) are insignificant. Its negative effects, especially with hard bristles, can be grave: Damage or injury to gingiva and mucosa can lead to gingival recession or aphthous ulcers.
The question that remains, however, is whether any of this is actually useful for patients!
It is up to dentists and dental hygienists not to react but rather to act! Guidelines for good toothbrushes need to be defined, for example, for periodontitis patients with thin gingiva, recession, large interdental spaces etc. Worthy of thought: A motivated patient brushes daily for 60, 70 or 80 years! Long-term freedom from injury is more important than momentary efficiency.
It seems that a start has been made: Superfine bristles—they clean just as well as hard bristles—and unconventional 3-headed brushes are being widely discussed.
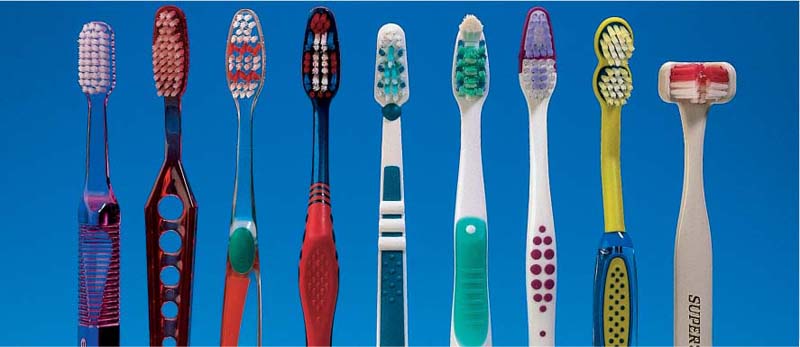
484 Modern Toothbrushes—Frontal View
How is one to evaluate the enormous differences in shape, bristle array, handle etc.?
The best that a toothbrush can offer is its ability to effectively clean the teeth, while preventing damage or injury to gingiva or teeth, and help reduce bad breath.
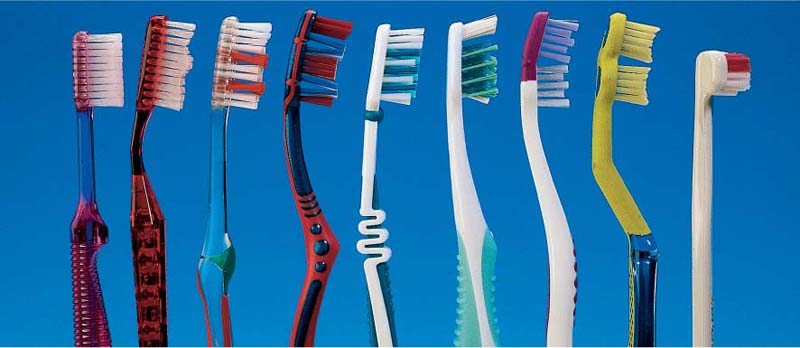
485 Modern Toothbrushes—Lateral View
This figure corresponds to Fig. 484. From left to right…
|
– Elmex |
Supersoft |
|
– Paro |
Future |
|
– Elmex |
Inter X medium |
|
– Trisa |
FlexHead soft |
|
– Dr. Best |
X-aktiv Flex |
|
– Oral-B |
Cross Action |
|
– Colgate |
Navigator medium |
|
– Mentadent |
Insider soft-medium |
|
– Superbrush |
Junior |

486 Meridol and Superbrush—New Developments; Progress?
Left: The Meridol brush has superfine, flexible bristles, designed to absorb excessive force.
Right: The three brush heads simultaneously clean vestibular, occlusal and oral tooth surfaces. Using a light vibratory movement, teeth are cleaned one-by-one. This design was superior to other brushes in clinical trials (middle: head of the Nais electric toothbrush. cf. p. 230).
Toothbrushing Technique
Innumerable toothbrush movements have been recommended over time, and then abandoned: Rolling, vibrating, circular, vertical and horizontal (Jepsen 1998). More important than the technique is the efficiency of cleaning, a systematic procedure and that no damage is caused.
Dentists and dental hygienists have recognized again and again that most patients, despite instruction, seem to be satisfied with an apparently “genetically determined” horizontal scrubbing technique.
The most frequently recommended “modified Bass technique” (Bass 1954) is depicted below.
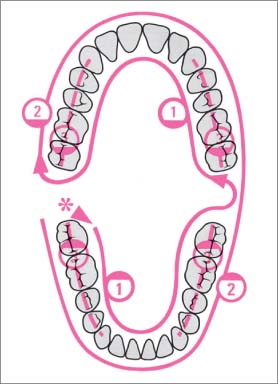
487 Systematic Toothbrushing
The sequence depicted has been shown to be effective (start: right, posterior*)
| 1 Oral Surfaces mandible/maxilla, and all distal surfaces at the end of each arch. 2 Facial Surfaces mandible/maxilla 3 Occlusal Surfaces mandible/maxilla 4 Interdental Spaces, using special hygiene aids |
Modified Bass Technique
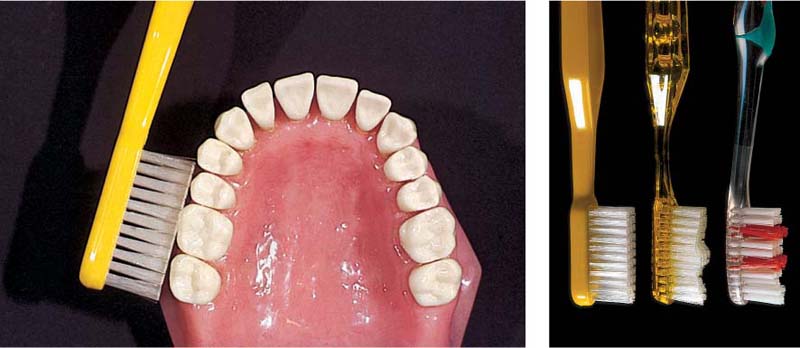
488 Placement of the Toothbrush
Toothbrush bristles positioned perpendicular to the tooth long axis will not effectively clean the interdental spaces.
Right: Instead of the “original” Bass technique, which used a tworow brush, today the “sulcus cleansing technique” is performed with the more common three- or four-row brushes. This combination should provide improved cleaning.

489 45° Angle of the Bristles—Occlusal View
When the brush is applied at a 45° angle to the teeth and then rotated toward the occlusal plane, the bristles slip easily into the interdental areas and gingiva sulci without excessive force. With the brush in this position, small rotatory or vibratory movements will effectively remove plaque.
Problem zone: Angular arch form in the canine regions.
490 45 Degree Angle—Distal Surfaces
Viewed from the distal, the position of the bristles in the Bass technique becomes obvious.
Right: Distal surfaces will not be effectively cleaned by hard bristle brushes; extremely flexible toothbrush bristles may provide effective distal cleaning.
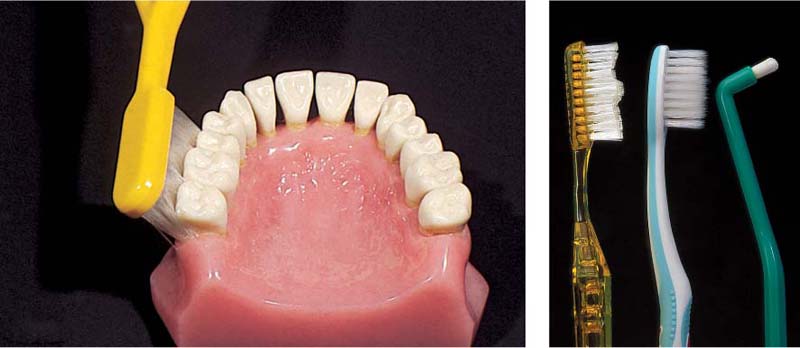
Dental floss is not recommended for such surfaces, which often exhibit concavities and/or furcations. Single-tuft brushes are more effective (right).
The Solo Technique—A Different Way to Brush Your Teeth
In 2000, Jiri Sedelmayer described the unreasonableness of the usual toothbrushing methods of many individuals: “Among other things, areas that scarcely need cleaning, such as prominent tooth surfaces and gingiva, are often injured. Notorious plaque-retentive areas, above all the interdental spaces, gingival sulcus and oral-distal tooth surfaces are regularly cleaned by only a disappearing few.” Sedelmayer was in fact correct, and in the same breath suggested a new technique, an alternative to the usual scrubbing, at least for individuals who are prepared to devote adequate time for their oral health.
The problem with classical toothbrushes is that when they are used with the recommended non-traumatic slight pressure, the niches are not achieved; with heavier force, however, prominent tooth surfaces and gingiva are so abused that true long-term damage is the consequence (recession, wedge-shaped defects etc; p. 456; Lussi et al 1993).
Using a soft, round, single-tuft brush with light force, the technique cleans tooth-by-tooth, above all the lingual aspects perfectly, including marginally and deep into the interdental space. However, other special hygiene aids are also necessary.
491 “Solo” Technique—Begin at Mesial of Tooth 11
The round, single-tuft brush is applied to the tooth surface with light force, and the bristles splay out. The mesial sulcus of tooth 11 is cleaned using minimal circular movements.
Left: An example of “solo” brushes, beginning (left) with the ages-old chewed twig!
Round “solo” brushes are commercially available from TePe, Curaden, Tandex etc.
492 Continuing Along the Gingival Margin…
The gingival margin and gingival sulcus are effectively de-plaqued, using the patient’s own sense of feel.
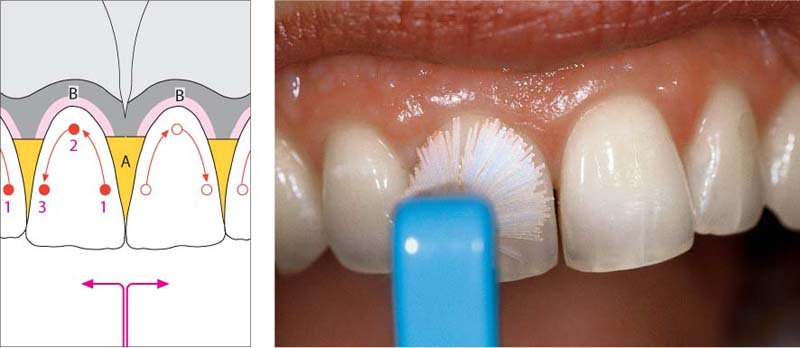
Left: Simple schematic—initiate tooth cleansing “from the middle toward the side” (e.g., tooth 11):
1 Mesial
2 Marginal
3 Distal
A Papilla
B Gingival Margin
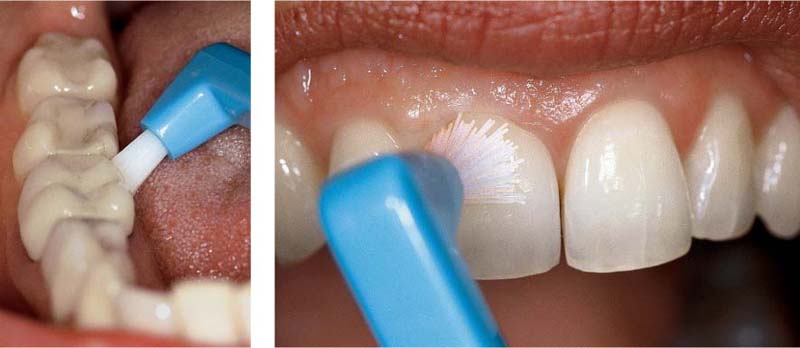
493 … and Continuing Distally
The brush is guided distally and angled so that it achieves maximum contact with distal tooth surfaces, sulci and the papillary region.
This procedure is repeated for each tooth.
Left: What the classical brushes almost never accomplish: Perfect cleaning of the ligual marginal surfaces and interdental areas in the posterior segment of the mandible.
Electric Toothbrushes
Comparative clinical studies have shown that the efficiency in plaque removal of the newest electric toothbrushes is at least as good as that achieved with manual toothbrushes. Various products offer primarily advantages for persons with reduced manual dexterity, or the handicapped, but also offer an alternative to the hand toothbrush for highly motivated individuals. Preferred today are electric brushes with round heads, and sonically active toothbrushes, the latter because of their additional hydrodynamic activity (van de Weijden et al. 1996, Zimmer et al. 2000, Warren et al. 2001).
494 Effective Cleaning with Electric Toothbrushes
One can use the same system described for manual toothbrushes (Fig. 487) for the “quadrant system” built into some electric brushes. This provides 30 seconds of brushing per quadrant (see below; Q1-Q4).
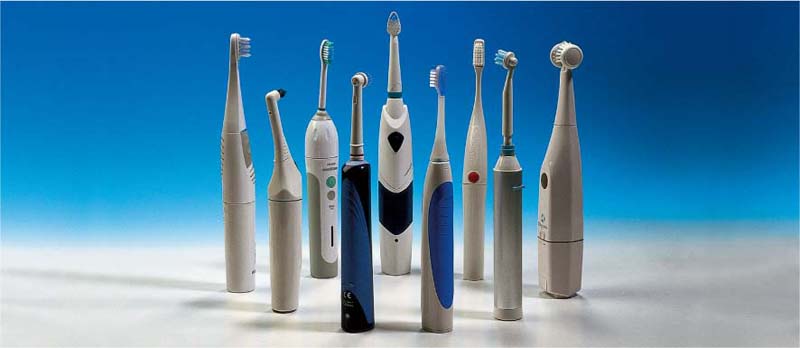
495 A “collection” of some commercially available electric toothbrushes
(from left to right)
| • Interplak • RotaDent • Philips Sonicare • Braun Oral-B • Waterpik • Ultra sonex • Roventa • Nais • Oralgiene |
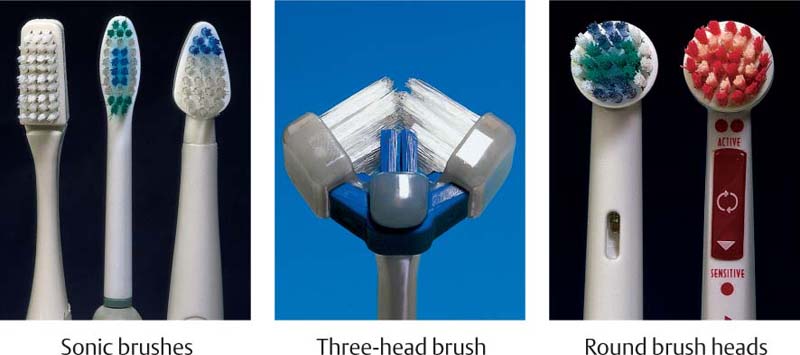
496 Brush heads
The choice of a brush head is as important as the choice of the electric brush itself. With the high frequency brushes, there is a potential danger of gingival trauma. Brushes whose bristle movement stops when excessive force is applied should be recommended (e.g., Sonicare).
Each patient should be informed and instructed in the proper use of the electric toothbrush.
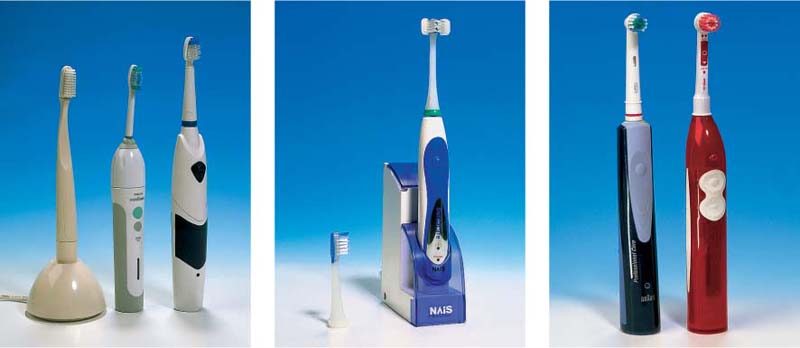
497 Current trends …
… include primarily sonic or combined sonic-ultrasonic toothbrushes, e.g., the Ultrasonex, Sonicare and Waterpik (left), the Nais electric toothbrush (middle; with its “normal” and three-unit head). The hydrodynamic effects of these brushes removes plaque even where the bristles cannot physically reach.
Brushes with round, rotating or oscillating heads are today mature products of high efficiency (Braun Oral-B, 5th generation and Trisa, right).
Interdental Hygiene
Gingivitis and periodontitis are usually more pronounced in the interdental area than on oral or facial aspects. Dental caries also occurs more frequently in the interdental region than on oral or facial smooth surfaces. Therefore, interdental hygiene, which cannot be achieved with the toothbrush, is of critical importance for periodontitis patients. The most appropriate interdental hygiene aids must be selected for each individual patient. The selection from the numerous commercially available devices depends for the most part on the morphological situation of the interdental spaces.
Dental Floss
The use of dental floss is indicated for healthy patients, and for gingivitis and mild periodontitis cases, as well as for patients with crowded teeth. It is well known, however, that the acceptance of dental floss (floss, tape, super floss) is quite low for most patients, especially males! Alternative interdental hygiene aids should be recommended even if these are less efficient than floss if patients will at least use them daily.
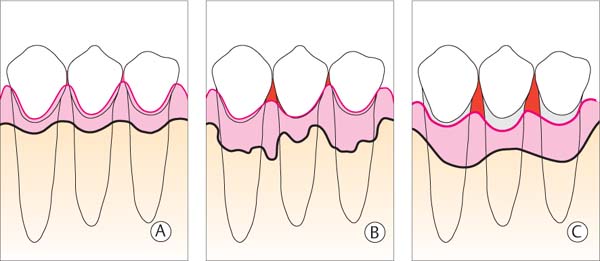
498 Morphology (schematic) of the Periodontium
| A Healthy B Periodontitis C Treated, Healed Periodontitis |
These three situations require differing techniques and various hygiene aids for interdental plaque control.
The diagrams portray the course of the alveolar bone, the gingival margin and the expanse of the interdental spaces (red).
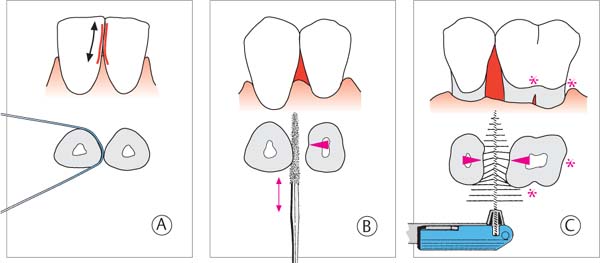
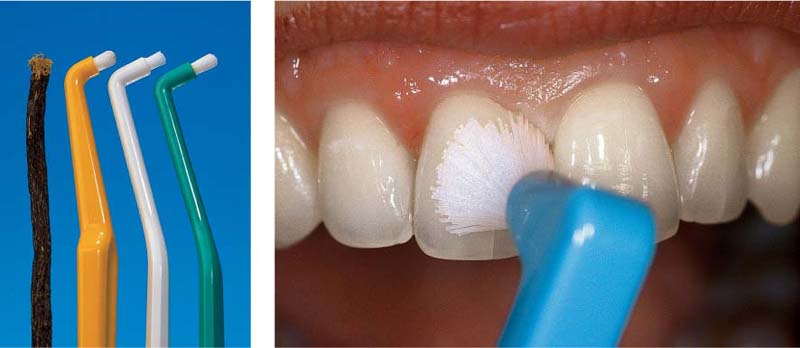
499 Size of the Interdental Space and Oral Hygiene Aids
The choice of a hygiene aid for interdental plaque control depends primarily upon the size of the interdental space.
| A Dental floss for narrow interdental spaces B “Tooth sticks” for slightly open interdental spaces C Interdental brushes for widely open interdental spaces, root concavities and grooves |
Toothpicks, Interdental Brushes
Toothpicks or interdental brushes are indicated for plaque removal if the interdental spaces are open, e.g., following completion of periodontitis therapy, as well as for patients who accept dental floss but seldom actually use it.
The newest “toothpicks” are no longer simply wooden throw-away articles, rather they are adorned with tiny hair-like bristles, they are elastic, multi-use, fine plastic files (“Brush Sticks”). Some patients become passionate about these devices!
With expansive areas of exposed root surface, especially in the molar regions, one often observes more or less severe grooves which can only be cleaned using interdental brushes.
These devices should be used without dentifrice except in special cases and then only short-term. The abrasive in dentifrice would rapidly abrade exposed dentin in the interdental space.
These devices can also be regularly used to apply fluoride or chlorhexidine gel into the interdental space to prevent caries or the recolonization of residual pockets.
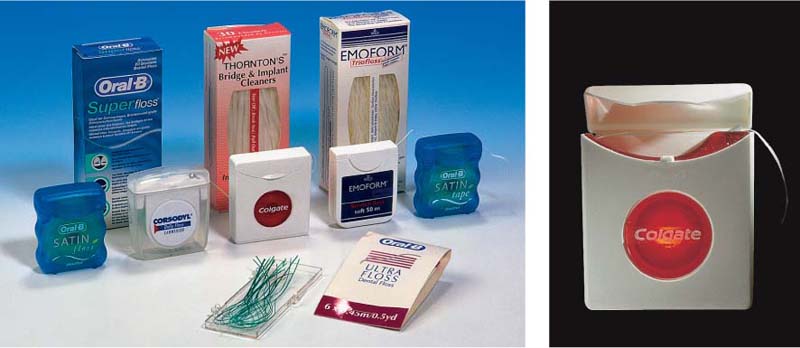
500 Choices: Floss, Tape, Ultra- and Superfloss
Today’s dental floss, with filaments of nylon, kevlar etc., is strong enough to traverse even the tightest contact points. For splinted teeth, bridges etc., various threading devices are available (e.g., Eez Thru, Butler). Both waxed and unwaxed dental floss can be recommended.
Right: Dental tape (Colgate)
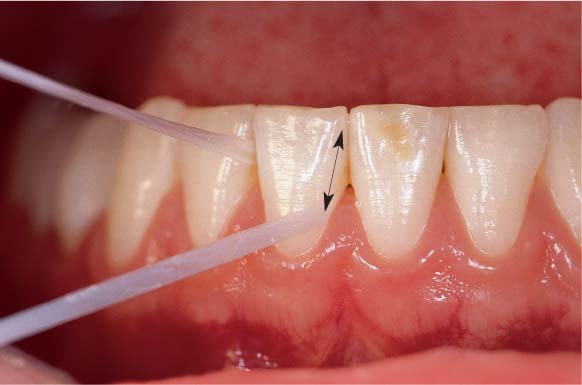
501 Use of dental floss
To avoid injury to the papillae, the dental tape is carefully maneuvered through the contact point using a sawing motion. Cleaning of both proximal surfaces is accomplished with up and down movements (double arrow) into the sulcus with the floss stretched tightly.
When the floss “sings” the tooth surface is clean.
Other Devices for Interdental Cleaning
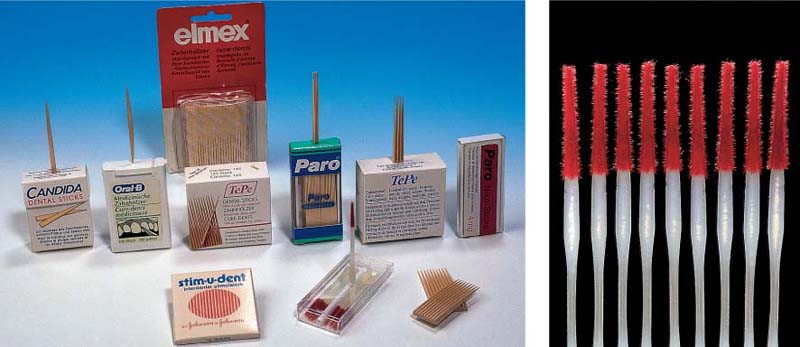
502 Selection
The traditional wood interdental cleaners exhibit a triangular profile. The various manufactures use either hard or soft wood (birch, balsa, linden). Some products are impregnated with various substances (fluoride, CHX, mint, nicotine!).
Right: The new “Brush Stick” (Esro) cleans very effectively.

503 Clinical Use of “Brush Sticks”
The red, felt-like tip is guided into the interdental space at a slight angle. Plaque removal is accomplished by horizontal back and forth movements (double arrow). If the interdental spaces are large, the brush stick is first pressed against the proximal surface of one tooth, and then the adjacent tooth. Concavities can be cleaned very well using the blunt end of the Brush Stick!
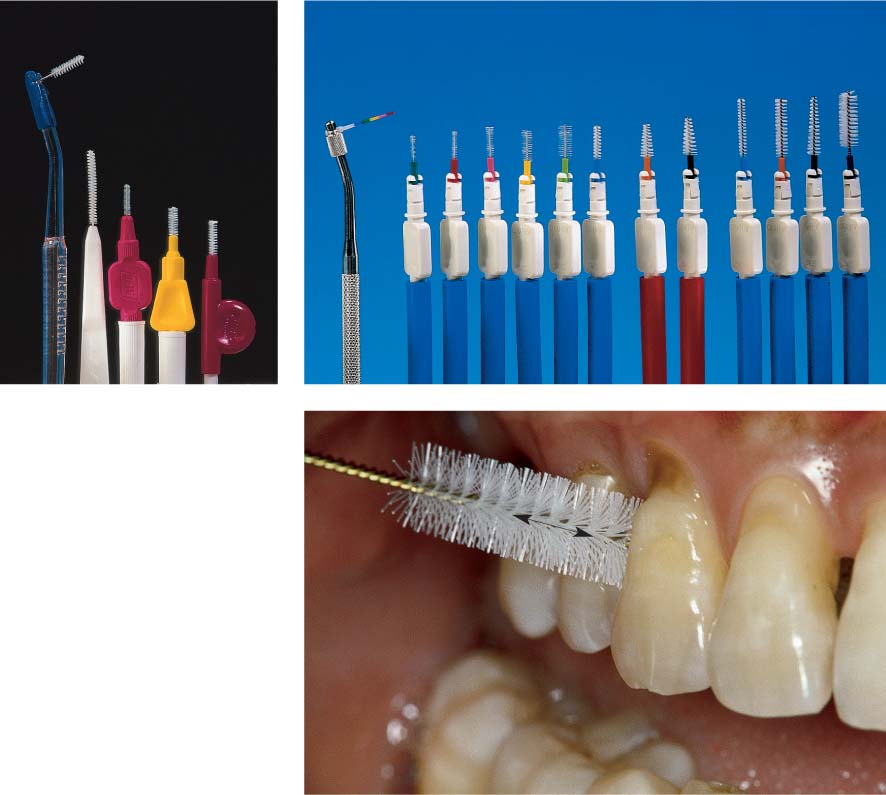
504 Selection
Numerous companies offer interdental brushes. Excellent products include various bristle lengths, strength and diameter, with handpieces or separate holders (pictured is the assortment from Curaprox; at left, the coded measurement probe for the choice of brush type).
Left: Oral-B (with handpiece), Top Caredent, TePe, Oral Prevent, Paro (Esro).
505 Use of a Large Interdental Brush
Appropriate interdental brushes are available today for the smallest to the largest interdental spaces. They represent the ideal cleaning tool, especially for periodontitis patients. The brush is inserted obliquely into the interdental space, from apical. Cleaning is performed with a back and forth motion (double arrow).
The trend today is toward long, flexible (soft) bristles.
Additional Hygiene Aids
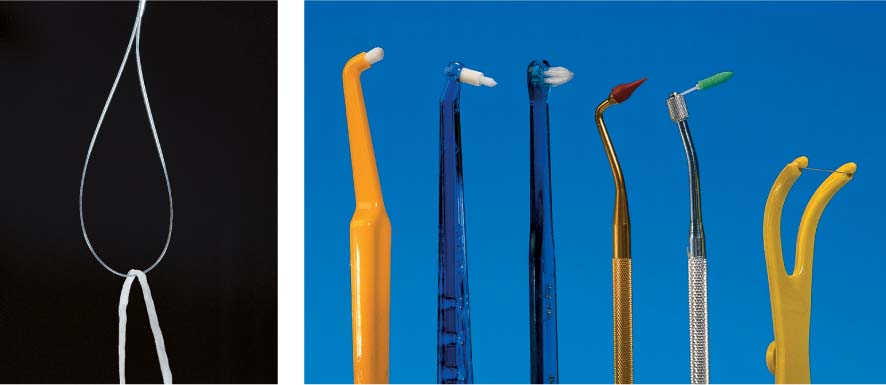
506 Hygiene Aids for Special Problems
|
• Round solo brush (p. 229) • Pointed, single-tuft brush, e.g., for the furcation entrance • Stimulators Massage in the area of the interdental papillae • Soft-foam attachment (Oral-B) Cleaning for titanium implants • “Fork” for dental floss |
Left: Threader for floss and tape.
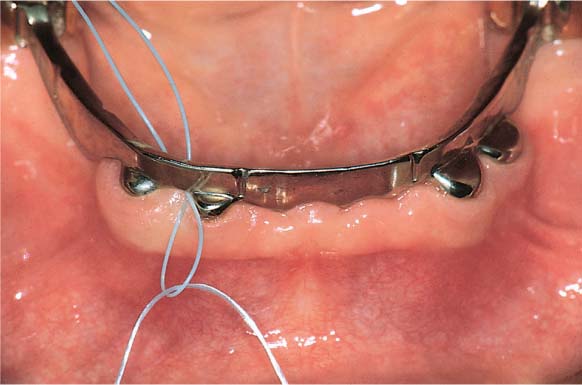
507 Threading Dental Tape
With fixed splints, bridges and bar constructions, the dental floss cannot be applied from the occlusal, but must be inserted. In such cases this can be accomplished using a threading sling (e.g., Butler).
The threader is particularly helpful for patients with limited manual dexterity, and also for interdental spaces for which the superfloss threader is too “soft.”
Dentifrice
A dentifrice is an integral component of daily home care to enhance oral hygiene. Dentifrices effectively double the efficiency of mechanical plaque removal and therefore help to prevent oral diseases such as caries and gingival inflammation (active principle of prevention).
The most important component of any dentifrice is the abrasive substance. Manufacturers use many different abrasives, which vary not only with regard to their chemical composition (phosphates, carbonates, silica, alumina etc.), but also in particle size and shape (rounded, angular). These differences determine the polishing effect of the product, as wells as the abrasiveness of the dentifrice on dentin (measured in vitro as the RDA value: “Radioactive/relative dentin abrasion”).
The non-mechanical components of dentifrices include their chemical ingredients (passive principle of prevention): These ingredients prevent caries (fluorides), treat hypersensitive exposed dentin (K- and Sr-salts; fluoride; p. 458), possess disinfecting properties (Triclosan), and serve to whiten stained teeth (H2O2; carbamide): All in one tube!

508 Dentifrices
From the enormous number of products on the market, the dental team must select only a few, and must know the advantages and disadvantages of each in order to provide proper information during oral hygiene instruction.
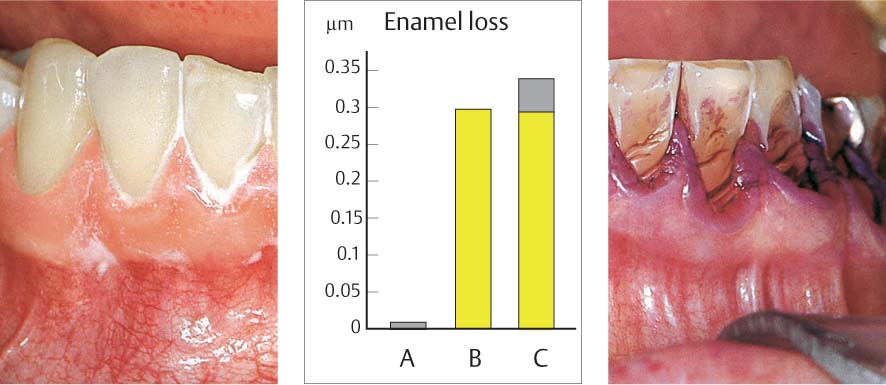
509 Damaging Toothpaste? Damaging Technique?
Left: Healthy dentition. How will it look in 40 years?
Middle: Loss of enamel is minimal after a single toothbrushing (A), but this is not the case with fruit acids and chelators from foodstuffs (grapefruit; B/yellow). Toothbrushing after consumption of acidic foods is yet worse (C).
Right: This patient brushed with a scrubbing technique for 50 years, while also consuming acidic foods!
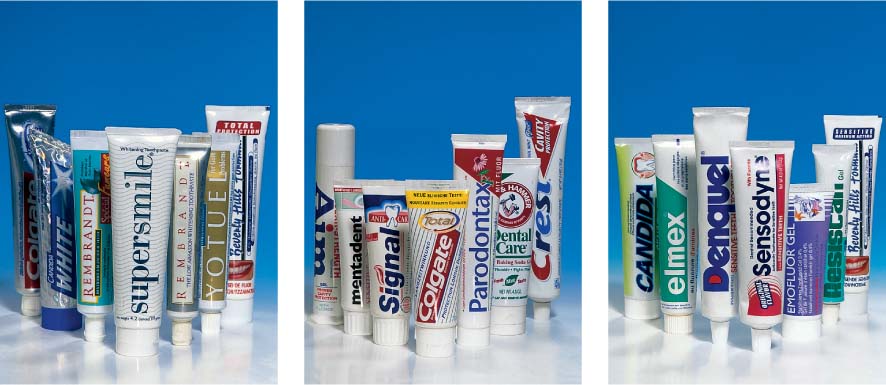
510 Types of Dentifrices
|
• “Whitening” Dentifrices (left) • Normal Fluoride Dentifrices (middle) • Dentifrices for Tooth Neck Sensitivity (right) |
Does long-term use of whitening dentifrices cause tooth damage? Must exposed dentin be cleaned using mildly abrasive dentifrice?
Chemical Plaque Control—“Soft Chemo” Prevention
Purely mechanical plaque control is effective up to a certain point, but excessively robust toothbrushing can injure the gingiva and damage tooth structure. Optimum personal oral hygiene can only be achieved through the use of certain supportive antimicrobial agents, which may be included as ingredients in dentifrices or mouthwash. These chemical ingredients must not interact with other substances within a dentifrice and should exhibit high substantivity (AAP 1994, Brecx et al. 1997, Cummins 1997). The substantivity of plaque-inhibitory substances depends upon:
• Pharmacokinetics
• Concentration and dose
• Effectiveness over time
• Site of application
A therapeutically effective “soft chemo” substance should affect at least an 80 % plaque reduction. Until today, this level of effectiveness has been achieved only by the bisbiguanide chlorhexidine (CHX). For this reason, CHX in all of its commercially available forms remains today the substance of choice.
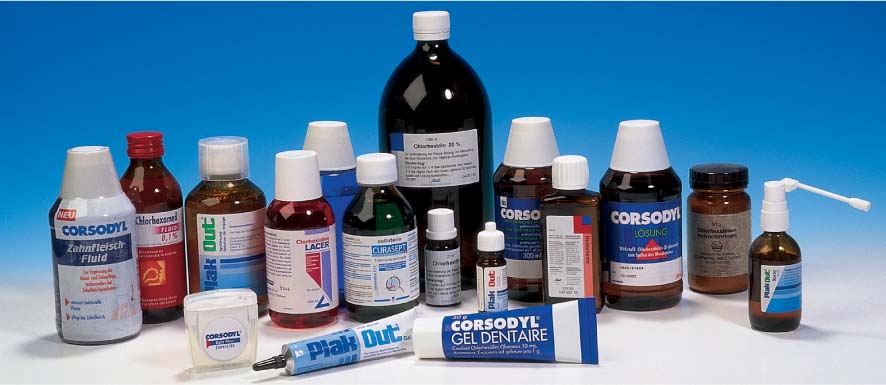
511 CHX Digluconate Products
In Europe and elsewhere, but not in the USA, various CHX mouth-washes, gels, sprays etc. are available for patients, in concentrations of
• 0.06–0.12%
• 0.1–0.2%
• 10% (concentrate; PlakOut)
For clinical use, concentrations up to 20 % CHX are available, as well as CHX-HCl in powder form. Diluted or dissolved, this provides a cost-effective disinfectant, and can also be used as the cooling solution for ultrasonic instruments.
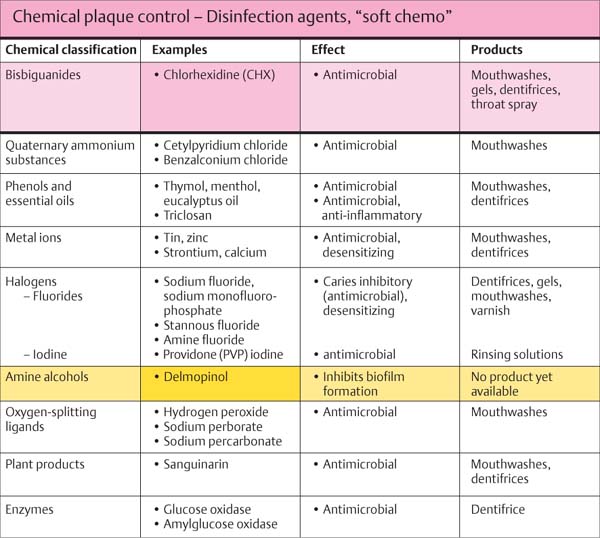
512 Agents for Chemical Plaque Control—“Soft Chemo”
CHX in all its available forms is the most potent agent for supragingival plaque control.
Most of the additional disinfection products listed in this table work as antimicrobials, and in appropriate concentrations are bacteriocidal.
While CHX represents the second generation of effective plaque inhibitors, the aminoalcohols (e.g., delmopinol) represent the third generation. These are not bacteriocidal, rather they inhibit the formation of biofilm. This new group evolved from the newest research on biofilm formation (p. 24).
Note: Plaque reduction is not synonymous with inflammation reduction. Therefore, in this table no specific inflammation-reducing products are listed.
Irrigators
The supragingival efficacy of mouthwashes containing caries-preventive (fluorides) or antiseptic ingredients (e.g., chlorhexidine) is well acknowledged. Mouthwashes and also the use of intraoral irrigators represent only adjuncts to mechanical oral hygiene.
The pulsating, hydrodynamic forces produced by irrigators can rinse away food debris from interdental spaces and plaque-retentive areas, but do not remove plaque biofilm (Hugoson 1978). Irrigation solutions have always contained aromatics, and later also disinfective ingredients. The use of chlorhexidine in sub-optimum concentrations (e.g., 0.06 %) led to improved plaque inhibition and an anti-inflammatory effect (Lang and Räber 1981, Flemmig et al. 1990).
In contrast, the success of pulsating irrigators with the common tips is limited in the subgingival area, and in periodontal pockets (Mazza et al. 1981, Wennström et al. 1987). With special tips, the pulsating stream penetrates more deeply, but biofilm is not removed (Flemmig 1993, reported up to 90 % penetration during pocket rinsing).
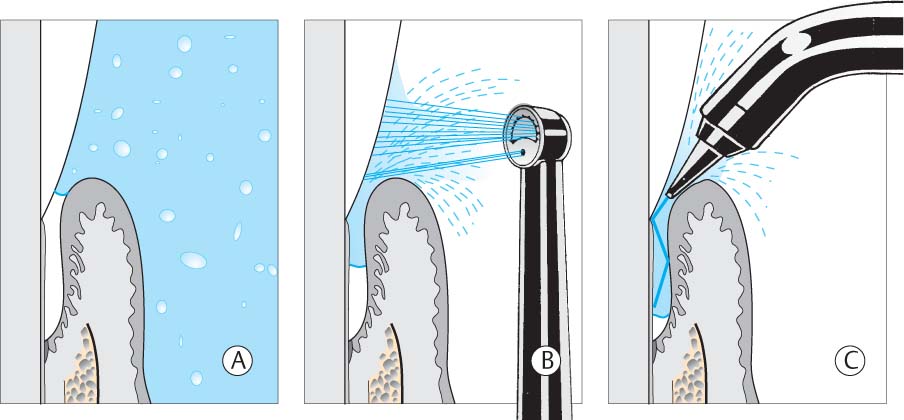
513 Mouthrinsing—Irrigators
|
A Mouthrinsing—no solution enters the pocket (< 5 %). B Single or multiple sprays—about half of the pocket depth is penetrated (ca. 50 %). C Special tips (PikPocket)—the solution is forced deeply into the pocket (ca. 90 %). |
Modified from Flemmig 1993
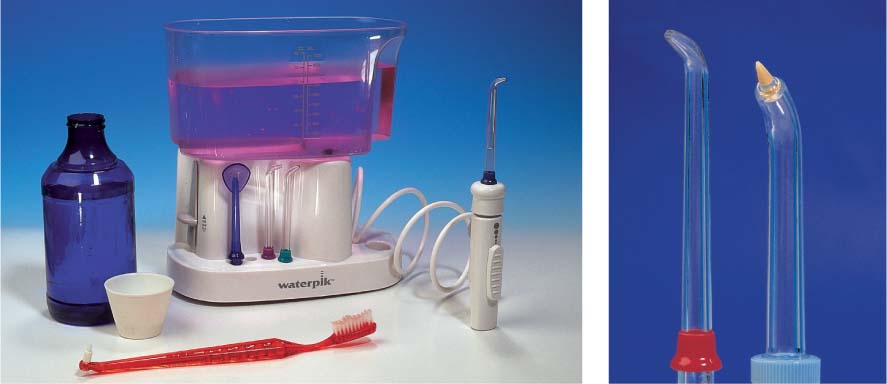
514 Oral Irrigator—Waterpik
The “mother of all oral irrigators.”
Waterpik represents the first technically simple oral irrigator. Contemporary models feature an off/on button on the handle, as well as pressure regulation. In this case, CHX was added to the rinsing solution; the toothbrush in the foreground reminds that the irrigator should be used after toothbrushing.
Right: Normal tip (left) and special tip (PikPocket).
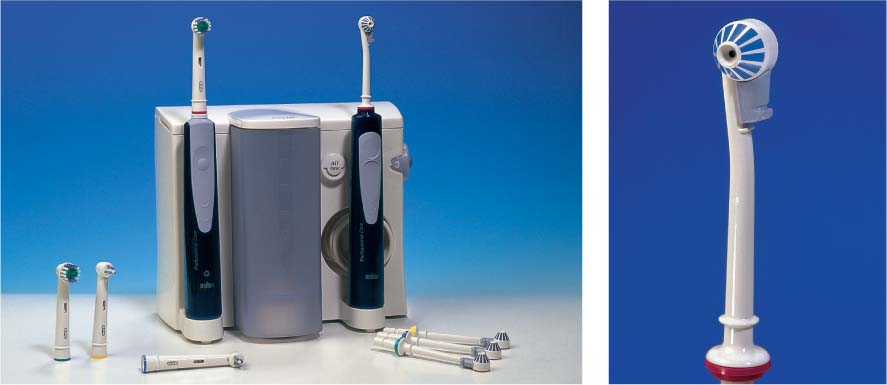
515 “Professional Care Center”—Braun Oral-B
The well-known Braun electric toothbrush offers a large assortment of brushes, including the “Interspace” brush, and the special oral irrigator (Oral-B Oxyjet) in a combined unit.
Right: In combination with a special attachment, this device produces fine micro air bubbles in the water stream. It is claimed that this effectively attacks plaque bacteria and removes food deposits from between the teeth.
Oral Hygiene for Halitosis
It has been estimated that half of all people suffer from episodic or permanent halitosis. A myriad of factors could be responsible for this pathologic Foetor ex ore—systemic, oronasal and oral, associated with a large and diverse number of volatile molecules.
In the absence of systemic diseases, 9 out of 10 cases of halitosis originate from the tonsils and the tongue, particularly the posterior dorsal tongue surface (Stassinakis 2002). Gram-negative anaerobic microorganisms from the periodontal pocket may also contribute to halitosis, primarily by way of their metabolites, not only their lipopolysaccharides but also short-chain fatty acids such as butyric acid and propionic acid. Breakdown products of the host defense response may also play a role in halitosis. Clinically, it is relatively easy to measure volatile sulfur compounds such as hydrogen sulfide (H2S) and thiol (mercaptans) (v. Steenberghe and Rosenberg 1996, Loesche and Kazor 2002).
The most important step to reduce halitosis appears to be improved oral hygiene, especially cleansing of the tongue (Saxer 2000, 2002; Seemann et al. 2001).
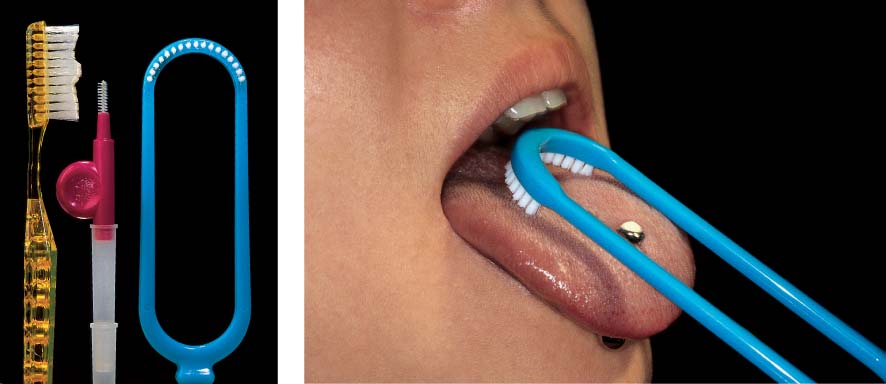
516 Tongue Cleansing
Special scrapers are available for cleaning the tongue. Patients should be informed that it is most important to clean the posterior portion of the tongue dorsum. An initial gag reflex usually subsides quickly.
Note: This procedure not only reduces halitosis, it also removes a large reservoir of periodontopathic bacteria.
Left: Combo for oral hygiene: Toothbrush, interdental brush, and the tongue brush.
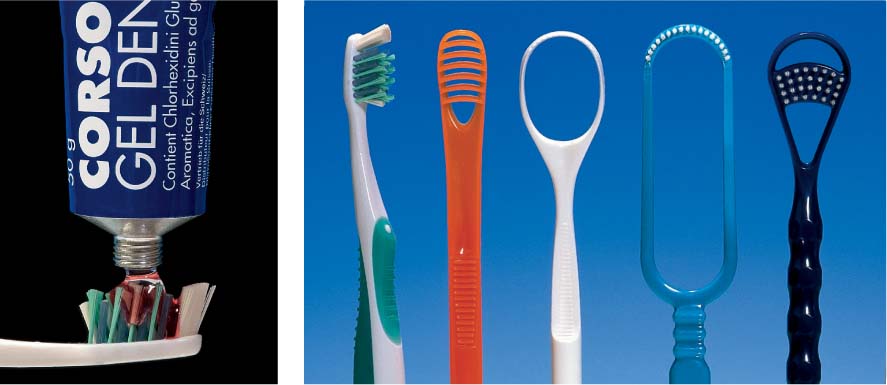
517 Tongue Scrapers
In addition to the normal toothbrush, which can also be used for tongue cleaning, a variety of tongue scrapers is commercially available: Scraper, tongue brush and combinations.
Left: In addition to mechanical cleaning, antiseptics may also be used; e.g., 1 % chlorhexidine gel. The toothbrush is loaded with gel.
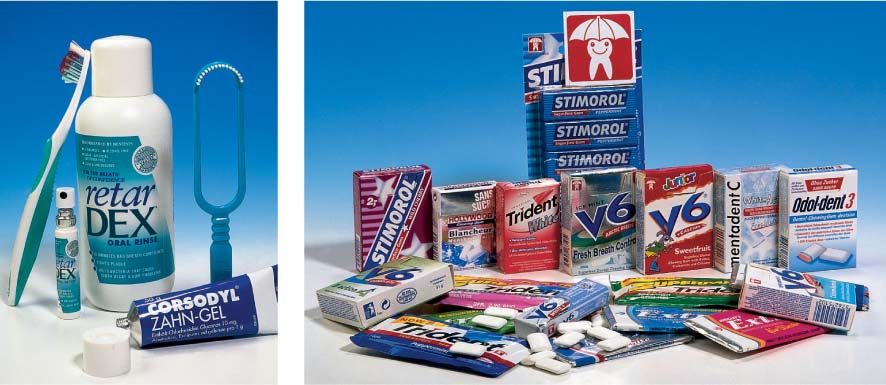
518 Additional Options on the Road Toward “Full Mouth” Cleansing
Chewing sugar-free gum increases saliva flow (enamel remineralization), massages the gingiva and may remove some bacteria that are then swallowed.
Left: Articles for oral hygiene—mechanical: toothbrush, tongue scraper; chemical: antimicrobial sprays, gels and mouthwashes (e.g., retarDEX, Esro).
Possibilities, Successes and Limitations of Oral Hygiene
Oral Hygiene and Prophylaxis
There is no longer any doubt that effective mechanical oral hygiene (toothbrush, interdental hygiene) is the best periodontal prophylaxis (reviewed by Axelsson 2002). Mechanical oral hygiene can be optimized by the short-term use of chemotherapeutics (above all chlorhexidine). With optimum oral hygiene, oral health can be maintained (primary prevention).
Oral Hygiene and Gingivitis
Beyond pure prevention, optimum supragingival plaque control is also effective gingivitis therapy (secondary prevention; Löe et al. 1965). Because the patient cannot remove calcified plaque (calculus), professional tooth cleaning must be performed at regular intervals.
Oral Hygiene and Periodontitis
As meaningful as oral hygiene is for disease prevention, gingivitis treatment and oral health maintenance, it is relatively ineffective when used alone for treatment of periodontitis. Even with a highly motivated and dextrous patient, there exist clear limitations: The best efforts in home care cannot reach the deep subgingival plaque. Calculus and endotoxin-containing cementum can never be removed by the patient.
An example of these relationships was published in 1983 by Dr. Egelberg’s research group (Cerecek et al., Fig. 519): Distributed according to probing depths, periodontitis patients were treated in three phases: Phase A—normal oral hygiene; Phase B—additional use of a perio-aid (blunt toothpick) supragingivally; Phase C—professional supra- and subgingival debridement (Cavitron) with anesthesia. Follow-up examinations (D) were then performed over a 9-month period following termination of the experimental phase. The results clearly demonstrated that oral hygiene alone significantly reduced the plaque and bleeding indices, but not the probing depths, which were virtually unaffected. Only following professional subgingival scaling (C) did a significant reduction of probing depths and true attachment gain occur (compare results following traditional subgingival debridement, p. 280).
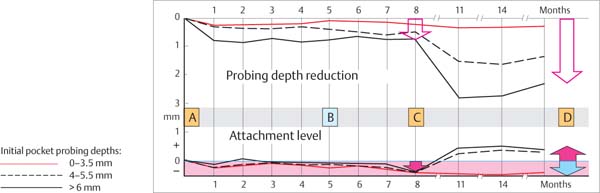
519 Oral Hygiene vs. Subgingival Scaling (Cercek et al. 1983)
|
A Oral hygiene by the patient: Toothbrush and interdental hygiene aid B Oral hygiene as in A—additional use of the PerioAid C Professional subgingival scaling (ultrasonic scaler) D Results after 17 months |
Oral Hygiene Following Periodontal Treatment
Oral hygiene by the patient is the most important factor for maintenance of the results of periodontal therapy. Only with optimum plaque control by the patient, enhanced by the dentist or dental hygienist at recall appointments (maintenance therapy) can recurrence of disease or re-infection of inactive residual pockets be prevented (Rosling et al. 1976b, Nyman et al. 1977, Knowles et al. 1979, Axelsson 2002). Where are the contradictions to the findings presented on this page?
How is it possible that with good oral hygiene alone—which apparently is ineffective subgingivally—that a treated residual pocket of, e.g., 4 mm or more, can remain inactive for months or even years, when it is known today that such pockets will be re-colonized in a very short time (Petersilka et al. 2002)?
The answer may come from the Socransky group (Haffajee 2001a, b; 2003). They reported that a permanent excellent plaque control regimen can slowly but surely alter the microbial composition of the pocket flora. In particular, the pocket flora contains a lower percentage of periodontopathic bacteria! The prevention of migration of pathogenic microorganisms from the supragingival to the subgingival region appears also to play a certain role.
Initial Therapy 1—Creating Conditions that Enhance Oral Hygiene
• Tooth Cleaning—Supragingival Scaling
• Creation of Hygiene Capability
• Gingivitis Treatment
Active professional treatment by the dentist or dental hygienist should begin even as oral hygiene instruction, patient motivation and monitoring of home care are ongoing. The patient cannot be expected to improve her/his oral hygiene if the preconditions for optimum home care are not simultaneously created (creation of hygiene capability). Professional prophylaxis is particularly important in this regard, as well as elimination of any plaque-retentive areas (niches) that represent harbors for bacterial accumulation.
The procedures described below are part of the first phase of initial therapy. Together with oral hygiene by the patient, these procedures comprise the only treatment necessary for gingivitis, and are important prerequisites in periodontitis therapy as well.
The following pages provide details concerning:
|
• Instruments and materials, and their uses • Supragingival tooth cleaning and calculus removal • Removal of iatrogenic irritants (niches) • Reduction of naturally-occurring plaque-retentive areas • Subgingival plaque and calculus removal from pseudopockets and shallow periodontal pockets |
The various treatments performed during the first phase of initial therapy cannot be strictly separated from each other, either in the presentations that follow in this book, or in the practice of dentistry. At a single appointment, for example, calculus removal, elimination of amalgam overhangs, minor odontoplasty and occlusal equilibration may all be accomplished.
The subgingival treatment of root surfaces (second phase of initial therapy) may also intersect with the first phase. In clinical situations that represent the indistinct transition from gingivitis to incipient periodontitis, i. e., when pockets are shallow, supra- and subgingival scaling often can be performed simultaneously.
On the other hand, scaling and definitive root planing in deep pockets and eventual soft tissue curettage must be relegated to the second phase of initial therapy. These procedures are often categorized as actual surgical therapy.
Supragingival tooth cleaning—Power-driven Instruments …
The removal of all stains, deposits and concrements comprises the first phase initial therapy. It is also an important preventive measure in the healthy periodontium, and the most significant post-operative measure following completion of periodontitis therapy. Thorough tooth cleaning is performed during each recall appointment (maintenance phase, p. 447).
The prevention/treatment/maintenance therapy trio “without end” demands the use of auxillary personnel such as the dental hygienist or the trained dental assistant. It also demands rationalization, standardization and work simplification, as well innovation in the development of new instruments (ultrasonic devices, Air-Scaler etc.).
Difficult-to-remove stains resulting from medicaments (e.g., chlorhexidine), tobacco, beverages (tea, wine) and foodstuffs as well as dental plaque can be removed using instruments that provide a water-powder spray (e.g., Cavitron-Jet). The powder that is used in the water spray must be minimally abrasive for dentin and restorative materials (Iselin et al. 1989). Furthermore, the spray should never be
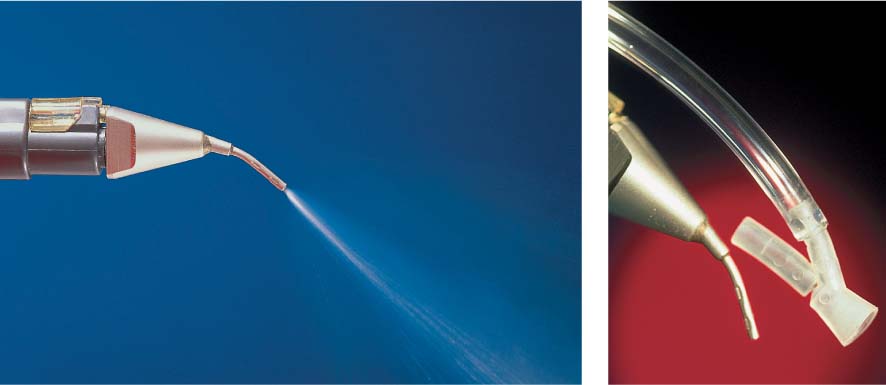
520 Powder-water Spray Device (Cavitron-Jet)
The powdered abrasive consists primarily of sodium bicarbonate (NaHCO3) which can remove tough deposits and stains when used with a water spray.
The water-powder spray requires use of a high-speed evacuator.
Right: “Jet Shield”
This “mini-evacuator” is affixed directly to the working end of the Cavitron-Jet.
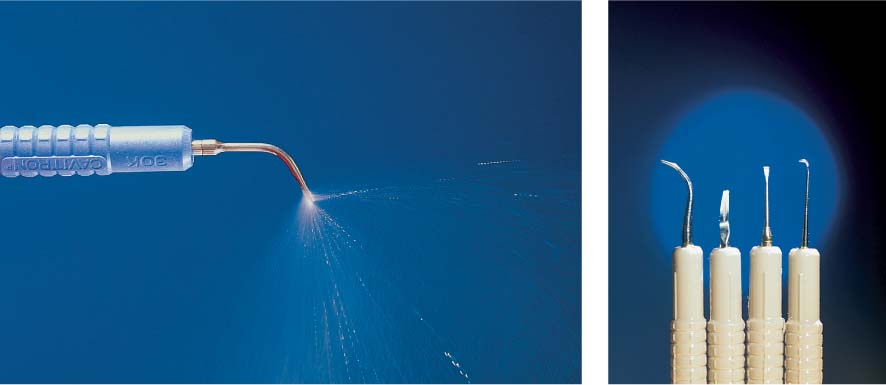
521 Stabilized Power System (SPS) with Ultrasonic Scaler Tips (Cavitron Thru Flow inserts—TFI)
In modern instruments, the water coolant is directed through the instrument tip in a groove on the instrument head. Ultrasonic scalers work at between 25,000–50,000 cycles per second, with very small amplitudes.
Right: Various ultrasonic scaler tips; from left to right: TFI-1000, TFI-9, TFI-1, TFI-7.
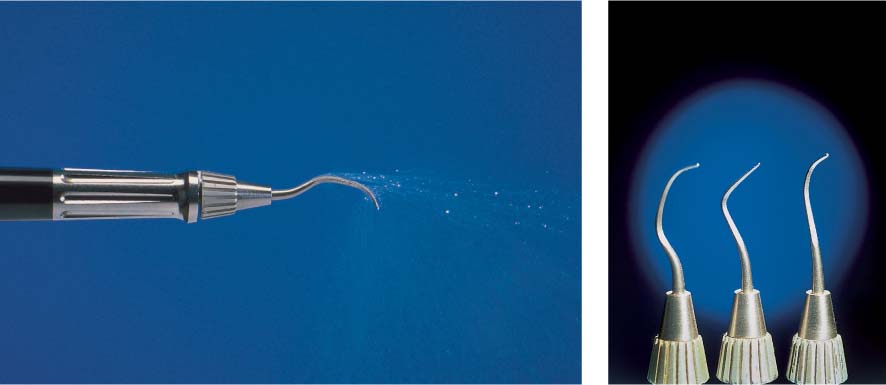
522 Air-Scaler (Titan-S, “Sonic Scaler”)
The air-scaler has a regulable frequency of maximum 6,000 Hz and thus is considerably slower than an ultrasonic instrument. The motion of the tip of the instrument is between 0.08–0.20 mm; relatively slow.
Right: Three tips for the Titan-S device.
Additional manufacturers:
• KaVo
• Satelec, and others
… and their Use
directed perpendicular to the tooth surfaces, and should usually be used only on enamel, with constant movement of the tip. Such devices do not guarantee perfect cleaning in interdental spaces or niches. The spray with normal abrasive powder should not be directed into pockets. With the new, “mild,” minimally abrasive agents and fine tips, effective cleansing can be achieved, in certain circumstances, even subgingivally (e.g., glycine powder from Espe, with the EMS Airflow Handy 2; p. 282; Petersilka et al. 2002).
After the removal of soft deposits, calculus becomes visible. Calculus is an excellent substrate for plaque accumulation and must be completely removed. Numerous power-driven instruments are available: Ultrasonic apparatus (e.g., Cavitron) as well as Air-Scaler that can be attached to the air-water supply of the dental unit (e.g., Titan-S, Satelec; Sonicflex KaVo etc.; Hermann et al. 1995).
However, the most important and most precise means for removal of concrements remains: hand instruments (p. 242).
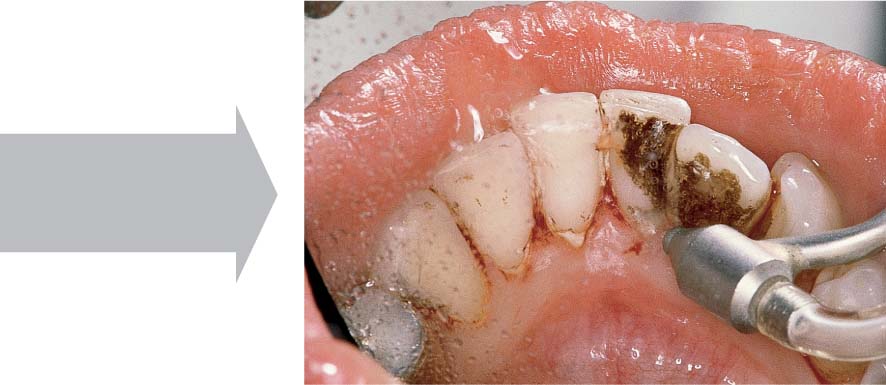
523 Removal of Soft Deposits and Stains
Tough deposits, plaque and stains from tobacco, tea, wine or chlorhexidine can be removed from accessible enamel surfaces using the powder-water device. Cleaning in interdental areas, however, is insufficient. The stream should be directed onto the tooth surface at an angle of 45°. A high speed evacuator is used to retrieve the reflected solution.
Caution: Highly abrasive on cementum, dentin and restorations!
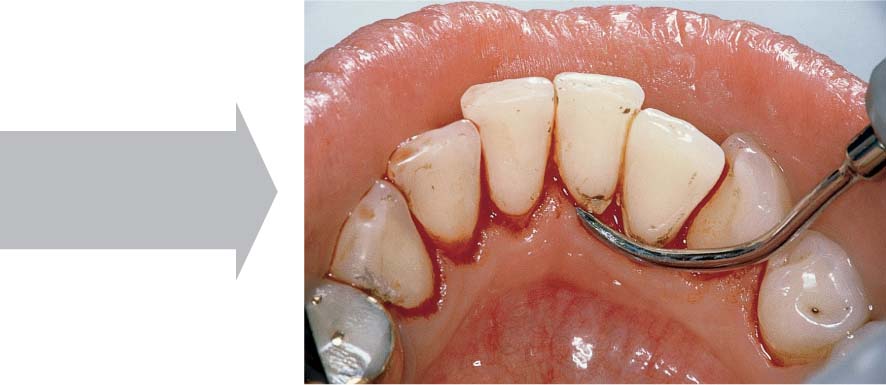
524 Removal of Hard, Supragingival Concrements with an Ultrasonic Device
Following removal of soft debris and plaque, remaining calculus is completely removed using the ultrasonic device. In narrow, poorly accessible sites and niches, fine ultrasonic tips or hand instruments must be used afterwards.
Caution: Overheating, cracks in enamel and porcelain!
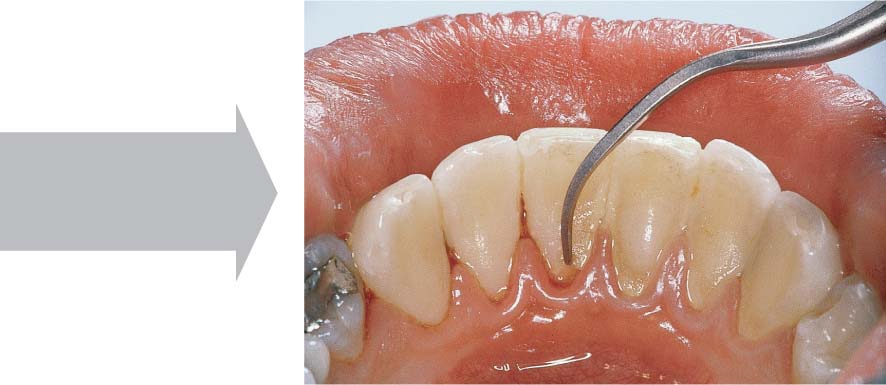
525 Removal of Hard Supragingival Concrements Using the Air-scaler
This instrument, which attaches to the turbine handpiece air-water orifice, permits removal of concrements in a manner similar to the ultrasonic instrument; however, the sensitivity is improved and the frequency can be regulated. Less pressure is necessary, and rinsing is continuous. This simplifies therapy, improves visibility and permits more efficient performance.
Pictured is the Titan-S scaler.
Supragingival Tooth Cleaning—Hand Instruments, Prophy Pastes …
In addition to ultrasonic devices, hand scalers and curettes remain the most important instruments for periodontal therapy and prophylaxis. For the removal of soft deposits and stains, hand instruments are enhanced by the use of brushes, rubber cups and polishing strips along with cleaning and polishing pastes.
It is not the manufacturer that is critical for successful treatment, rather the shape of the instrument, especially its degree of sharpness, and above all the manual dexterity of the clinician (scaling technique).
For the removal of supragingival deposits, chisels, straight and angled scalers and also lingual scalers are effective. In premolar and molar segments, also on difficult-to-reach areas, grooves and depressions on the crown, as well as exposed root surfaces, the removal of supragingival concrements may require curettes in addition to scalers, usually without anesthesia.
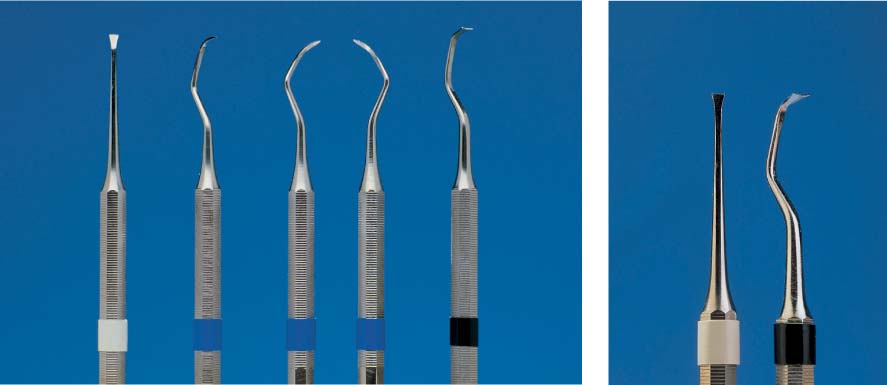
526 Scalers
For supragingival calculus removal and for concrements that are located only a few millimeters below the gingival margin, sharp-edged, pointed scalers in various shapes are indicated:
| • Zerfing Chisel ZI 10 (white) • Zbinden Scaler ZI 11, 11 R+L (blue), straight and paired • Lingual Scaler ZI 12 (black) |
Right: Working end of the Zerfing chisel (45° sharpening angle!) and the lingual scaler.
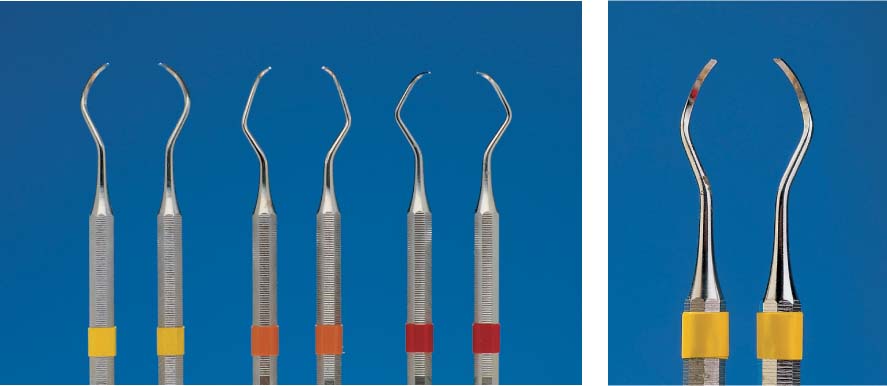
527 Curettes
For difficult-to-reach areas and for subgingival accretions, the scaler armamentarium must be enhanced by curettes:
| • Universal Curettes ZI 15 (yellow) 1.2 mm wide • Anterior Curettes GX 4 (orange), Deppeler • Posterior Curettes M 23 A (red); both are ca. 0.95 mm wide; Deppeler |
Right: Working ends of a pair of universal curettes.
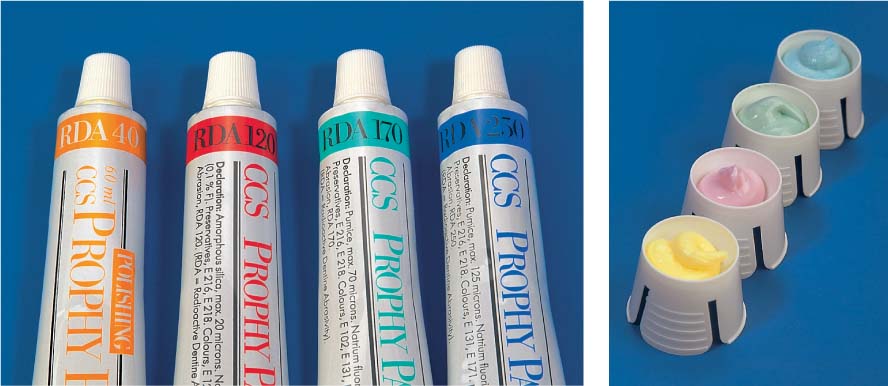
528 Standardized Prophy Pastes—RDA
Prophy pastes are available according to abrasiveness. The standardization is achieved on the basis of dentin abrasion, measured by radioactivity. All are fluoride-containing:
|
RDA Value |
Abrasiveness |
Color |
|
• 40 |
mild |
yellow |
|
• 120 |
normal |
red |
|
• 170 |
moderate |
green |
|
• 250 |
heavy |
blue |
Right: Finger cups with color-coded prophy pastes.
… and their Use
For the first phase of initial therapy, the classical universal curettes are indicated. The slender Gracey curettes, which are sharpened on only one edge, are used almost exclusively for subgingival scaling and root planing in periodontitis patients (p. 259). Today, ultrasonic and sonic devices are being used more and more often, in addition to hand instruments.
If supragingival calculus is covered with thick soft deposits, these should be removed with brushes and coarse prophy paste before mechanical debridement.
Whenever calculus is removed, the teeth should be polished afterwards with a rubber cup and polishing paste. This polish of the teeth and any exposed root surfaces is performed with fluoride-containing prophy pastes, which are classified according to their dentin abrasiveness (radioactive dentin abrasion = RDA; p. 234).
Contact points and the interdental areas can be cleaned using fine polishing strips (see p. 244).
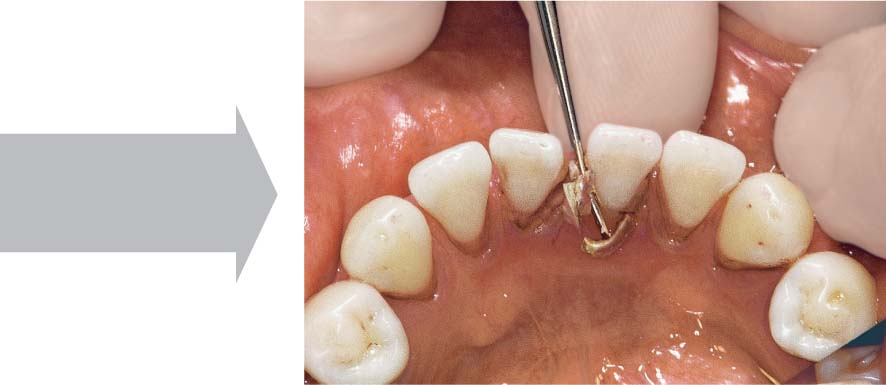
529 Supragingival Calculus Removal
The Zerfing chisel is the only instrument that is used in the anterior segment with a pushing motion.
Straight and angled scalers and/or ultrasonic devices are then used for removal of any remaining calculus.
The lingual scaler (Fig. 526, right) smoothes the narrow lingual surface of mandibular anterior teeth.
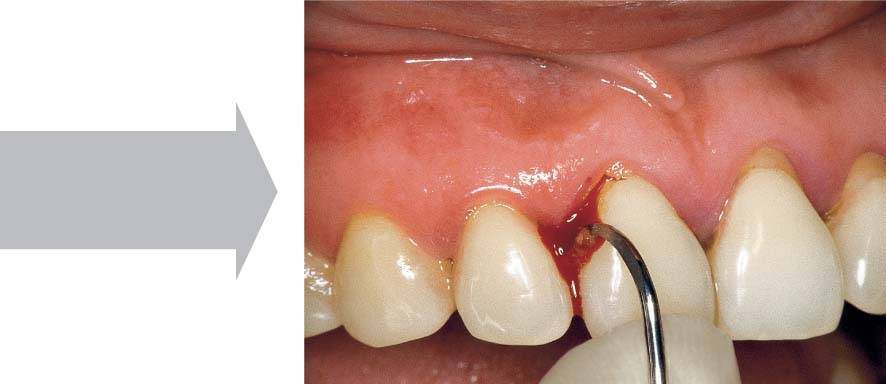
530 Subgingival Calculus Removal
The largest masses of subgingival accretions are located only a few mm apical to the gingival margin. These should be removed during gross debridement, without anesthesia, using scalers and curettes or ultrasonic devices, as necessary.
Gingival bleeding will occur even during very careful scaling, as the ulcerated pocket epithelium is injured.
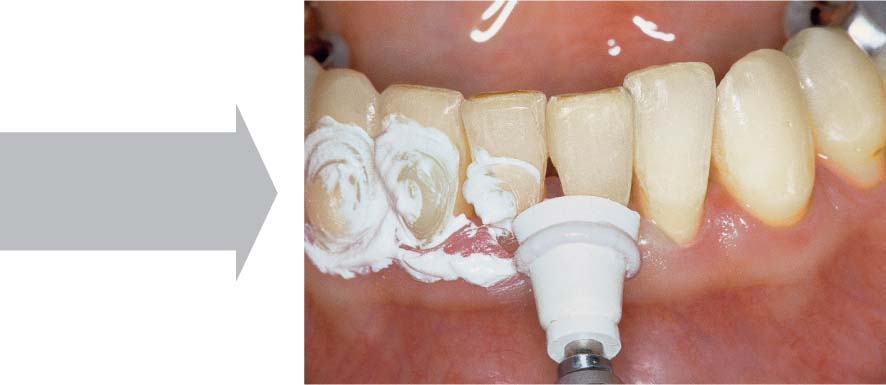
531 Polishing with Rubber Cup and Prophy Paste
Each time scaling is preformed, the teeth must be polished, otherwise rough surfaces will enhance re-accumulation of plaque bacteria.
Rubber cups and polishing paste are ideal for this procedure (RCP technique, “rubber cup and paste”), because they are kinder to the gingival margin than are rotating brushes. The rubber cup can be used near shallow pockets to achieve polishing 1–2 mm beneath the gingival margin.
Creating of Conditions that Enhance Oral Hygiene—Removal of Iatrogenic Irritants
Concurrent with mechanical removal of plaque and calculus, all imperfect dental restorations are corrected with the goal of creating smooth supra- and subgingival tooth surfaces as well as impeccable transitions areas between natural tooth surfaces and the margins of restorations and crowns. Only when this is done will it be possible for the patient to maintain efficient plaque control: Creation of hygiene capability.
The most important iatrogenic irritants, which must be removed or corrected, include:
|
• Rough, poorly contoured restorations • Overhangs of restoration margins • Open crown margins located subgingivally • Improperly contoured bridge pontics • Depressible clasps, prosthesis saddles etc., which can injure the periodontium directly. |
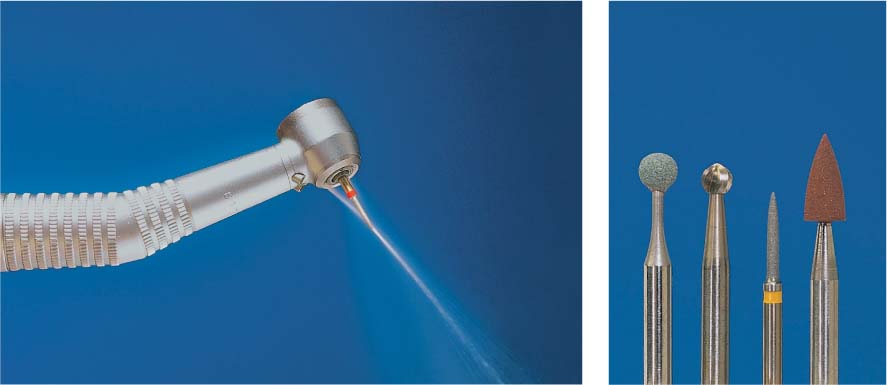
532 Instruments for Recontouring and Polishing Old Restorations
High-speed handpiece with variously-shaped, fine, flame-shaped diamond burs.
Right:
| • Round stone• Round bur • Flame-shaped, fine diamond bur • Rubber tip polisher (Shofu “brownie”) |
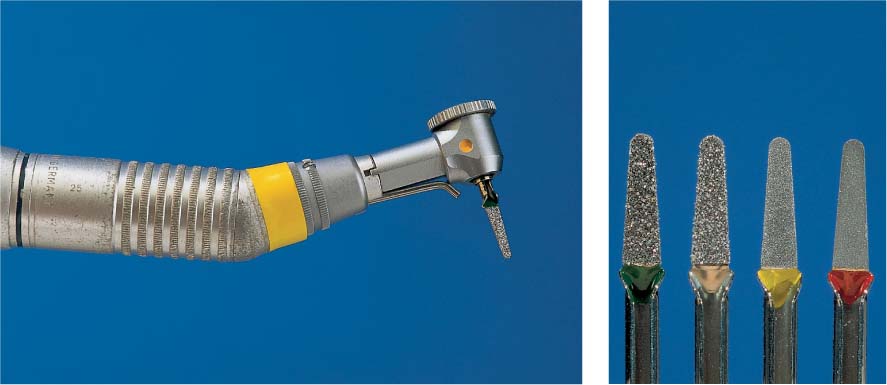
533 Mechanical Files
Handpiece with prophylaxis head (EVA system; KaVo).
0.4–1.5 mm length. Regulable speed, up to 10,000 rpm.
Right:
|
• Proxoshape Set (Intensiv) Diamond coating coarseness: 75 μm, 40 μm (yellow), 15 μm (red) |
Possibility to remove restoration overhangs even in relatively narrow interdental spaces.
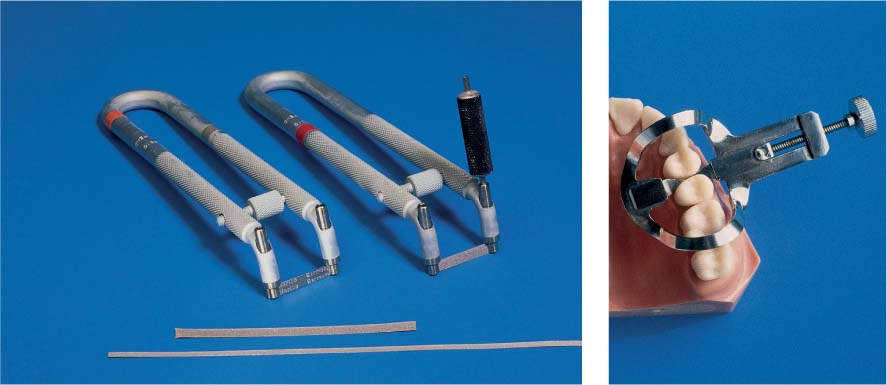
534 Manual Filing
A strip holder simplifies the removal of restoration overhangs and polishing in areas of narrow interdental spaces, and also protects the cheeks, tongue and lips. Pictured:
| • LM Holder; Steel Strips (Horico) |
Right: MEBA separator Extremely narrow contact points are not always accessible even for the finest strips. The separator can provide access.
The finishing and polishing of all restoration surfaces can be performed with fine diamonds (water cooling), round burs and finishing disks.
Interdental amalgam overhangs can be removed with flame-shaped diamonds and periodontal files or with the Proxoshape files (EVA system).
Metal and plastic strips, either hand-held or in an appropriate holder, are also useful in the marginal/proximal regions for smoothing restoration margins. Old restorations exhibiting overhangs or cracks should be replaced, because secondary caries is common beneath defective restorations!
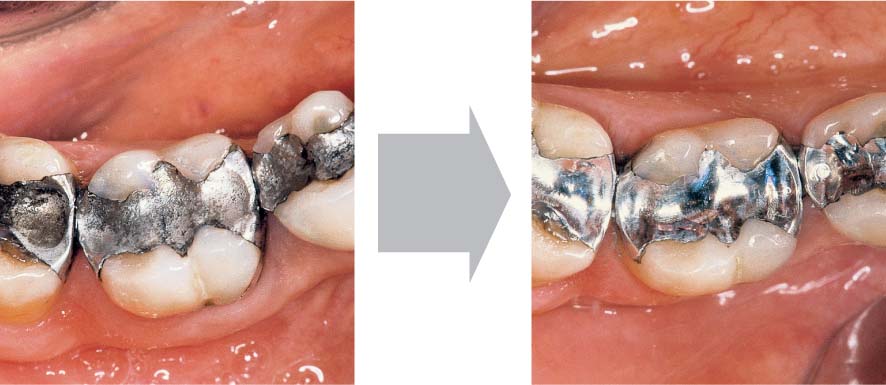
535 Old amalgam restorations before and after recontouring
Left: The rough, discolored surface of old restorations enhances plaque accumulation. Even though the occlusal surfaces do not have any direct contact with the marginal periodontal tissues, polishing the restorations leads to a reduction in the bacterial load in the oral cavity. Functional contacts in centric occlusion and lateral occlusion must be maintained.
Right: Contoured and polished old amalgam restorations.
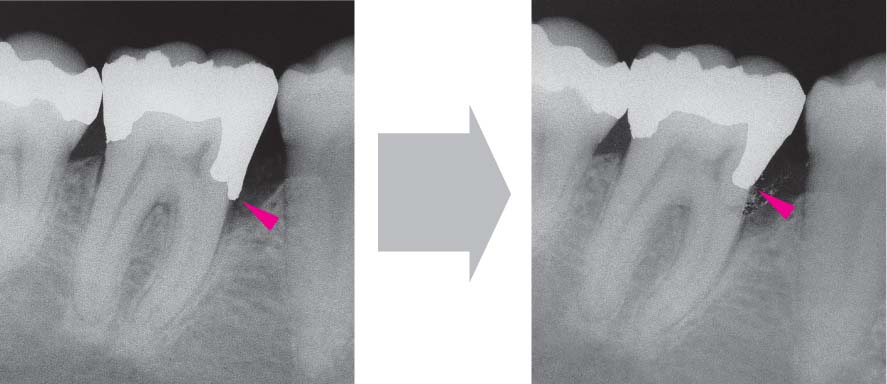
536 Amalgam overhang before and after removal
Left: Tooth 46 exhibits a pronounced marginal overhang on the mesial aspect (massive plaque accumulation, arrow). A deep bony pocket is also located near this iatrogenic niche.
Right: The proximal overhang was removed and the restoration was polished. The margin is now perfect, discouraging any further plaque accumulation. If there is suspicion of caries, the restoration should be replaced.
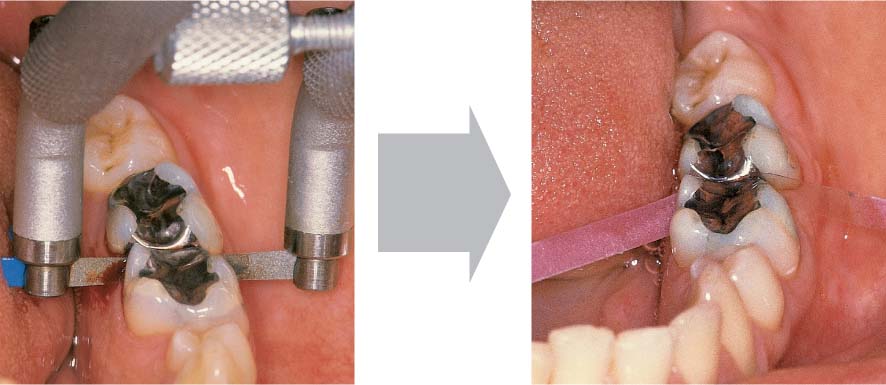
537 Smoothing the proximal restoration surface using strips
Left: LM strip holder with diamond-coated steel strip during smoothing of the distal surface of tooth 36. The contact area must be protected.
Right: The interdental surface of the restoration is finally polished using fine, very mildly abrasive linen strips, which can also be used in the contact area.
Goal: Smooth proximal surfaces make possible perfect interdental hygiene with dental floss.
Correction of Iatrogenic Irritants—Bridge Pontics
For esthetic reasons, bridge pontics in the anterior region should contact the attached gingiva. An ovoid pontic (p. 502) that presses into the gingiva can enhance esthetics by stimulating papilla formation around the abutment, but may render hygiene more difficult.
In posterior areas, where esthetics is not a consideration, it is often beneficial to leave 1–2 mm of space beneath pontics to facilitate use of hygiene aids for the removal of plaque under the pontic.
A facetted pontic (“modified ridge lap,” p. 502) makes it easier to use interdental brushes, stimudents or superfloss to clean the abutment teeth, because of the guidance that is absent when the pontic is far removed from the gingiva, or when a bar-like pontic is used.
Improperly constructed bridge pontics may be corrected on an emergency basis using flame-shaped diamonds. The undersurface of pontics treated in this manner can be polished almost to laboratory smoothness using Proxoshape files (15 μm abrasiveness).
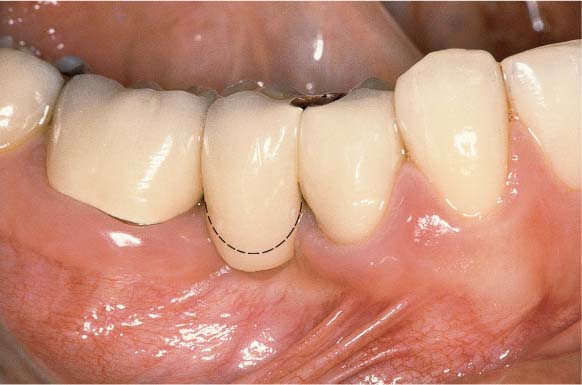
538 Improper Bridge Pontic Form
This pontic is too long and its saddle shape contacts both attached gingival and mobile oral mucosa on the facial aspect (type “ridge-lap,” p. 502). It is also too wide, contacts the mesial abutment over a broad expanse, encroaches on the mesial gingival papilla and precludes any effective interdental hygiene. The planned shortening and contouring is indicated by the dashed line.
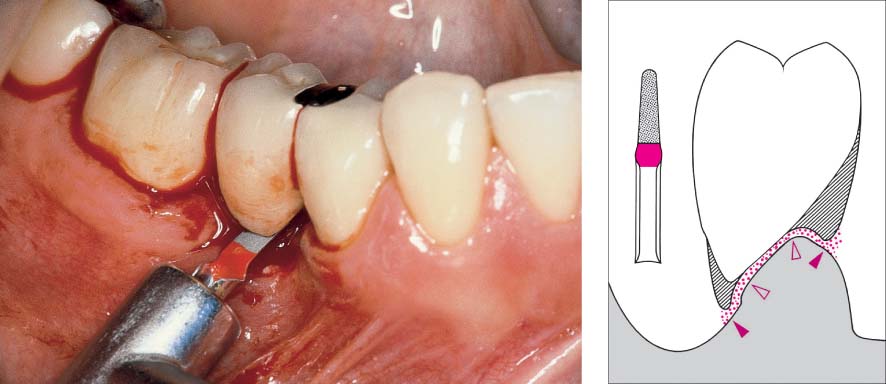
539 Correction of the Pontic
The fixed bridge is functional. Therefore, the poorly contoured pontic is recontoured on its marginal and proximal surfaces using flame-shaped diamonds.
Right: Massive plaque-retention area beneath the concave, saddle-shaped pontic (solid red arrows). Contouring renders the pontic’s undersurface flat to convex, and plaque retention is therefore reduced (empty arrows).

540 Pontic Area Accessible for Hygiene
A periodontal dressing (Coe-Pak) remained in situ for 10 days. After healing of the gingival wound, optimum oral hygiene is possible in the proximal surfaces of the abutment teeth and beneath the pontic, e.g., using superfloss or “Brush and Floss”.
The yellowish fiber-optic light used from the lingual aspect reveals healthy, keratinized gingiva.
Removal of Natural Plaque-retentive Areas—Odontoplasty of Grooves, Depressions, Irregularities
The natural morphology of a tooth manifests grooves, irregularities, depressions etc. on both the crown and the root. In a healthy dentition, these can usually be cleaned satisfactorily with the toothbrush and interdental hygiene aids.
However, morphologic anomalies that represent plaque-retentive niches may be found at the cervical aspect of some roots. Frequently encountered are narrow grooves that extend apically from the lingual pit of an incisor far down the root surface.
Furthermore, fused roots of multirooted teeth may exhibit an irregular profile, with large grooves that may extend deeply into the subjacent dentin. Following initial periodontal pocket formation, such grooves are exposed and become plaque-retentive areas that are difficult to ascertain clinically. They may assume an etiologic role in localized, progressive destruction of periodontal supporting structures.
To a certain degree, such niches can be opened by means of mild odontoplasty, and thus rendered more accessible for cleaning.
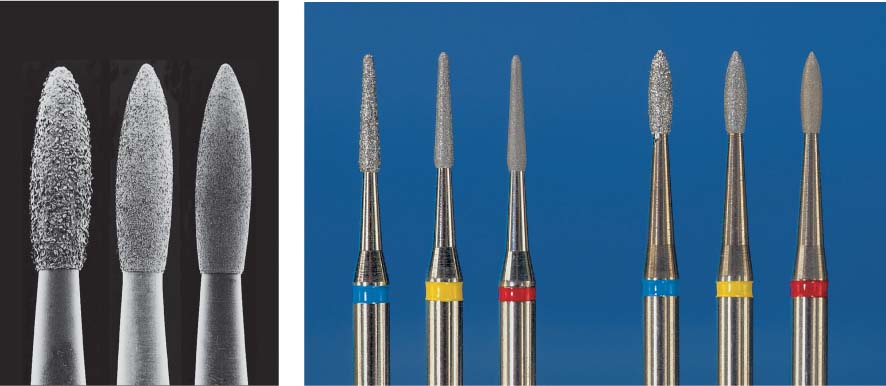
541 Diamonds for Contouring and Polishing—the Perio-Set …
… consists of slender, conical and flame-shaped diamonds for subgingival debridement, odontoplasty and final polishing of ground tooth or root surfaces; two shank lengths are available. Left: Flame-shaped Perio-Set diamonds in three degrees of abrasiveness (SEM):
| Perio-Set (Intensiv Co.) • 75 μm (blue) • 40 μm (yellow) • 15 μm (red) |
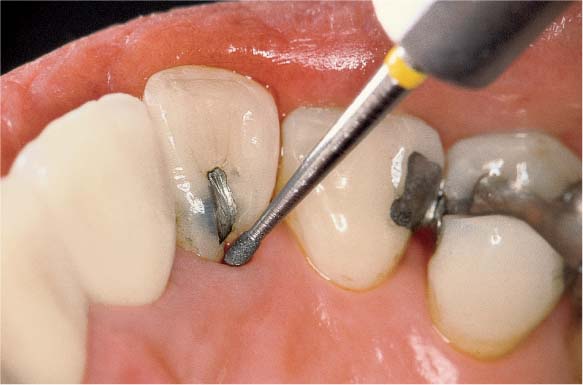
542 Recontouring (opening) a Depression on Tooth 22
Apical to the lingual pit amalgam on this lateral incisor, a fine groove that could be detected clinically with an explorer extended 5 mm apically into the periodontal pocket.
The groove was so narrow that its depth could not be probed with either a scaler or a curette. An odontoplastic modification was indicated, which included widening, rounding and polishing with a 15 μm diamond.
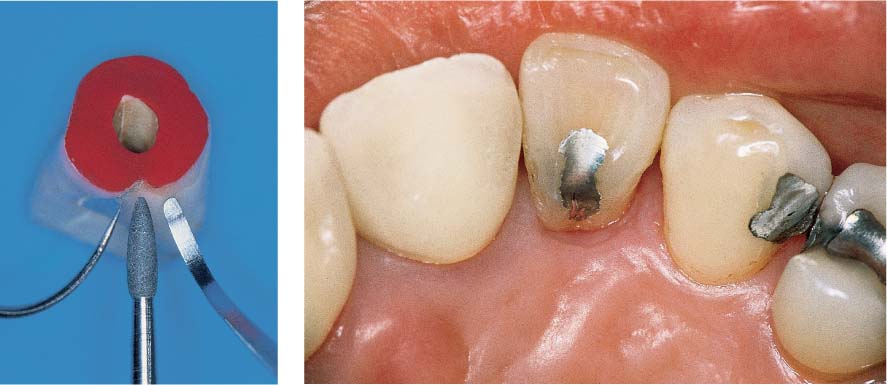
543 Tooth 22 after Odontoplasty
The narrow groove was opened up using diamond burs. The depth of the groove can now be reached with fine hand instruments (e.g., an 0.8 mm wide curette), making adequate professional debridement possible. After odontoplasty, tooth surfaces should be repeatedly treated with topical fluoride.
Left: Section through a similar anterior tooth, at the level of the gingival margin.
Reduction of Natural Plaque-retentive Areas—Crowding: Morphologic Odontoplasty
Crowding is one of the few tooth position anomalies that may play an indirect role in the initiation and progression of gingivitis/periodontitis. In such cases, occlusal/functional factors play no role. Crowded teeth create niches for plaque accumulation, and simultaneously render the patient’s oral hygiene more difficult.
Extensive orthodontic treatment (p. 463) involving selective tooth extraction, is often not possible due to the large technical, temporal and financial considerations, especially in adults.
Careful morphologic odontoplasty may represent an alternative to orthodontics in cases of tooth crowding; the procedure can also improve the esthetics. Odontoplasty is performed using fine diamonds, exclusively in enamel. Following the procedure, tooth surfaces must be polished and treated with fluoride.
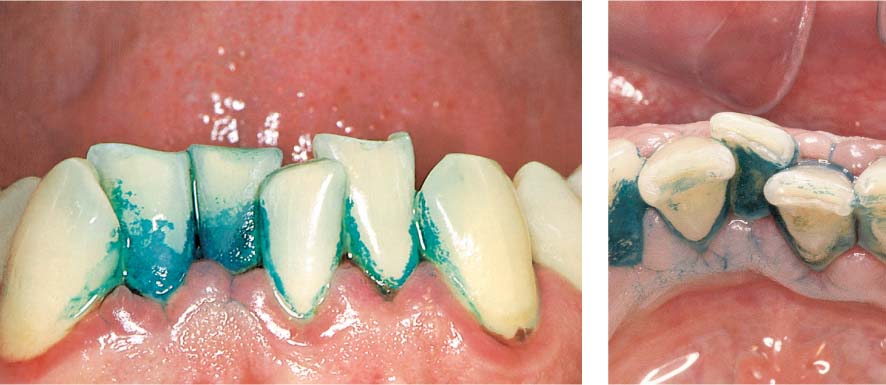
544 Crowding—Plaque-retention Factor
In this case of severe anterior crowding in the mandible, one observes severe gingivitis and plaque accumulation on those tooth surfaces that do not benefit from self-cleansing by the lip and tongue. This situation can be significantly improved by minor odontoplasty.
Right: View from the occlusal aspect. Tooth 31, in its severely labioverted position, is never touched by the tongue.
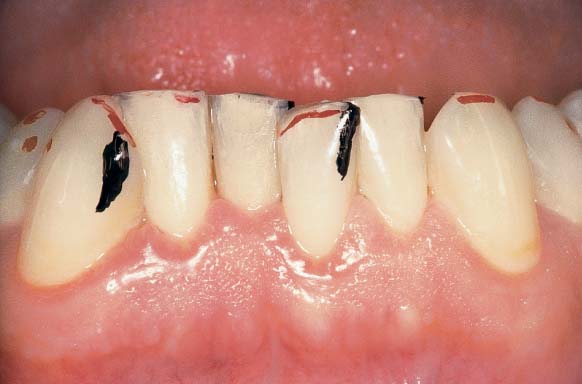
545 Odontoplasty—Morphologic Grinding
Minor esthetic odontoplasty was performed on the incisal edges, while retaining all occlusal contacts in centric (red). The black surfaces will be selectively and morphologically smoothed, to decrease the niches.
The extremely narrow contact surfaces are polished using abrasive strips so that the interdental areas become accessible for dental floss.
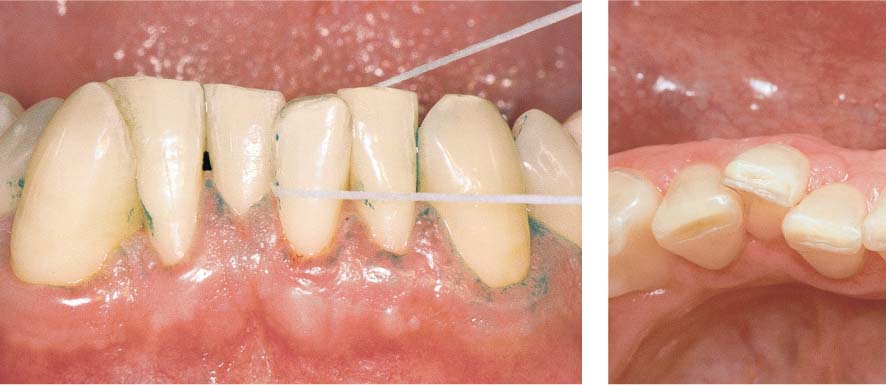
546 Clinical View Following Odontoplasty and Prophylaxis
The plaque-retentive areas are no longer so expansive. Disclosing agent reveals only minor plaque accumulation. Interdental hygiene with floss is now possible.
This minor odontoplastic treatment and optimization of oral hygiene by the patient led to significant reduction of gingival inflammation.
Right: Even in the lingual area, the clinical situation is improved. Mild marginal inflammation persists.
Treatment of Plaque-elicited Gingivitis
Clinical Procedure, Step-by-Step
The treatment for gingivitis (“gingival disease,” classified as Type I A, p. 520) is identical to the “initial treatment 1” (hygiene phase) performed collaboratively between the patient and the clinician. It includes motivation, information, oral hygiene instruction and check-up, as well as professional supragingival plaque and calculus removal (debridement). When performed throughout the entire dentition, this treatment can be extremely time-consuming. It will be demonstrated here in the mandibular anterior segment. The 30-year-old female exhibited a moderate, plaque-induced gingivitis. There was no attachment loss, but pseudopockets to 4 mm were noted. The patient had never received comprehensive oral hygiene instruction. OHI was therefore provided simultaneously with professional tooth cleaning procedures.
Initial findings (mandibular anterior):
| PI: 72 % | BOP: 69 % | TB: 0–1 (p. 174) |
The clinical appearance and radiographs are depicted below.
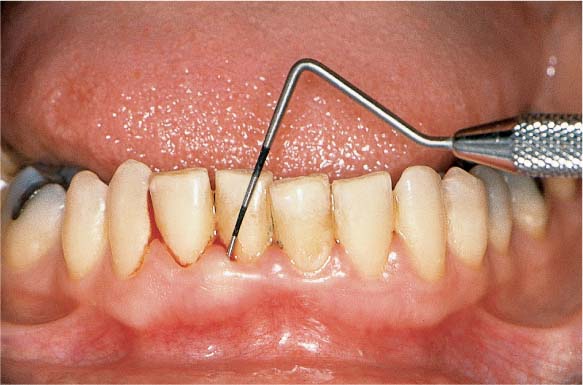
547 Initial Findings—Moderate Gingivitis
The gingivae are swollen by edema, especially in the papillary area. Profuse hemorrhage occurs immediately after gentle probing, particularly in interdental areas. The patient’s generally mediocre oral hygiene is enhanced in the mandibular anterior area by mild crowding, which favors plaque accumulation.
The width of the attached gingival is normal.
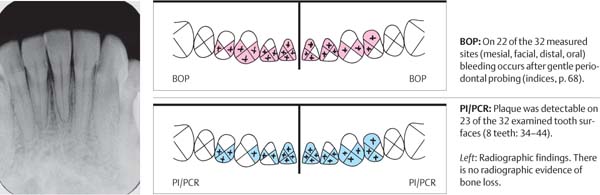
548 Bleeding Index (BOP) and Plaque Index (PI or PCR)
BOP: On 22 of the 32 measured sites (mesial, facial, distal, oral) bleeding occurs after gentle periodontal probing (indices, p. 68).
PI/PCR: Plaque was detectable on 23 of the 32 examined tooth surfaces (8 teeth: 34–44).
Left: Radiographic findings. There is no radiographic evidence of bone loss.
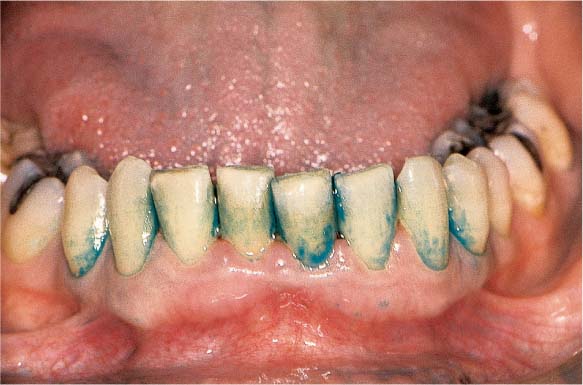
549 Stained Plaque
On almost all teeth, there is more or less pronounced plaque accumulation, particularly in the marginal and interdental regions.
Plaque and Calculus Removal in the Mandibular Anterior Area; Lingual View
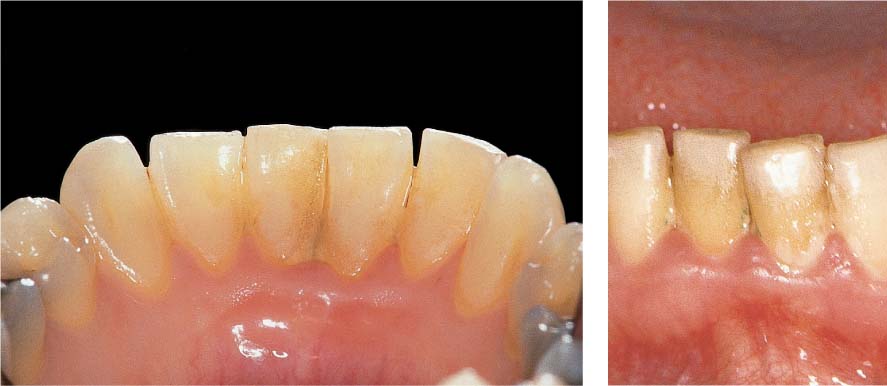
550 Initial Condition
A plaque-induced gingivitis with supragingival calculus is shown from the lingual aspect.
Oral hygiene instruction (toothbrush) was given at the first appointment.
Interdental hygiene (using dental floss) was demonstrated at the next appointment.
Right: Gingivitis, facial view.
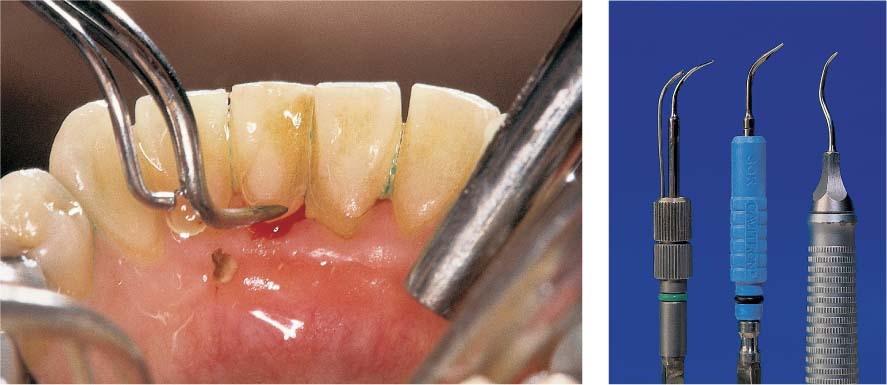
551 Debridement Using the Ultrasonic Scaler
Power-driven devices are particularly indicated for the initial removal of soft and hard supragingival deposits (gross debridement).
Right: Historical (left) and modern ultrasonic instruments with internal cooling (middle; Dentsply Cavitron) or sonic scaler (e.g., KaVo Sonicflex, right).
Caution: These create aerosols; barriers are indicated.
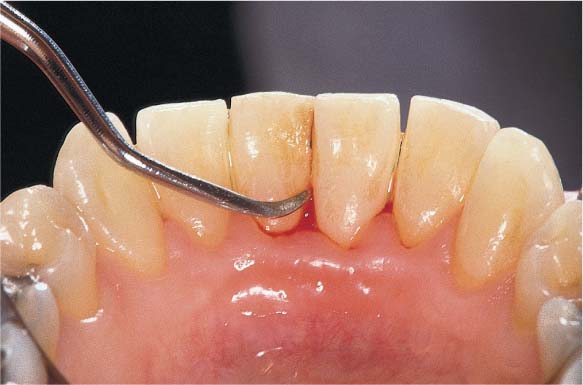
552 Scaling—Tooth Cleaning Supragingivally Using Hand Instruments
After use of power scalers, it is imperative that hand instruments (scalers and curettes) be systematically employed for fine debridement.
Less important than the particular instrument used is the result: A clean tooth.
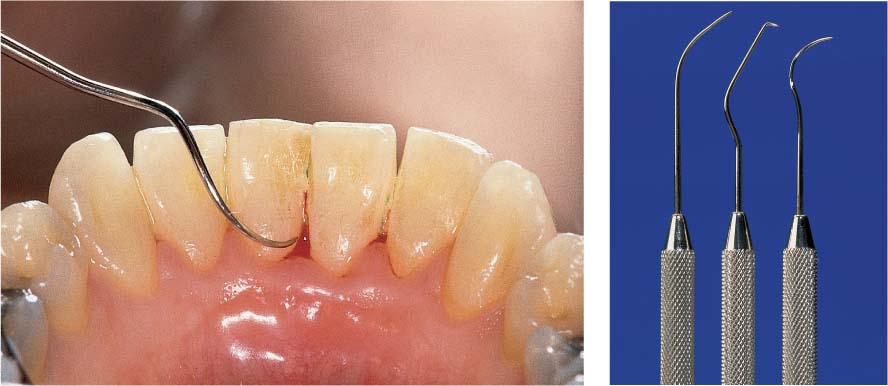
553 Checking with a Pointed Explorer
The smoothness of the tooth and root surface is checked with a very fine explorer.
Right: Fine, pointed explorers:
| • EXD5 • EXD3CH • EXS3A All instruments from Hu-Friedy Co. |
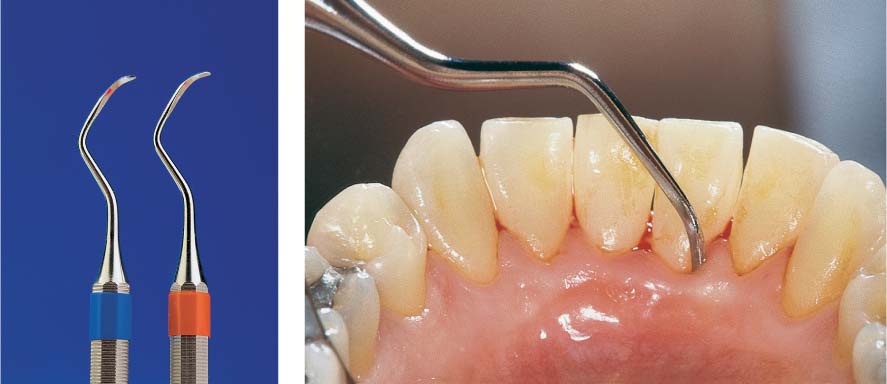
554 Subgingival Cleaning with Universal Curettes
Even in gingivitis therapy, fine curettes are applicable. Their rounded ends injure gingiva only slightly when they are used subgingivally in pseudopockets with a horizontal stroke.
Left: Instruments:
| • Scaler M23 • Curette M23A (Deppeler Co.) |
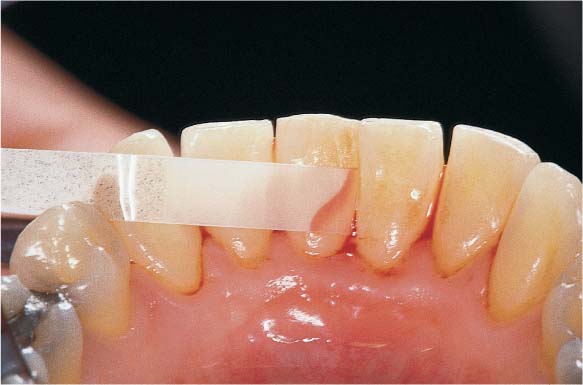
555 Plaque Removal And Preliminary Polishing in the Interdental Area—Strip with Mild Abrasiveness
Following mechanical therapy of the oral and facial tooth surfaces, the proximal surfaces and the contact areas are cleaned with strips incorporating fine abrasives.
For polishing, dental tape or smooth, uncoated strips may be used with a fluoride-containing prophy paste (p. 232).
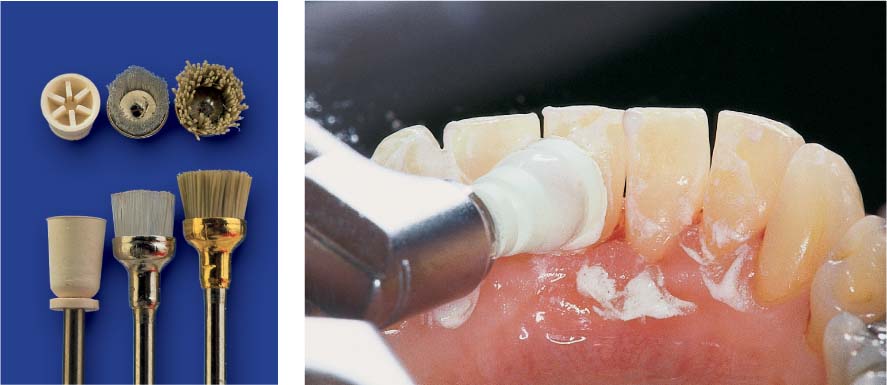
556 Polishing with a Rubber Cup and Paste—RCP Method
Using the RCP method, tooth surfaces are carefully treated. Soft deposits (plaque!) should be removed exclusively with RCP, because repeated mechanical scaling (e. g., during recall visits) could enhance the formation of recession and wedge-shaped defects.
Left: Depending upon the tenacity of the deposits (stains), rubber cups or soft-hard brushes can be employed.
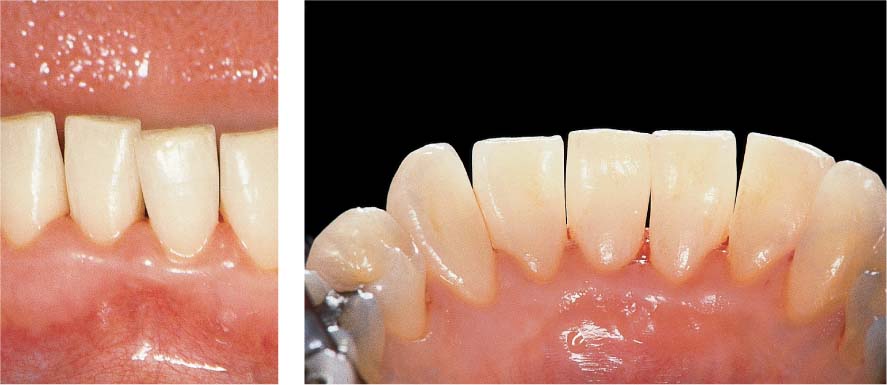
557 Mandibular Anterior Area Immediately after Treatment
Plaque and calculus have been removed. The time for these procedures was ca. 15 min. Even with very careful mechanical treatment of the tooth surfaces, minute trauma to the gingiva cannot be avoided. Such minor injuries heal within a few days.
Left: View from the facial, immediately following plaque and calculus removal.
Gingivitis Treatment
Summary
In this 30-year-old female, restorations were placed from time to time over many years. At these infrequent dental appointments, however, oral hygiene instruction was never provided. The patient reported that a very brief calculus removal was performed at such appointments.
During gingivitis therapy in all sextants by the dental hygienist, the patient was readily motivated. She learned the demonstrated plaque control methods using toothbrush and dental floss without any difficulty. Her plaque index (PI or PCR) fell to 12 %. Upon probing the gingival sulci, only minimal bleeding occurred (BOP 9 %, p. 69).
The patient’s continued excellent cooperation was expected; therefore, 1–2 short follow-up appointments were scheduled. Subsequently, a recall interval of ca. 6 months was deemed sufficient to maintain the successful therapeutic result: Freedom from clinical inflammation, and periodontal health. The recall interval should also make it possible to detect early on any problems or failures with home care.

559 Initial Condition—Mandibular Anterior Segment
Inflamed and slightly swollen gingiva, pseudopockets, bleeding on probing. Generalized marginal plaque accumulation is barely visible.
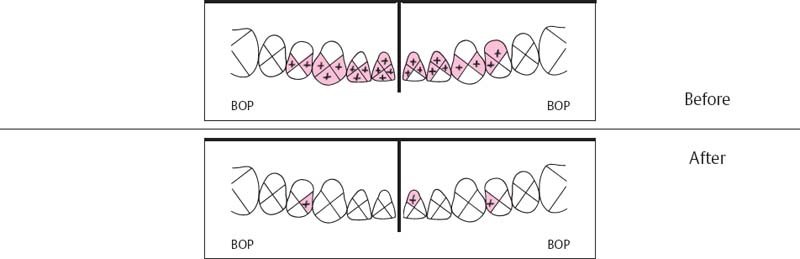
560 Bleeding Index (BOP)
Before Initiation of Therapy
Over two-thirds of all marginal and interdental areas of the 8 teeth examined (34–44) bled after probing (BOP 69 %).
Following Treatment
The number of bleeding sites was reduced from 69 % to 9 % by means of local therapy alone. In the depicted region, there are only three sites that exhibit mild, point bleeding upon probing.
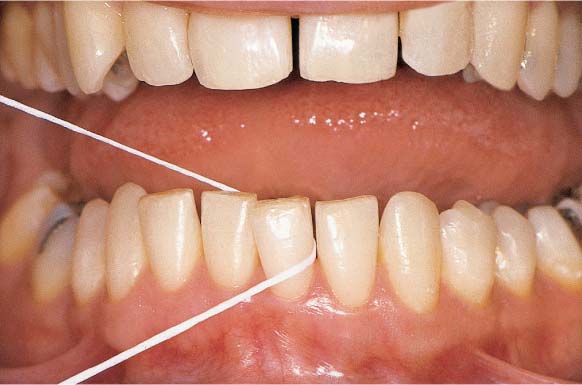
561 Six Months later
Gingivitis has been eliminated. The gingiva exhibits normal form, color and contour. It is coral pink, keratinized and mildly stippled. Plaque is virtually absent.
This patient brushes the teeth using a hand toothbrush and the modified Bass technique, and cleans the interdental areas with dental floss. The patient now understands the cause of her gingivitis, and therefore can prevent recurrence (tertiary prevention).
Phase 1 Therapy
• Initial Therapy 2—Causal, Antimicrobial Therapy
• Traditional, Non-Surgical Pocket Treatment
• FMT—Pharmacologically Supported “Full Mouth Therapy”
Actual Phase 1 therapy—the second component of initial treatment—includes closed debridement of periodontal pockets. This is also referred to as conservative therapy, in contrast to periodontal surgery (p. 295), and also as “non-surgical” therapy. The following procedures comprise this aspect of treatment:
|
• Debriding the root surfaces of plaque and calculus • Removing endotoxin-containing cementum layers (?) • Root planing • Possible soft tissue curettage • “Full mouth therapy” |
Definitions
Nomenclature for these procedures is not internationally uniform. Presented here is a recapitulation of definitions (AAP “Glossary of Periodontal Terms,” 2001):
Debridement—Plaque and Calculus Removal (Scaling)
Removal of non-adherent and adherent biofilm as well as calcified plaque (calculus) from gingival or bony pockets, without modifying the root surface.
Detoxification of the Root Surface
Mechanical or chemical detoxification of the root surfaces. Removal of any remaining endotoxin-containing layers of cementum. This procedure is not necessarily differentiable from subgingival calculus removal on the one hand, or root planing on the other.
Root Planing
Smoothing the root surfaces using curettes and possibly also diamond burs. This procedure is also not a distinct entity vis-à-vis subgingival cleaning and planing of root surfaces.
Gingival Curettage
Removal of the pocket epithelium and infiltrated subepithelial connective tissue (often classified as surgical therapy).
Conservative Therapy—“Closed Curettage”
All of the above-defined procedures are performed without reflecting the soft tissue, i. e., without direct vision into the pocket or onto the root surface (as of today; cf. p. 282).
“Open Curettage”
After creating a gingival flap (modified Widman procedure, p. 309), the gingiva is reflected to such an extent that root planing can be performed with direct vision. This is classified as a surgical procedure.
“Full Mouth Therapy”—FMT
Definitive antimicrobial, closed, non-surgical, mechanopharmacologic pocket therapy of the entire oral cavity (FDIS—“full mouth disinfection”) within 24 hr, to avoid re-infection and microbial transmission.
The differences between the treatment measures in Initial Therapy 1 (supragingival plaque and calculus removal) and Initial Therapy 2 (sub gingival) are not sharply defined.
Non-Surgical, Anti-Infectious Therapy—Goals of Treatment
The goal of traditional, non-surgical therapy is the elimination of the microorganisms responsible for periodontal destruction, from the pocket and surrounding tissues. The creation of a clean tooth and a clean, biologically compatible root surface that is as smooth as possible, and the removal of diseased or infected tissues are essential to therapy (Frank 1980, Saglie et al. 1982, Allenspach-Petrsilka & Guggenheim 1983, O’Leary 1986, Adriaens et al. 1988, Peter-silka et al. 2002).
Removal of the pocket epithelium and portions of the infected connective tissues was a matter of controversy until recently; current research results clearly demonstrate the possibility of bacterial colonization of pocket epithelial cells (intracellular) and of connective tissue components. The most frequently encountered colonizers are A. actinomycetemcomitans, P. gingivalis, T. denticola and, in addition to the acknowledged pathogens, also Streptococcus constellatus (Socransky & Haffajee 2002).
Today’s question? Should the pocket epithelium be removed in addition to removal of biofilm from the soft tissue pocket wall?

562 Principles of Conservative Pocket Therapy
This stained histologic section through a gingival pocket (HE, 20x) will be used to illustrate root planing (debridement) and soft tissue curettage.
Soft tissue curettage (2) is never used alone. True “causal” therapy includes the elimination of micro-organisms wherever they have become organized as a biofilm.
It is imperative that the root surface be thoroughly debrided (1).
1 Scaling and Root Planing
The unilaterally sharp Gracey curette (1) removes plaque, calculus, endotoxin-containing cementum and sometimes dentin from the root surface. The arrow indicates the direction toward which the curette tip is pulled.
2 Gingival Curettage
A Gracey curette sharpened on its other edge (2) is used to remove pocket epithelium and remaining (apical) junctional epithelium, as well as the infiltrated connective tissue.
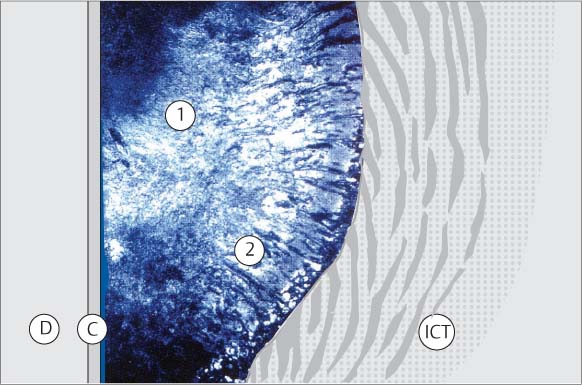
563 Subgingival Biofilm at the Base of a Pocket
Histologic section, plaque stained with toluidin blue and methylene blue, modified.
Of special interest is the biofilm formation on the soft tissue wall.
|
1 |
Biofilm/plaque on the root surface |
|
2 |
Biofilm attached to the soft tissue wall! |
|
D |
Dentin |
|
C |
Cementum |
|
ICT |
Infiltrated connective tissue |
Courtesy M. Listgarten
Antimicrobial Therapy—Combating the Reservoir
The answer to the question posed on the previous page would be: Yes. However, the AAP (2002) in its “Academy Statement Regarding Gingival Curettage,” concluded that soft tissue curettage has no additional effect beyond scaling and root planing.
In any case, it is most important that purely mechanical therapy as a means to achieve the ultimate goal—periodontal healing—should be enhanced by the use of all antimicrobially effective measures.
The initial question concerns the bacterial reservoirs in the ecosystem represented by the oral cavity. The diagram below (Fig. 564) demonstrates the possible niches, the plaque-retentive areas in which periodontopathic microorganisms may be harbored.
Such microorganisms can rapidly contaminate (re-colonize) a freshly-treated pocket, and thus compromise the treatment results. Therefore, such bacterial reservoirs must also be “treated,” especially in highly susceptible patients.
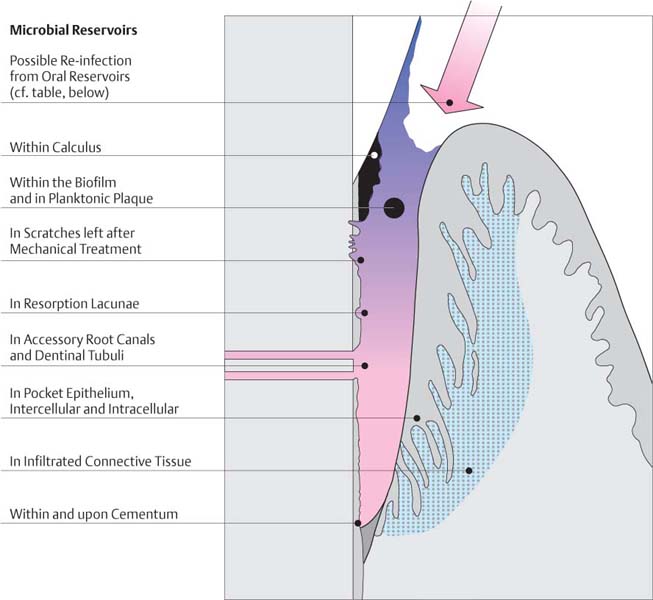
564 Oral Microbial Reservoirs
Increases in plaque accumulation occur wherever microorganisms find a secure and undisturbed niche with good nutritive sources. Clusters of microbial colonies are always found in the small scratches that remain following root surface debridement, as well as the deep crypts in tonsils and on the dorsal surface of the tongue; many such clusters harbor the well-acknowledged periodontopathic anaerobes. Even a 0.5 mm thick biofilm provides oxygen-free (anaerobic) conditions for these microbes.
Modified from P. Adriaens 1995
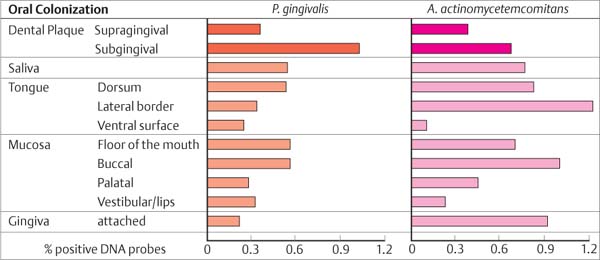
565 P. gingivalis and A. actinomycetemcomitans in the Oral Reservoirs
Occurrence of the two species in 24 patients.
The presence and relative concentrations support the thorough cleaning of the tongue surface (pp. 237 and 281), and not only for patients with halitosis.
Modified from Socransky et al. 1999
Root Planing—With or without Curettage?
The primary goals in pocket treatment are removal of the biofilm and thorough debridement of the root surfaces.
Following elimination of non-adherent and adherent plaque, all subgingival calculus is removed. The superficial layers of the root cementum contain endotoxin. This lipopolysaccharide (LPS) from gram-negative bacteria can inhibit connective tissue regeneration and reestablishment of the periodontal ligament to the root surfaces. For this reason, root planing should be performed into “healthy” (hard) cementum or dentin layers.
After the root surface is thoroughly planed, the “peeling out” of the pocket epithelium and infiltrated connective tissue can be accomplished. If the curettes used for root planing are sharp on both edges (universal curettes), some soft tissue curettage will be accomplished inadvertently while the hard tooth structure is being planed.
The goals of these procedures include elimination of infection within the pocket and the pocket epithelium, and the ultimate healing of the periodontal lesion.
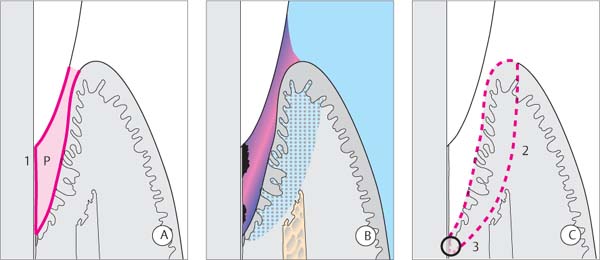
566 Root Planing and Curettage—Principles
A Cleaning the Root and the Pocket:
The root surface is treated (1), and the plaque (P) is removed from the pocket.
B Original Pocket:
With calculus, adherent plaque and non-adherent microorganisms.
C Soft Tissue Curettage:
In addition, but never as the sole therapy, pocket epithelium/infiltrate (2) and junctional epithelium (3) are removed.
Effects of Subgingival Debridement—Pocket Healing or Recolonization?
The goal of closed anti-infectious therapy is the complete healing of all periodontal pockets, but this goal is seldom achieved. Access and vision are severely limited during closed instrumentation. Almost always, here and there, residual pockets of varying depths persist (Badersten 1984; p. 280). The so-called “critical depth” of residual pockets is 4–5 mm. Such pockets offer anaerobic conditions, which provide the well-known pathogenic, gram-negative anaerobic microorganisms a favorable environment. Remaining deeper pockets can serve as a bacterial reservoir for the re-colonization of residual pockets. Patients who harbor residual pockets should be maintained in a strict recall schedule to control or eliminate such pockets.
Subgingival instrumentation (debridement) normally removes about 90 % of the bacteria from a pocket, including both “favorable” and pathogenic flora: The processes of healing and recolonization are in competition with each other, and residual pockets usually persist.
The favorable effect of closed pocket treatment is that the non-pathogenic flora recolonizes the pocket faster than the pathogenic microorganisms (Fig. 567; Petersilka et al. 2002).
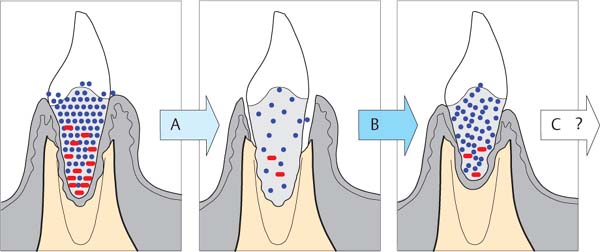
567 Pocket Instrumentation—Schematic of Residual Pockets
A Untreated pocket:
Non-pathogenic (blue) and pathogenic (red) pocket flora.
B Following instrumentation:
The pocket flora is dramatically reduced.
C Recolonization:
The percentage composition of the “blue” (non-pathogenic) has increased; these or the host response have kept the “red” (pathogens) in check.
Closed Therapy—Indication, Instrumentation
It has been stated many times: Periodontal diseases should be prevented, or, failing prevention, should be diagnosed and treated early on.
Standard methods for the treatment of mild and moderate periodontitis include closed, non-surgical, anti-infectious pocket treatment (scaling and root planing). This approach is effective, tissue-friendly (minimal recession), less hemorrhagic, and routinely results in favorable treatment results. Perhaps even more important today, it is affordable for the (informed) patient.
For the dentist and her/his therapeutically active dental hygienist, closed therapy is the definitive therapy for uncomplicated cases, and represents the initial therapeutic approach for complex, advanced cases.
Contraindications for this approach are rare (patients on anticoagulant medications, risks for focal infection, systemic diseases).
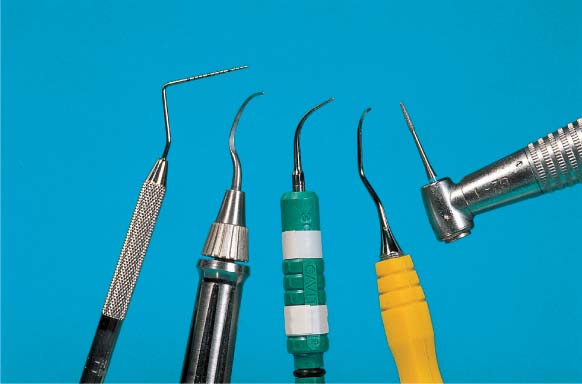
568 Instrumentarium for Mechanical/Anti-Infectious “closed” Therapy
These types of instruments are required for all patient treatments:
• Periodontal probe
• Sonic scaler—supragingival
• Ultrasonic device—pockets—subgingival
• Curettes—scaling, polishing
• Motor-driven special instruments—furcations, grooves, etc.
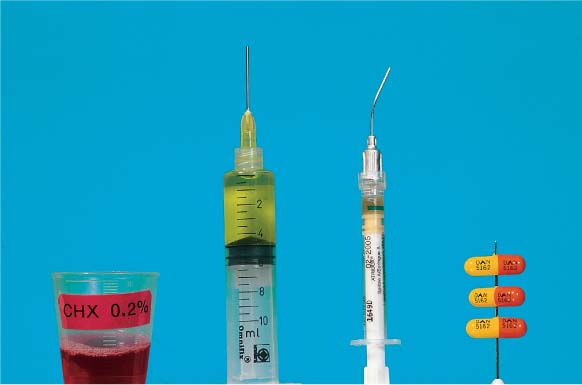
569 Chemical/Pharmacologic Adjunctive Therapy
The paradigm shift toward anti-infectious/antimicrobial therapy includes disinfectants and antibiotics more and more as co-therapeutic agents, above all for the treatment of aggressive cases.
• Disinfectant agents FMT (pp. 235, 283)
• Local CRD “Controlled release drugs” (p. 292)
• Systemic antibiotics (p. 288)
Conclusions
The goals of subgingival scaling are simple:
• Complete removal of biofilm and calculus
• Root planing (to reduce new plaque formation)
• Creation of a bioacceptable root surface (chemical conditioning with various substances, following mechanical treatment).
Subgingival scaling is a technically difficult endeavor, because it is performed without direct vision. Even the experienced clinician will not always effectively treat all root surfaces, nor completely remove all plaque and calculus from all surfaces.
Today, the question is: How can we improve the “gold standard” of closed causal therapy and subgingival scaling? Most recently, in addition to the classical, mechanical instrumentation, topical antimicrobial agents have been successfully employed (disinfectants, antibiotics); however, such adjunctive measures will only be helpful when used in combination with thorough scaling and root planing! Systemic antibiotics may often be indicated in severe, aggressive cases (p. 287).
A new television technique may bring “light and vision” into the periodontal pocket! The Dental View device can dramatically reduce the amount of “missed” subgingival calculus.
Hand Instruments for Scaling and Root Planing—Curettes
For the removal of large subgingival calculus deposits, curettes are indicated, in addition to sonic and ultrasonic devices (p. 259). For root planing and soft tissue curettage, curettes are the instruments of choice.
Numerous manufacturers offer a myriad of hand instruments, which may vary with regard to quality (e. g., steel) and design. In this Atlas, we do not make recommendations concerning specific manufacturers or instrument sets, because it is acknowledged that every “school” as well as each and every dentist has its/her/his favorite instruments. Most important is that a set of curettes must provide effective approaches to all root surfaces, while providing the proper angle of application of the blade to the root surface (ca. 80°). Curettes must be sharpened before each use (p. 268).
It is important to note the difference between universal curettes, which have two cutting edges, and Gracey curettes, which have only one cutting edge. Gracey curettes are primarily indicated for debridement and root planing, and less often for soft tissue curettage.
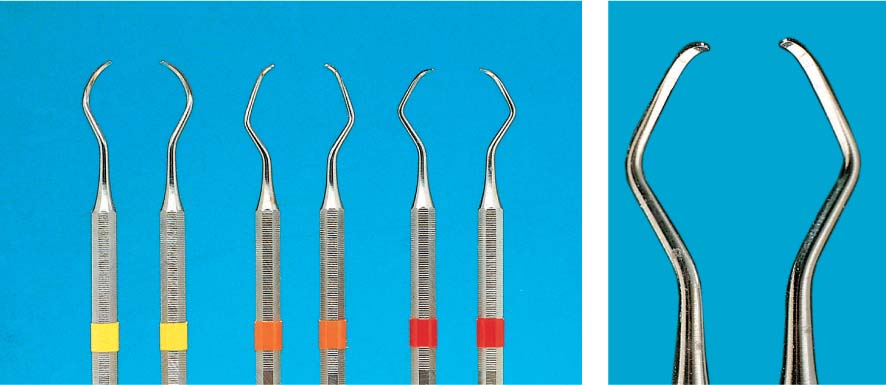
570 Curettes (Deppeler Co.)
| • Universal curettes, ZI 15 Yellow; for initial gross debridement • Anterior curettes, GX 4 Orange; for anterior teeth and canines, and sometimes premolars • Posterior curettes, M 23 A Red; for premolars and molars |
Right: Working end of the paired posterior curettes, M 23A.

571 Minimum Gracey Set
In most clinical cases, a set consisting of four double-ended Gracey instruments is sufficient. Depicted here are color-coded curettes with soft grips (ADEC, Deppeler).
|
• Gracey 5/6 |
yellow |
|
• Gracey 7/8 |
gray |
|
• Gracey 11/12 |
red |
|
• Gracey 13/14 |
blue |
Right: Double-bend shank and working end of the paired Gracey curettes 13/14.
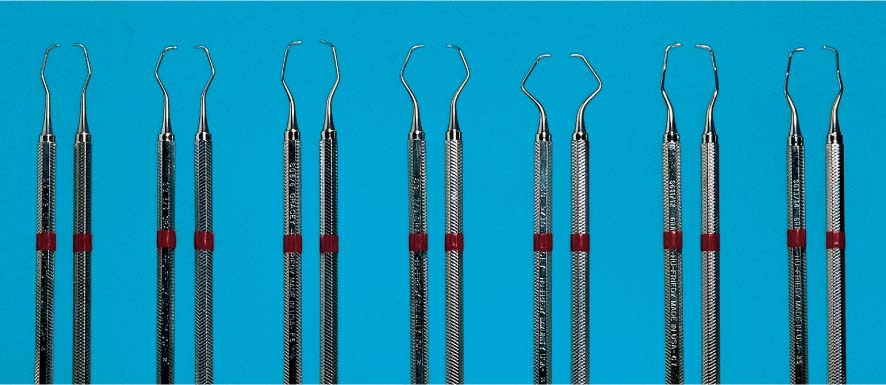
572 Complete Set of Gracey Curettes: 7 Double-Ended Instruments (Hu-Friedy Co.)
|
• Gracey 1/2 • Gracey 3/4 • Gracey 5/6* • Gracey 7/8* • Gracey 9/10 • Gracey 11/12* • Gracey 13/14* |
* These four instruments comprise the minimum set (Fig. 571).
Powered Instruments for Debridement
In addition to the classical hand instruments, powered devices are finding increasing use in practice today for supraand subgingival periodontal debridement. Included are:
• Ultrasonic devices (20–50,000 Hz)
• Sonic devices (up to 6,000 Hz)
• Motor-driven devices incorporating diamond-coated tips.
The goal, with both hand instruments and powered devices, is to create biologically acceptable root surfaces. Calculus must be completely eliminated, but without creating root surface roughness; rough root surfaces are more quickly colonized by bacteria than smooth surfaces. If used properly, curettes and ultrasonic devices can achieve relatively smooth surfaces; on the other hand, sonic and motor-driven devices more often elicit roughness (Römhild 1986; Schwarz et al. 1989; Ritz et al 1991; Axelsson 1993; Kocher & Plagmann 1997). Rough but clean tooth surfaces, especially in the region of the gingival margin, should always be given the “finishing touch” with curettes to ensure smoothness, and to inhibit or delay re-infection of the pocket.
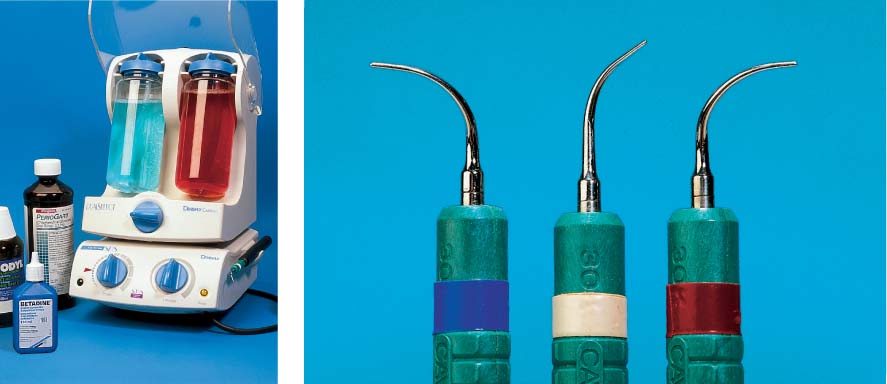
573 Ultrasonic Device
Ultrasonic devices function in direct contact with the tooth surface according to the principles of cavitation and acoustic microstreaming. Examples:
| • Dentsply Pictured: Slimline attachments • EMS • Satelec |
Left: Dual Select (Dentsply). With this attachment, one can select water or one of two antimicrobial cooling solutions.
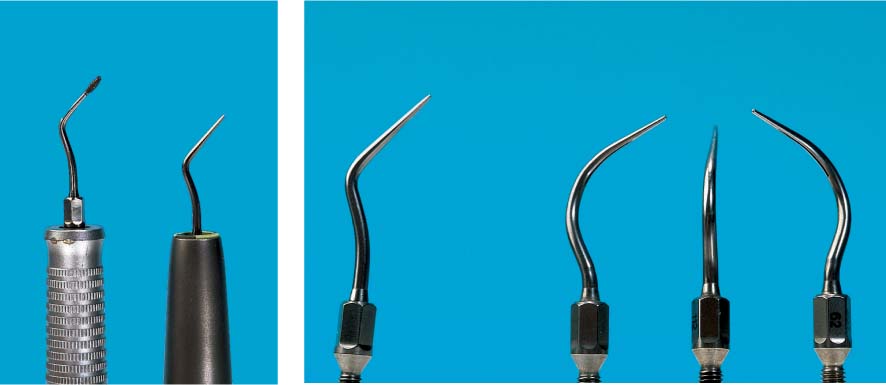
574 Sonic Devices—KaVo Sonicscaler—Insert No. 8 with Elongated Tip
No. 60, 61 and 62 are special tips for subgingival application.
| Examples of sonic devices: |
| • Sonicscaler, KaVo • Airscaler, Titan-S • Siroson, Siemens |
Left: Working tips—overview. Diamond-coated tips for working in furcations.
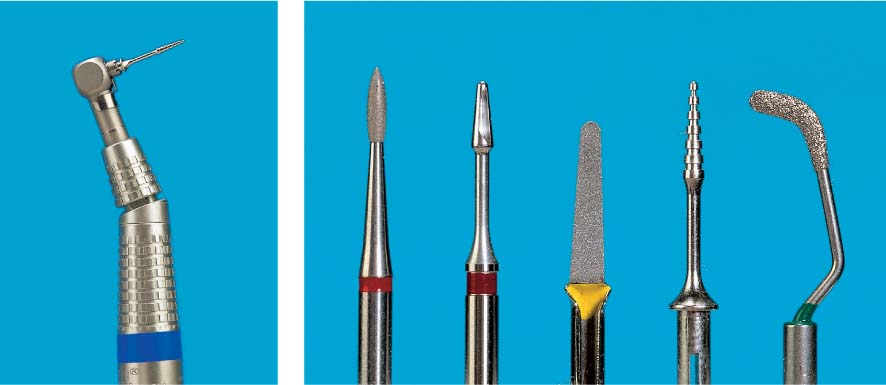
575 Additional Motor-Driven Instruments for Subgingival Application
| • Perioset—diamonds (Intensive SA) • Scalex tips (Rotex) • EVA-System—Proxoshape (Instensiv SA) • Peri-O-Tor (Dentatus) • Perioplaner, Periopolisher (Mikrona) |
Left: Handpiece with the Peri-O-Tor attachment.
Gracey Curettes—Areas of Use
Complete Set
For closed (“blind”) subgingival scaling and root planing, special instruments are indicated that are adaptable to the most varied root shapes. As early as the 1930’s, Dr. C.H. Gracey, a dentist, together with an instrument maker by the name of Hugo Friedman (Hu-Friedy!), conceptualized a set of instruments that “…gives every dentist the possibility to treat even the deepest and least accessible periodontal pockets simply and without traumatic stretching of the gingiva. In addition, these curettes make it possible to completely remove all subgingival calculus, and to perfectly clean and plane every root surface, which will enhance subsequent tissue adaptation and re-attachment.”
Numerous modifications of the instruments led finally to the Gracey curettes of today. The use of these instruments has been described in detail (Pattison & Pattison 1979, Hell-wege 2002).
Anterior Teeth to the Premolars
Figs. 576–582 demonstrate the systematic use of the original Gracey curettes (GRA) in quadrant 2 (maxillary left).
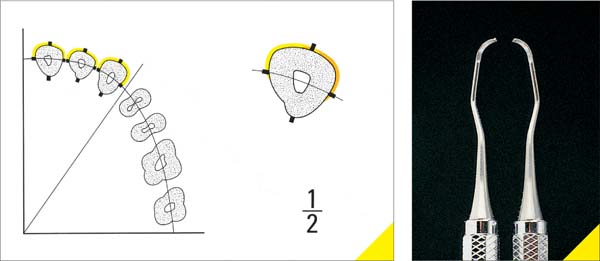
576 Gracey 1/2—Incisors, Canines
The primary area of use for this paired instrument is the facial root surfaces of incisors and canines.
Right: GRA 1/2
Medium length shank, mild angulation
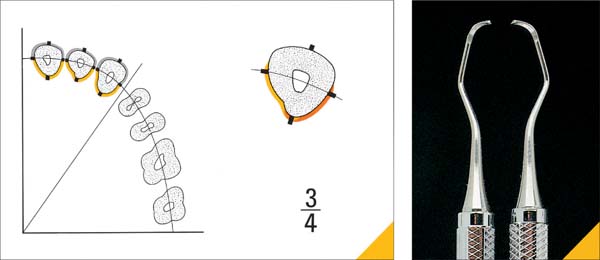
577 Gracey 3/4—Incisors, Canines
Primary use is the same as with GRA 1/2, but because of the more severe angulation, the 3/4 is particularly indicated for palatal and lingual surfaces.
Right: GRA 3/4
Shorter shank, sharper angulation.
The cutting edge of these paired instruments is the “outer” edge, along the convex curvature of the working tip.
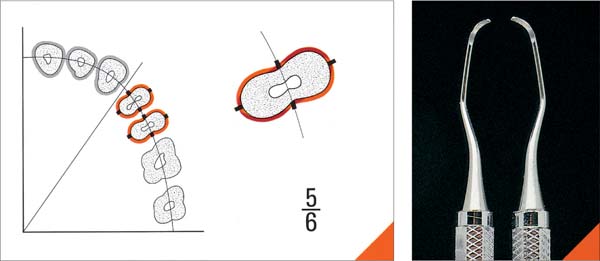
578 Gracey 5/6*—Anterior Teeth and Premolars
The area of use corresponds for the most part to that of an anterior universal curette.
This Gracey curette with its long, straight shank can be used in virtually all areas of the dentition where deep pockets exist.
Right: GRA 5/6
Longer shank, slight angulation. * The four double-ended instruments marked with an asterisk comprise the minimum Gracey set (cf. Figs. 571 and 586).
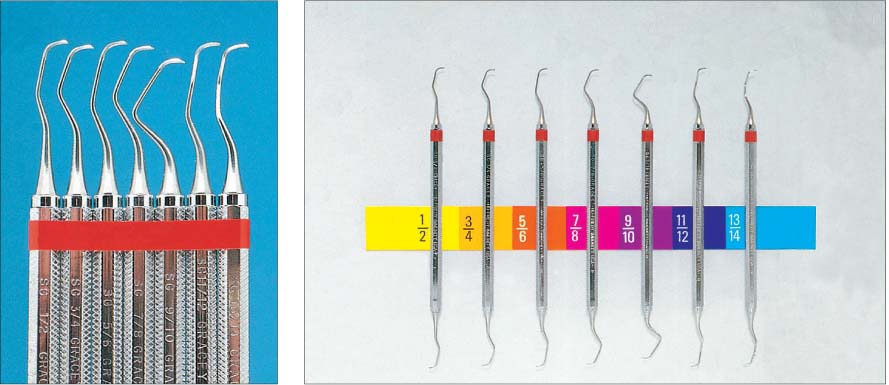
579 Complete Gracey Curette Set (original Hu-Friedy Co.)
|
GRA |
1/2 |
yellow |
|
GRA |
3/4 |
orange |
|
GRA |
5/6* |
red |
|
GRA |
7/8* |
magenta |
|
GRA |
9/10 |
purple |
|
GRA |
11/12* |
violet |
|
GRA |
13/14* |
blue |
(Color-coding valid for this double page.)
Left: The seven different working ends of the complete Gracey set.
Posterior Area
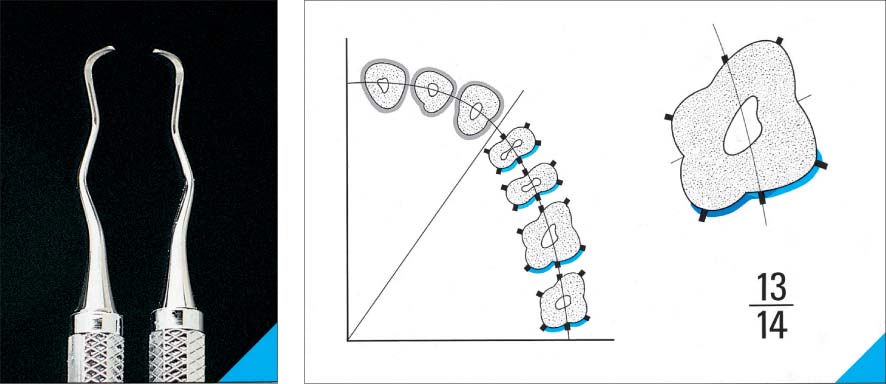
580 Gracey 13/14*—Molars, Premolars—Distal
First, for example, all distal surfaces are cleaned, from the facial (buccal) aspect and then from the oral (palatal/lingual) aspect. The line angles are indicated by short bars. This is the transition from one tooth (root) surface to another, where the use of individual instruments changes.
Left: GRA 13/14* Triple-bend shank.
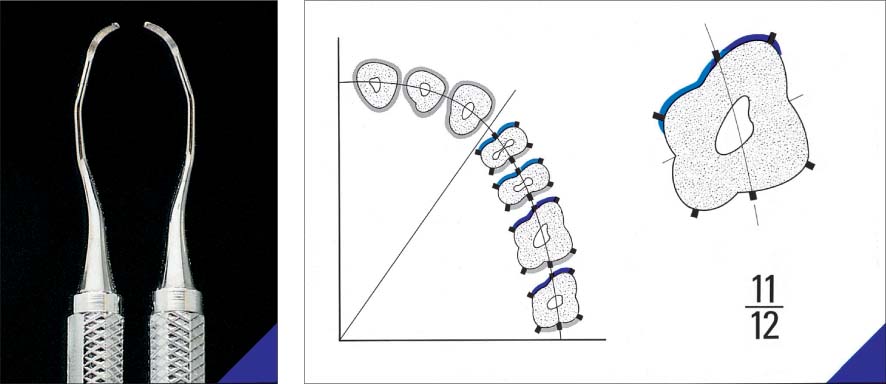
581 Gracey 11/12*—Molars, Premolars—Mesial
This instrument, with its sharp convex cutting edge, is indicated for treatment of all mesial surfaces from the buccal aspect, and the other end for mesial surfaces from the oral aspect.
Like the GRA 13/14, the GRA 11/12 is particularly well suited for multirooted premolars as well as in furcations and depressions.
Left: GRA 11/12*
Longer shaft with several mild angulations.
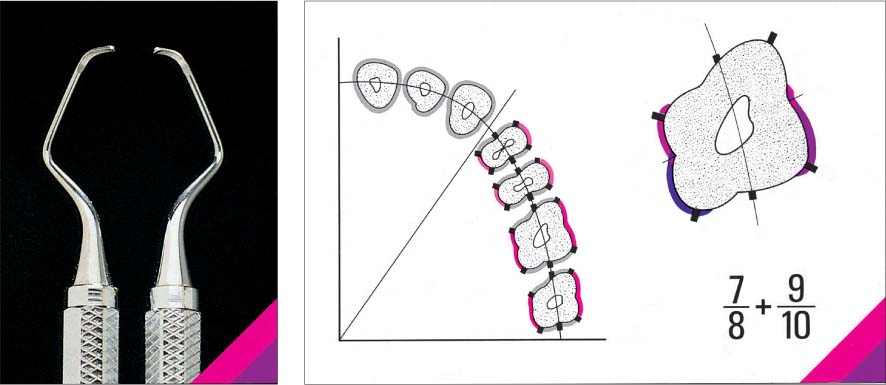
582 Gracey 7/8* and 9/10—Molars and Premolars—Facial and Oral Surfaces
Due to the rather severe angulation of the longer shank, both instruments, in addition to their primary indication on buccal and oral surfaces in the posterior area, are also useful in deep depressions and furcations. The angulation permits axial, oblique and horizontal strokes.
Left: GRA 7/8*
Medium length, severely angled shaft.
Hand Instruments for Special Problems—Curettes
Closed debridement, whether as definitive treatment for mild periodontitis or as initial therapy prior to surgical intervention, is a demanding task that often includes scaling and root planing of poorly-accessible, irregular root surfaces in deep pockets and involved furcations, even in patients with minimal mouth opening capacity. These difficulties will also be encountered when mechanical debridement is performed in tandem with antimicrobial irrigation (“full mouth therapy,” p. 218).
Problems and problem areas include:
• Deep, narrow pockets, e. g., on anterior teeth
• Distal pockets
• Patients with minimum mouth opening
• Substantial furcation involvement (p. 381)
• Dental implants in periodontitis-susceptible patients
Caution: Manufacturers offer hundreds of different hand instruments! The clinician is wise to limit the number of instruments to only those that are necessary for successful treatment!
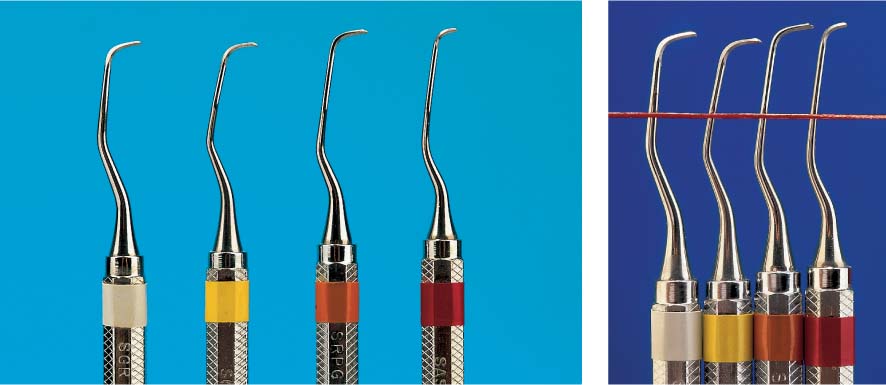
583 Special Gracey Curettes
Several special variations of the classic Gracey curettes are available for use in demanding situations (exemple: 11/12; Hu-Friedy):
| • Type SGR “rigid”: Incorporating a wider and more rigid shaft and working end • Type SG “normal”: With an elastic shaft • Type SRPG “after 5”: Elongated shaft for depths up to 8 mm • Type SAS: Longer, finer working end; anterior teeth |
Right: Comparative view.
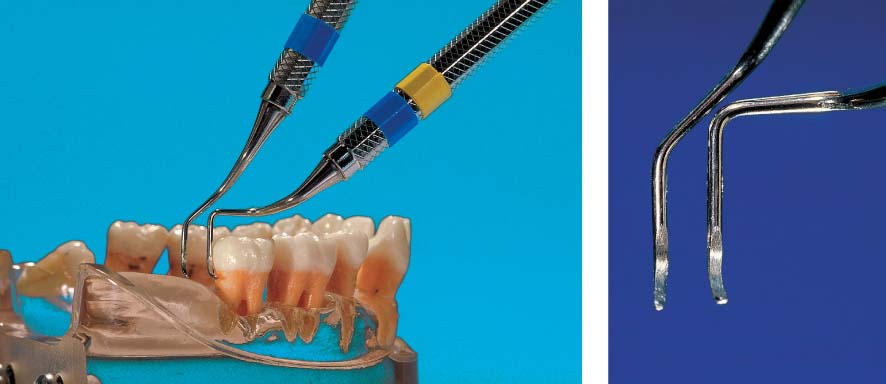
584 Enhanced Angulation
Gracey curettes 11/12 (mesial) and 13/14 (distal) require that the patient open wider for treatment of second and third molars. Depicted is the 13/14 (blue collar) with normal angulation of the shaft; the new number 17/18 (blue/yellow) can be used even with minimum mouth opening.
Right: Different angulation of the working end.
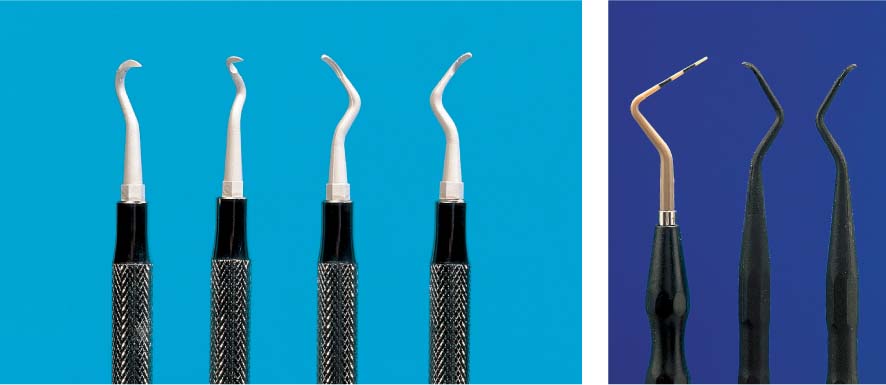
585 Plastic Instruments
For the treatment of the surfaces of titanium dental implants, the clinician must employ instruments that will not damage the fixture surfaces. Especially in cases of mucositis and also peri-implantitis, the accessible titanium surfaces should be cleaned using only plastic scalers.
Left: Curette tips (Hu-Friedy); right, probe (Deppeler) and carbon fiber curette (HaWe).
Practical Scaling Technique with Gracey Curettes—Systematic Approach
Minimum Gracey Set
An introduction to the scaling technique using Gracey curettes is simplified by limiting the instrument set to four double-ended instruments (p. 258, Fig. 571). Color-coded handles simplify their assignment to certain tooth surfaces. In addition to an adequate armamentarium, certain prerequisites must be fulfilled in order to optimally perform the technically difficult scaling procedures, such as patient position, operatory arrangement, and operator position (Wolf 1987):
• Positioning of the patient and the clinician
• Operatory lighting
• Sharp instruments and selecting proper cutting edge
• Secure stroke (modified pen grasp and fulcrum)
• Precise knowledge of all probing depths
• Systematic procedure, step-by-step
• Detecting roughness
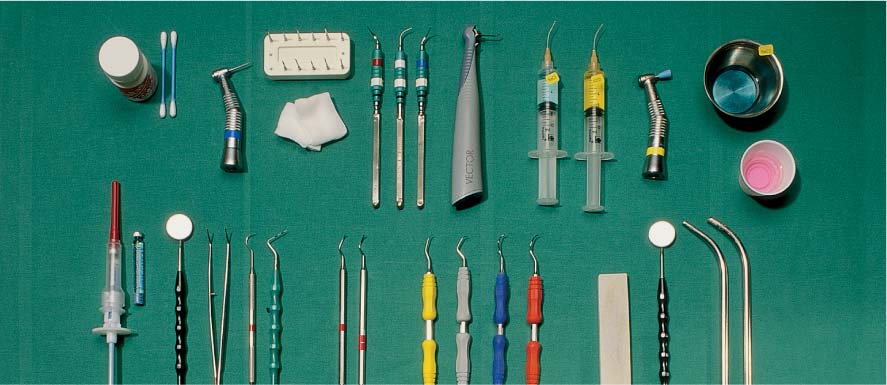
586 Basic Instrumentarium for Scaling—Complete
Above:
• Ultrasonic tips
• PerioSet diamonds
• Rinsing solution
Below:
• Anesthesia
• Mirror, forceps, pointed probe
• Periodontal probe
• Scaler, universal curettes
• Minimum Gracey set
• Sterile sharpening stone etc.

587 Minimum Gracey set: Areas of Use, Color Codes
|
• Gracey 5/6 anteriors/canines |
yellow |
|
• Gracey 7/8 premolars and molars, buccal and oral |
gray |
|
• Gracey 11/12 molars and premolars, mesial, furcations |
red |
|
• Gracey Gracey 13/14 molars and premolars, distal, furcations |
blue |
Left: Minimum color-coded set.
Checklist—Scaling Technique
|
Operatory: |
Light, power, water, air, instrumentarium |
|
Clinician: |
Eye protection, mask, gloves |
|
Treatment technique: |
Operator position, instrument selection, fulcrum, direct or indirect vision (mirror). Patient’s periodontal data, including probing depths and radiographs. |
The following pages, 264–267, demonstrate the systematic use of the minimum Gracey set in the maxillary left quadrant.
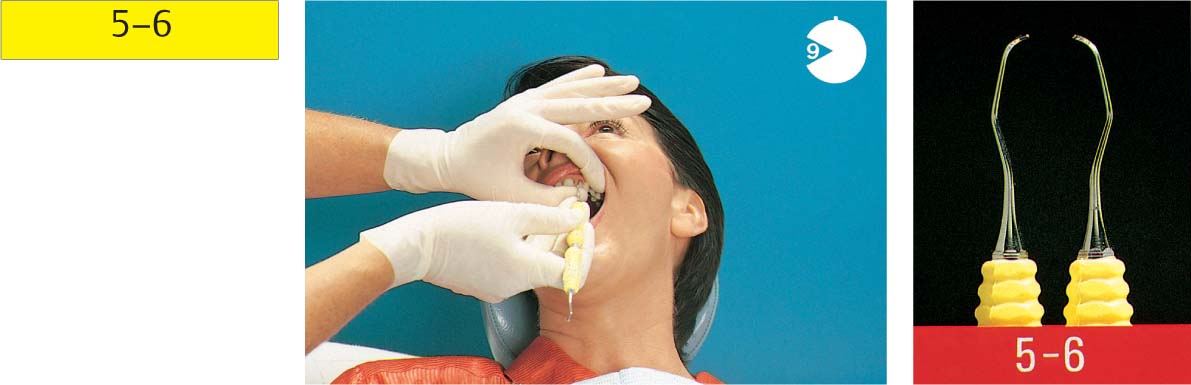
588 Scaling on Distobuccal Surfaces—Tooth 22
Patient’s head: Reclined position, head inclined to the right
Dentist: ca. 9 o’clock position Rest position/fulcrum: Intraoral, indirect, upon the thumb of the left hand
Vision of the operator: Direct
Right: GRA 5/6, working ends.
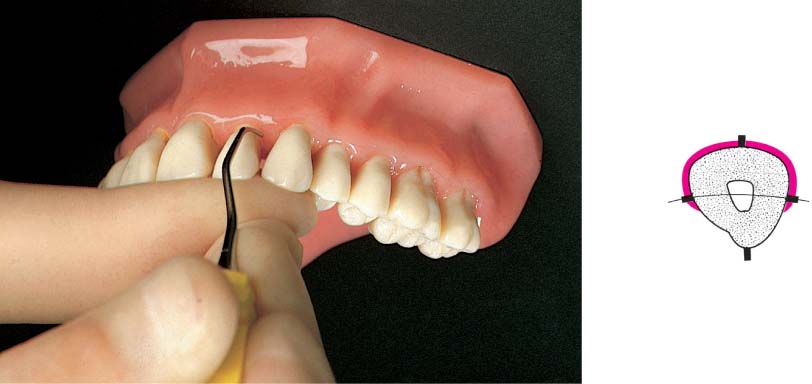
589 Model Situation
This indirect, intraoral rest position permits the fulcrum point of the working hand (4th finger) to be placed nearest to the root surface being treated.
Right: The cutting edge of the instrument cleans all distobuccal root surfaces, then the mesiobuccal surfaces are treated with the other blade of the double-ended Gracey 5/6 curette. Instrument changes are made at the indicated markings.
Anterior Region, Palatal
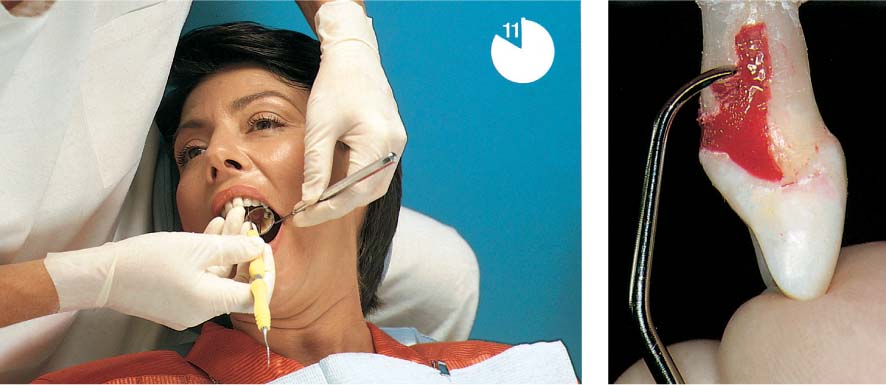
590 Scaling on Distopalatal Surfaces—Tooth 22
Patient’s head: Extended to the right and dorsally
Dentist: ca. 11 o’clock position Rest position/fulcrum: Intraoral, directly on tooth 21
Vision: Indirect (mirror)
Right: Parallel, 3–4 mm working strokes from the palatal toward the interdental area.
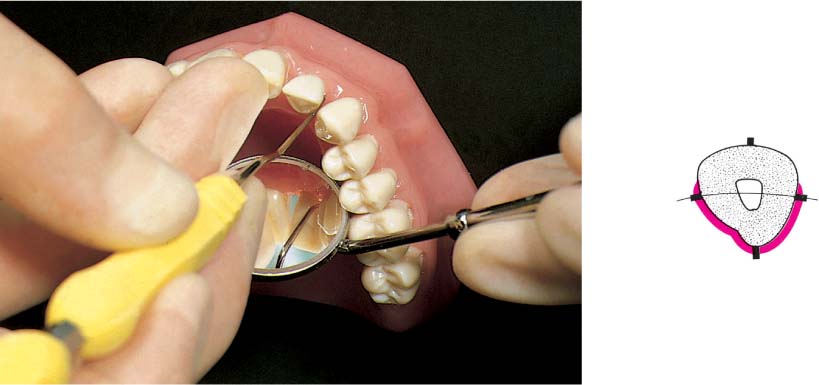
591 Model Situation
The mouth mirror permits indirect vision and insures proper lighting of the working field. Observe the modified pen grasp.
Right: Mesiopalatal and distopalatal root surfaces are approached using alternate ends of the 5/6 Gracey curette.
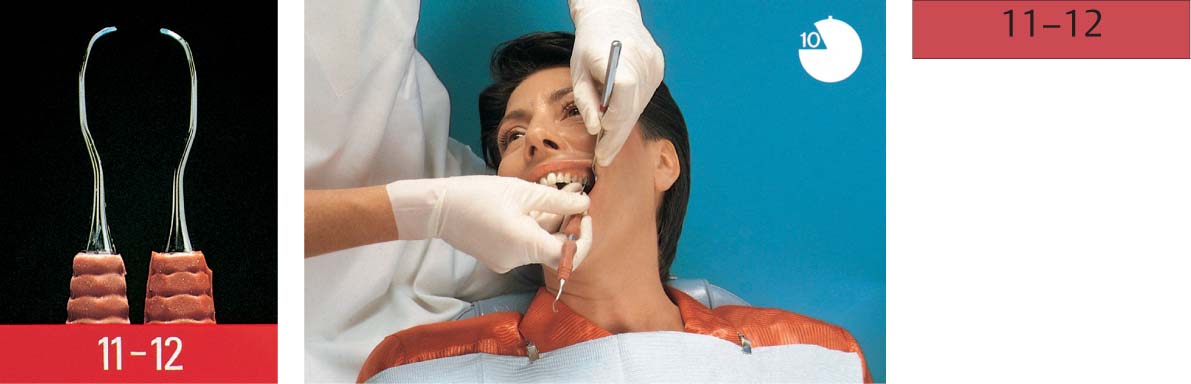
592 Scaling on Mesial Surfaces, from the Buccal—Tooth 26
Patient’s head: Inclined slightly to the right
Dentist: ca. 10 o’clock position
Rest position: Intraoral, directly on the adjacent tooth
Vision: Direct
Left: Two working ends of the double-ended GRA 11/12 curette.
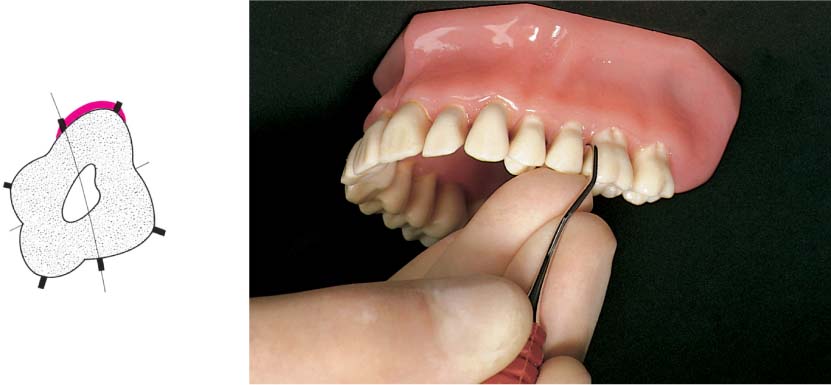
593 Model Situation
The ring finger establishes a fulcrum for the working hand, as near as possible to the mesial surface of tooth 26. The working strokes for subgingival scaling are initiated by a rotating movement of the forearm around the fulcrum.
Left: Section through tooth 26. GRA 11/12 is used from the buccal approach to scale the mesial surfaces from the mesiobuccal line angle, under the contact area, toward the palatal, including the mesial furcation.
Posterior Segment—Mesial
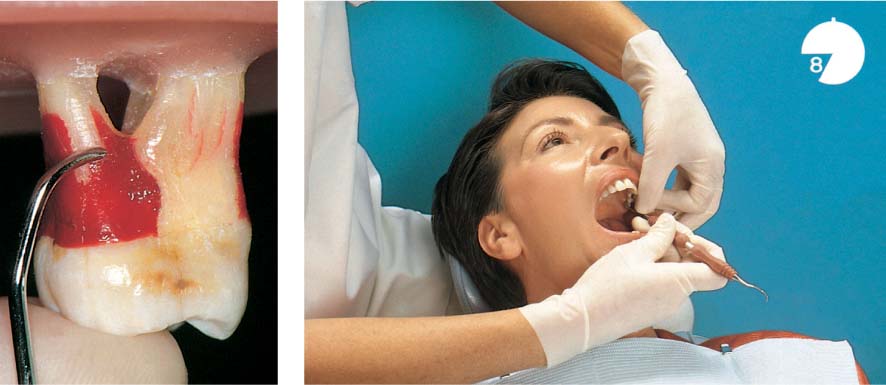
594 Scaling on Mesial Surfaces from the Palatal—Tooth 26
Patient’s head: Inclined to the left and back
Dentist: ca. 8 o’clock position Rest position: Extraoral on the mandible or intraoral on the opposing arch. Guidance by the left thumb.
Vision: Direct
Left: Entrance to the mesial furcation can only be achieved from the palatal approach.
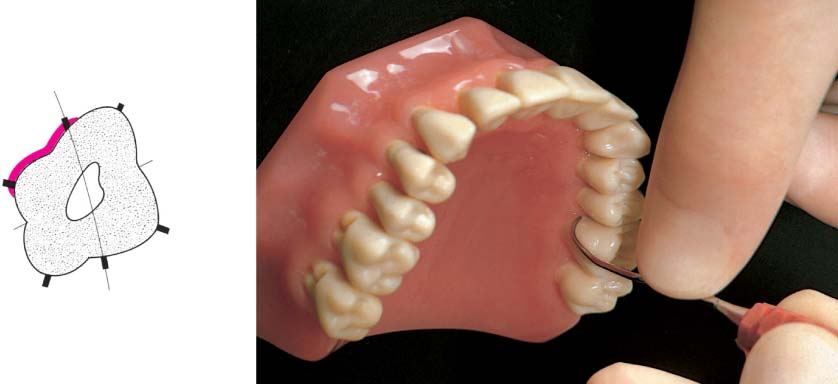
595 Model Situation
The left thumb guides and stabilizes the curette. Only light pressure is necessary for scaling the root surface if the instrument is properly sharpened.
Left: Section through tooth 26. The working area for the Gracey curette 11/12 is from the palatal approach.
596 Scaling on Distal Surfaces from the Buccal—Tooth 26
Patient’s head: Inclined far to the right
Dentist: ca. 10 o’clock position Rest position: Intraoral, directly upon the adjacent tooth
Vision: Direct; mirror retracts the cheek.
Right: GRA 13/14 working ends.
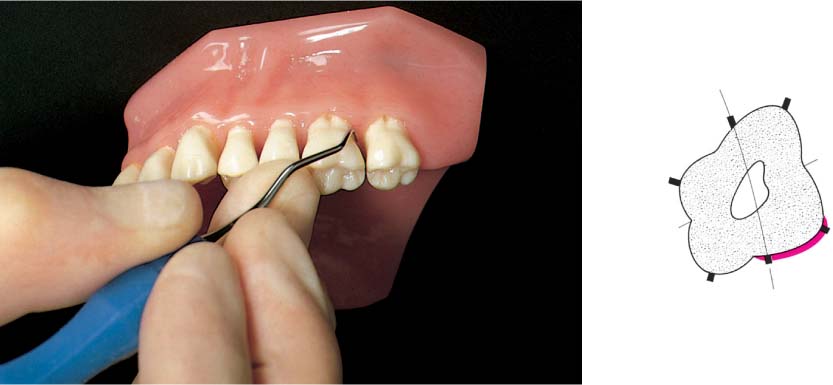
597 Model Situation
The rest position is with the ring finger on tooth 25, very near the working (distal) area of tooth 26. The shank portion immediately adjacent to the curette blade must be parallel to this tooth surface.
Right: Section through tooth 26. Contact points and the four line angles are depicted. From the buccal approach, the GRA 13/14 is indicated for the distal surface, from the distobuccal line angle to the contact area.
Posterior Segment—Distal
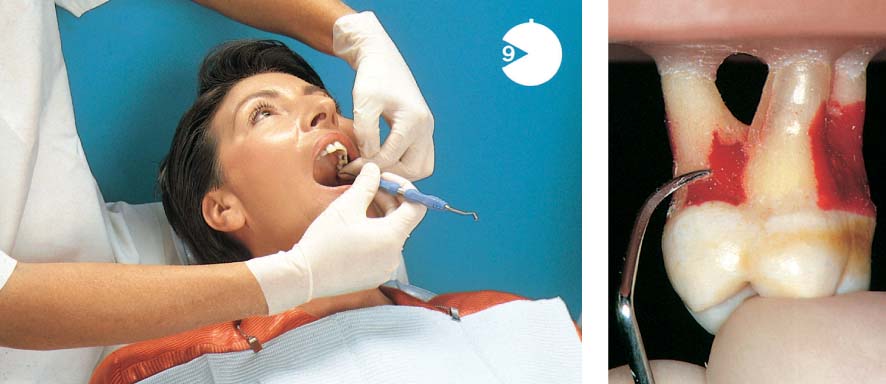
598 Scaling on Distal Surfaces from the Palatal—Tooth 26
Patient’s head: Inclined to the left
Dentist: ca. 9 o’clock position
Rest position: Intraoral, indirect, on the back of the first finger of the left hand. This finger also serves to guide the instrument and apply pressure to it.
Vision: Direct
Right: The palatal root is treated from the palatal toward the contact area and the distal furcation.
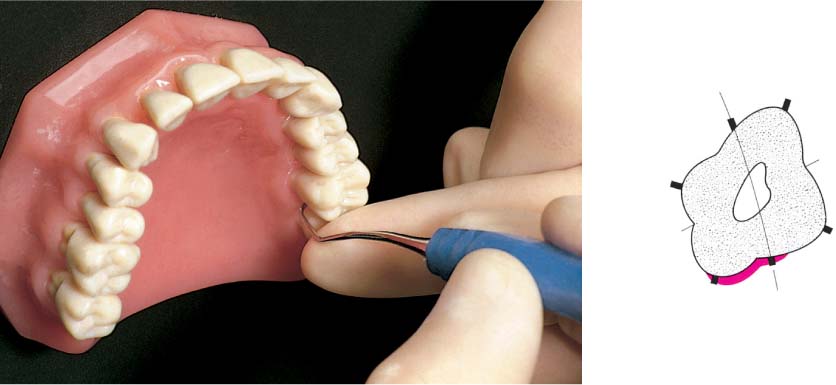
599 Model Situation
The first finger of the left hand serves two functions:
• Fulcrum for the working hand
• Guidance and lateral pressure for the curette
Right: Beginning on the palatal surface, the GRA 13/14 curette scales the distal surface of tooth 26 from the line angle, across and into the furcation region, then under the contact area.
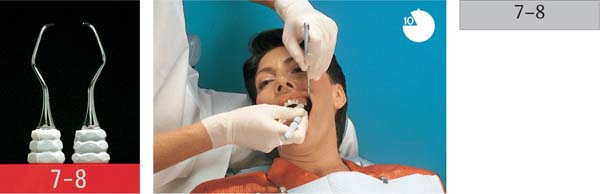
600 Scaling the Buccal Surfaces—Tooth 26
Patient’s head: Tilted slightly toward the operator
Dentist: ca. 10 o’clock position
Rest position: Intraoral, directly on the adjacent tooth
Vision: Direct
Left: Working ends of the GRA 7/8 curette
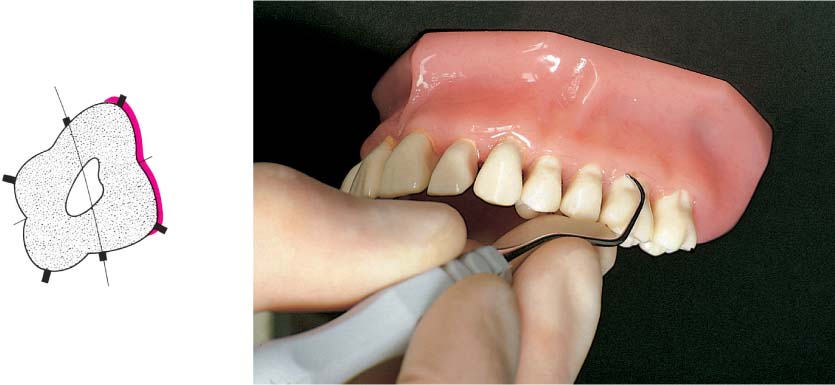
601 Model Situation
In addition to axial strokes, the buccal molar surfaces are often treated using oblique or horizontal strokes. The modified pen grasp is obvious, with the middle finger in the first curve of the instrument shank.
Left: The indentation represents the entrance to the buccal furcation. Note: Mesial and distal sections of the exposed roots near the furcation are treated using the GRA 11/12 (mesial) and 13/14 (distal).
Posterior Area—Palatal
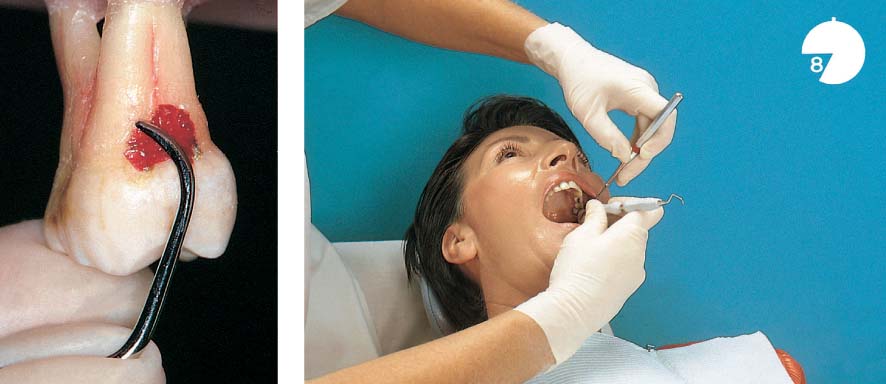
602 Scaling the Palatal Surfaces—Tooth 26
Patient’s head: Tilted toward the left, away from the operator
Dentist: ca. 8 o’clock position
Rest position: Intraoral, directly upon the occlusal surfaces
Vision: Direct
Left: The palatal root segments are basically round in shape, however, shallow grooves do occur and these may present difficulties during scaling.
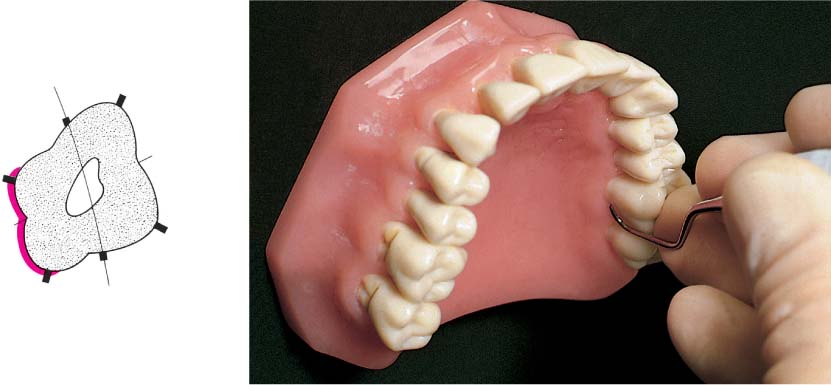
603 Model Situation
Rest position (fulcrum) directly on the occlusal surface of tooth 26.
Left: GRA 7/8 curette is used to scale the palatal surfaces from the distopalatal to the mesiopalatal line angles. In this area, there are no furcations, but often grooves.
After scaling this final (palatal) posterior tooth surface, systematic treatment of the maxillary left quadrant is complete. The pockets are then rinsed and any bleeding is staunched.
Instrument Sharpening
The curette is a universal instrument that serves both non-surgical as well as surgical periodontitis therapy. The curette is used for scaling, subgingival debridement, root planing, and curettage of the gingival soft tissues.
Knowledge of its characteristics and maintenance of its functions are therefore of great significance. Instruments that have become dull must be re-sharpened; no degree of manual dexterity or force can compensate for the disadvantage of a dull instrument. Dull instruments lack “bite”; calculus is burnished rather than removed.
The systematic sharpening of curettes may be accomplished before, during or after patient treatment. Especially the small, slender curettes quickly become dull during scaling because of contact with enamel or metal restorations. Such instruments must be re-sharpened during the treatment appointment, using a sterile, mildly abrasive sharpening stone (Fig. 606).
A curette that has been sharpened 10–15 times becomes thin and may break; it must be replaced.
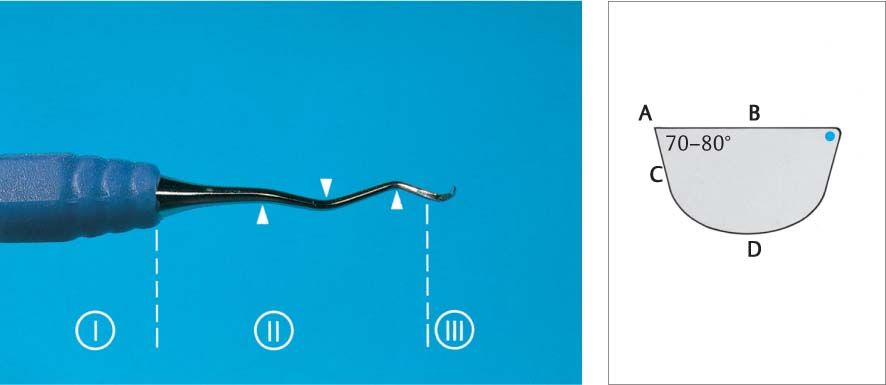
604 Curette—Nomenclature (Example: Gracey Curette 13/14)
|
I |
Handle |
|
II |
Shank |
|
III |
Working end with cutting edge (blade) |
Right: Section through the working end (Gracey curette).
A Cutting edge
The convex edge is sharp; the other edge is blunt (blue dot).
B Face
C Side
D Back
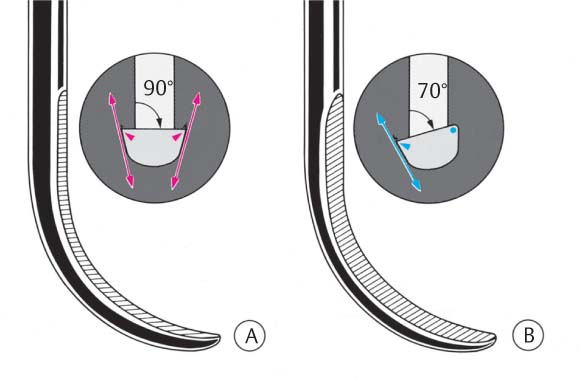
605 Differences between Universal (A) and Gracey (B) Curettes
1 The face (B; Fig. 604) of the working end forms a 90° (universal) or 70° (Gracey) angle to the shank.
2 Both edges of the working end (universal curette) are sharpened; but only the convex (lower) edge of the Gracey curette.
3 Only in Gracey curettes is the working end arched over the surface as well as over the edge.
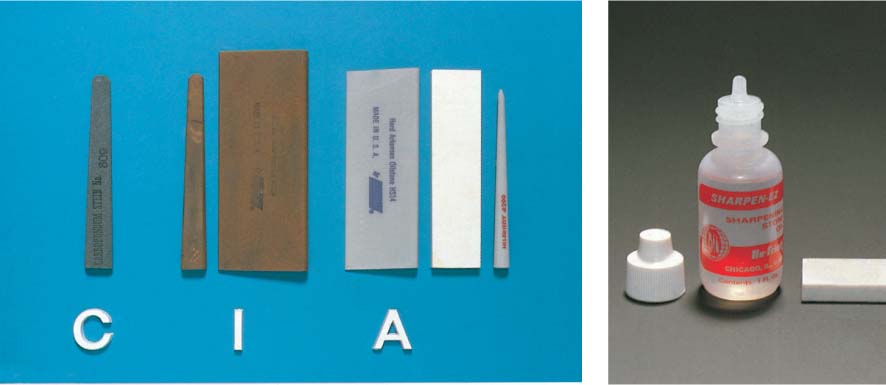
606 Sharpening Stones—Sharpening Oil
|
C |
“Carborundum” SiC/Silicium carbide; artificial; gross, highly abrasive |
|
I “India” |
Al2O3, aluminum oxide, artificial, course grained, abrasive |
|
A “Arkansas” |
Al2O3, aluminum oxide, natural, average-to-fine grained, mildly abrasive |
Right: Acid-free mineral oil (Hu-Friedy).
Manual Sharpening of Hand Instruments
Even though powered devices (sonic and ultrasonic) are widely used today, scalers and curettes still command a prominent role for all treatment techniques including both closed and open therapy, surgical procedures, and for prophylaxis (professional tooth cleaning), alone or in combinations.
Efficient and thorough scaling and planing, particularly on infected root surfaces, can de facto only be optimally performed with sharp instruments (Bengel 1998, Christan 2002).
Years of experience have clearly demonstrated that “free-hand” instrument sharpening is only rarely successful in providing perfectly shaped and sharp hand instruments. Thus, for manual sharpening and re-sharpening, sharpening aids are necessary. On the basis of years of experience, dental hygienist C.M. Kramer (1989, 1999) developed the two sharpening stations depicted below. The basic principles include precise positioning of the instrument (the “horizontal, facial side”) and the predetermined sharpening angles on the jig (template), with separate settings for scalers and curettes.
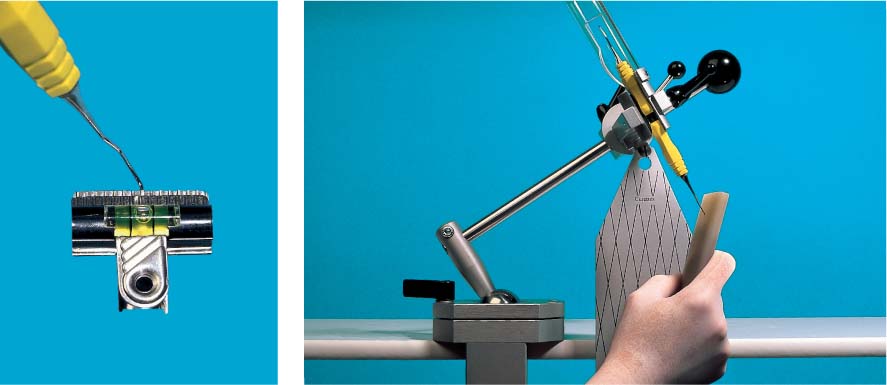
607 Instrument Sharpening with the Kramer Sharpening Station
The vise-like holder with the large ball joint permits positioning of the instrument in any conceivable position.
Left: Initially, the special clip is used to grasp the working end. The instrument face must be always positioned horizontally, and then the sharpening procedure can begin. The sharpening stone is held parallel to the guiding lines on the front of the station.
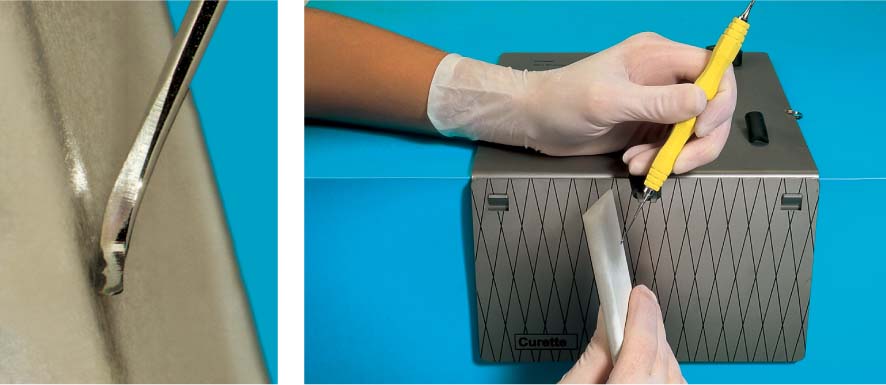
608 A Simplified Version—Kramer “Mini” Sharpening Holder
The above sharpening station is ideal for individuals with little experience, and is optimal for sharpening numerous instruments. The advantage of the mini-sharpening station is that dull instruments can be sharpened at chair-side.
The diamond-shaped lines on the vertical portion of the station insure that the scaler/curette is presented to the stone at the proper angle.
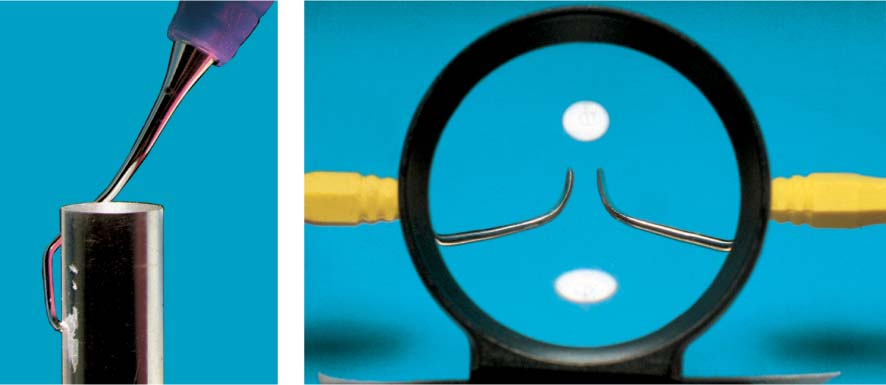
609 Tests for Sharpness: Light Reflection Test and Scratch Test
Manual sharpening (cf. Fig. 608, left) is performed with an oiled Arkansas stone.
The metal removal is clearly visible; it remains suspended in the oil and can be easily removed. The final test for sharpness of the cutting edge: Dull edges do not reflect light, but sharp edges do.
Left: Acrylic rod (PST, Hu-Friedy) tests the sharpness of the instrument, which removes acrylic chips.
Automated Sharpening
The biggest problem during free-hand sharpening is the difficulty of maintaining the angle of the sharpening stone to the instrument tip, and maintaining this angle during the entire sharpening procedure. It demands manual dexterity, knowledge of the individual instrument’s characteristics and … practice (Römhild & Renggli 1990, Pöschke 1990). The primary goal of mechanical instrument sharpening includes not only simplification of the sharpening procedure, but also the elimination of the above-mentioned difficulties. This is possible using the “PerioStar” (Mikrona Co., 1990).
The main advantages of the PerioStar 2000 include:
• The device precisely holds the shank of the instrument, and permits fixation in any position.
• A special clip permits the horizontal positioning of the facial surface (the only “approximation”).
• The adjustable sharpening module with its mounted sharpening wheel; when properly positioned, sharpening is performed with a secured angle of 72° for scalers and 78° for curettes.
Commercially available today is a simplified variant, the PerioStar 3000 (HaWe Neos; see below).
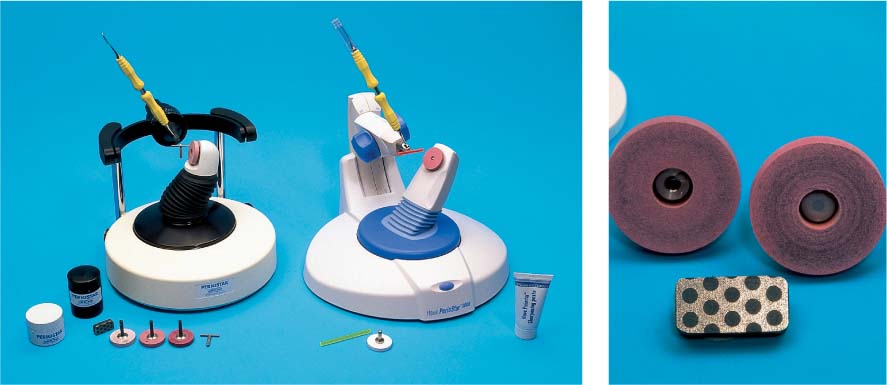
610 PerioStar 2000 (Left) and PerioStar 3000 (Right)
These commercially available devices are provided with various sharpening stones, sharpening pastes, as well as an acrylic rod for testing sharpness.
Right: Sharpening stones and the diamond-coated block for removing grooves and scratches from the sharpening stone.
Sharpening stones in fine, medium and coarse abrasiveness are available (coded with white, red and blue dots).
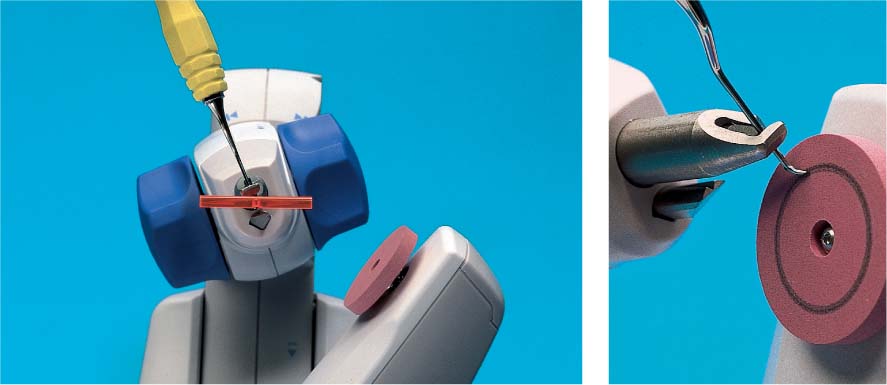
611 Adjusting and Sharpening—Gracey Curette 5/6 and PerioStar 3000
The mildly fluorescing rod of the chip—it sits upon the facial surface of the curette blade—is oriented horizontally with the instrument. The abrasive element is then brought to bear upon the instrument tip.
Right: The lubricated sharpening disk in action. Clearly visible is the precision holding device.
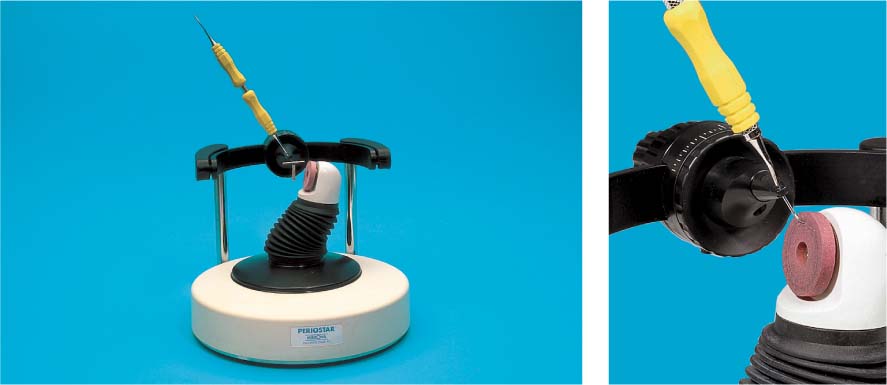
612 Overview—Adjusting and Sharpening with the PerioStar 2000
The sharpening disk can be adjusted with the dark rotating table (below) appropriately onto the curette tip for sharpening: The sharpening angle relative to the “face” is automatically established and reduced to 55°!
Right: Sharpening in progress—Note the precise holding mechanism to insure that the instrument is maintained at the most proximal portion of the shank.
Subgingival Debridement—Closed Root Cleaning
Step-by-Step Clinical Procedure
Indications and prerequisites for closed therapy were described previously (p. 253).
The procedure is performed without direct vision. Treatment of a single tooth with moderately deep pockets may require 4–10 min, because of working “blind,” and dependent upon the individual root anatomy/morphology. Ultrasonic instruments and hand curettes can be used in combination. In the case described here, the maxillary right quadrant is treated using Gracey curettes and a closed technique. In the other quadrants, following closed therapy, several sites required “open” therapy (p. 277).
The 29-year-old patient suffered from aggressive periodontitis (Type III), with localized deep pockets and pronounced gingivitis. A microbiologic examination revealed high levels of Aa and Pi.
Initial findings (values for Quadrant 1):
| PI: 61 % | BOP: 86 % | TM: 0–2 (p. 174) |
The clinical picture, probing depths and radiographic findings are shown in Figs. 613–615.
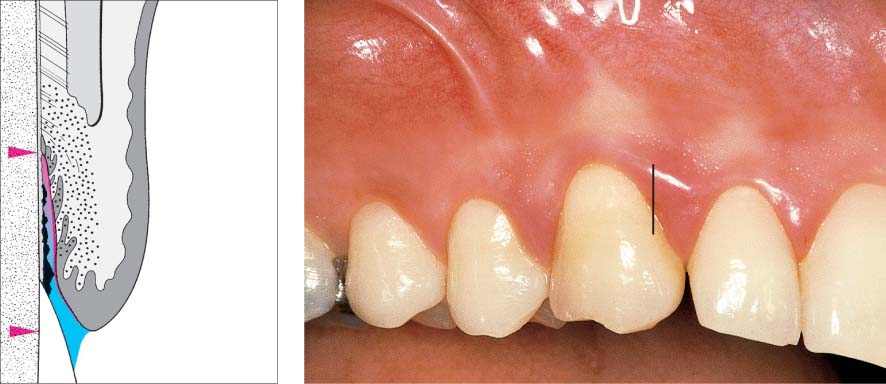
613 Initial Condition—Before Creation of Hygienic Relationships
Especially in the papillary areas, the gingiva is edematous and erythematous. Virtually no stippling.
Left: The schematic depicts the histologic situation on the mesio-facial aspect of tooth 13. In the cervical area, calculus and adherent plaque (blue) cover the root surface, and apically elevated levels of gram-negative microorganisms (red). The gingival connective tissue is infiltrated.
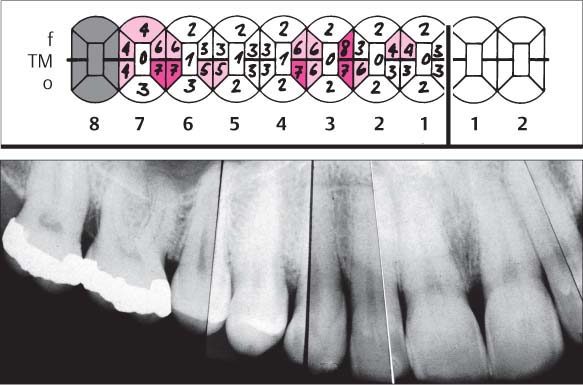
614 Clinical and Radiographic Findings
Probing Depths and Tooth Mobility (TM)
Probing depths up to 8 mm were measured. The very deep pocket on the mesiofacial of tooth 13 resulted from both attachment loss and swelling of the papilla.
Radiographic Findings
The radiograph clearly reveals the massive bone loss that was anticipated by the clinical pocket measurements.
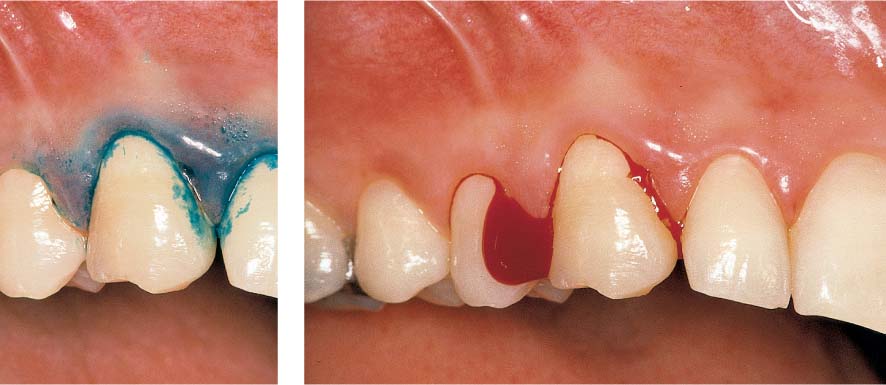
615 Hemorrhage and Plaque
After probing the pockets around teeth 13 and 14, copious hemorrhage resulted. This is a clinical indication of the severity of the inflammatory reaction in this case of periodontitis (“gingivitis”).
Left: Stained supragingival plaque. Plaque accumulation on the mesial surface of tooth 14 is minimal, and does not correlate with the copious hemorrhage in this region. The etiology is likely a strong reaction to the subgingival periodontopathic bacteria.
After the Hygiene Phase

616 Buccal View
Two weeks after supragingival plaque and calculus removal, initial motivation and OHI, the gingivae are already less erythematous and swollen. The enamel defect on the distoincisal of tooth 13 was attributed to bruxism.
Right: Sub gingival concrements and plaque persist.
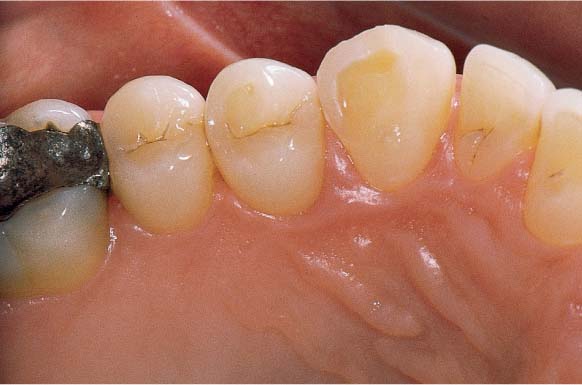
617 Palatal View
Following the first phase of initial therapy—oral hygiene and professional supragingival debridement—the gingivae are still slightly edematous.
Of note in this photograph is the pronounced wear facet on tooth 13. The patient must be made aware of the stress-elicited bruxing habit, and be encouraged to reduce this parafunction.
Subgingival Debridement
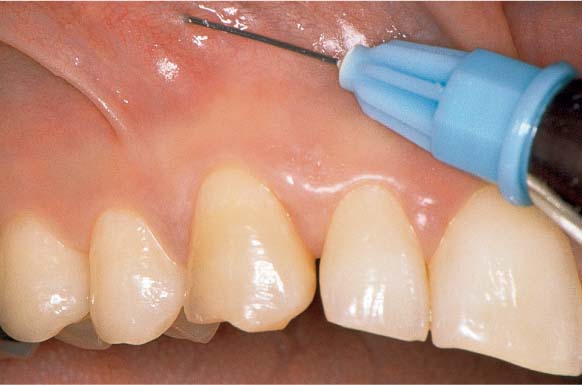
618 Anesthesia
Subgingival debridement is performed using hand instruments, generally with infiltration or nerve block anesthesia.
With the use of slim ultrasonic instruments (“Slimline,” Cavitron) it is often possible to treat shallow pockets without any need for infiltration anesthesia.
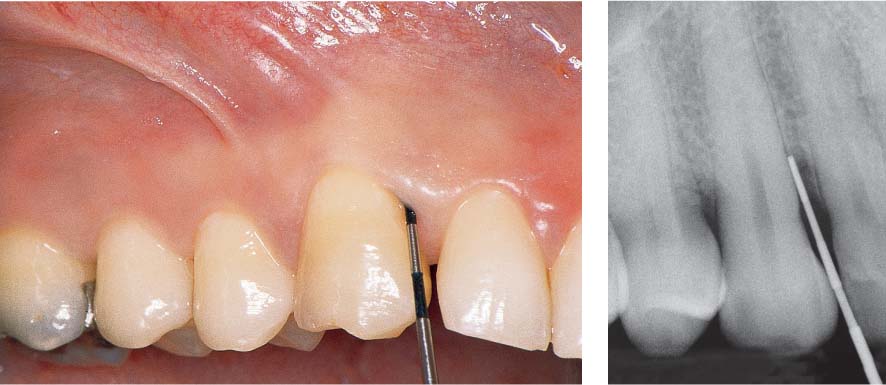
619 Probing the Depth of the Pocket
Before any mechanical treatment of the root surface, the depth of the pocket is ascertained circumferentially under anesthesia. The floor of the pocket is usually irregular. Usually only isolated sites on the root surface exhibit pronounced attachment loss.
Right: The radiograph reveals that the periodontal probe, using a force of 0.25 N, almost reaches the interseptal bone.
Double-Ended Curette (Gracey 5–6, yellow) Used in the Anterior Segment
In the anterior and canine regions, the double-ended curette is applied to treat root surfaces on two adjacent surfaces.
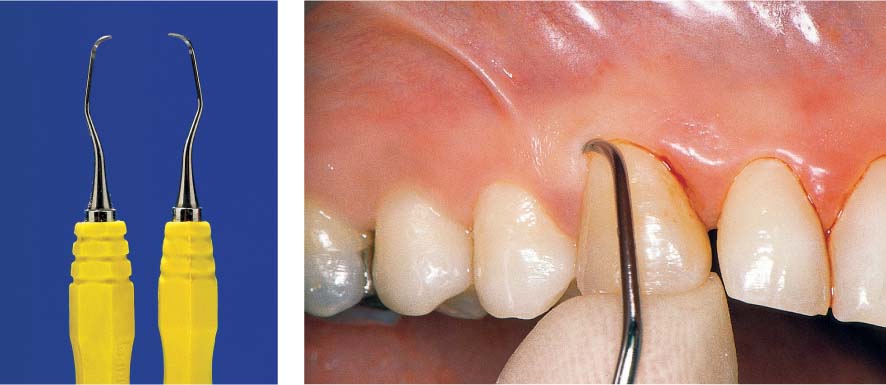
620 Gracey 5—Distobuccal
Using this end of the curette, with overlapping and primarily vertical strokes, plaque and calculus are removed.
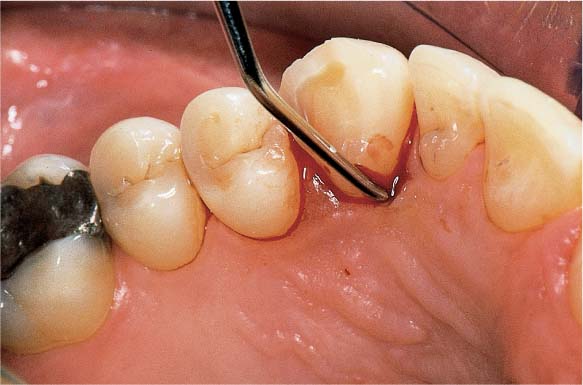
621 Gracey 5—Mesiopalatal
The same working end of the curette that treated the distobuccal surface, can also clean the diagonally opposed mesiopalatal root surface.
Note: Photographic limitations do not permit depiction of the fulcrum.
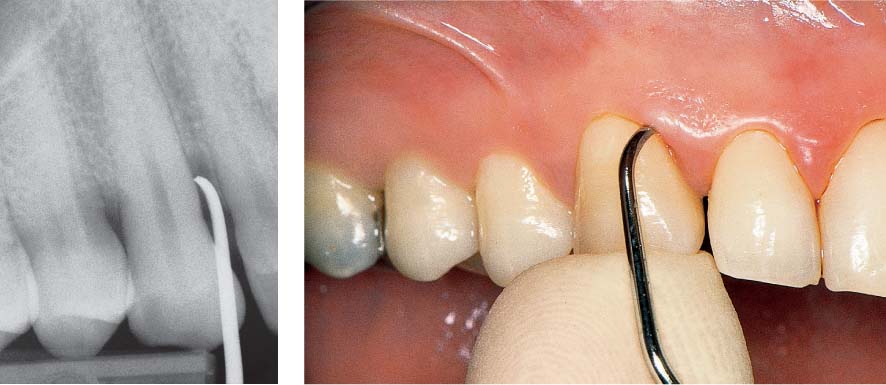
622 Gracey 6—Mesiobuccal
This end of the curette functions mesiobuccally and distopalatally. If the first “long” shaft of the curette is parallel to the root surface, the effective angle of the “face” is the desired value of ca. 80°.
Left: The Gracey curette does not achieve the fundus of the pocket, in contrast to the more elegant curettes (e. g., “minifive”) with their shorter and narrower working ends.
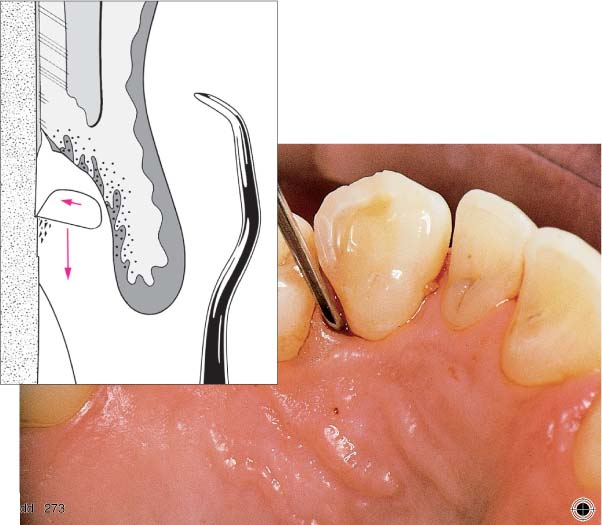
623 Gracey 6—Distopalatal
The same working end of the curette (above, Fig. 622) also serves for treatment of the distopalatal root surface.
Left: The angle of the curette blade to the root surface should be ca. 80°.
The working end of all Gracey curettes is sharpened on only one surface!
Scaling with Gracey Curettes in the Posterior Area
Double-Ended Curette, GRA 11/12 (red), for Use on Mesial Surfaces
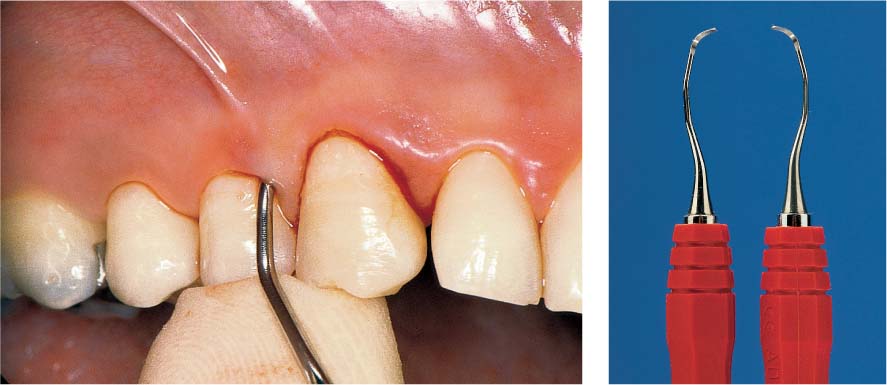
624 Gracey 12—Mesiobuccal
The mesial root surfaces of premolars and molars are best approached with the two paired working ends of the double-angled Gracey 11/12 curettes; shown here in the maxillary right quadrant, with GR 12 from the buccal, and GR 11 from the palatal.
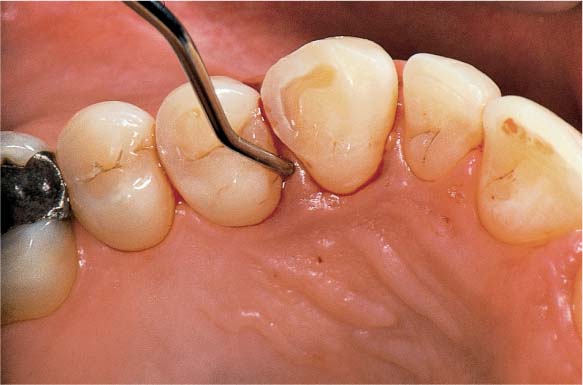
625 Gracey 11—Mesiopalatal
This blade of the double-ended 11/12 cleans the mesial surfaces of the premolar from the palatal aspect.
The mesial surfaces treated with the double-ended 11/12 curette must also be treated in the interdental area with overlapping strokes.
(In the maxillary left quadrant, the Gracey 11 is applied buccally and the Gracey 12 from the palatal approach.)
Double-ended Curettes, Gracey 13/14 (blue), for Treating Distal Surfaces
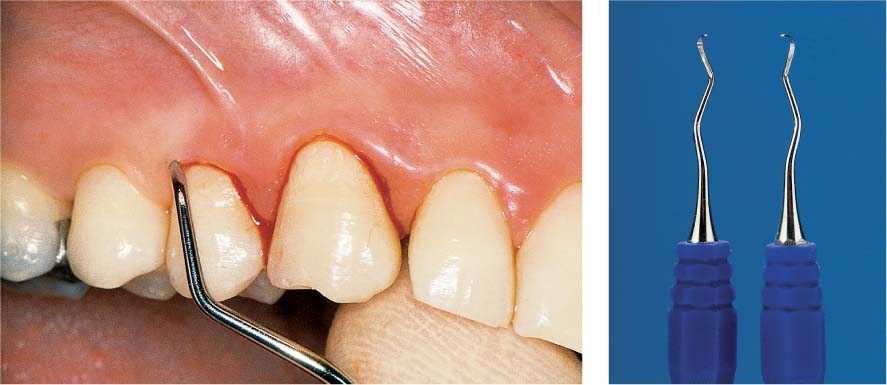
626 Gracey 13—Distobuccal
The distal aspect of the premolar (tooth 14) is treated from the buccal approach.
(On the left side of the maxilla, Gracey 14 would be used.)
Right: The working ends of the double-ended Gracey curette 13/14.
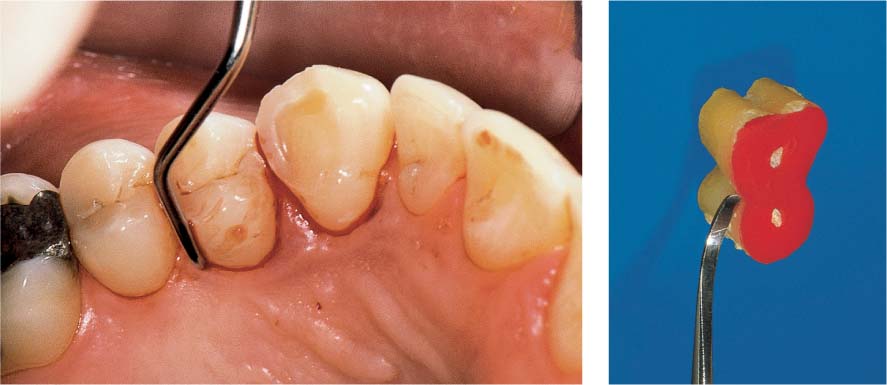
627 Gracey 14—Distopalatal
Note that the terminal shank of the instrument is parallel to the root surface.
Right: Remarkable is the “hourglass” profile of the root surface, exhibiting furcation entrances that must be probed and as far as possible effectively cleaned.
The morphology of the roots and use of the wrong instruments establish the limits of subgingival scaling even more than the absolute pocket depth.
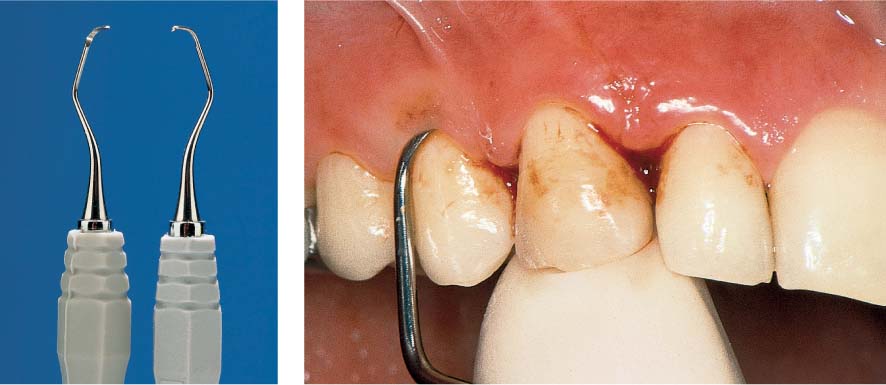
628 Gracey 7—Facial
Usually, subgingival debridement is performed from the buccal and oral aspects; depicted here in the maxillary right quadrant, Gracey curette 7 is used from the buccal approach up to the line angle and into the mesial interdental space.
Left: Working ends of the double-ended Gracey 7/8 curette.
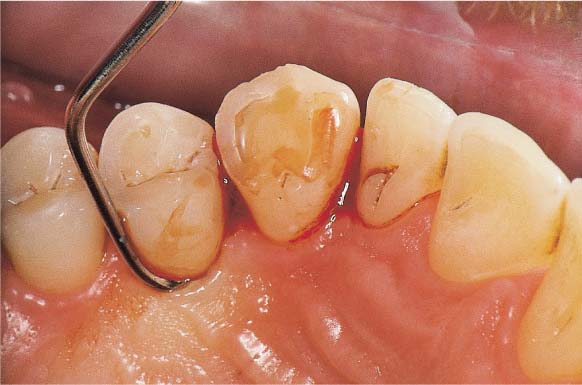
629 Gracey 8—Oral
In most cases, during the scaling of mesial (Gracey 11/12) and distal (Gracey 13/14) root surfaces (p. 274), the usually shallower buccal and oral pockets and the corresponding line angles are also effectively treated. Thus, using the Gracey 8, the palatal treatment of tooth 14 can be quickely completed.
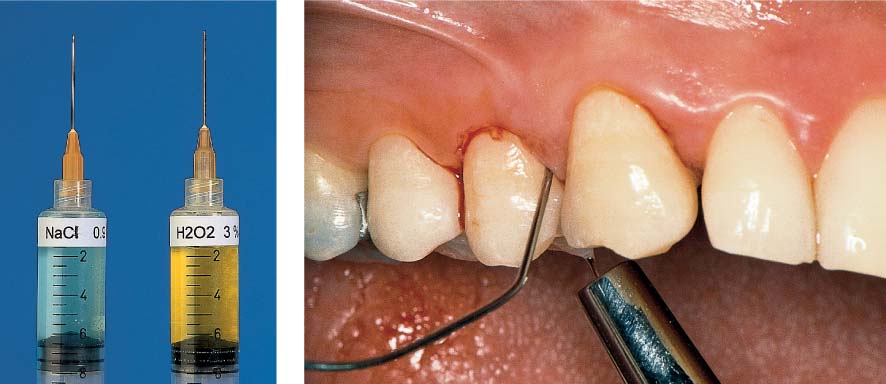
630 Pocket Rinsing
Following mechanical/instrumental treatment, the pocket should be thoroughly rinsed with NaCl 0.9 % and/or H2O2 3 % in order to remove from the pocket any remaining microbial plaque, calculus or cementum. This final phase of closed therapy will enhance the anti-infectious component of treatment.
Left: NaCl (0.9 %) and H2O2 (3 %) solutions. The canula must be blunt (e. g. Max-I-Probe, Hawe Co.)
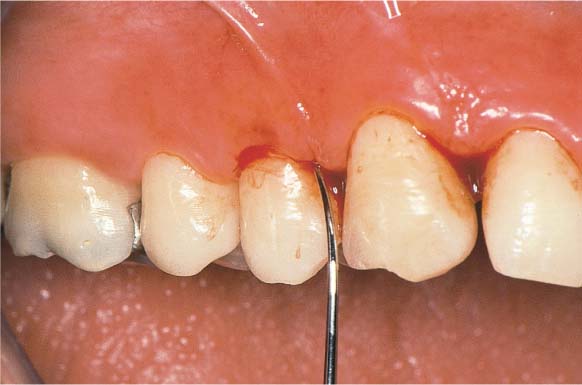
631 Root Surface Evaluation
Using a fine, pointed probe (depicted: EXS3A; Hu-Friedy) the surface of the root is evaluated with regard to its smoothness. This simple clinical test reveals whether the treatment procedure using curettes has effectively reached all segments of the root and removed all deposits.
But the most important aspect is not the planing and smoothing of the root surface, rather the removal or the destruction of the subgingival bacterial biofilm.
Closed Therapy in Quadrant 1 …
Summary
Initially, the 29-year-old patient with aggressive periodontitis exhibited only moderate compliance with oral hygiene instructions. Following initial supragingival prophylaxis and repeated OHI, the patient’s compliance improved. The visible gingival inflammation was reduced; however, BOP persisted.
Closed root planing was performed in the entire dentition, as depicted for the maxillary right quadrant. Teeth 17 through 11 did not require surgical intervention following the closed scaling therapy (cf. probing depths, lack of furcation involvement), but in several other quadrants, especially in the molar regions, flap surgery was indicated.
This case illustrates again that periodontitis is seldom generalized. It is the rule that each tooth, even each surface of each tooth, will exhibit differing severities of periodontal defects (single-tooth diagnosis, p. 196).
Initial Findings Before Initiation of Treatment
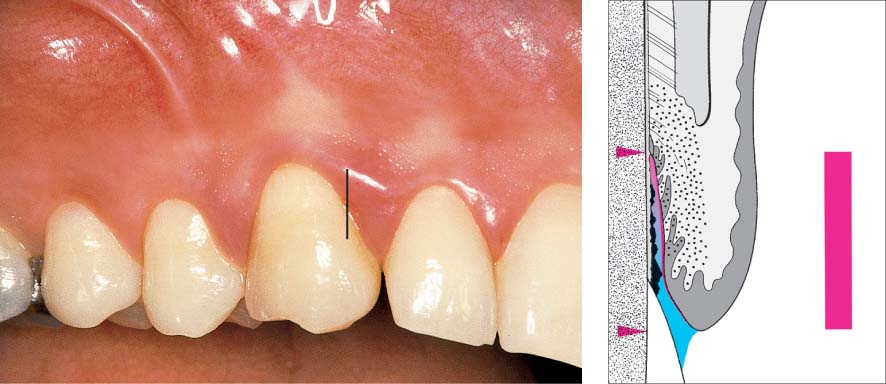
632 Clinical View
Gingivitis and generalized mild, but localized severe periodontitis. The gingiva bled copiously upon probing. The patient had never been adequately informed about oral hygiene.
Right: Pocket “filled” with plaque and calculus (red bar = pocket depth), pocket epithelium and infiltrated subepithelial connective tissue.

633 Probing Depths—Initial Findings (Quadrant 1)
Because of the gingival swelling, the attachment loss must be somewhat less valued than the measured probing depths (p. 169).
Three Years after Subgingival Debridement
Physiologic probing depths are in evidence, resulting from the gingival shrinkage and connective tissue repair. Only one site shows a probing depth beyond 3 mm.
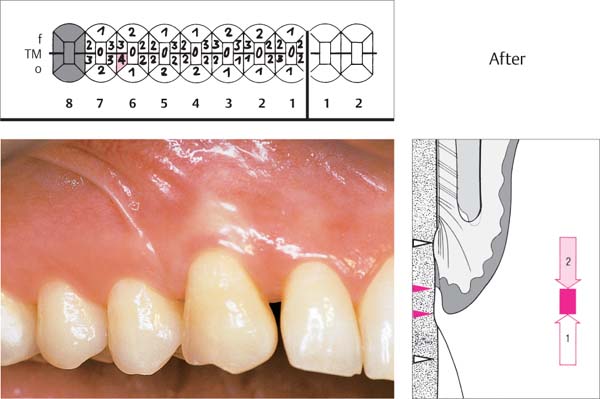
634 Clinical View, Three Years after Treatment
Professional treatment and the patient’s oral hygiene endeavors led to mild recession yet fully healthy gingiva, but without pronounced stippling.
Right: An active pocket responded to the treatment and the result is a shallow, inactive “residual pocket” (red bar).
| 1 Shrinkage 2 Attachment gain (repair) |
… and in the Rest of the Dentition?
Summary of the Entire Case
Following closed subgingival root planing in the entire dentition, not unexpectedly some sites exhibited persistent deep and active pockets in quadrants 2, 3 and 4.
Therefore, on teeth 25 (distal), 26 (distal), 36 (mesial) and 46 (mesial) paper points were used to harvest microbiologic samples for the preparation of cultures (Fig. 636, left). The presence of Aa was, at that time (1991), only qualitative (“yes/no”). On the other hand, the black-pigmenting Bacteroides types (BPB) and the sum of all anaerobic flora were quantitatively determined (“colony forming units,” CFU).
Flap surgical procedures were performed on all of the remaining deep pockets, combined with systemic administration of amoxicillin and metronidazol (van Winkelhoff et al. 1989). The patient remained on a 3-month recall schedule. Two years later, physiologic probing depths were in evidence, with only a few exceptions.
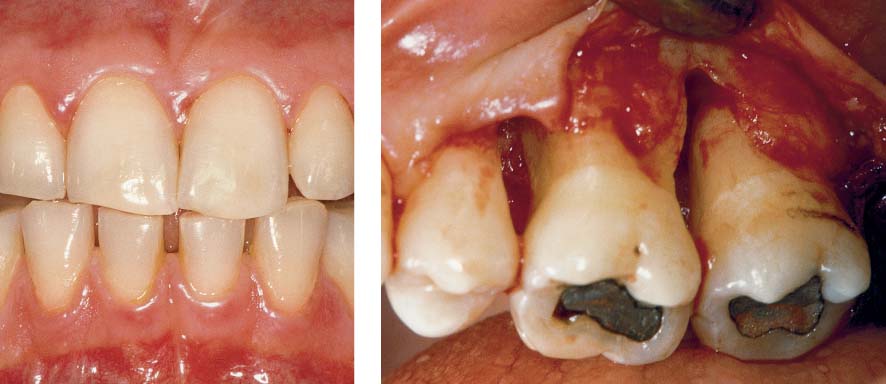
635 Intra-Operation View of Teeth 25, 26, 27
Deep bony pockets, but the furcations are closed. Even with direct vision, root planing was difficult and time-consuming.
Left: Initial anterior view. The gingiva, especially in the maxilla, is erythematous, swollen and not stippled. But this clinical view does not provide any clues as to the severity of periodontitis.
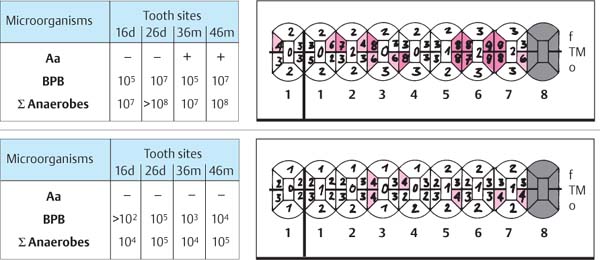
636 Probing Depths and Tooth Mobility—Initial Findings Periodontal pockets up to 9 mm.
Left: Bacterial culture—findings from active residual pockets following Phase 1 therapy.
Probing Depths and Tooth Mobility—Two Years later
Left: Bacterial culture—significantly reduced findings six months after completion of treatment.
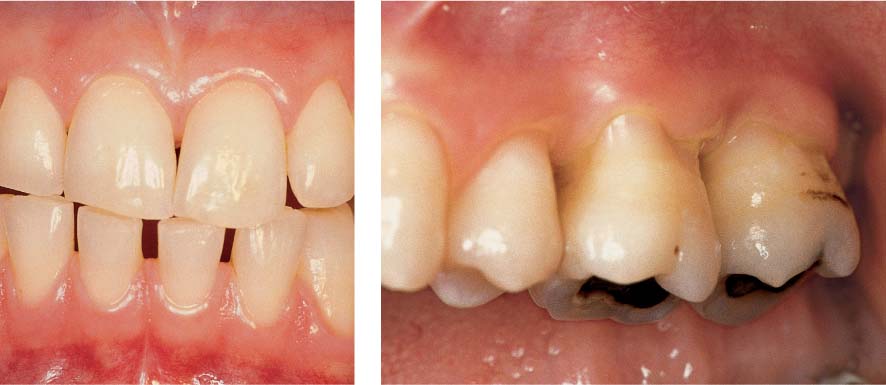
637 Teeth 25, 26, 27—Findings after Two Years
Irregular course of the gingival margin (shrinkage, cf. bony configuration in Fig. 635). Reduction of probing depths: 2–4 mm.
Left: Final view, anterior segment. The gingiva is inflammation-free and very thin, and therefore does not exhibit stippling.
Limitations of Closed Therapy
The boundaries between closed and open (surgical) root treatment are dependent upon a myriad of criteria, and therefore not always easy to clearly define:
• Closed and open treatment may be necessary, and the latter always follows the former. Frequently, following optimum debridement, a few areas will require surgical therapy, e. g., in poorly accessible regions (molars and furcations) and with expansively progressive diseases.
• Wound healing occurs more rapidly following closed procedures, and often with fewer pain complications.
• The treatment procedures are also dependent upon the philosophy of the individual practice: If the dentist collaborates routinely with a dental hygienist, in most cases the DH will initially perform the closed therapy. In mild/slight cases, this may be the only therapy required, but in more severe situations, surgical treatment may be necessary subsequently.
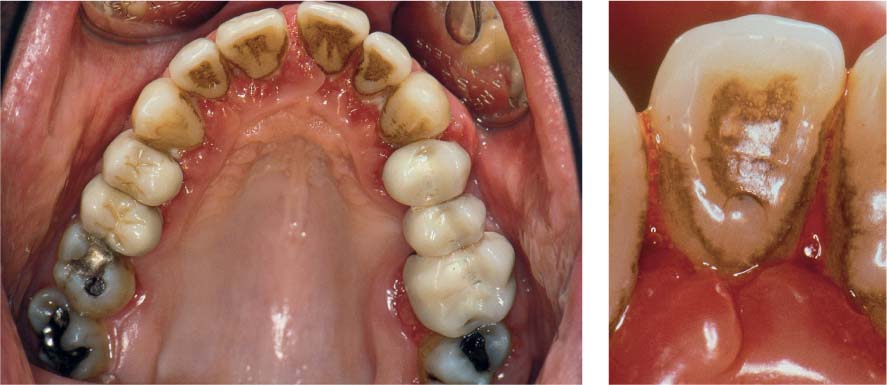
638 Initial View—Occlusal, Maxilla
Periodontitis accompanied by severe gingivitis. The gingivae are severely erythematous and hyper-plastic. BOP is ubiquitous. The patient practiced no oral hygiene. The teeth were severely stained. The initial supragingival debridement and OHI had to be careful and supportive.
Right: Pre-treatment view of teeth 13, 12; 21.
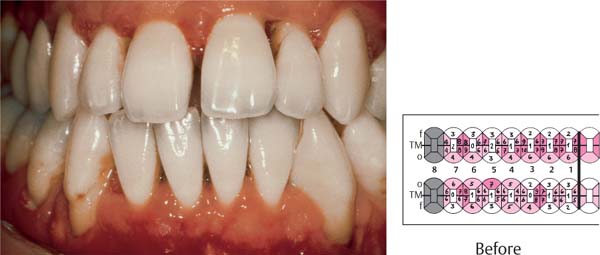
639 Initial Findings, Anterior Segment
Initial ulcerations were obvious on several papillae. The diastema between teeth 11 and 12 had remained unchanged over the past two years. Note gingival recession on teeth 34, 33 and 43, 44.
Right: Initial probing depths and tooth mobility.
The severity of this case made it difficult to believe that treatment consisting solely of closed debridement would bring a successful result.
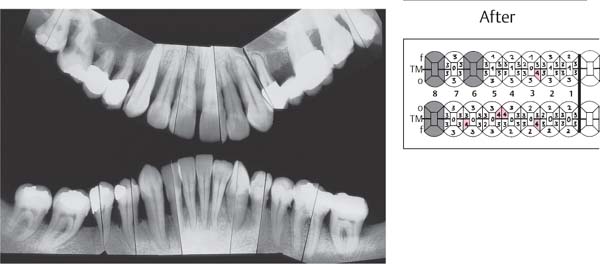
640 Radiographic Findings
The radiographs confirmed the clinical diagnosis of severe, aggressive periodontitis. The mandibular molars also exhibit furcation involvement (F1), confirming the clinical findings. Tooth 16 was extracted.
Right: Probing depths and tooth mobility after treatment. At almost all sites, physiologic probing depths are in evidence. How to explain such success?
• The dentist’s own philosophy also plays a role: Many dentists prefer an optimum, precise and relatively hemorrhage-free conservative approach; others prefer a surgical approach and are quicker to move to the scalpel. Worthy of note, also, is that even surgical interventions may vary from extremely conservative toward relatively radical (see Surgery, p. 295).
• Last but not least, the patient’s own wishes must be considered. The patient may also have an opinion regarding conservative treatment versus surgical intervention.
In the case depicted here, advanced periodontitis was treated using closed therapy, with a successful result.
The 34-year-old patient suffered from generalized, aggressive periodontitis with simultaneously pronounced gingivitis, and exhibited ulcerations in some areas. Until recently, he had been a heavy smoker.
Initial findings:
| PI: 70 % | BOP: 78 % | TM: 0–2 |
The figures below depict the clinical situation, probing depths and radiographic findings.
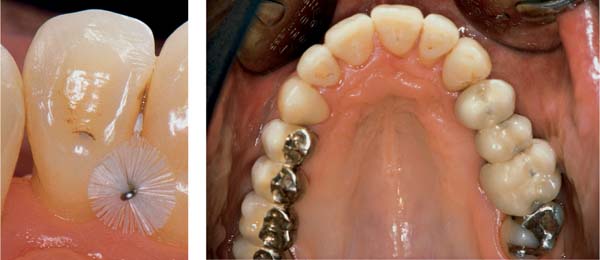
641 Clinical Findings Two Years after Closed Treatment—Occlusal View
Healthy gingival and periodontal conditions. Note the spontaneous closure of the diastema between teeth 11 and 21. In Quadrant 1, a bridge was fabricated from teeth 14, 15 to 17. The old, overcon-toured bridge in Quadrant 2 was left in place because of financial considerations.
Left: Clinical view of teeth 13, 12 and 11 after therapy and optimum oral hygiene.
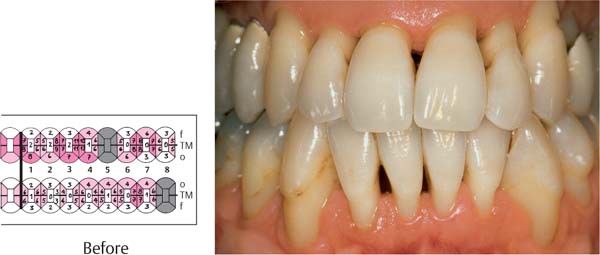
642 Final Result, Two Years after Closed Therapy—Anterior View
As depicted in this clinical photograph, purely closed treatment led to relatively favorable results, including some shrinkage of the gingival tissues; however, the degree of gingival recession had increased. The clinical, esthetic result necessitated free gingival grafting procedures above the canines.
Left: Initial probing depths (left side).
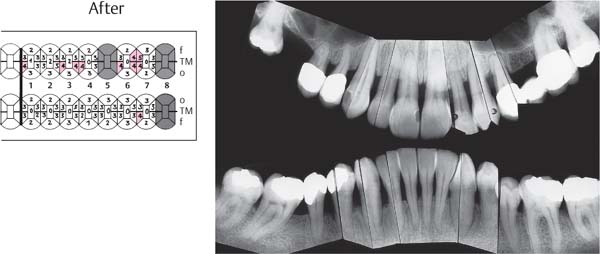
643 Radiographic Findings Two Years after Treatment
The intraoral conditions have “stabilized.” Several teeth exhibit new bone apposition, e. g., mesial of tooth 43 and in the mandibular furcations.
Left: Probing depths and tooth mobility two years after therapy (cf. Fig. 640, right).
Courtesy L. Ritz
Possibilities and Limitations of Closed Therapy …
Phase 1 therapy (I: plaque control, supragingival debridement; II: subgingival scaling, root planing and eventual curettage) is certainly the most important and fundamental measure for comprehensive treatment of periodontal disease. Phase 1 therapy is truly causal therapy, the gold standard.
The often necessary adjunct to Phase 1 therapy is periodontal surgery. This permits treatment of the root surfaces with direct vision, and is therefore also “causal” therapy. In addition, surgical approaches can eliminate or correct symptoms or consequences (defects) of the disease process.
… in Gingivitis
In most cases of gingivitis, initial therapy (Phase I) is the only treatment necessary. One exception is fibrous gingival hyperplasia, which may persist even after elimination of the inflammation. This is often the case following severe gingivitis, with mouth breathing, as well as chronic ingestion of certain medications that have gingival overgrowth as a side effect (phenytoin, dihydropyridine, cyclosporine-A; p. 121). In such cases, Phase 1 therapy must be followed by surgery (gingivectomy/gingivoplasty).

644 Pocket Depth Reduction and Gain of Attachment after Various Treatment Methods in 4–6 mm Pockets (Knowles et al. 1979)
Compare also Fig. 727: Pocket reduction and attachment gain in deeper (7–12 mm) pockets.

645 Changes in Pocket Depths Following Closed, Non-surgical Therapy
Badersten et al. (1984) demonstrated early on the advantages and shortcomings of closed treatment. Ideal areas are those with probing depths (PD) up to ca. 6 mm (blue region). Attachment loss is present with PD of 3 mm and less, to deep “residual pockets” with PD greater than 7 mm. In such cases, other techniques (surgery) or the use of medications is more promising (p. 287).
… in Mild Periodontitis
In such cases, especially on single-rooted teeth, Phase 1 therapy alone usually leads to good results (Badersten 1984; Badersten et al. 1984a, b; cf. Fig. 644).
… in Moderate and Advanced Periodontitis
In such cases, success after only Phase 1 therapy is rare. As already noted, subgingival plaque and calculus removal becomes more difficult as pocket depth increases (Waerhaug 1978).
Root irregularities, grooves, furcations and fusions cannot be perfectly cleaned; scaling and planing of the root surface can be performed only incompletely at best. The consequences include a total lack of new attachment (regeneration) and re-infection of the residual pockets.
It is therefore absolutely necessary to re-evaluate the patient’s periodontal condition ca. 8 weeks after completion of Phase 1 therapy (“Phase 1 evaluation”). At this time, a decision can be made regarding the necessity for surgical intervention.
FMT—“Full Mouth Therapy”
• Non-Surgical Therapy, plus …
• FDIS—“Full Mouth Disinfection”
“Full Mouth Disinfection”—FDIS
It is becoming more and more clear that purely mechanical, non-surgical periodontitis therapy can be greatly improved if all of the currently available pharmacologic possibilities are utilized. Such possibilities improve the success rates for pocket reduction and clinical attachment gain to the levels achieved by surgical methods (Drisko 2002; Quirynen et al. 2002).
The therapeutic terms antimicrobial and anti-infectious do not imply only that the root surfaces in the area of pockets are scraped clean; rather, that the microbial colonizers of the pocket must be reduced, and those microbes with pathogenic potential must be eliminated. This principle also holds true for the entire oral cavity with all of its plaque retentive niches, and the recolonization of residual pockets; the oral cavity must therefore also be thoroughly disinfected (FDIS). And finally, the oral cavity of the patient’s partner must be examined and treated as necessary.
The principal procedure for “full mouth therapy” including “full mouth disinfection” is portrayed in the figure below (Fig. 646).
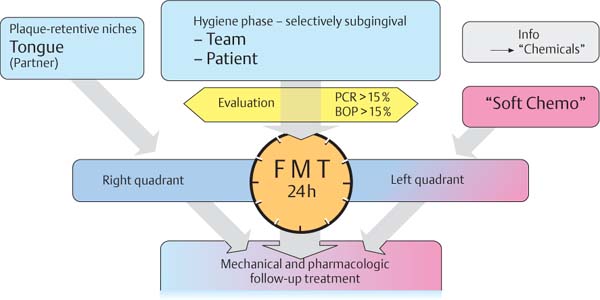
646 FMT—“Full Mouth Therapy”—Schematic
Important: The intensive anti-infectious treatment begins with an extended phase of purely mechanical hygiene, until the patient’s PI and BOP are reduced to 15 % by home care procedures.
The decision is then made whether FMT will be performed quadrant-by-quadrant or (better) within 24 hours. Now also begins the intensive use of antiseptic agents in the pockets and in the oral cavity, before, during and after the active FM therapy.
Practical Procedure for FMT
The procedure is simple and includes the following steps (Quirynen et al. 2001; Saxer 2001):
• An extended hygiene phase; goal: PI and BOP ≤ 15 %
• Actual closed pocket therapy—FMT, pharmacomechanical, within a short period of time
• Supervised follow-up care (mouth, tongue, teeth)
During the hygiene phase the patient is motivated in toothbrushing technique, tongue cleansing with a brush or scraper, and the periodontal pockets are purely mechanically debrided, deeper and deeper at each appointment.
After achieving the established hygiene goals, the actual “full mouth therapy,” now pharmacomechanical, is instituted within a 24-hour period of time (p. 210):
|
• Oral rinses (CHX 0.1–0.2 %) 1–2 days before initiating therapy (reduction of the “bacterial load” in the oral cavity) • Mechanical pocket therapy, including: Use of antiseptics during the FMT; repeated pocket rinsing (CHX 0.2 %; H2O23 % plus betadine 0.5 %), and “filling” the pocket with CHX gel after treatment • Supervised follow-up care (tongue cleansing with CHX). |
FMT—Instrumental/Mechanical and …
Is “full mouth therapy” the wonder concept of the future? Here remains the controversy! Where praise is heard, criticism is not far behind. The loudest outcry against FMT: The “brutal” hours-long stress situation for the patients during the 24-hour treatment, and the occasionally occurring bout of fever following therapy!
It has long been known that fever, even septic shock, may be the reaction after massive antibiotic administration and the subsequent massive death of bacteria; this also leads to an equally large release of bacterial metabolic by-products, e. g., LPS (also PGE2, IL-1, IL-6 etc.). The host response may be overcome.
The proper use of FMT prevents this type of stress and fever: During the extended hygiene phase, the bacterial mass in the oral cavity and within pockets is reduced successively from appointment to appointment using careful mechanical instrumentation and without local anesthesia. Thus, at the end of the hygiene phase, most shallow pockets are already “healed” and only a few deep and active pockets remain to be treated by the FMT method.
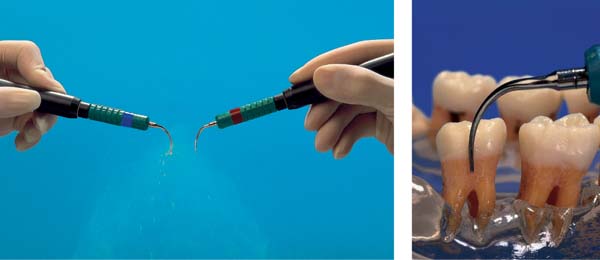
647 Fine Tips for the Ultrasonic Device—Cavitron
The use of thin, fine tips with internal cooling (pictured, the paired Slimline tips) permits effective subgingival debridement in areas where curettes are difficult to maneuver, and usually without anesthesia (caution: contaminated spray aerosol!).
Right: Using the thin, curved ultrasonic tips, even the narrowest furcations can be debrided with a “closed” approach.
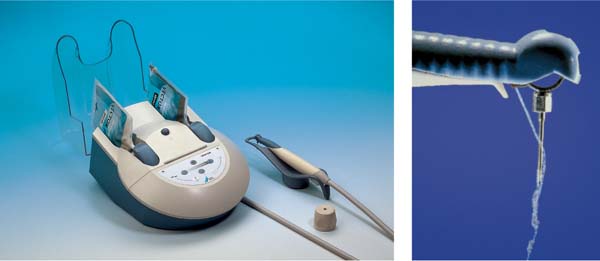
648 Linear Vibrations of the Vector Ultrasonic Device without Spray Aerosol
The Vector device is only mildly abrasive and therefore not indicated for the removal of hard calculus. However, for the destruction and removal of subgingival biofilm it is ideal and also gentle on exposed root surfaces. It is therefore well indicated for follow-up care postoperatively and during recall.
Right: Unusual characteristic—the Vector without any spray aerosol.
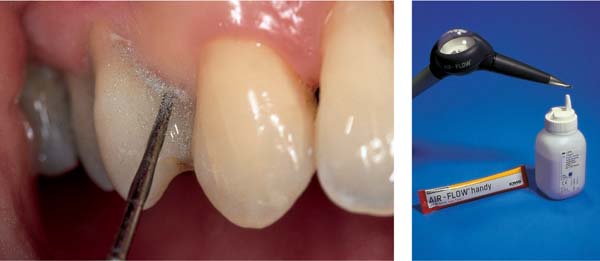
649 The Vector in Use—Delicate!
Two powder suspensions provide the mild abrasiveness for polishing capability of the device. The purely linear vibrations reduce pain sensation. Only very few patients require local anesthesia.
Right: EMS—Handy 2
This powder-water spray device, with its special fine tip, can also be used subgingivally, thanks to the minimally abrasive powder (amino acid glycine; Petersilka et al. 2003).
… Pharmacologic Therapy
If this more “patient” procedure is employed, neither fever nor particular stress will occur. And, 9 out of 10 patients questioned reported that they would decide on this form of therapy again. The overriding question is, what does the patient consider to be less burdensome: Long-term results and financial concerns? The choice of “getting it all over with” (FMT in 24 hours), or the more traditional approach to periodontal surgery, sextant by sextant? These questions must be answered by a thoroughly informed patient.
The authors who have enthusiastically endorsed closed, anti-infectious treatment methods (FMT) hope that their efforts will bring us closer to the goal stated by Dr. Jörgen Slots (2002): “Effective, safe and affordable periodontal therapy” (Bollen & Quirynen 1996; Vandekerckhove et al. 1996; Bollen et al. 1998; Quirynen et al. 1998; Mongardini et al. 1999; DeSoete et al. 2001, and others).
The antiseptic agents described below, and the various possibilities for their uses represent cost-effective pharmacologic agents for FMT.
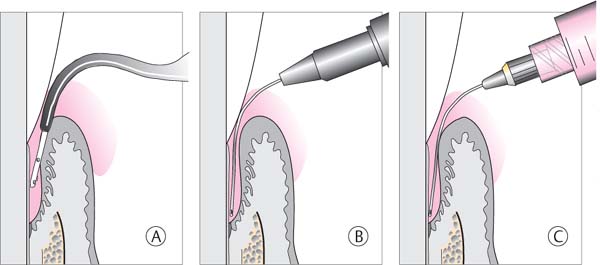
650 Pocket Rinsing with Antiseptics—Subgingival
Using the depicted blunt and therefore non-traumatic cannulae, the fundus of the pocket can be achieved in most cases.
|
A |
Perioflex |
(Oral-B) |
|
B |
Periodontal Pik |
(WaterPik) |
|
C |
Max-I-Probe on a 10 ml syringe |
(HaWe) |
A single rinsing has only a short-term effect. Prolonged effects can only be achieved with repeated irrigation using relatively high concentration disinfectants.
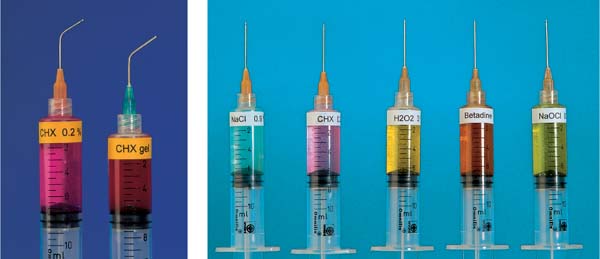
651 Disinfection Agents for Subgingival Application
The depicted agents can be used alone or in combination, together with the mechanical treatment:
|
• NaCl |
0.9 % |
|
• CHX |
0.2 % |
|
• H2O2 |
3% |
|
• Betadine |
0.5 % |
|
• NaOCl |
0.5 % |
Left: Two CHX modalities
| • |
Stay updated, free dental videos. Join our Telegram channel
VIDEdental - Online dental courses


