Esthetics play an important role in any prosthodontic treatment. However, it is at its most significant when it involves the teeth of the anterior maxilla. If the best possible final result is to be achieved, it is not only the anatomical aspects but also – and above all – the esthetic ones that need to be considered from the outset, ie, at the diagnostic stage.
Diagnosis with esthetic considerations
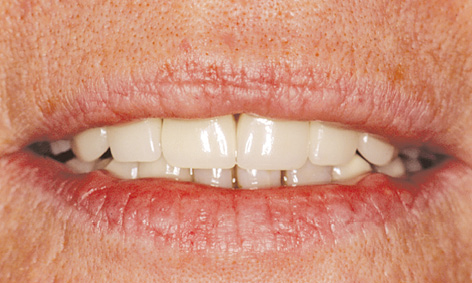
The length of the upper lip is the most significant factor in the anterior maxilla. If the smile line is high, even the smallest irregularities in the red or white esthetic components of a restoration can result in esthetic failure (Figs 4-1a and 4-1b).
Extensive diagnostic investigations with the aid of a wax-up or set-up on articulated study casts are recommended before any implant placement. Knowledge of the spatial relationships in the gap that needs to be filled, along with the desired height-to-width ratio of the future crown, are key factors determining the final result.
When it comes to the technological planning involved in replacing a tooth, comparison with its counterpart on the opposite side delivers very important information for the subsequent prosthetic restoration. The height of the tooth, determined by the course of the cementoenamel junction (CEJ) of the contralateral and neighboring teeth, needs to be taken into account in the planning stages. If the vertical measurement from the ideal position of the incisal edge to the residual ridge exceeds the optimal crown height, then it will be necessary to carry out bone or soft tissue augmentation procedures.
This becomes apparent on the diagnostic cast when the ideal position of the dental crown is fixed and the result is a gap between the tooth and the residual ridge at the cervical end (Fig 4-1c). If the labial resorption is not particularly pronounced, augmentation can normally be performed in a single session with implant placement.
The planned shape of the tooth and the information obtained from this diagnostic step should be transposed to the operation area by means of a surgical guide template. This needs to fully reproduce the extent of the set-up tooth in the gap (Fig 4-1d). The template is made of transparent plastic and stabilized on the incisal edges of the neighboring teeth with plastic occlusal rests. For better orientation, the desired position of the implant is marked on the cast (Fig 4-1e). It is best if the implant can be placed at the center of the gap and along the course of the dental arch.
Attention: Placing implants too far palatally may result in crown deformity, either vertical or with a vestibular overlap in the form of a “balcony,” which interferes with occlusion. This can cause difficulties when cleaning the teeth. Positioning the crown too far in the labial direction displaces the soft tissue and leads to its atrophy. This results in a crown that is, or appears, too long.
The longitudinal axis of the crown, which ideally also determines the longitudinal axis of the implant, is set by drilling a hole 3 mm in diameter (Fig 4-1f). For a better view, the drill hole can be exposed by cutting away the labial side of the template. The cervical margin of the set-up tooth should still be clearly identifiable (Fig 4-1g). Later, during the surgical procedure, a direction indicator is used to check the axis of the tooth or implant.
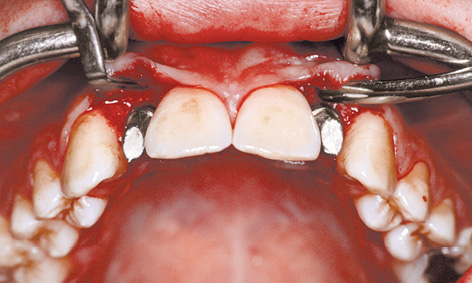
If the patient is using an interim prosthesis, this can also deliver important information during the diagnostic phase. It can be used to try out the position of the crown, and to test static and dynamic occlusion. Moreover, any residual ridge defects are shown up by the pink acrylic part of the prosthesis in the region of the defect (Fig 4-1h).
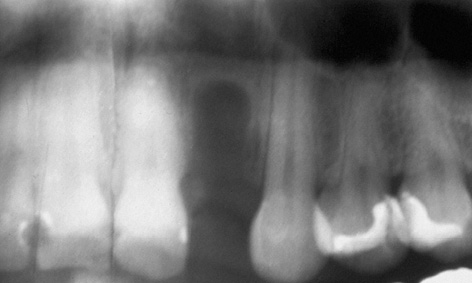
Radiographs (a panoramic radiograph and dental films at least) are also needed for diagnostic purposes (Fig 4-1i). In cases where atrophy has already occurred, an additional computed tomography (CT) or cone beam computed tomography (CBCT) scan will be required (see 3D diagnosis, p. 230).
The planned position of the implant is determined on the radiograph. A radiographic template with integrated titanium sleeves is recommended to determine the magnification factor of the panoramic radiograph. In contrast to the posterior region, the bone supply in the anterior maxilla is generally sufficient for an implant length of 13 to 18 mm. If the “Simpler in Practice” method is to be used, it is advisable to fashion a stable baseplate on the diagnostic cast (Fig 4-1j).
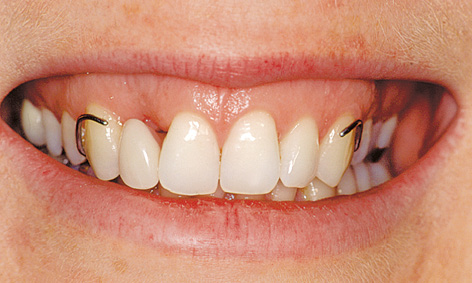
Fig 4-1b Short upper lip – high smile line.
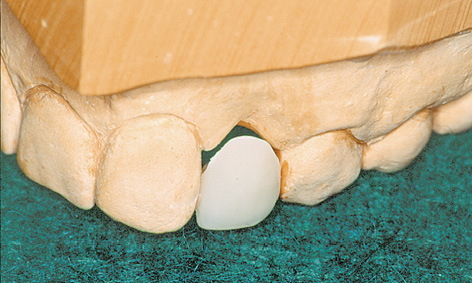
Fig 4-1c Gap between the edge of the crown and the residual ridge.
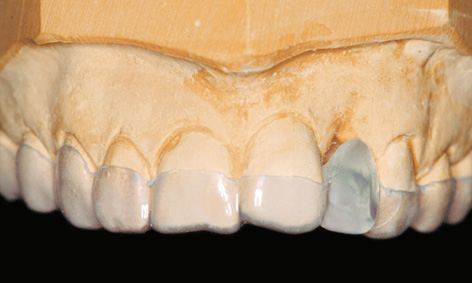
Fig 4-1d Duplicated tooth in the template.
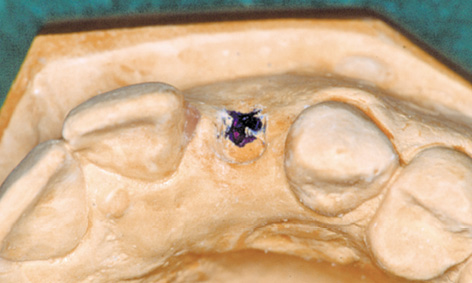
Fig 4-1e Marked implant position.
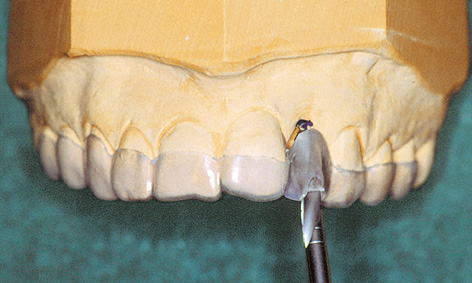
Fig 4-1f Hole drilled along the axis of the tooth.
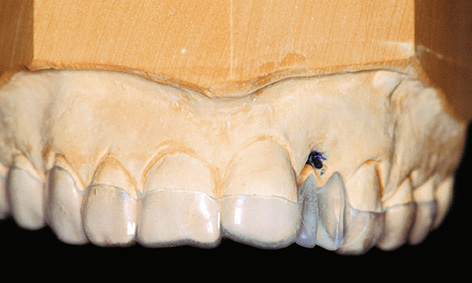
Fig 4-1g The drill hole has been exposed on the labial side.
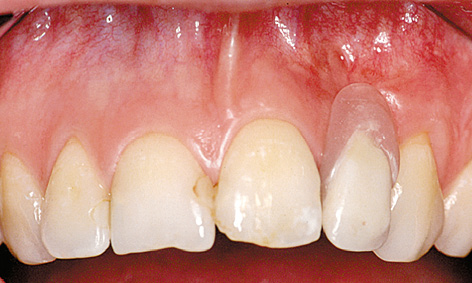
Fig 4-1h Pink acrylic shows the extent of the defect.
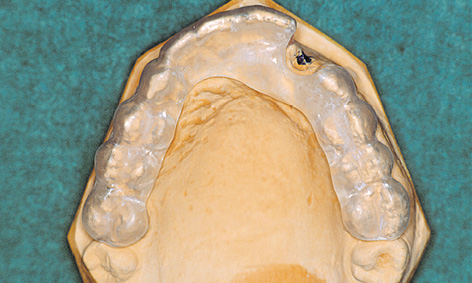
Fig 4-1j The baseplate.
See page 237 for the continued procedure.
3D diagnosis and SimPlant planning
Three-dimensional (3D) diagnosis is continually gaining in significance and is indicated in most cases when planning a single-tooth implant in the anterior maxilla. It is particularly important in immediate implant placement where immediate loading is planned.
A planning program, such as SimPlant in this case (Dentsply), is normally used for this. The data obtained from the CBCT or CT scan are transferred into the planning program in Digital Imaging and Communications in Medicine (DICOM) format (Fig 4-2a). The data set includes the panoramic section, which provides an overview of the whole situation (Fig 4-2b). In the case presented here, tooth 22 needs to be extracted, with immediate loading of the implant (see the “Immediate loading” case, page 270). However, the cross-sectional view is the most significant when it comes to detailed implant planning (Fig 4-2c). The planned implant, taken from the library, is placed virtually into this projection (Fig 4-2d). The exact position of the implant is then checked further in all planes and projections (Fig 4-2e). Bone densitometry around the implant can be used to assess bone quality, another important factor for immediate loading of the implant (Fig 4-2f). In this case, the very high bone density in the coronal region of the implant is falsified by the projection of the tooth that still remains here. Superimposition of the long axis of the implant facilitates the planning and fabrication of a surgical drill guide, which allows precise drilling and placement of the implant (see the “Immediate loading” case, page 271, Figs 4-14c and 4-14d). Visualization of the long axis of the implant also shows where the access hole for the retaining screw is to be located (Fig 4-2g). This information is important when choosing a suitable abutment. The selected abutment (angled by 22 degrees in this case) can also be planned three-dimensionally and virtually placed (Fig 4-2h).
It is only thanks to 3D planning that the surgical guide template can be fabricated and the immediate provisional restoration can be prepared before the operation.
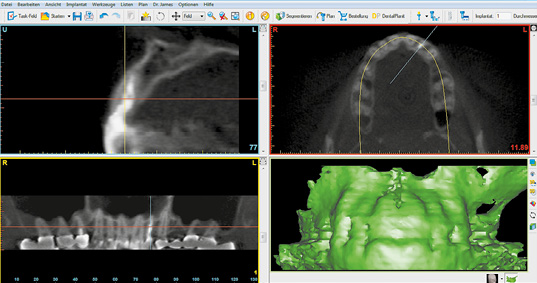
Fig 4-2a CBCT scan images for the planning process.
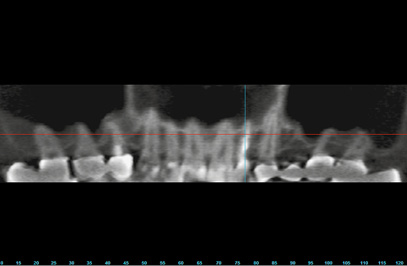
Fig 4-2b Overview on the panoramic section.
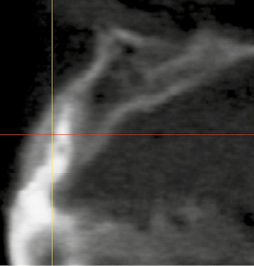
Fig 4-2c Cross section.
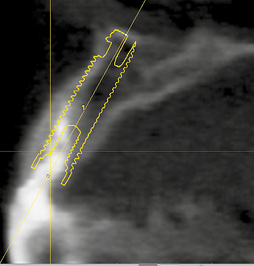
Fig 4-2d Positioning of the implant.
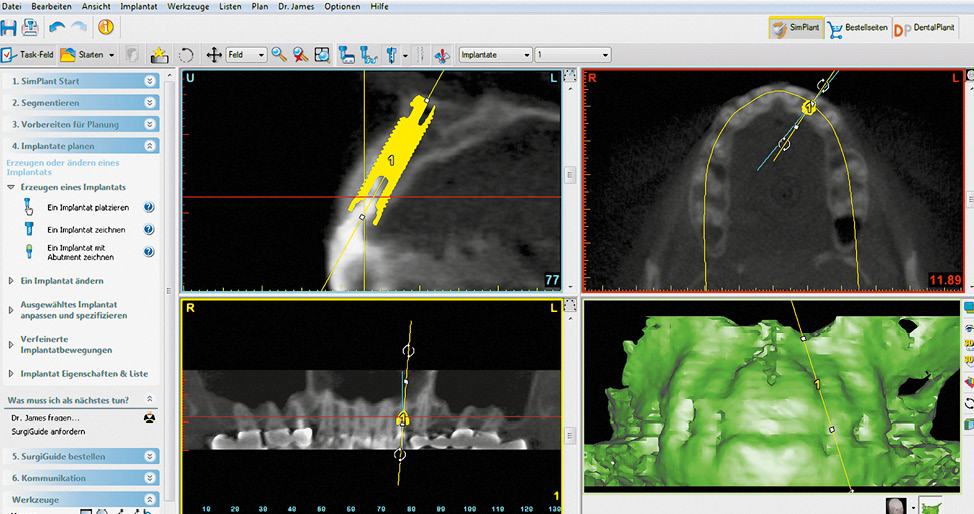
Fig 4-2e Position of the implant in all planes.
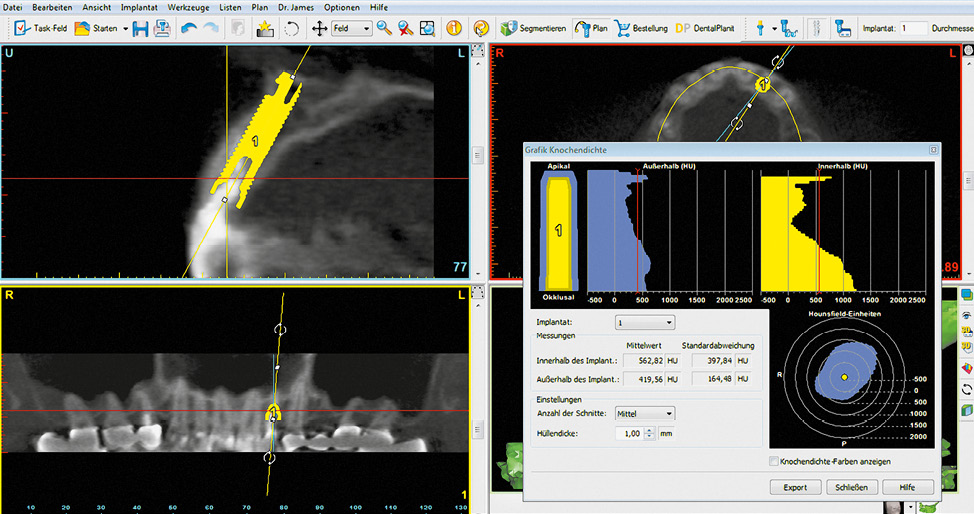
Fig 4-2f Bone densitometry around the implant.
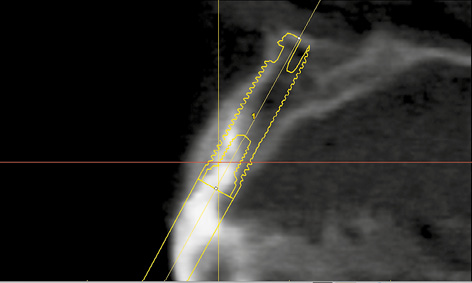
Fig 4-2g Access hole for the retaining screw.
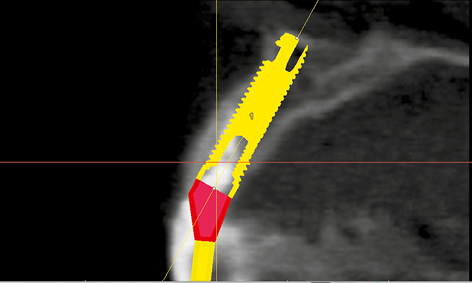
Fig 4-2h Positioning the angled abutment.
Single-tooth replacement
Implants can be used for a particularly natural and atraumatic restoration of single-tooth gaps in the anterior maxilla. Esthetically unacceptable clips are just as redundant as preparing neighboring teeth for a bridge, which are usually completely healthy. Another advantage of single-tooth implants is that they allow optimal cleaning of the interdental spaces.
Apart from the high esthetic requirements that apply to anterior teeth, single-tooth implant placement is usually unproblematic. Bone defects and the loss of interdental papillae are generally less serious than with larger gaps involving several teeth. Tissue reconstruction achieves good and, above all, predictable results in most cases.
After an average implant healing phase of 6 months, the question that often presents itself is how to make sure that the patient is fitted with an esthetically satisfactory restoration as soon after exposure of the implant as possible. The implantological protocol dictates that a healing abutment of appropriate length be incorporated during the exposure operation. This abutment should be at least 1 to 2 mm proud of the gingiva, so that it does not become overgrown by it. However, a protruding titanium abutment can be unsightly in the anterior part of the dental arch. In addition, the incorporation of the previously worn provisional prosthesis, especially one fabricated by casting, can be problematic in some cases due to lack of space. The healing abutment should stay in situ until the gingival situation has stabilized.
Following gingival stabilization, the healing abutment is replaced by the definitive abutment. After the latter (eg, CeraOne for a single-tooth implant; Nobel Biocare) has been incorporated, an impression is taken and the prosthetic crown fabricated. In contrast to the conventional protocol, the Simpler in Practice technique allows the patient to be offered an esthetically pleasing provisional restoration immediately. Furthermore, it offers the option of shaping the contour and course of the gingival margin around the implant and also to influence the continued development of the papilla by appropriate configuration of the interdental space.
Typical treatment course
Single-tooth implant – Simpler in Practice technique
This case follows on seamlessly from the standard diagnostic procedure.
Baseline situation
This young, 30-year-old woman lost tooth 22 due to apical and periodontal inflammation. She had been fitted with a removable provisional prosthesis by her dentist (see Diagnosis, Fig 4-1h, page 229). The ridge defect that developed after the extraction (Fig 4-3a and see Diagnosis, Fig 4-1i) would have resulted in considerable esthetic as well as functional restrictions, had she been provided with a conventional prosthetic restoration with no augmentative measures. Therefore, an implant-based solution was the preferred option to protect the neighboring teeth.
Diagnostic tools
- Clinical examination
- Panoramic radiograph
- Dental cast analysis
Treatment plan
1.Implant placement and augmentation, recording the implant position
2.Fabrication of the provisional restoration – Simpler in Practice technique
3.Exposure and incorporation of the provisional
4.Definitive ceramic crown
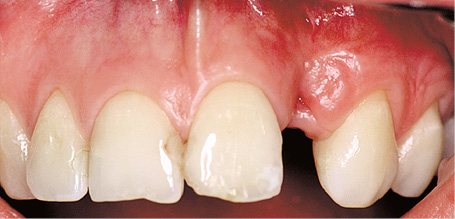
Fig 4-3a Clinical situation before treatment.
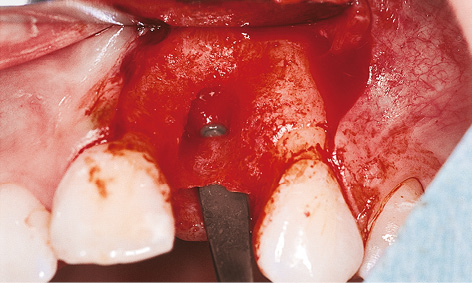
Fig 4-3b Bone defect with apical fenestration.
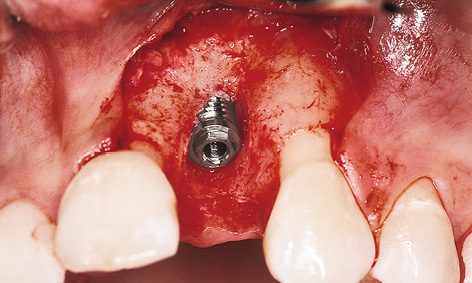
Fig 4-3c The implant in situ.
Implant placement, recording the fixture position and augmentation
The bone defect between teeth 21 and 23 was revealed following dissection of the mucoperiosteal flap. There was only a thin palatal bone lamella with apical fenestration at this location (Fig 4-3b). Once the implant was placed (Fig 4-3c), an impression coping was screwed onto it and a prepared baseplate incorporated (Fig 4-3d and Diagnosis, Fig 4-1j). The impression coping was fixed into the baseplate with a self-curing polymer (Pattern Resin, GC America; Fig 4-3e).
Once the self-curing polymer had hardened, the impression coping was unscrewed from the implant and the impression coping/baseplate complex removed. A healing abutment was then screwed on to act as a spacer (Fig 4-3f) and bone augmentation performed with the bone substitute Bio-Oss and a Bio-Gide membrane (Geistlich; Fig 4-3g). The membrane needed to be securely attached (eg, with a titanium pin or preferably a resorbable Resor-Pin [Geistlich] on the labial side and with a mattress stitch suture on the palatal side) to ensure that the augmentation material remained in place on the bone. The mucoperiosteal flap was repositioned following periosteal slitting and the wound then closed by suturing. The 7-month healing phase was uncomplicated (Fig 4-3h).
Exposure and provisional loading
After the 7-month healing phase, the implant was exposed with an incision on the palatal side and the healing abutment unscrewed. This revealed good regeneration of the hard tissues (Fig 4-3i). Osseous support for the papillae was now in place.
The sterilized CerAdapt abutment (Nobel Biocare) was screwed on (Fig 4-3j) and the retaining screw tightened with the aid of a torque controller (32 N/cm). The provisional crown was cemented on with TempBond (Kerr). This was followed by gingival adaptation and suturing (Fig 4-3k).
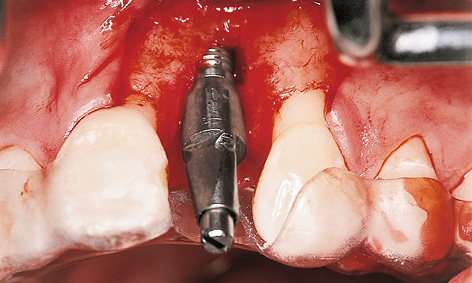
Fig 4-3d Impression coping screwed onto the implant and the baseplate stabilized on the teeth.
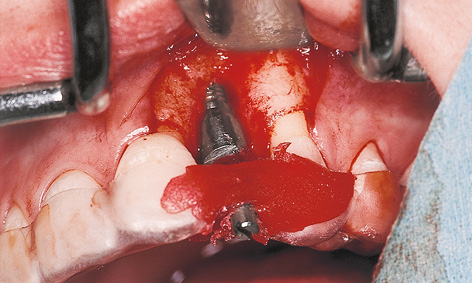
Fig 4-3e The impression coping has been integrated into the baseplate.
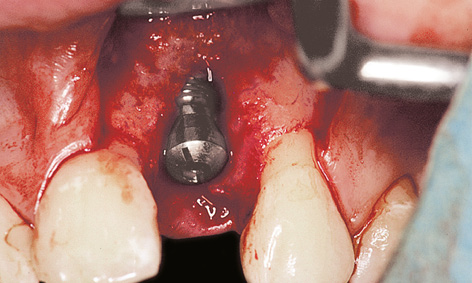
Fig 4-3f Healing abutment as spacer.
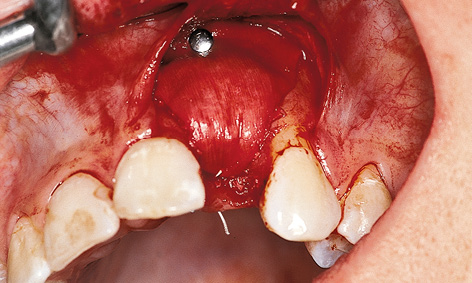
Fig 4-3g Bone augmentation with Bio-Oss and Bio-Gide.
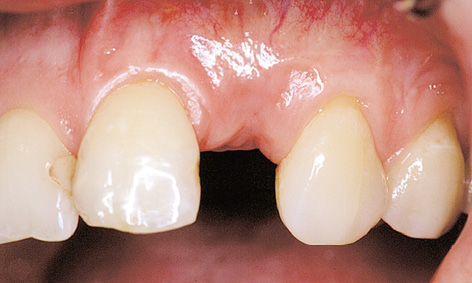
Fig 4-3h Healing phase.
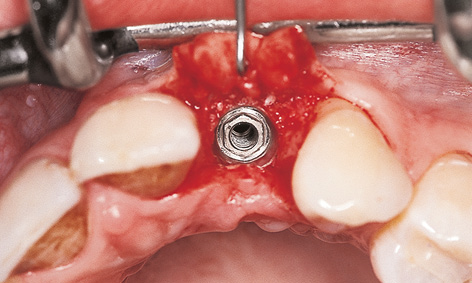
Fig 4-3i Exposure of the implant.
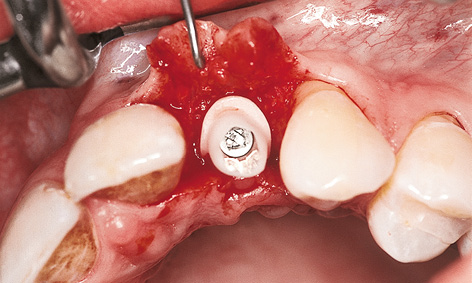
Fig 4-3j Fitted CerAdapt abutment.
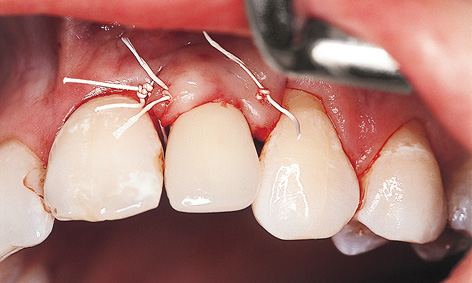
Fig 4-3k Provisional crown.
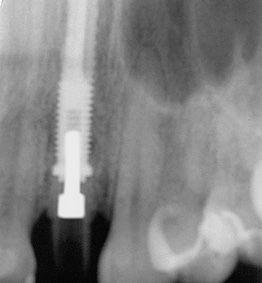
Fig 4-3l Regeneration of the bone defect.
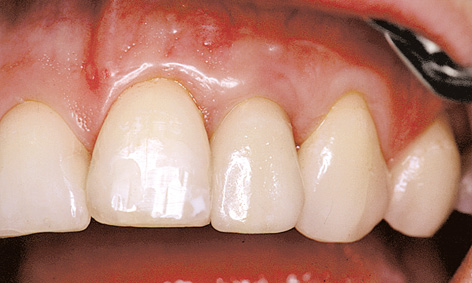
Fig 4-3m Definitive ceramic crown.
Attention: During the exposure operation, it may turn out that the bone margin makes fitting the abutment difficult or impossible. If this is the case, the diameter of the abutment needs to be reduced or the bone reamed out.
The postoperative radiograph should confirm the optimal positioning of the implant components. If this is not the case, the fit of the abutment will need to be corrected. Here, the radiograph showed not only that a good fit has been achieved, but also that the former bone defect has regenerated (Fig 4-3l; cf. Diagnosis, Fig 4-1i).
Definitive restoration
A few months later, following gingival stabilization, the CerAdapt abutment was reshaped in the mouth and thus adjusted to the final soft tissue contours. Once this shaping was complete (as with a tooth stump), the full ceramic crown could be fabricated in the laboratory. Figure 4-3m shows the cement-retained ceramic crown 8 months after exposure of the implant.
Treatment course
- Implant placement and augmentation (1996)
- 7 months to exposure
- 3 months to the definitive crown
Treatment
|
Surgery and provisional restoration: |
Dr Christoph T. Sliwowski |
|
Ceramic crown: |
Dr Eberhard Helbig |
Simpler in Practice Technique
Simpler in Practice is a method of fabricating a provisional restoration on implants before they are exposed. For a working cast to be created with this technique, the position of the inserted implants has to be recorded intraoperatively and transferred to a situational cast. The model implants also need to be incorporated secondarily into the working cast. This is done with the aid of a preoperatively fabricated baseplate onto which the impression copings are attached during implant placement.
Fabrication of the provisional restoration – Simpler in Practice
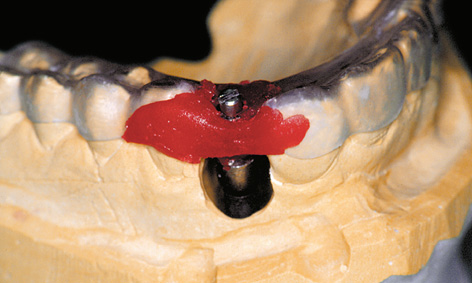
Fig 4-4a Baseplate on the reamed-out cast.
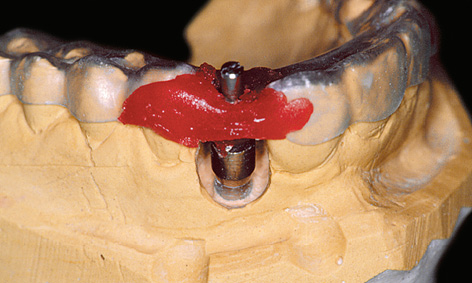
Fig 4-4b Secondarily incorporated model implant.
Producing a definitive cast
The provisional restoration can be fabricated without delay on the original cast on which the baseplate was produced.
Attention: However, consideration will need to be given to the fact that the positions of the teeth or the gingival situation could have changed during the several months of the healing period.
The implant position as recorded in the mouth is transferred to a working cast with the aid of the existing baseplate. After the plaster cast is reamed out in the implant region, the model implant is screwed onto the fixed impression coping and the baseplate placed onto the reamed-out cast (Fig 4-4a). Once the correct fit of the baseplate on the cast has been ascertained, the model implant is fixed into the working cast with plaster (Fig 4-4b).
Attention: The model implant must not touch the plaster cast while the baseplate is being put into place.
Preparation of the CerAdapt abutment
The gingival line acts as a reference when preparing the CerAdapt abutment at the cervical end (Fig 4-4c). Preparation of the abutment is also determined by the inclination of the adjoining teeth and an analysis of the local spatial relationships (Fig 4-4d).
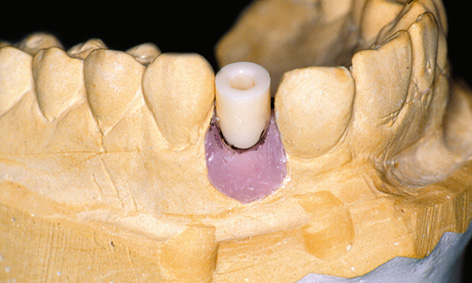
Fig 4-4c CerAdapt abutment with the gingival line marked in.
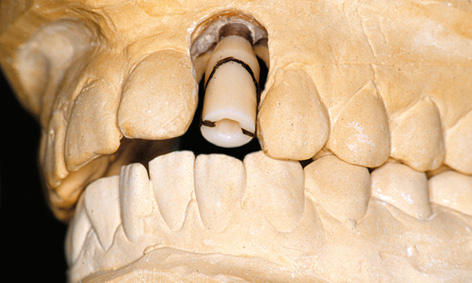
Fig 4-4d Occlusal relationships marked in the articulator.
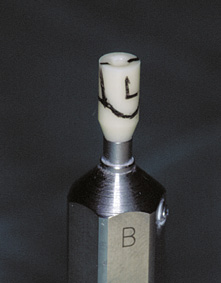
Fig 4-4e CerAdapt on the holder.
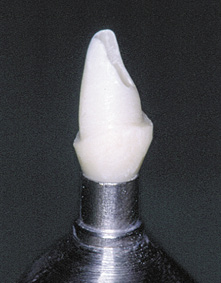
Fig 4-4f Prepared abutment.
Attention: Presently, most abutments are fabricated from zirconia using the computer-aided design and manufacturing (CAD-CAM) technique.
Before milling starts, the desired shape is drawn in with a permanent marker (Fig 4-4e). The CerAdapt abutment is prepared with the aid of a water-cooled turbine handpiece. During preparation, care must be taken to ensure that enough space is left for the papillae at the proximal ends. The preparation should not extend more than 1.5 mm subgingivally. It is vital to adhere to the minimum thicknesses recommended by the manufacturers due to the risk of fracture (Fig 4-4f; see also page 258).
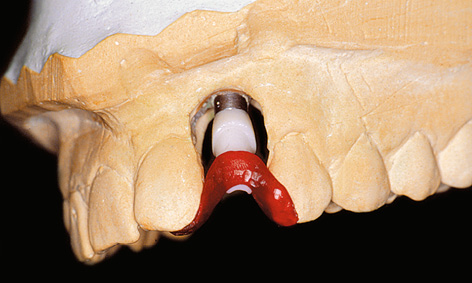
Fig 4-4g Plastic transfer used to position the abutment.
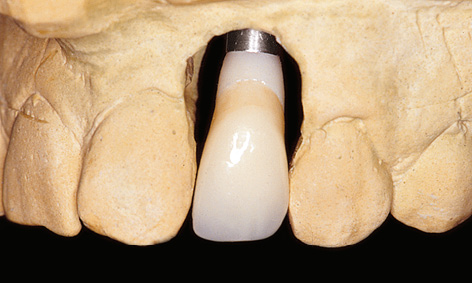
Fig 4-4h Prosthetic implant superstructure imitating the tooth (with space left for the papillae at the proximal ends).
Fabrication of the transfer and provisional crown
The exact position of the abutment on the hexagonal base of the model implant is fixed with the aid of a plastic transfer made of, eg, Pattern Resin (Fig 4-4g). Its function is to ensure torsion-free transfer of the CerAdapt abutment from the cast to the patient’s mouth.
After the transfer is made up, a provisional crown is fabricated on the abutment. The general rule is that, ideally, the prepared abutment with the provisional crown attached to it corresponds to the natural tooth that is being replaced (Fig 4-4h). The mesiodistal position of the implant determines the spatial relationships of the proximal surfaces and the shapes of the interdental papillae. It is best to place the implant at the center of the gap. The provisional crown should be in static occlusion with slight infraocclusion. Occlusal contacts should be avoided in articulation (laterotrusion and protrusion movements).
Fabrication of the provisional restoration delivers a wealth of information, which is of significance to the optimal appearance (shape and color) of the definitive, metal-free ceramic crown. The latter is fabricated a few months later, once the gingival situation has stabilized.
Typical treatment course
Esthetic requirements dictated by a high smile line
If the upper lip is short or the smile line high, implant placement needs to be very carefully planned and performed. The anterior teeth are so exposed that even the tiniest irregularities catch the eye straight away.
Baseline situation
This female patient lost tooth 12 due to apical periodontitis. While the atrophy of the residual ridge is moderately advanced, the prognosis for a conventional prosthetic restoration is on the unfavorable side due to the short upper lip (Fig 4-5a; also see the standard diagnosis section on page 229 and Fig 4-1b).
Diagnostic tools
- Clinical examination
- Panoramic radiograph
- Dental cast analysis
Treatment plan
1.Implant placement and augmentation, recording of implant position
2.Fabrication of the provisional restoration – Simpler in Practice
3.Exposure and incorporation of the provisional
4.Definitive ceramic crown
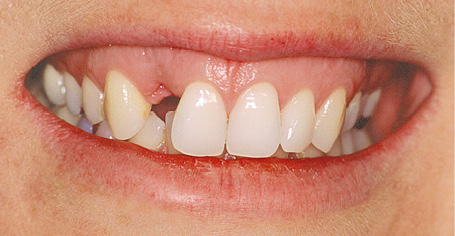
Fig 4-5a Situation after the loss of tooth 12.
Implant placement
An incision was made in the sulcus along teeth 15 to 21 to avoid vertical releasing incisions around the anterior teeth, which carry the risk of scarring. The mucoperiosteal flap along with the papillae was carefully dissected and lifted and an 18-mm long MK II implant inserted (Brånemark System; Fig 4-5b). The implant position was recorded by polymerizing a plastic impression post into the baseplate with Pattern Resin (Fig 4-5c). This impression post (of the “snap-on” type) is more user-friendly than screw-retained impression copings, but less precise. The papillae needed to be augmented up to the black mark. For this purpose, a healing abutment of appropriate height (3 mm) was used as a “supporting column” (Fig 4-5d). Following periosteal slitting, the flap and papillae were repositioned without tension and secured with mattress sutures (Fig 4-5e). This ensured that the desired gingiva height was achieved at the end of the operation.
The interim restoration was produced using the thermoplastic foil splint technique (Fig 4-5f). As it is supported by the teeth alone, the restoration exerts no pressure on the mucosa so that the healing process is not impaired.
Laboratory method
The position of the implant was reproduced according to the baseplate (Fig 4-5g). A provisional cylinder, which needed shortening in accordance with the spatial relationships, was selected as the first provisional restoration. To maintain and shape the soft tissues in the interproximal spaces, a provisional crown of reduced diameter was built up on the plastic cylinder, starting from the head of the implant, and then finished (Fig 4-5h).
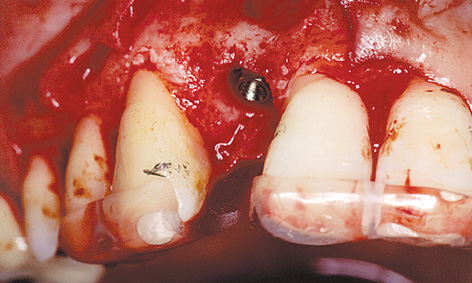
Fig 4-5b Insertion of the implant.
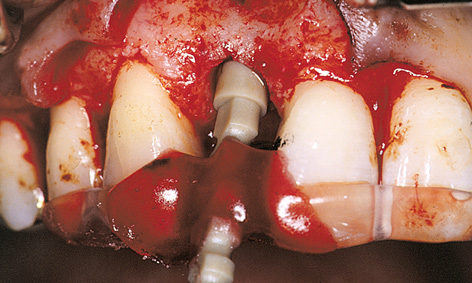
Fig 4-5c Recording the position of the implant.
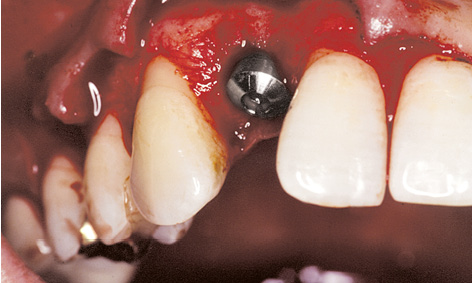
Fig 4-5d Healing abutment as “supporting column” for the gingiva.
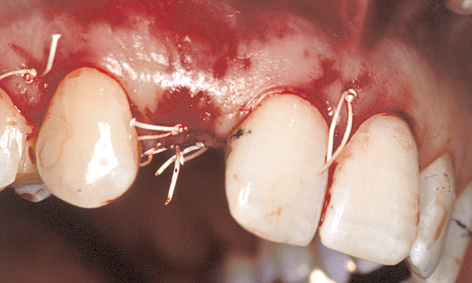
Fig 4-5e Mobilization of the flap by periosteal slitting.
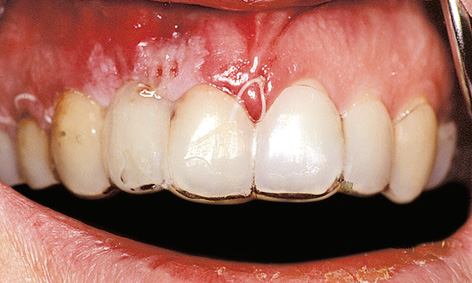
Fig 4-5f Provisional restoration based on a thermoplastic splint.
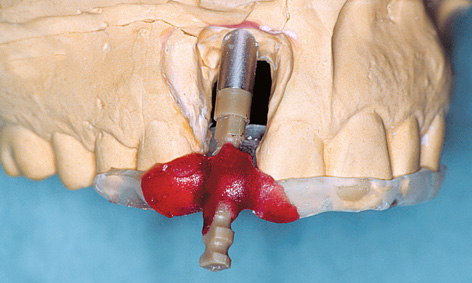
Fig 4-5g Secondary placement of the model implant.
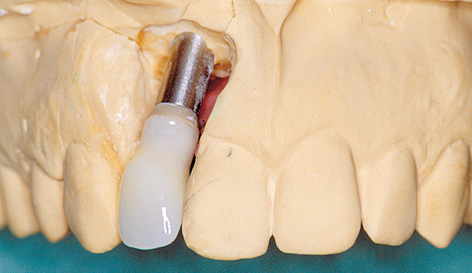
Fig 4-5h Provisional crown on the plastic cylinder.
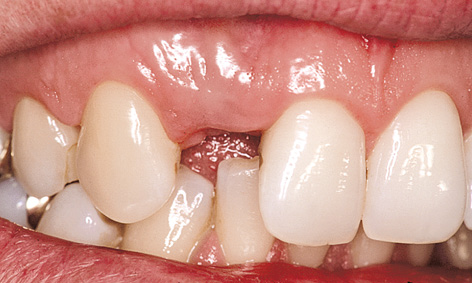
Fig 4-5i Clinical situation before exposure.
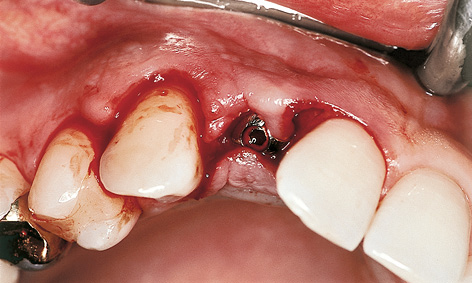
Fig 4-5j Incision.
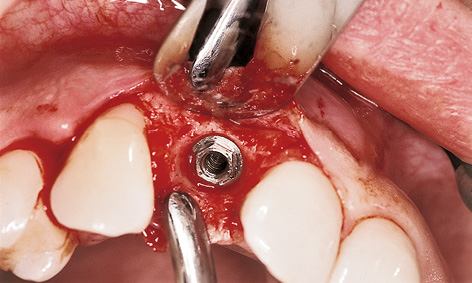
Fig 4-5k Removing the healing abutment.
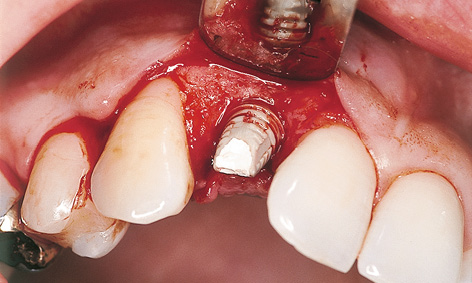
Fig 4-5l Provisional cylinder screwed into place.
Exposure
The 6-month healing phase was uncomplicated and the height of the soft tissues remained largely stable. Since augmentation had been decided against at the time of implant placement due to the incomplete healing of the apical periodontitis, the horizontal shaping of the residual ridge remained incomplete. The lack of bone support contributed to the fact that the metallic healing abutment shimmered through the slightly receded mucosa (Fig 4-5i).
To improve the esthetic situation, the bone augmentation was performed in the same session as the implant exposure.
The incision for this was made on the labial side in the sulcus of teeth 14, 13 and 11, shifting it slightly in the palatal direction around the implant. Only one papilla between teeth 14 and 13 was lifted (Fig 4-5j). Gentle lifting of the flap revealed that the bone loss had remained moderate due to the supporting function of the healing abutment. After removing the healing abutment (Fig 4-5k), the prepared provisional cylinder was screwed on first. The screw access hole was filled with gutta-percha (Fig 4-5l) and the provisional crown secured into place with TempBond; any excess of the latter can be removed under visual control (Fig 4-5m).
To ensure good spatial relationships when shaping the papillae, the interproximal spaces between the implant and the neighboring teeth were kept as clear as possible. In order to provide bone support for the papilla, which is a prerequisite for its regeneration; the gaps and the thin labial bone wall were augmented with the bone substitute Biogran (Biomet 3i), without using a membrane. After this, the flap and papilla 13 to 14 were secured with mattress sutures (Fig 4-5n).
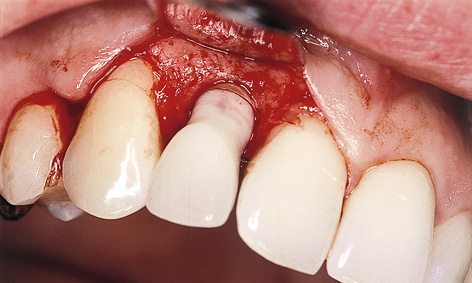
Fig 4-5m Provisional crown – space for the bone augmentation.
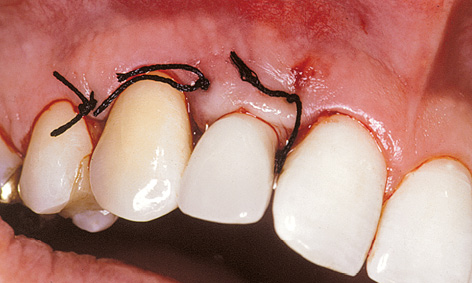
Fig 4-5n Stabilization of the flap with mattress sutures.
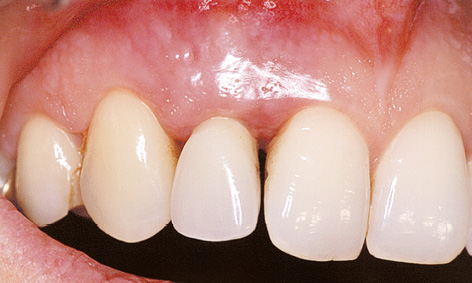
Fig 4-5o First phase of healing.
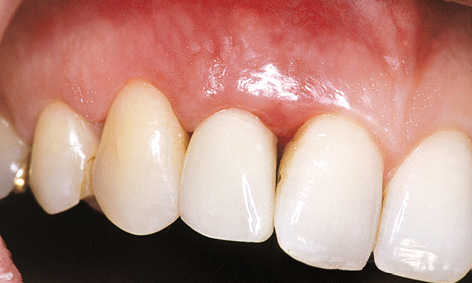
Fig 4-5p The provisional crown has been widened.
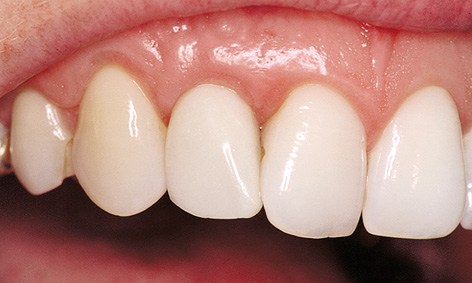
Fig 4-5q Stabilization of the gingival situation.
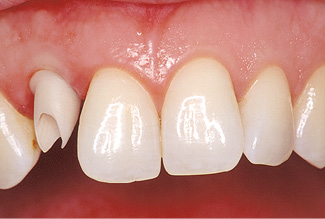
Fig 4-5r CerAdapt abutment screwed into place.
Prosthetic restoration
The patient wore the first provisional restoration during a regeneration phase lasting several months (Fig 4-5o). After approximately 6 to 8 weeks, it was possible to widen the existing resin crown slightly in the subgingival region for the first time and force the soft tissue in the proximal and labial directions (Fig 4-5p). This procedure was repeated until a satisfactory result was achieved after 6 months (Fig 4-5q). The provisional was replaced with an anatomically adapted CerAdapt abutment (Fig 4-5r). If the abutment appears too narrow at the apex in similar situations, it can be widened by adding on ceramic. When a restoration of increased diameter is first incorporated, it causes blanching of the gingiva. This should last only a few minutes; if it lasts longer, it may result in gingival damage.
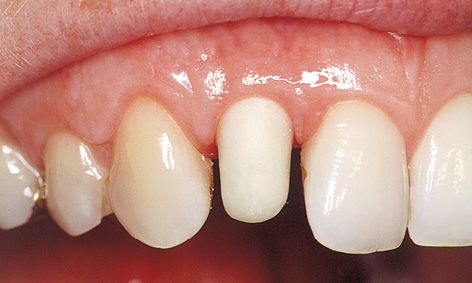
Fig 4-5s Try-in of the Procera cap.
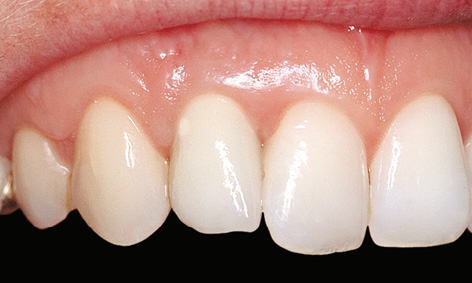
Fig 4-5t Replacement of tooth 12 after 1 year of functional use.
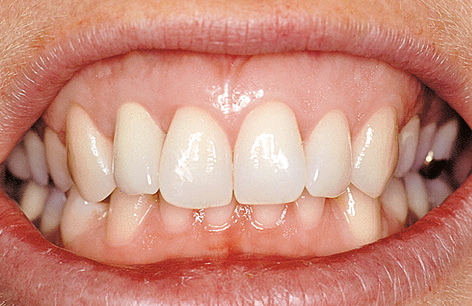
Fig 4-5u Esthetically integrated dental prosthesis.
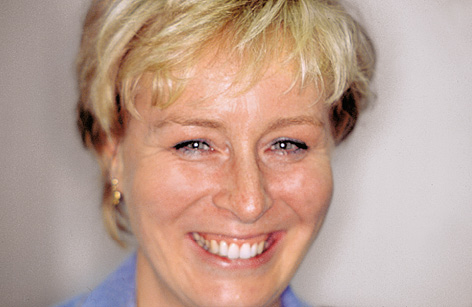
Fig 4-5v The patient can laugh again.
After the CerAdapt abutment was fixed into place with a gold screw at 32 N/cm, the screw access hole was filled with gutta-percha, the provisional relined and then provisionally cemented into place. Following a 14-day gingival stabilization phase, the CerAdapt abutment was slightly reworked and shaped in the same way as a prepared tooth. An all-ceramic Al2O3 cap can be fabricated with the aid of the Procera method. This cap is checked for fit inside the mouth (Fig 4-5s). Once the Procera cap is faced with AllCeram ceramic (Procera), the finished crown can be fixed into place with adhesive (Fig 4-5t).
Figures 4-5t, 4-5u and 4-5v show the restoration 1 year after the surgical procedure.
Treatment course
- Implant placement (1997)
- 6 months to exposure
- 6 months to definitive prosthetic loading
Treatment
|
Surgery and prosthetics: |
Dr Christoph T. Sliwowski |
|
Dental technology: |
Horst Mosch |
Atypical treatment course – problematic baseline situation
In patients presenting with malformations – such as dental agenesis, particularly of the lateral incisors – the gaps are often very narrow due to the accompanying maxillary hypoplasia. For this reason, implants now represent the best long-term restoration for this problem, both esthetically and functionally. An implant-based restoration means that healthy teeth do not need to be prepared for a bridge. Moreover, it is often possible to reconstruct atrophied segments of the residual ridge during the operation. In a few cases, the gap between the central incisor and the canine is too small for the insertion of a standard Brånemark implant (regular platform [RP], diameter 3.75 mm). Implants of reduced diameter have been developed for cases like these. An implant of this type (narrow platform [NP], diameter 3.3 mm) made it possible to perform an implant-based restoration in the following case.
Single-tooth implants in an adolescent girl presenting with shortage of space
Baseline situation
A 17-year-old girl presented with agenesis of teeth 12 and 22. Teeth 13, 11, 21 and 23 were free of caries (Fig 4-6a). The gap in region 12 was 4.5 mm wide, while the gap in region 22 was narrower than 4 mm. Gaps at least 6- to 7-mm wide should be available for the placement of a standard implant. Therefore, the plan was to use two NP implants for the restoration of the gaps (see radiograph with measuring template, Fig 4-6b).
Diagnostic tools
- Clinical examination
- Panoramic radiograph with reference objects
- Dental cast analysis
Treatment plan
1.Implant placement and augmentation, recording the positions of the implants
2.Fabrication of provisional restorations – Simpler in Practice
3.Exposure and incorporation of the provisionals
4.Definitive ceramic crowns
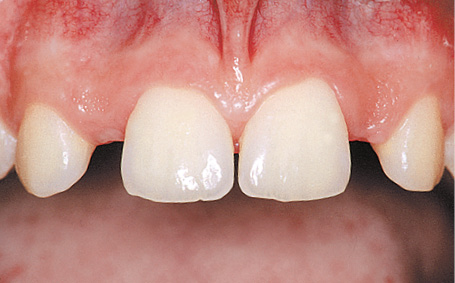
Fig 4-6a Clinical baseline situation.
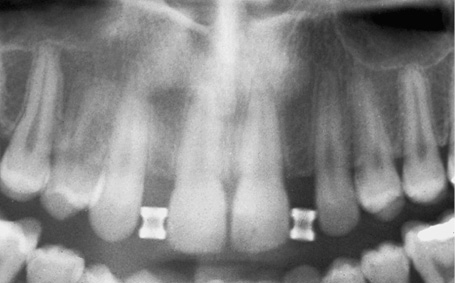
Fig 4-6b Panoramic measuring radiograph with template.
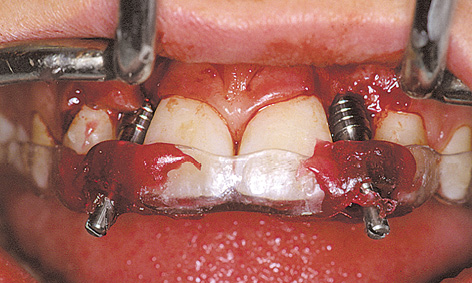
Fig 4-6c Recording the positions of the implants.
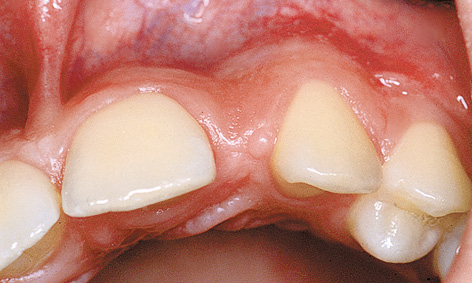
Fig 4-6d Residual ridge before augmentation/Implant placement.
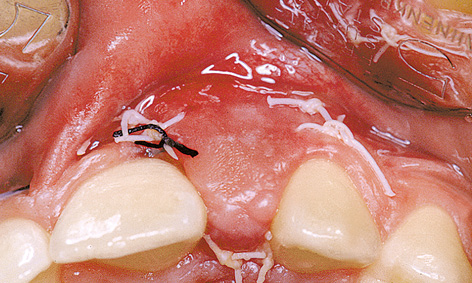
Fig 4-6e Overcontouring shortly after augmentation.
Implant placement
Before implant placement, the missing teeth were waxed up onto the situational cast for diagnostic purposes. Two 15-mm long NP implants were inserted following the appropriate diagnostic process. Immediately after the implants were inserted, their positions were recorded by fixing impression copings onto the baseplate (Fig 4-6c).
For improved esthetics, the atrophied alveolar bone was augmented during the same procedure using the bone substitute Bio-Oss and the guided bone regeneration (GBR) membrane Bio-Gide (Figs 4-6d, 4-6e and 4-6f). To achieve normal residual ridge contours (Fig 4-6f), a bone substitute loss of approximately 30% needed to be taken into account in the augmentation. This meant that overcontouring was necessary when augmenting the alveolar process (Fig 4-6e). The small diastema between teeth 11 and 21 had already closed up spontaneously at the time of exposure (compare Figs 4-6a and 4-6l). Because of this change in position of the teeth, the missing teeth were once again waxed up on the updated situational cast (Fig 4-6g). To ensure symmetry of the teeth, tooth 21 had to be stripped on the distal side to make it approx 0.2 mm narrower. In the laboratory, the positions of the implants were transferred from the baseplate to the cast (Fig 4-6h). At the time of this patient’s treatment, the single tooth replacement (STR) abutment with its thin walls and minimal diameter represented the abutment of choice in situations with very limited space.
STR abutments with a height of 2 mm were chosen in this case (Fig 4-6i). The abutments were shortened as required and prepared for prosthetic purposes (Fig 4-6j). Provisional plastic crowns were initially fabricated on the abutments (Fig 4-6k).
Exposure
The 7-month healing period was uncomplicated (Fig 4-6l). For the exposure, the incision was made slightly toward palatally, to displace the gingiva in the labial direction for better esthetics.
STR abutments (2 mm high) were fitted into place and tightened with a torque controller (20 N/cm). Before the wound was sutured, the screw access holes were filled with gutta-percha (Fig 4-6m) and the provisional crowns put into place with TempBond (Fig 4-6n). This sequence ensured that any excess cement could be removed under visual control. The follow-up radiograph shows the precise fit of the implant components (Fig 4-6o) with minimal interproximal spaces between the implants and the neighboring teeth. Two months after exposure, the gingival situation was largely stable (Fig 4-6p), allowing the definitive ceramic crowns to be fabricated and also fixed into place with provisional cement. The photos 6 years after implant placement show a stable gingival situation and the natural appearance of the anterior teeth in the maxilla (Figs 4-6q and 4-6r).
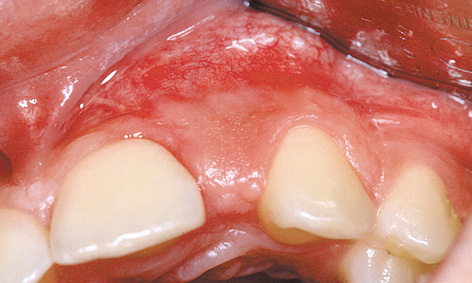
Fig 4-6f Stabilization of the gingival situation.
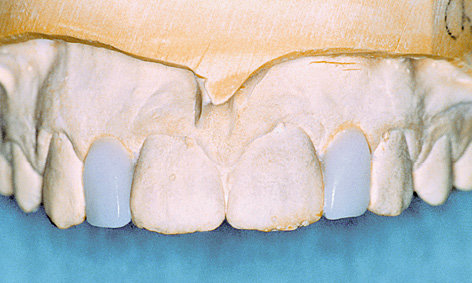
Fig 4-6g Wax-up.
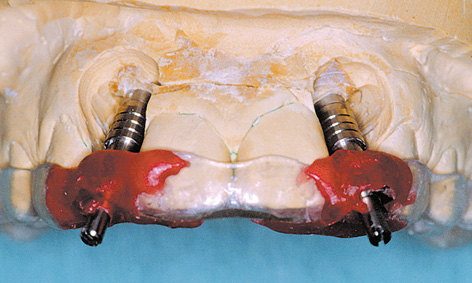
Fig 4-6h Transferring the positions of the implants to the cast.
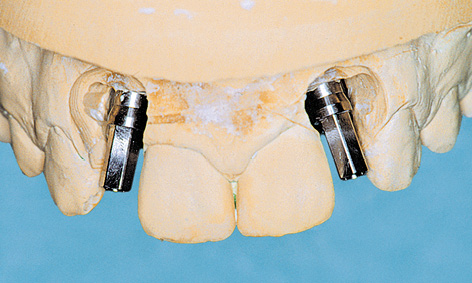
Fig 4-6i STR abutments screwed into place.
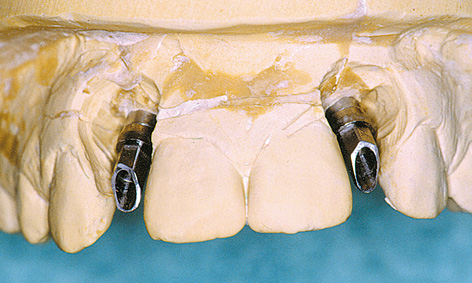
Fig 4-6j Customizing the STR abutments.
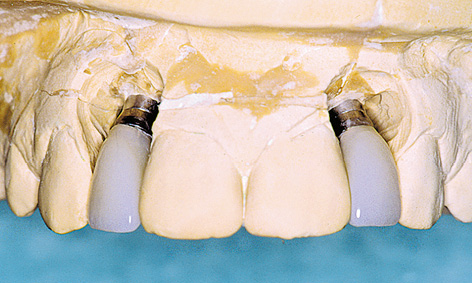
Fig 4-6k Provisional crowns.
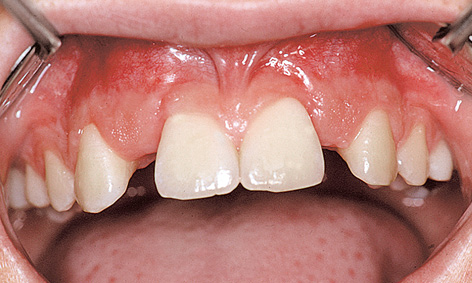
Fig 4-6l Clinical situation prior to exposure.
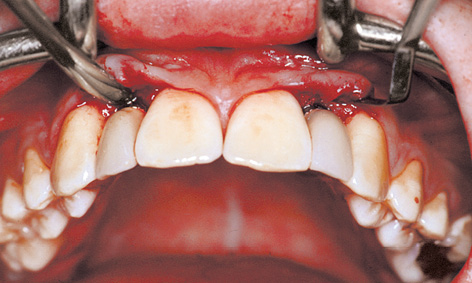
Fig 4-6n Provisional crowns.
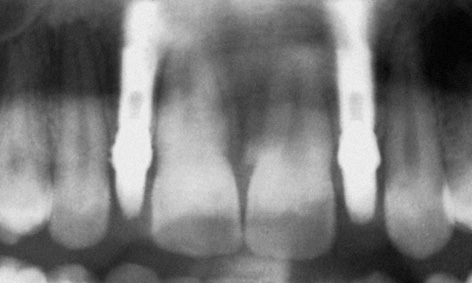
Fig 4-6o Follow-up panoramic radiograph.
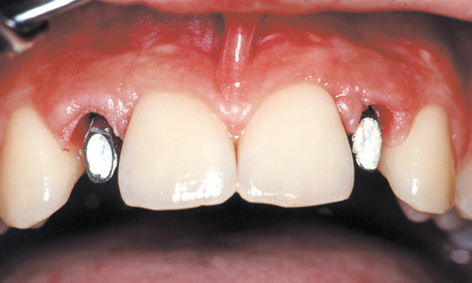
Fig 4-6p Stable gingival situation.
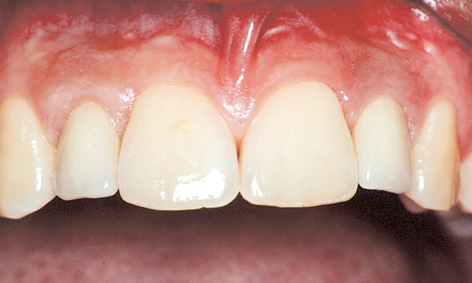
Fig 4-6q Prosthetic restoration after 6 years of functional use.
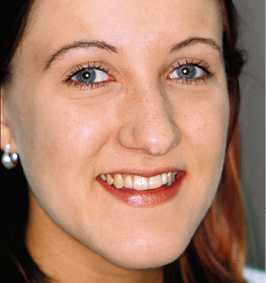
Fig 4-6r The patient is satisfied with her treatment.
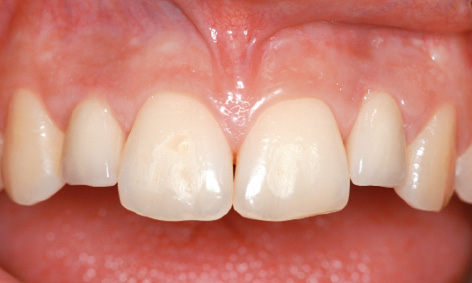
Fig 4-6s Clinical situation after 14 years with implant crowns that are now too short.
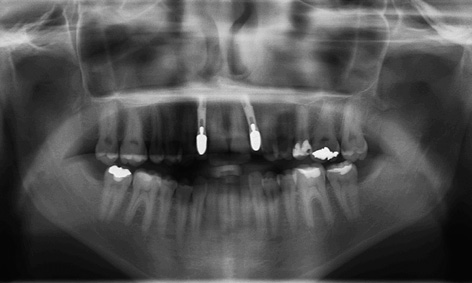
Fig 4-6t Follow-up panoramic radiograph after 14 years.
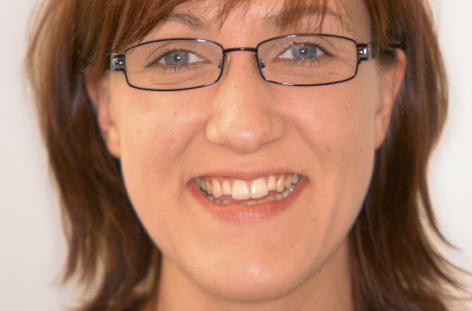
Fig 4-6u In the interim, the adolescent patient has grown into an adult woman.
Continued follow-up
A check-up after 14 years shows that the jaw did continue to grow during this period and that the implant crowns are now visibly too short (Fig 4-6s; see also Note on page 250). However, the follow-up panoramic radiograph after 14 years shows a stable osseous situation around the implants and confirms the success of the implant treatment (Fig 4-6t). The adolescent patient has now become a businesswoman, has children of her own and is still satisfied with the final result of her treatment (Fig 4-6u). Moreover, she expresses little interest in replacing her old crowns, which are now too short with new, longer ones.
Treatment course
- Implant placement and augmentation (1996)
- 7 months to exposure
- 2 months to definitive loading
Treatment
|
Surgery and Prosthetics: |
Dr Christoph T. Sliwowski |
|
Dental technology: |
Horst Mosch |
Implants in adolescents
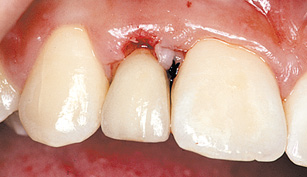
Fig 4-7a Crown 12 after insertion.
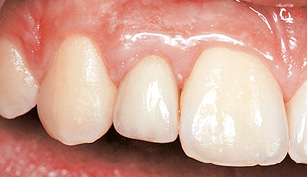
Fig 4-7b Crown 12 after 2 years.
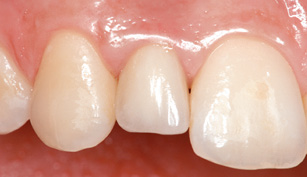
Fig 4-7c Crown 12 is now visibly too short after 14 years.
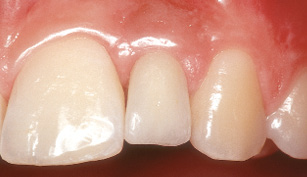
Fig 4-7d Crown 22 after insertion.
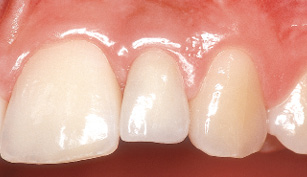
Fig 4-7e Crown 22 after 2 years.
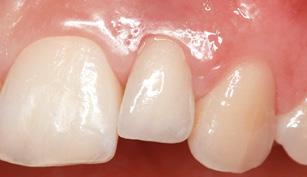
Fig 4-7f Crown 22 after 14 years with the gingival margin running too far in the apical direction.
As a matter of principle, when providing adolescent patients with an implant-based restoration, it will be necessary to establish whether bone growth is complete (for example, by means of a hand-wrist radiograph). If implant placement is performed too early, it can inhibit growth locally in the maxilla, possibly resulting in esthetic and functional defects. If doubts still remain in spite of extensive diagnostic investigations confirming that bone growth is complete, the provisional retention of implant crowns offers the option of subsequent correction. In the present case, both the hand-wrist radiograph and the patient’s age of 17 years indicated that bone growth had largely been completed. The experiences of several authors in the treatment of adolescents, which made up the topic of the Consensus Conference in Jönköping in Sweden in November 1995, along with the experiences of the present author, suggest that minor signs of growth can continue to occur up to the age of 23 years, ie, long after the statistic completion of growth.
Changes in tooth length were also still apparent in this case. Figure 4-7a, a photograph taken during the surgical correction of the mesial papilla a few weeks after exposure, shows a well-balanced course of the incisal edges of teeth 13, 12 and 11. Figure 4-7b, taken 2 years later, shows that teeth 13 and 11 have continued to “grow” (as a result of appositional growth of the maxilla), while the incisal edge of implant crown 12 has not followed those of the neighboring teeth. A similar situation can be seen on the left side in implant 22 (Figs 4-7d and 4-7e). Since the implant crown had only been provisionally cemented on, it could be removed at any time without causing any damage and elongated by adding on ceramic (see Fig 4-6q, p. 248).
Continued follow-up
Examination of the patient 14 years after the implant placement provides interesting information. The completed bone growth, as diagnosed previously, had not been confirmed and implant crowns 12 and 22 are now considerably shorter than the patient’s own teeth, especially 11 and 21. Compared to Fig 4-7b, crown 12 is still too short, but the gingival margin blends in harmoniously with the overall appearance of the mouth (Fig 4-7c). Crown 22, however, is not only too short, but the gingival margin, which runs too far in the apical direction, disrupts the harmony of the anterior teeth (Fig 4-7f).
Atypical treatment course – problematic baseline situation
Emergency implant placement following traumatic loss of an anterior tooth
Baseline situation
A female patient, working as an assistant at a prosthodontic practice, had been dissatisfied with the esthetic appearance of tooth 21 for many years: the crown, fitted onto a post and core, was too short and part of the root showed as a dark margin at the cervical end (Fig 4-8a). A new restoration had been planned for some time, but not yet realized. The tooth itself had acted as a trigger for the treatment, having fractured along its root (Fig 4-8b). There could be no further delay now, and quick action was needed. While inflammation around the root of tooth 21 is clearly visible in all planes in the CBCT scan, it is also apparent that there is sufficient bone at the apex to provide a stable anchor for an implant (Fig 4-8c). A 17-mm long implant (4 mm in diameter) was planned in the SimPlant program (Fig 4-8d).
Diagnostic tools
- Clinical examination
- Panoramic radiograph
- Dental film
- CBCT and SimPlant planning
Treatment plan
1.Extraction of the root residue of tooth 21 and immediate implant placement with augmentation
2.Exposure with gingival correction
3.Prosthetic loading
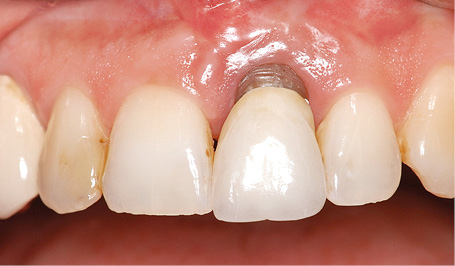
Fig 4-8a Esthetically displeasing restoration of tooth 21.
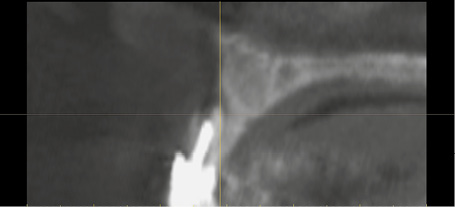
Fig 4-8b Split root of tooth 21 in cross section.
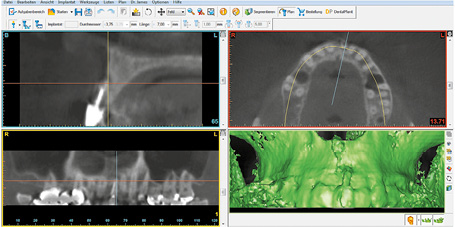
Fig 4-8c CBCT before the extraction.
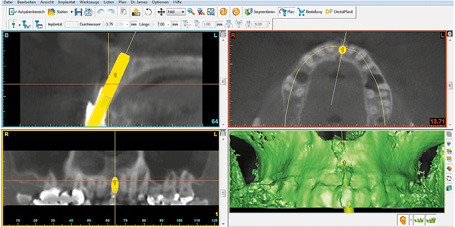
Fig 4-8d SimPlant planning of the immediate implant placement in region 21.
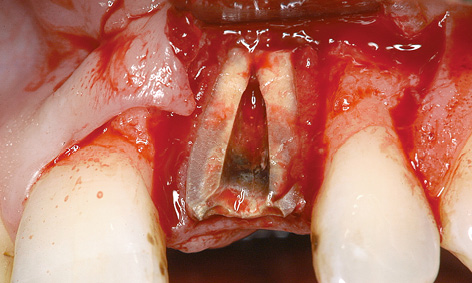
Fig 4-8e Split root of tooth 21 following flap reflection.
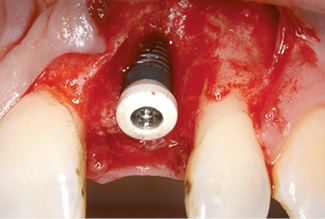
Fig 4-8f Inserted implant with healing abutment.
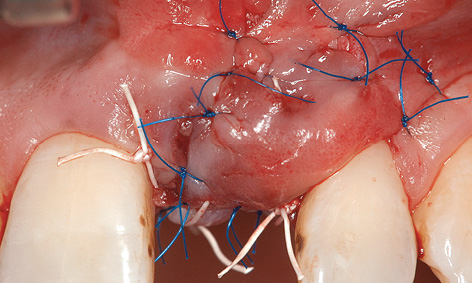
Fig 4-8g Laterally transposed split flap, pedunculated at the coronal end, secured into place with sutures.
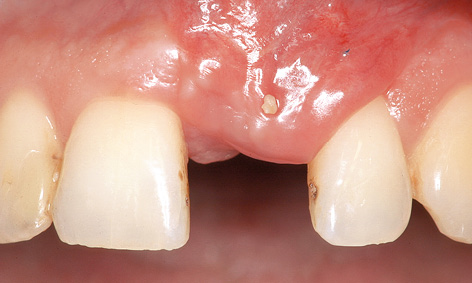
Fig 4-8h Clinical situation 4 weeks after implant placement.
Extraction and implant placement
Following conduction and infiltration anesthesia, the crown was first removed with the root pin. The gingival bridges in the interproximal spaces were cut and a releasing incision made distally of tooth 22 (Fig 4-8e). The palatal half of the root was removed with the granulation tissue and the bone bed refreshed. A 17-mm long Neoss implant (4 mm wide) was inserted into the extraction socket in accordance with the SimPlant planning. There was a total absence of bone on the labial side. A 2.7-mm long healing abutment was screwed onto the implant for better support of the augmentation materials (Fig 4-8f). First, the harvested bone chips were packed on the labial side of the implant and in the interapproximal spaces, followed by the regenerative bone substitute Bio-Oss. The augmented area was covered with a resorbable membrane (Tutodent, Tutogen; 15 × 20 mm), attached at the apical end with two titanium pins. Following the augmentation, saliva-tight suturing presented a great challenge in this situation. To do this, a split flap, pedunculated at the coronal end, was created and mobilized in its entirety. However, this was not sufficient to cover the wound, so that the flap also had to be transposed from distally to mesially. The flap was secured into place in this position with Gore-Tex (W. L. Gore and Associates) and 6-0 sutures (Fig 4-8g). However, the lateral transposition caused unwanted coverage of tooth 22 with unattached mucosa. The sutures were removed in three stages after 1, 2 and 4 weeks (Fig 4-8h).
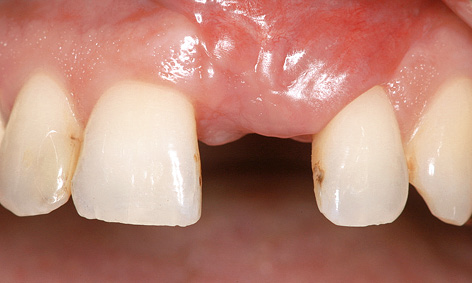
Fig 4-8i Gingival situation prior to exposure.
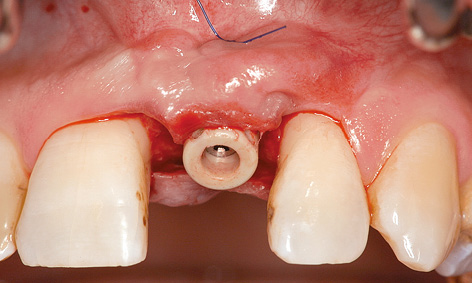
Fig 4-8j Loop suture for apical fixation of the flap.
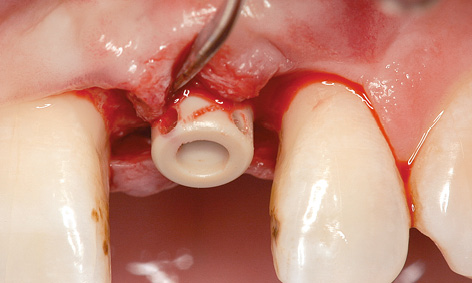
Fig 4-8k Perforations in the healing abutment.
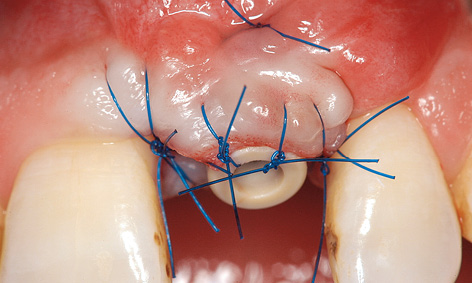
Fig 4-8l Mucosal distraction.
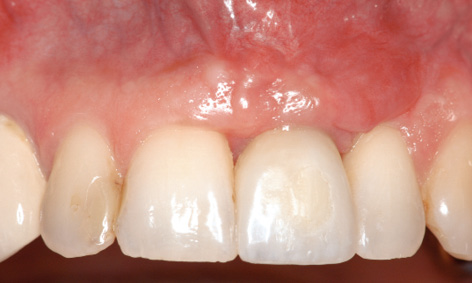
Fig 4-8m Long-term provisional restoration.
Exposure with vertical mucosal distraction
Implant 21 was exposed after 7 months’ healing (Fig 4-8i). The incision was made palatally of the implant and the flap mobilized slightly toward the labial side without release. A loop suture was made around the implant to secure the flap and to force the gingiva back in the apical direction (Fig 4-8j). Two small perforations were made in the new, 5-mm high polyetheretherketone (PEEK) healing abutment to hold the sutures in place (Fig 4-8k). This allows the flap to be securely attached to the implant. Adaptation in the interproximal spaces was also performed using microsurgical sutures (Fig 4-8l). Two months after exposure, a crown was fabricated on the provisional abutment and incorporated as the long-term provisional restoration (Fig 4-8m).
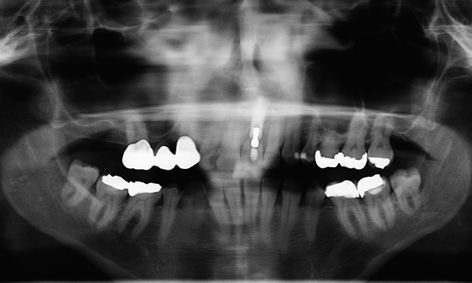
Fig 4-8n Panoramic radiograph after 5 years.
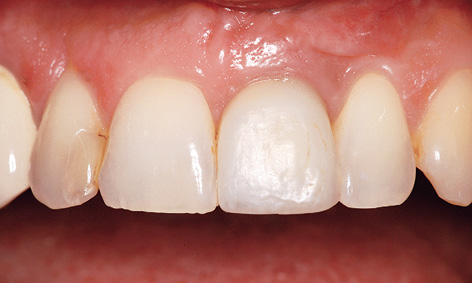
Fig 4-8o Provisional implant crown 21 after 5 years of functional use.
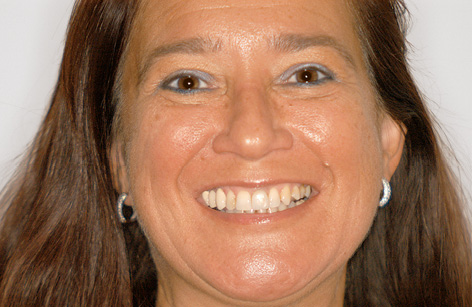
Fig 4-8p Satisfied patient.
Continued follow-up
Figures 4-8n and 4-8o show the follow-up panoramic radiograph and the restoration, still only provisional, with the labial screw access hole after 5 years in functional use. The patient is very happy with the long-term provisional and is not interested in having a definitive ceramic crown fabricated (Fig 4-8p).
Treatment course
- Extraction and immediate implant placement with augmentation (2007)
- 7 months to exposure with vertical mucosal distraction
- 2 months to provision of the long-term provisional
Treatment
|
Surgery and provisional crown: |
Dr Christoph T. Sliwowski |
|
Dental technology: |
Horst Mosch |
Problems and complications
If no preventive measures are taken, the loss of teeth is always followed by residual ridge atrophy in this region. When the atrophy is mild, an esthetically pleasing result can also be achieved without bone augmentation. If the osseous situation at baseline is poor, failure to carry out augmentation almost always causes problems later on. Provided that the mucosa is not perforated, augmentation can be left until the time of implant exposure. Mucogingival surgery techniques are also available where esthetic improvements are needed.
Spontaneous perforation of the mucosa
Baseline situation
This 19-year-old woman has lost tooth 12 due to apical periodontitis associated with chronic fistulation. A single-tooth implant was inserted after a waiting period of 3 months. Augmentation was not performed at the patient’s request (Fig 4-9b). In this case, simple exposure by mucosal punching would have caused irreversible damage – the head of the implant and the screw threads would have been exposed. Because of the perforation, direct correction by packing bone onto the defect appeared too risky at the time. A mucosal graft offered itself as the treatment of choice in this situation. This allows the visible metal components to be covered by mucogingival surgery. These regenerative measures were to take place, at the time of implant exposure.
Diagnostic tools
- Clinical examination
- Panoramic radiograph
- Dental film
Treatment plan
1.Implant placement without augmentation
2.Exposure
3.Prosthetic loading
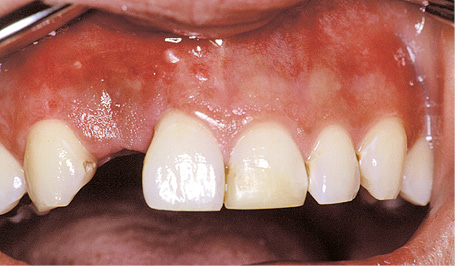
Fig 4-9a Healing phase following the insertion of implant 12 (no bone augmentation).
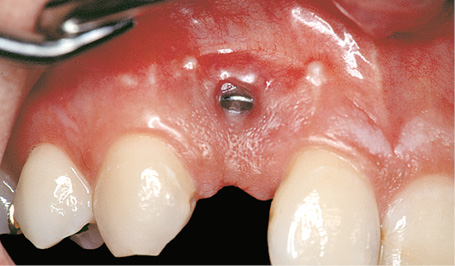
Fig 4-9b Spontaneous perforation of the mucosa over the implant.
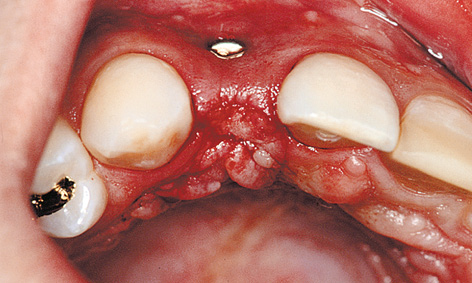
Fig 4-9c Superficial incision into the mucosa.
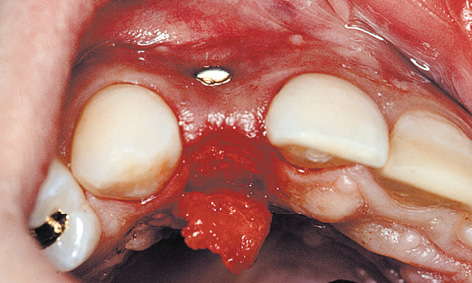
Fig 4-9d Split-flap technique with the connective tissue cut as far palatally as possible.
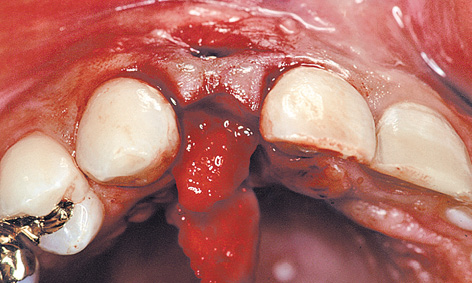
Fig 4-9e Mobilization of the connective tissue flap from the palate.
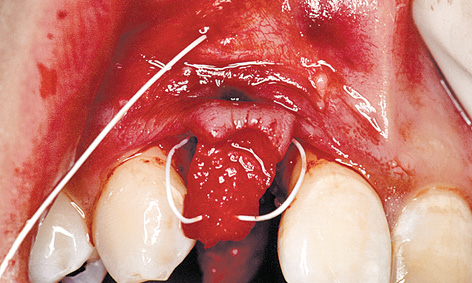
Fig 4-9f The flap is being pulled into the labial vestibule with the aid of the “reins” (roll flap technique).
Mucosal graft and implant exposure
The incision was made on the palatal side, in the mucosa only. The underlying subepithelial connective tissue was not cut (split-flap technique; Fig 4-9c). A mucoepithelial flap approximately 10 mm long was dissected away in the palatal direction and the underlying layer cut through completely at the end of the dissection (Fig 4-9d). The connective tissue on the palatal side, still pedunculated, was mobilized away from the bone, working apically to coronally (Fig 4-9e).
Continuing the microsurgical procedure, the the labial full-thickness mucoperiosteal flap, together with the pedunculated palatal connective tissue, was dissected away from the bone. A back-stitch suture starting deep in the labial vestibule was taken over the pedunculated, palatal tissue to form “reins,” and then pulled back out in the vestibule (Fig 4-9f). Tightening the suture (the “reins”) pulled the palatal connective tissue under the labial flap, fixing it into this position (the roll flap technique; Fig 4-9g). At the same time, the cover screw was replaced with the healing abutment. The perforation was completely covered. This was followed by adaptation of the papillae and secure closure by suturing (Fig 4-9h). The sutures remained in situ for 2 to 3 weeks, until gingival stabilization first became apparent. When compared with Fig 4-9b, the excess gingiva on the labial side following removal of the sutures (Fig 4-9i) looks like a conspicuous gain in tissue. However, some subsequent atrophy is to be expected.
Prosthetic loading
If a gingiva deficit has developed around the head of an implant, an all-ceramic abutment is the device of choice. In the present case, the implant was also loaded with an all-ceramic abutment (CerAdapt; Fig 4-9j). After the gingival situation has stabilized completely, an all-ceramic crown can be incorporated using the adhesive technique. The final photo shows the clinical situation 2 years after the implant was loaded with the prosthesis (Fig 4-9k).
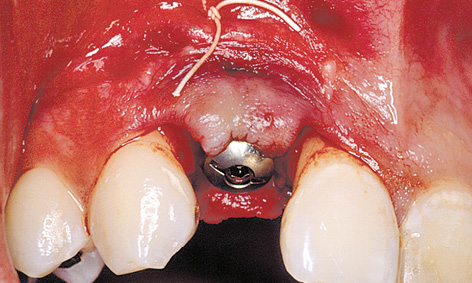
Fig 4-9g Tightening the “reins.”
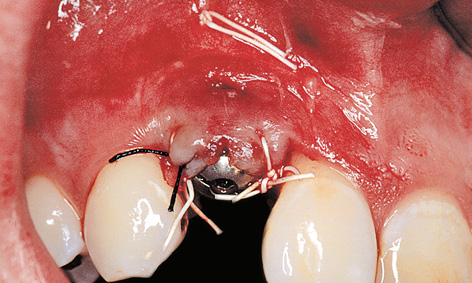
Fig 4-9h Secure closure via additional suturing.
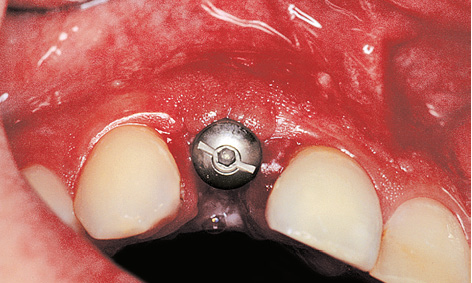
Fig 4-9i Excess gingiva.
Stay updated, free dental videos. Join our Telegram channel

VIDEdental - Online dental courses


