5
Patient Examination and Initial Therapy
Claire Mc Carthy3, Steve Engeberston1, Edgard El Chaar2, Mea Weinberg1, Stuart L. Segelnick1, and Dena M. Sapanaro4
1Arthur Ashman Department of Periodontics and Implant Dentistry, New York University, New York, NY, USA
2Department of Periodontics, University of Pennsylvania, Dental Medicine, Philadelphia, PA, USA
3King’s College, London, UK
4Department of Pediatric Dentistry, New York University, New York, NY, USA
Medical History for the Dental Patient
The most important dental visit is the initial visit in which the dental and medical history is obtained. Presenting a case history to a colleague or instructing faculty must contain the following key pieces of information:
- The patient identifying characteristics (Pt.ID) include sex, age, distinguishing characteristics, or whether the patient has been referred from another dentist or department within the same clinic.
- The chief concern (CC) should be elicited describing the particular motivating factor that caused the patient to seek care at this time, ideally in the patient’s own words.
- The history of the present illness (HPI) is the history of the CC. Symptoms should be described in terms of location, quality, severity, timing (including onset duration and frequency), setting in which symptom occurs, alleviating or aggravating factors, and any associated manifestations. Medications including name dose and frequency should be determined as well as, known allergies, tobacco, alcohol, and drug use. Smoking history consists of determining whether the patient is a former, current, or never smoker and pack‐years are used to quantify the smoking exposure. Alcohol use includes frequency and amount: four or more ounces for men and three ounces or more of daily alcohol intake constitute “heavy” consumption. Illicit drug use may be determined by direct questioning.
- Past medical history (PMH) must include childhood illnesses, current illnesses. and their durations, hospitalizations, surgeries, obstetrics, and psychiatric treatments and diagnosis. Health maintenance including immunizations and any screening tests that have been performed should be determined.
- A family history (FH) of illnesses of immediate family members should be included. A personal and social history (SH) should include occupation, education history, possible sources of stress, important life experiences, military service, exercise and diet, and any alternative health practices the patient may engage in.
- The review of systems (ROS) can be thought of as a completion of any health issues that may not have arisen during the history. A “head‐to‐toe” scheme of questioning helps to not forget to ask anything, one possible order of questioning might begin with neurologic, then on to the skin, eyes, ears, nose, throat, neck, breasts, respiratory, cardiovascular, gastrointestinal, genitourinary, musculoskeletal, hematologic, and endocrine.
An American Society of Anesthesiologists (ASA) classification can be assessed for the patient. ASA 1 is a healthy patient, ASA 2 is a patient with mild systemic disease, ASA 3 is severe systemic disease, and ASA 4 is severe systemic disease that is a constant threat to life. ASA 5 and 6 refer to moribund and braindead patients not likely encountered in the outpatient setting.
The dentist should keep in mind that careful patient listening and asking open‐ended questions will help in the collection of medical history data.
Clinical and Radiographical Examination
Clinical Examination
Healthy gingiva is normally coral pink with variations in melanin pigmentation among different ethnical groups. The firm, pink, coronally located gingiva is distinguished from the more pliable and red mucosa seen on the maxillary buccal and on the buccal and lingual aspect of the mandibular teeth separated by a distinct line called mucogingival line. On the palatal aspect, the firm pink gingiva is continuous with the firm palatal mucosa with no demarcation line. The gingival tissue between the mucogingival line and the gingival margin is called the attached gingiva. On the surface of the oral gingiva there is a characteristic dimpled or stippled pattern formed from invaginations of the oral gingival epithelium in the underlying connective tissue.
Radiographic Examination
A thorough radiographic examination can provide an abundant information about the periodontium and past damage to periodontal structure, but cannot identify sites of ongoing periodontal destruction. In order to get an accurate measurement between the CEJ and radiographical crest, the parallel technique is recommended and the following is needed: the X‐ray beam is oriented perpendicular to the bone and the film is parallel to the long axis of the tooth and adjacent bone.
When using the parallel technique for peri‐apical radiographs, anatomical constraints frequently require compromise in the positioning of the film and consequently the X‐ray beam.
By taking bitewing radiographs, it is possible to position the film more accurately and the X‐ray beam closer to the CEJ than it is in situ. Therefore, vertical bite‐wing radiographs are recommended for obtaining an anatomically correct image of the position of the alveolar bone, providing at the same time the dental anatomy relevant to periodontal assessment, i.e. crown, coronal part of the root, root trunk, furcation.
The distance between the crest of bone and the CEJ is of great significance since it allows us if bone loss exists. Hausmann et al. (1991), compared measurements taken from bite‐wing radiographs in sites showing no CAL loss. They found that distance between CEJ to bone crest varied from 0.4 to 1.9 mm, and a distance >= 2 mm is considered an appropriate cut off point for bone loss.
Now that we have established the use of radiographs in diagnosis, the second most pertinent radiographical assessment is the observed intrabony defects. In 2000, Eickholz et al. explored the accuracy of radiographical measurements of a defect and found that radiographical intrabony defects were underestimated when compared to surgical measurements by 1.41 + 2.58 mm.
Radiographic Artifacts
Two radiographic artifacts have been studied in length, the crestal lamina and the furcation arrows.
For the longest time, the crestal lamina dura presence was a sign of periodontal stability as stated by Rams (1994), and negatively associated with periodontitis recurrence in cases on a maintenance program. Similarly, Carranza described a break in crestal lamina as early radiographic sign of periodontitis. Generally, presence of lamina dura indicates periodontal stability while its absence doesn’t mean an active periodontal breakdown is taking place.
When radiographs of maxillary molars are observed, a small, triangular radiographic shadow is sometimes noted over either the mesial or distal roots in the proximal furcation area. In a skull study, Hardenkop found an association of the furcation arrow with Class II or III furcation involvement, which was significant when compared with uninvolved furcations. The image was equally apparent over mesial or distal furcations and was not affected by the existence of a buccal furcation involvement. However, the absence of the furcation arrow image does not necessarily indicate absence of a bony furcation involvement.
Oral Hygiene
Effective removal of oral biofilm is critical for the management of periodontal and peri‐implant disease with this task resting largely with the patient and their commitment to performing regular self‐care and returning to the dental office at agreed intervals. Substantial evidence supports a cause–effect relationship between biofilm accumulation and periodontal destruction and failure to follow oral hygiene regimes will certainly compromise clinical outcomes (Löe et al. 1965). Non‐adherence may be partly attributed to the non‐symptomatic nature of periodontal disease and inability to recognize any obvious benefits due to the subtlety of changes that occur. Complex recommendations, absence of immediate results, and unpleasant side effects are some of the other reasons for non‐adherence to treatment recommendations for the management of chronic diseases.
Interproximal plaque removal is considered an essential component of periodontal therapy with substantial evidence to support the efficacy of this intervention in the reduction of plaque biofilm and gingival inflammation (Slot et al. 2008). However, this aspect of oral care is where patients are most lax.
Toothbrushing
Current recommendations for home care regarding toothbrushing include using a soft bristled manual toothbrush or powered oscillating rotating brush with small size brush head, focusing the bristles at the gum line, brushing one tooth surface at a time; use of a fluoridated toothpaste with a frequency of twice a day, morning and at night, for a minimum of two minutes.
- Manual Toothbrush: Position towards gum line at 45°. Move the brush in small circles and short side to side strokes.

The Modified Bass is the most widely accepted and used brushing technique. This method of brushing requires the tufts to be pointed apically at about 45° and the ends pressed against the tooth and gingival margin to adapt the bristles to the embrasure anatomy and gingival crevice. The brush is then vibrated or moved in small circles on each surface. The brush is then moved to the next tooth/section and the technique repeated.
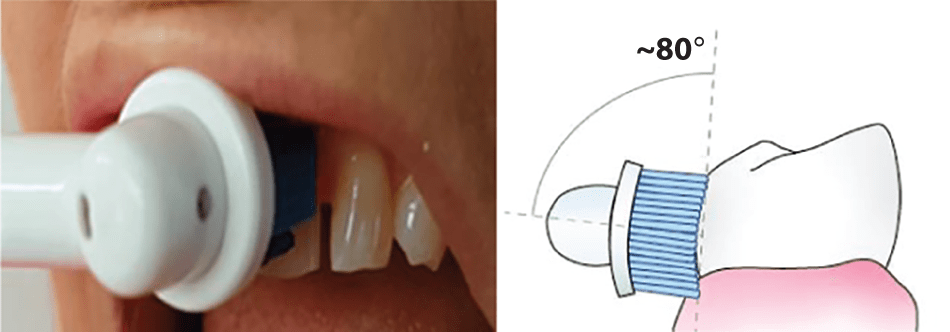
- Power Toothbrush: Position towards gum line at approximated 80 degrees to the tooth surface. Hold brush steady on each surface. Suggest counting to 5 on each surface to ensure sufficient time to remove biofilm and stimulate the gingival tissues.
Interproximal Cleaning
Interproximal Brushes
Using specialized brushes called interproximal or interdental brushes is recommended. Patient instructions should include the following: Choose the size of brush that is a snug fit for each space (space sizes will vary). Position the brush at the gum level and push the brush into the space between your teeth. Move the brush in and out between the teeth using a back and forth (horizontal) motion. Repeat this for every space. Do this twice a day, every single day, immediately after toothbrushing.

Dental Floss or Tape
Floss is designed for use in very tight spaces, with no disease, so may not be suitable for patients with significant tissue loss. It is often not as effective as interproximal brushes (discussed earlier), which remove more biofilm. The use of floss is recommended for spaces that are too tight for an interdental brush. Floss and floss holders may be used to clean between the teeth in very small tight gaps. Hold the floss taut and gently guide it between the teeth. Slide it underneath the gum and apply pressure against the tooth. Press the floss firmly against the tooth and move it along the tooth away from the gum area. Repeat this in the same space, this time cleaning the other tooth.

Specialized Oral Hygiene Aids
Single Tufted Brush
This is often recommended for areas that have advanced bone loss, where the roots of the teeth are visible, for deep spaces, around implants and areas of gum recession. Patients should be instructed to hold the handle as they would a pencil, position the bristles slightly beneath the gum line (on recommended area) and apply gentle pressure and rotate the bristles under the gum in small circles. This tool should be used once per day for effectiveness.

Behavior Change Techniques
Tips to help your patient get started and keep up their new homecare routine (McCarthy 2019)
|
Set a date to get started. Straight after a patient comes to see their dental professional is a good starting point, when instructions are fresh and motivation is at its highest. |
|
This can be difficult, so make it easier by setting a reminder alarm or putting a note in the bathroom or use an App to help establish this new habit. |
|
Ensure you have everything you need in the right place. Ideally, you should stand in front of a mirror so you can see what you are doing and correctly target specific areas of your mouth. Decide exactly when the patient will be most likely to follow their oral care plan each day then it will start to form a routine and become a habit. |
|
Demonstrate techniques and then observe the patient practicing so you can check they have understood your instructions correctly. Offer them positive feedback and encouragement. Record any instructions/demonstration on their mobile phone using the video feature so they can watch it at home. |
|
Suggest making a note of each time a patient uses their interdental brushes. This is a simple, yet effective tool that increases adherence. Use a calendar/planner, or download a toothbrushing chart from the web, or a mobile phone App that can monitor progress. |
|
It is not always easy to change the habits of a lifetime, or start doing something new, especially if it requires some time and effort. If‐Then plans are a proven method to help people start and stick with new behaviors. See If–Then table in the following text. |
Source: McCarthy (2019)/Springer Nature.
| Some examples of If–Then statements, used in implementation intentions specific to oral hygiene, are as follows (Gollwitzer and Sheeran 2006). |
| If I am feeling too lazy to clean my teeth when I wake up in the morning, Then I will do it before I leave the house for work. If I am too tired to use my interproximal brushes before I go to bed, Then I will use them at lunchtime everyday instead. If I cannot remember to use my interdental brushes, Then I will leave them next to my toothbrush to remind me to use them immediately after I use my toothbrush. |
Source: Based on Gollwitzer and Sheeran (2006).
Non‐surgical Periodontal Therapy
Benefits
Non‐surgical periodontal therapy (NSPT) is considered the first line of defense and a minimum standard of care in the presence of periodontal destruction. NSPT includes behavioral management to reduce and eliminate modifiable risk factors and encourage regular effective oral hygiene practices. The goal of NSPT is to reverse inflammation, eliminate edema, and bleeding and reduce plaque accumulation and probing depths by creating a biocompatible root surface environment and formation of a long junction epithelium. The patient participation including daily oral care and attendance for professional recall appointments is critical to the success of treatment.
Limitations
NSPT is a complex procedure with many clinician and patient challenges that determine the efficacy and outcome of technical and behavioral interventions. Non‐surgical therapy is a closed procedure that is performed blind. Therefore, a clinical must have an experienced and detailed knowledge of root morphology and the ability to detect subgingival deposits and roughness using tactile transfer. Locating subgingival calculus requires the use of methodical, overlapping, and light strokes on the root surface using a very thin flexible exploring instrument or probe such as the ODU 11‐12 Explorer.
Large bulky instruments reduce access to narrow and deep sites, furcation areas, concavities, and grooves. Dull instruments with worn cutting edges also make a complex task even more difficult. Dull instruments that have not been well maintained will increase the risk of burnishing calculus onto root surfaces, increase the number of strokes and length of time required to complete the task, and also require more force to remove deposits, thus increasing the risk of operator fatigue and injury. When choosing instruments for root surface debridement, choose instruments that are lighter in weight, with a comfortable handle, a longer terminal shank, and a miniature working end to optimize treatment outcomes. Patient tolerance and acceptance of treatment may also pose obstacles as well as unwanted side‐effects of treatment that includes gingival recession, sensitivity, and change in appearance of the teeth and surrounding tissues.
Armamentarium
Hand Instruments
Universal Curettes
Curettes are available in universal and area‐specific designs. A universal curette is a debridement instrument with a rounded back and a rounded toe. Universal curettes have two cutting edges per working end and these can be applied to all tooth surfaces in both the anterior and posterior sextants of the mouth. Universal curettes are used on crown and root surfaces (supra‐gingivally and sub‐gingivally). Universal curettes are one of the most frequently used and versatile of all the debridement instruments. They are used for the removal of light – moderate calculus deposits located both supra and sub‐gingivally.
Site‐Specific Curettes
A site‐specific curette is a debridement instrument with a rounded back, a rounded toe, and one cutting edge. The name site‐specific or area‐specific signifies that each curette can be applied only to specific surfaces and areas of the mouth. For this reason, a set of curettes is required to instrument the entire dentition. Site‐specific curettes are used for subgingival debridement and are the instrument of choice for deep narrow periodontal pockets with complex root morphology. They are designed especially for difficult and intricate instrumentation and are considered the “Gold Standard” for periodontal debridement.
Site‐specific curettes were first developed by Dr. Clayton Gracey in the late 1930s. These curettes facilitate instrumentation of root surfaces within periodontal pockets without causing trauma to the pocket epithelium. Site‐specific come in many variations such as standard design, extended shank, and miniature blade versions.
Scalers
Scalers are for use on enamel surfaces as they have a sharp point and are specifically designed to remove supragingival deposits from tight contact areas, and heavy calculus deposits commonly found on the lingually of mandibular anterior teeth. Scalers are contraindicated for use on root surfaces or in periodontal sites. They typically consist of two cutting edges and thin curved shape to facilitate access to narrow interdental sites.
Powered Instruments
Ultrasonic scaling devices are widely available and are now considered acceptable for root surface debridement. Ultrasonic scalers come with a variety tip designs for supra and sub‐gingival calculus deposits and site‐specific options for superior adaption in furcation defects. Powered instrumentation is more ergonomic that hand instruments and less physically demanding on the clinician. Technique is still dependent on clinician skill, attention to detail, time, and tip design. Studies show no differences in clinical parameters when comparing hand and power‐driven instrumentation techniques. Powered instrumentation requires less lateral pressure and therefore reduces force required to remove calculus and ultimately operator fatigue.
Techniques
The procedure should be undertaken in a methodical way, working around the mouth and around each tooth in an orderly manner. It is also important to select the correct instrument for the task you wish to carry out. Instrument selection is determined by the location of the deposit relative to the gingival margin, anterior or posterior area, mesial, distal, labial, or lingual, preference of the clinician and acceptance by the patient. NSPT consists of supragingival biofilm and calculus removal and subgingival debridement of root surfaces using a range of hand and powered devices.
Each stroke should be deliberate and effective. A firm finger rest (fulcrum) is essential for controlled use of the instrument. The movement of the instrument can be divided into two phases, the exploratory stroke – this will determine the size and location of the deposit and the working stroke – which will remove the deposit.
The working end is positioned apically until the calculus is felt. Do not press hard at this point. Slide the cutting edge over the deposit until you feel the instrument is apical to the deposit. Then press down firmly on your fulcrum finger and apply lateral pressure against the handle of the instrument with your thumb and index finger to engage the cutting edge. Ensure the terminal shank is parallel with the long axis of the tooth to establish the correct angle of the cutting edge (this is referred to as parallelism). Using lateral pressure, move the blade in a coronal direction to remove the calculus deposit in its path.
Supragingival Debridement
For supragingival calculus deposits, it is vital to establish the correct angle between the instrument face and the tooth surface. The face‐to‐tooth angulation for calculus removal is an angle that is greater than 45° and less than 90°. The ideal angulation for supragingival scaling or debridement is between 80° and 90° where possible.
Scalers are designed to facilitate supragingival deposit removal and they are a universal instrument with two cutting edges and the face is offset at 90° angle to the terminal shank. This makes it easier for placement and to achieve a blade to tooth angle of 90°. Common scalers for this purpose are sickle scalers such as 311‐312, M23T, 204s, H6/7.
Fundamental Elements of Hand Instrumentation
There are several fundamental elements of a calculus removal stroke that a clinician should take into consideration:
VIDEdental - Online dental courses


