and Paolo Biondi2
(1)
Aesthetic and Maxillofacial Surgery, Padova, Italy
(2)
Maxillofacial Surgery, Forlì, Italy
7.2.1 General Considerations
Abstract
The nose, with its central position, plays a major role in facial aesthetics, and the parameters that one must consider in clinical nasal analysis are impressive. For that reason, its evaluation is best done utilizing a practical and comprehensive checklist and writing down, for each clinical case, a list of the features discovered.
The nose, with its central position, plays a major role in facial aesthetics, and the parameters that one must consider in clinical nasal analysis are impressive. For that reason, its evaluation is best done utilizing a practical and comprehensive checklist and writing down, for each clinical case, a list of the features discovered.
As a protruding structure, the nose must be studied trying to envision its composite supporting framework, which is the main determinant of the external shape.
7.1 Points, Lines, and Subunits of the External Nose
As for the whole face, the surface of the nasal pyramid offers some points, lines, and areas for consideration (Fig. 7.1):
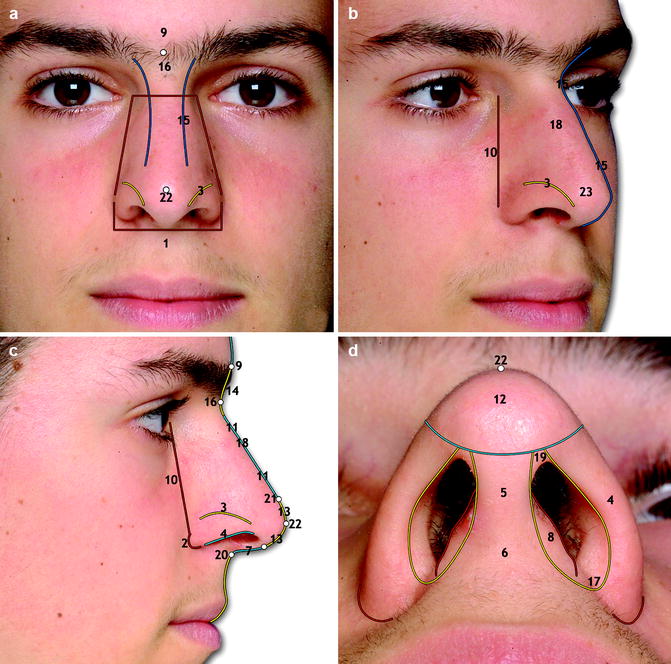
Fig. 7.1
Points, lines, and subunits of the nasal surface in frontal (a), oblique (b), profile (c), and basal view (d). The numbers refer to the list in Sect. 7.1
1.
Alar base width
2.
Alar crease junction
3.
Alar groove
4.
Alar rim
5.
Columella
6.
Columellar base
7.
Columella outline
8.
Footplates of the medial crura
9.
Glabella
10.
Nasal base line
11.
Nasal dorsum outline
12.
Nasal lobule
13.
Nasal lobule outline
14.
Nasal radix outline
15.
Nasal “unbroken” line
16.
Nasion
17.
Nostril sill
18.
Rhinion (clinically, this is evaluated with direct palpation of the dorsum)
19.
Soft triangle or facet
20.
Subnasal
21.
Supratip area or supratip breakpoint in clinical cases where a clear step over the nasal tip is present
22.
Nasal tip
23.
Tip-defining points
7.2 Direct and Photographic Clinical Analysis for Nasal Deformities
A note reporting the major findings regarding nasal aesthetics, determined by visual inspection and palpation only, is made during the first consultation. The successive revision and enhancement of the definitive form is written when the photographic documentation, either in a printed form or on a wide monitor, is also available.
Defining a nose as short or long, narrow, or wide should also be related to the sex, height, physique, and primarily to the whole face of the subject. A “balanced” nose exists only for a given face! This assumption points out the necessity of a general facial analysis prior to any specific evaluation of the nasal subunits.
7.2.1 General Considerations
The first step is the assessment of the general symmetry of the face and nose utilizing one reliable horizontal reference line. The most commonly utilized horizontal references are the lines connecting the medial canthus, the upper palpebral folds, or the apex of the eyebrow, which are easy to detect and draw; the next step is the creation of a unique vertical midline that should bisect the glabella, the nasal bridge, the nasal tip, and the Cupid’s bow (Fig. 7.2a–d). In a complex case, instead of a unique vertical midline, it is necessary to trace several small midline segments for every facial subunit to evaluate better the role of nasal asymmetry in the context of an asymmetric face (Fig. 7.2e–h).
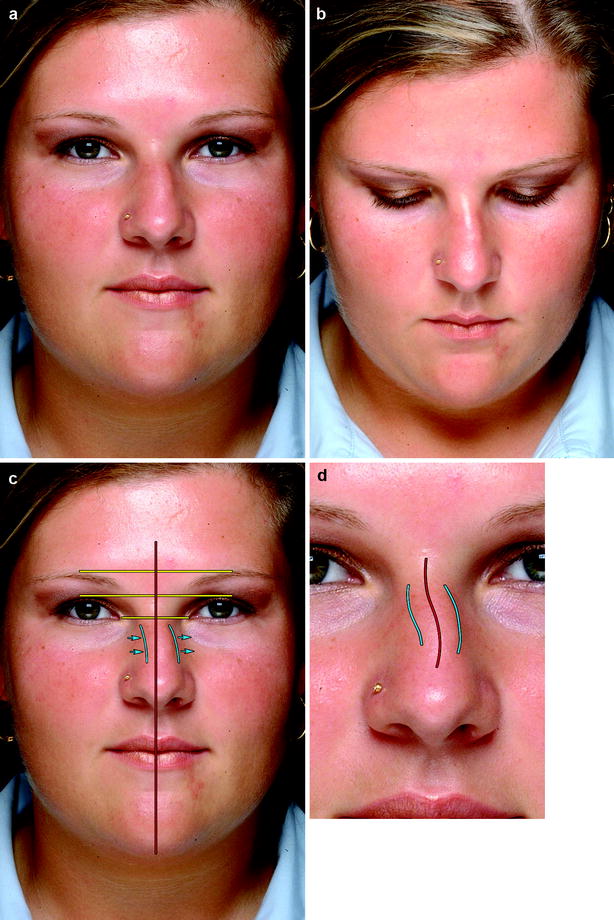
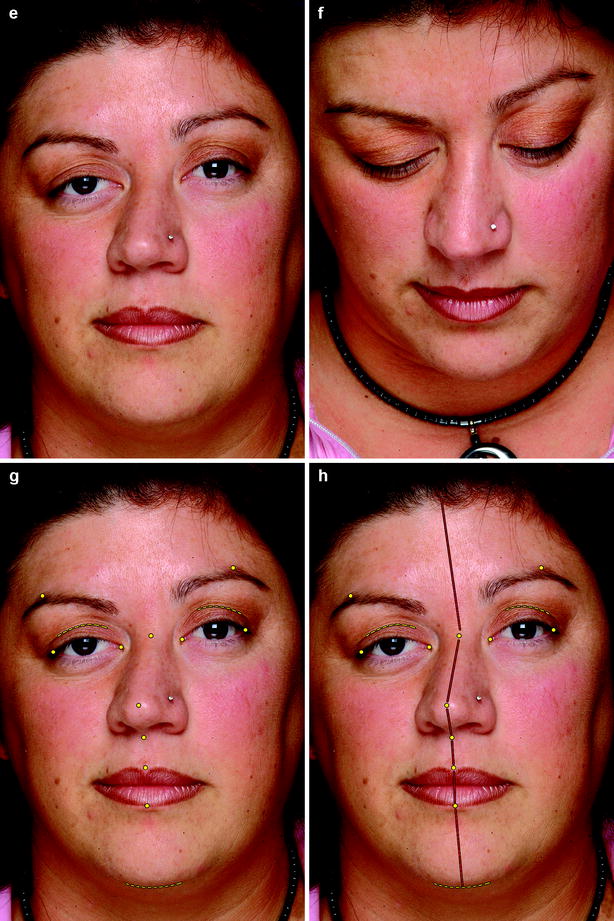
Fig. 7.2
An example of a symmetric face with an asymmetric nose secondary to a previous trauma (a–d); in this case, the horizontal reference lines are reliable in constructing the vertical midline. In a complex asymmetric case, instead of a unique central vertical line, it is necessary to trace several small midline segments for every facial subunit (e–h) in order to evaluate better the role of the nose in the whole asymmetry
The skeletal boundaries of the nose must be evaluated in order to recognize the surrounding structures from which the nasal pyramid emerges. Figure 7.3 shows these boundaries in a subject with an adequate supporting base, whereas Fig. 7.4 depicts three cases of depressed paranasal region due to maxillary hypoplasia and a case of a too protruding anterior nasal spine that greatly influences how the observer sees the shape and the projection of the nose. The reader can find the clinical and instrumental assessment of skeletal midface deformities in Chap. 9.
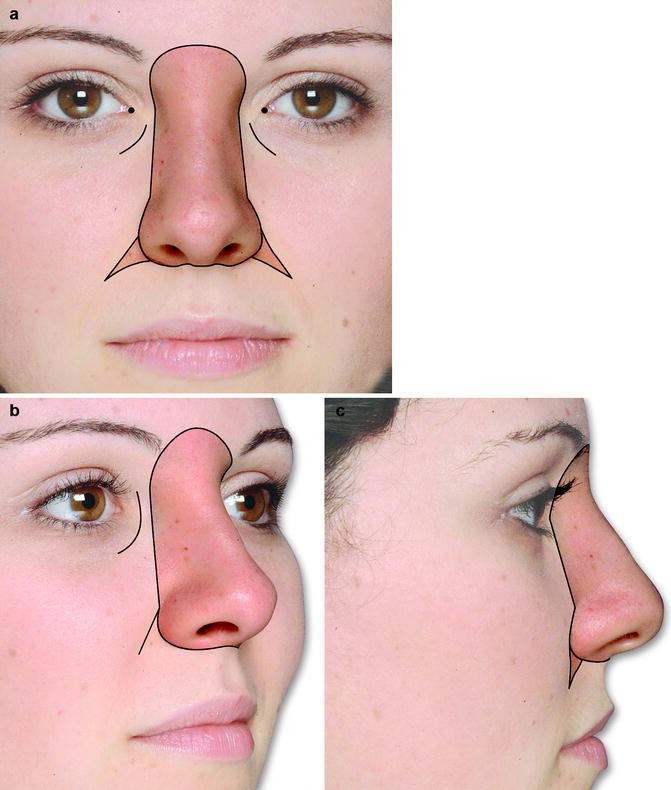
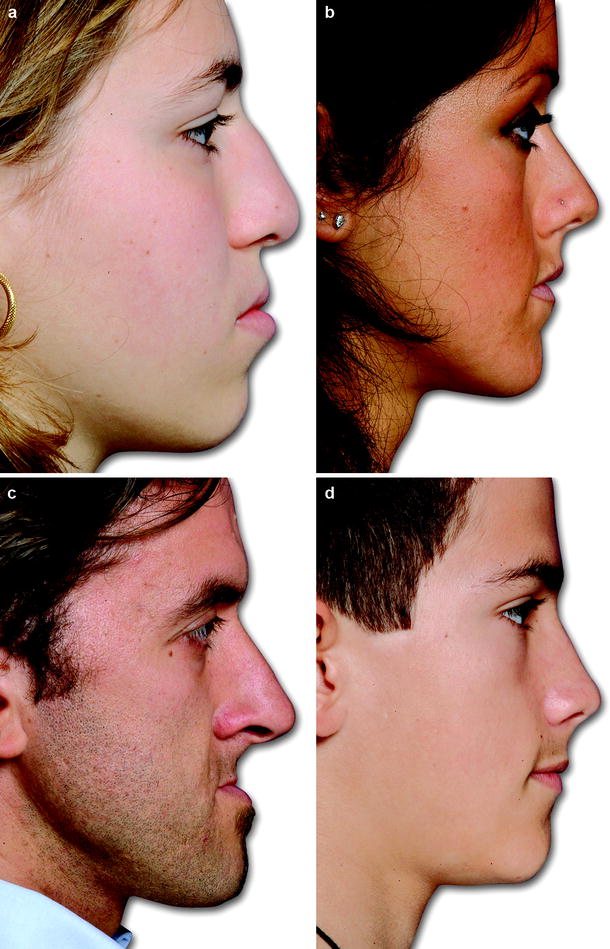
Fig. 7.3
The skeletal boundaries of the nasal pyramid in frontal (a), oblique (b), and profile view (c)
Fig. 7.4
Three cases of depressed paranasal region due to maxillary hypoplasia (a–c) and a case of a too protruding anterior nasal spine (d) that greatly influences how the observer sees the shape and projection of the nose
Utilizing the oblique views, the entire nasal outline must be evaluated, searching for the presence of a bilateral symmetric “unbroken” line [11]. In the attractive nose, this line descends gracefully from the supraorbital ridge onto the nasal dorsum and the nasal tip (Fig. 7.5). In the case of a deviated nose, dorsal irregularities, a dorsal hump, or a dorsal saddle, this line is “broken,” creating one or two steps or a strong curve as depicted in Fig. 7.6. Utilizing the nasal outline obtained from the oblique view helps in the assessment of the type, grade, and location of the deformity.
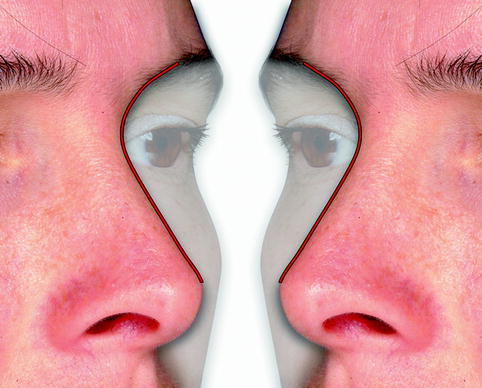
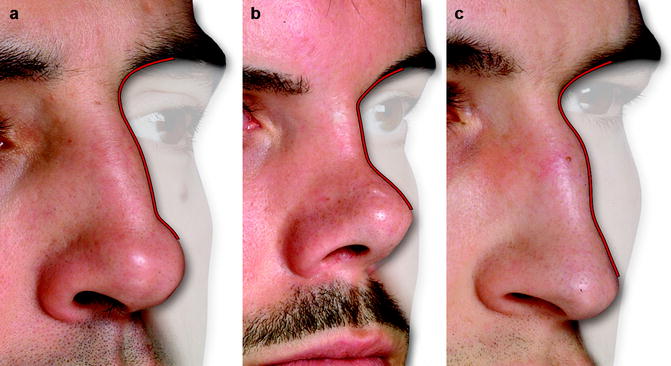
Fig. 7.5
The nasal unbroken line is the outline of the nasal pyramid in oblique view. In the attractive nose, this line descends gracefully and symmetrically from the supraorbital ridge onto the nasal dorsum and the nasal tip
Fig. 7.6
The nasal outline in oblique view of a dorsal hump (a), a dorsal saddle (b), and a crooked nose (c)
The nasal profile slope should be assessed clinically and utilizing the fullface profile view for a better comparison with the whole facial profile. In many cases, identifying and drawing the dorsal line is an easy task, and the difficulties that can remain lie only in the construction of a correct facial plane (Fig. 7.7).
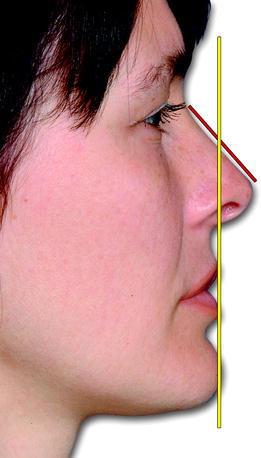
Fig. 7.7
Identifying and tracing the dorsal line can be relatively easy to do in the case of a straight dorsal outline. In this patient, the main difficulty is recognizing the projection of the chin that alters the facial plane. A vertical reference line passing through the subnasal point helps in the visualization of the excess chin projection
In some nasal and dentofacial deformities, the assessment of nasal slope can be difficult. In a posttraumatic nose with dorsal irregularities, as in a combination of bone hump and cartilage saddle, more than one dorsal line can be considered (Fig. 7.8). Furthermore, none of these lines can be utilized as guidance for the visualization of the treatment goals as they reflect the actual situation measured at different levels (bony nasal dorsum, cartilaginous nasal dorsum, and nasal lobule outline) and not the ideal slope for this subject.1

Fig. 7.8
A case in which the outcome of nasal trauma results in a bone hump and a cartilaginous saddle (a). The construction of the dorsal profile line can be done in different ways (b) line 1 is superimposed on nasal bone outline, line 2 is superimposed on lobule outline, and line 3 is superimposed on cartilaginous dorsum outline. None of these lines can be utilized as guidance for the visualization of the treatment goals as they reflect the actual situation measured at different levels (bony nasal dorsum, cartilaginous nasal dorsum, and nasal lobule outline) and not the ideal slope for this subject
The difficulty in assessing the nasal slope increases in the case of obvious nasal deformity combined with an equally obvious dentofacial deformity. Tracing some reference points and lines helps the observer to distinguish and grade the severity of each deformity (Fig. 7.9). In the sections dedicated to specific nasal regions, such as radix and lobule, more of the factors affecting the real and perceived nasal slope are explored.
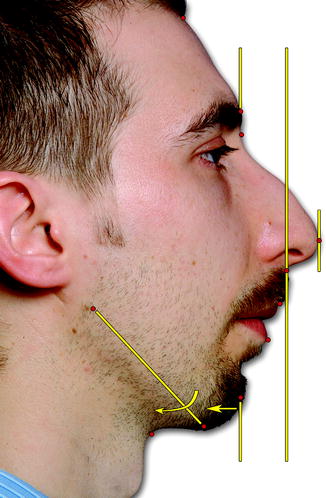
Fig. 7.9
A clinical case combining a clear nasal and dentofacial deformity. Tracing of some reference points and lines helps to distinguish and grade the severity of each deformity. On understanding the degree of the microgenia and mandibular clockwise rotation, the extent of the counterclockwise rotation of the nasal slope is not as great as may appear on initial examination
The next step consists of the appreciation of nasal widths. It should be done considering eight different basic parameters:
-
Whole nasal width
-
Radix width at the level of the base
-
Radix width at the level of the profile
-
Dorsal width at the level of the base
-
Dorsal width at the level of the profile
-
Alar base width
-
Nasal tip width
-
Columellar base width
Figure 7.10 shows a case of a large nose in which all eight widths are depicted.
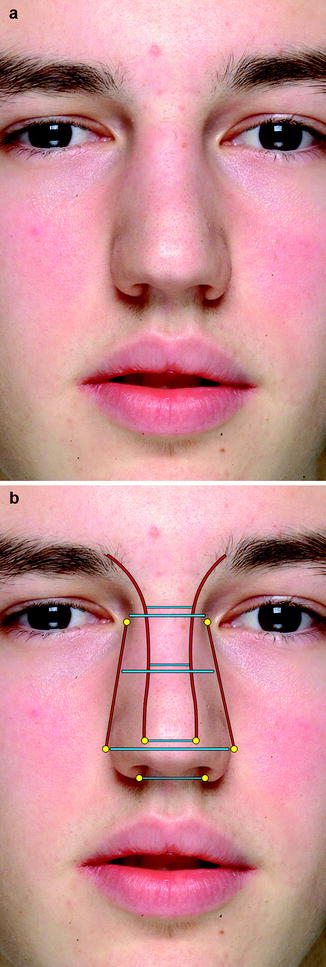
Fig. 7.10
Frontal view of a “large nose” in a teenager (a). The analysis of nasal width should consider eight different basic parameters (b) whole nasal width, radix width at the level of the base, radix width at the level of the profile, dorsal width at the level of the base, dorsal width at the level of the profile, alar base width, nasal tip width, and columellar base width
The general nose assessment is not finished without examining the overlaying skin and without the information obtainable by palpation. The skin assessment is a very important step; from radix to tip, along the midline, the thickness of the soft tissue envelope is thick over the glabella and radix breakpoint, thinner over the rhinion, and thick again at the supratip area (Fig. 7.11a). Moving from the midline to the nasal base line, at the level of the radix and osteocartilaginous dorsum, the skin thickness increases (Fig. 7.11b). The skin thickness at the level of the lobule and the base of columella is highly variable and must be assessed precisely in each case (Fig. 7.11c–f).
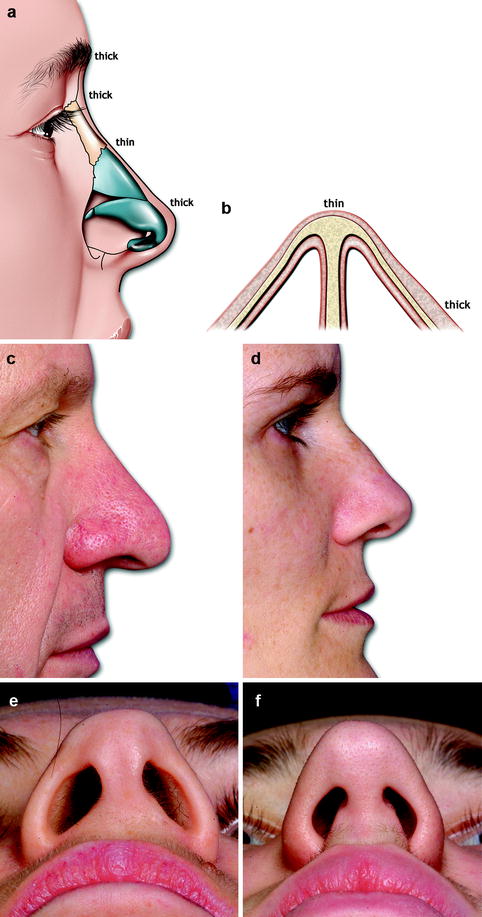
Fig. 7.11
From radix to tip, along the midline, the thickness of the soft tissue envelope is thick over the glabella and radix breakpoint, thinner over the rhinion, and thick again at the supratip area (a). Moving from the midline to the nasal base line, at the level of the radix and osteocartilaginous dorsum, the skin thickness progressively increases (b). A case of thick sebaceous skin that hides the underlying cartilaginous skeleton of the nasal tip (c) and the opposite condition in which the shape and volume of the lower lateral cartilage are easily assessed through the skin (d–e). A clinical case presenting a large columellar base due to increased soft tissue envelope thickness (f)
Utilizing the thumb and the index finger of the dominant hand (Fig. 7.12), the nose is palpated in order to establish:
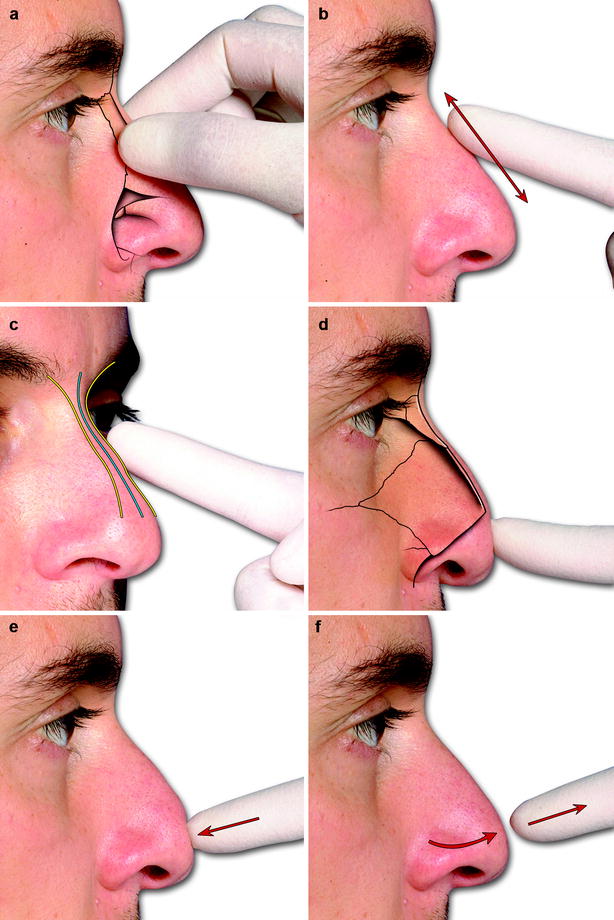
Fig. 7.12
Utilizing the thumb and the index finger of the dominant hand, the examiner can feel the distal end of the paired nasal bones (a), detect any bony or cartilaginous irregularities on the midline or the lateral aspects of the dorsum otherwise not evident (b, c), evaluate the distal portion of the septal cartilage outline normally hidden between the two domes (d), feel the amount of resistance offered by the cartilaginous dorsum and nasal tip to posterior displacement, and also observing the speed of the tip to return to its normal configuration upon release (e, f)
-
The length of the nasal bones (Fig. 7.12a).
-
The presence of any bony or cartilaginous irregularities (Fig. 7.12b–c).
-
The level of the most anterior–inferior aspect of the septal cartilage profile with respect to the most projecting point of the lobule (Fig. 7.12d).
-
The resistance offered by the cartilaginous dorsum and nasal tip to posterior displacement by pressure as well the speed with which the tip returns to its normal configuration upon release (Fig. 7.12e, f).
-
The grade of passive mobility of the skin over the skeletal framework. Other points to consider regarding the nasal soft tissue envelope are the presence of scars, the grade of elasticity and atrophy, as well the presence of telangiectasias.
7.2.2 Nasal Upper Third Assessment
Identifying the spatial location of the radix breakpoint and the definition of the nasofrontal angle is a fundamental part of nasal analysis.
The radix breakpoint is the most posterior point of the outline between the nasal dorsum and the frontal bone. Any change in the radix breakpoint influences how the observer judges the length as well as the slope of the entire nose. It is best assessed utilizing the corneal plane, the glabella, and the superior palpebral fold2 as references (Fig. 7.13).
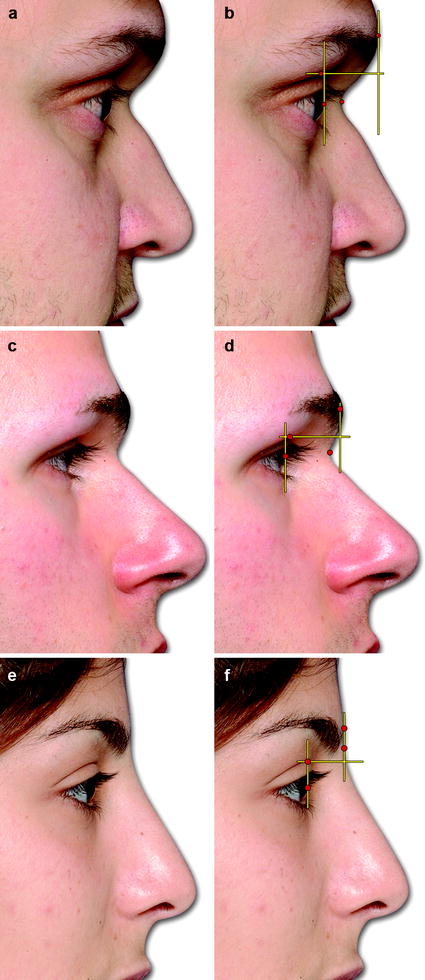
Fig. 7.13
Profile views of three different clinical examples of nasal radix. A too posterior and inferior nasal radix near the corneal plane and well below the superior palpebral fold; the anteriorly positioned glabella is in part secondary to the pneumatization of the frontal sinus (a, b). An inferior-positioned radix breakpoint, clearly below the superior palpebral fold, which can be mistakenly judged as being too posterior; in this case, the distance between the corneal plane and the nasal outline is not reduced (c, d). A shallow nasal upper third outline with a too anterior and superior radix breakpoint, which makes the nose appear too long (e, f)
The nasofrontal angle is not necessarily measured and can be assessed simply by drawing (or imaging) two lines on the profile. The upper line is based on the mean inclination of the outline from glabella to the radix breakpoint, whereas the lower one is based on the mean inclination of the outline from the radix breakpoint to the supratip area. Figure 7.14 shows the nasofrontal angle of the three clinical cases presented in Fig. 7.13.
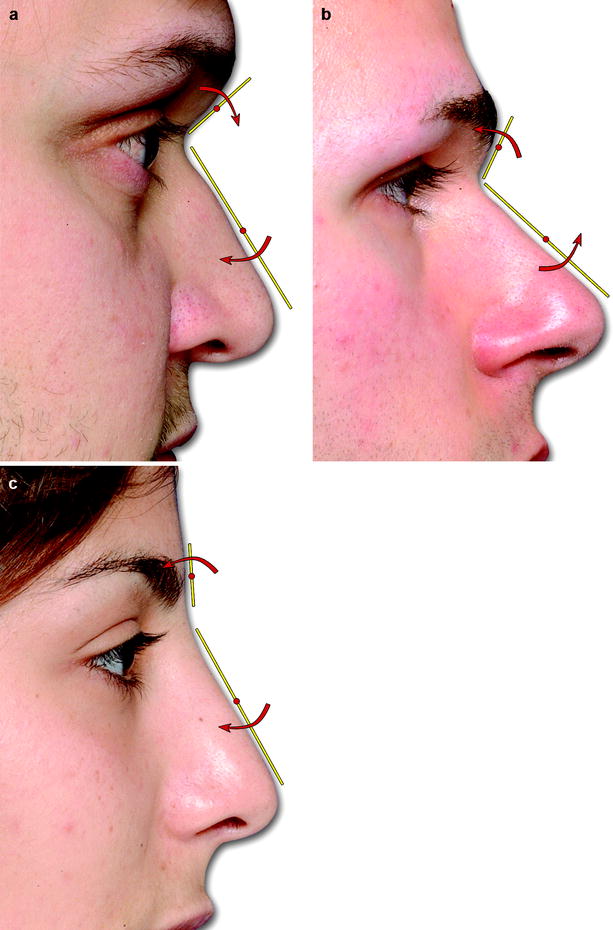
Fig. 7.14
The construction of nasofrontal angle can be simply done by drawing (or imaging) two lines. The upper line is based on the mean inclination of the outline from glabella to the radix breakpoint, whereas the lower one is based on the mean inclination of the outline from the radix breakpoint to the supratip area. Nasofrontal angles of similar degrees can be rotated clockwise (a) or counterclockwise (b) resulting in very different nasal patterns. In the case of a wide nasofrontal angle, the transition from the forehead to the nose is not so evident (c)
The profile of the bony portion is usually one third of the entire nasal dorsum and should be palpated to identify the real length of the nasal bones. Any convexity–concavity, symmetry–asymmetry, unilateral–bilateral lateral hump must be assessed visually.
Stay updated, free dental videos. Join our Telegram channel
VIDEdental - Online dental courses


