From the earliest attempts to successfully design and place dental implants, immediate loading and function have been hallmarks of treatment. Abundant failures in the early developmental stages of implants were commonplace and often occurred immediately or after a short period of functional loading. In many cases, patients were left with clinical problems more severe than their original edentulism. Although those early failure rates were unacceptable by today’s standards, many cases did survive and provide long-term support for functioning prostheses.
Retrospective analysis of those early, immediately, or provisionally loaded implants allows us to now understand why so many of those cases were successful and why others were not. For example, the successful biologic use of metals was highly limited until the development of clean surgical techniques and antibiotics in the nineteenth century. Early experimentation with various implant materials showed that the necessary characteristics of tissue compatibility, corrosion resistance, and strength could not be entirely met in all metals. Gold, silver, and platinum were tissue compatible and corrosion resistant, but lacked strength under high stress. Metals that provided better strength, such as brass, copper, and steel, had poor tissue compatibility and corrosion resistance.
During the 1930s, the first surgical implants were stainless steel alloyed with 18% chromium and 8% nickel, which had good corrosion resistance and strength and were well tolerated by the body. Molybdenum, added later, improved corrosion resistance and formed the basis of an alloy (i.e., Type 316L) commonly used today for orthopedic implants. During the same decade, an alloy used for casting dental appliances, cobalt chromium-molybdenum, was also used for surgical implants.
Corrosion or mechanical failure, such as wear, fretting, and fatigue of coatings, can release particulate debris capable of eliciting both local and systemic biologic responses. Metals are usually not tolerated in large amounts by the body. The ideal implant material would have to be passive to prevent an immunologic response and inert to resist corrosion that could harm local tissues and organs and compromise the long-term functioning of an implant in the biologic environment. Furthermore, the ideal implant material should not yield during insertion, fracture, or fatigue or otherwise fail during in vivo use. Therefore, an implant material’s intrinsic properties of elasticity, yield point, ultimate tensile strength, compressive strength, fatigue strength, hardness, and corrosion behavior must be appropriate for the function it is called to perform.
In 1940, Bothe et al. experimented with the surgical use of titanium and first reported its extreme biocompatibility. It was not until the 1950s, however, that research by Gottlieb and Leventhal and Clarke and Hickman documented titanium’s superior ability to withstand corrosion and remain relatively inert in the body. In the mid-1960s, Branemark et al. reported that ordered, living bone forms a direct structural and functional connection with a load-carrying titanium implant in the process that we now call “osseointegration.”
The modern understanding of biomaterials, implant surface textures, bone physiology, biomechanical loading and/or function, and the systemic health of patients thus enables clinicians to achieve high survival rates and long-term predictability in implant placement. Armed with this knowledge, selecting patients appropriate for immediate functional implants offers advantages, including shorter total treatment time, improved stabilization of hard and soft tissue anatomy, fewer patient visits, and an overall increase in patient comfort and function over a traditional two-stage approach.
Today, with the use of exceptional diagnostic information and sophisticated radiographs, such as CT scanning and computerized analysis programs, the unknowns of the anatomy and bone quality are no longer left to assumptions. Reformed three-dimensional views, anatomic models, surgical guides, and presurgical prosthetics can help ensure that implants placed into immediate functional loading are able to achieve aesthetic results and long-term survival rates that equal or surpass implants placed according to the standard, two-stage surgical approach.
▪
HISTORY OF IMMEDIATE LOADING
As we look back into the history of dental implantology, we see a natural progression from immediate functional loading to predictable two-stage procedures and the concept of how to achieve and maintain osseointegration. Now we see a return to immediate functional and provisional restoration when patient criteria are well suited to achieve osseointegration, predictability, and healthy, stable, and maintainable aesthetic results ( Box 32-1 ).
-
Egypt—slaves selling teeth (Kibrick et al 1975)
-
Sixteenth century—reimplantation of avulsed teeth
-
1886—Bugnot—implant tooth buds
-
1880-1900—gold, porcelain, gutta percha, platinum, etc.
-
1937—First endosseous implant (Dr. Alvin Strock)
-
1940—Screw type (Formiggini)
-
1962—Screw type (Cherceve) chrome cobalt
-
1966—Blade implant (Linkow, Weiss)
-
1967—Acrylic (Hodosh)
-
1968—TPS screw (Ledermann)
-
1975—Vitreous carbon
-
1980—Two stages systems (Branemark, Niznick)
-
1985—Implant placement by guided tooth position
-
1986—Immediate loading of traditional two-stage implants (Rosenlicht)
-
1988—Primary impressions for two-stage implants/indexing (Rosenlicht)
-
1992—CT scanning and presurgical diagnostic (Simplant)
-
1994—Computerized milled abutment (Atlantis abutment)
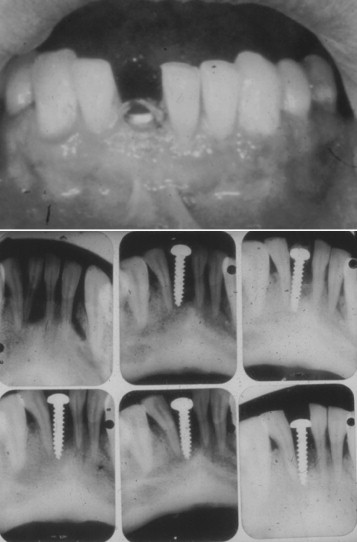
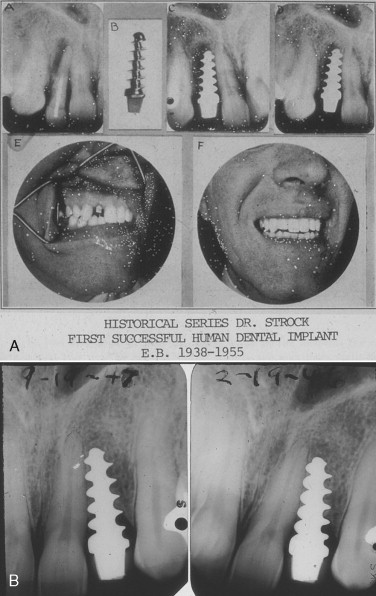
In 1937, Dr. Alvin Strock, a Boston oral and maxillofacial surgeon, placed an orthopedic bone screw into an immediate extraction site of a periodontally involved mandibular central incisor ( Figure 32-1 ). This implant, although never restored, met several criteria for success of a one-stage immediate implant. During the subsequent year, Dr. Strock placed another implant into an immediate extraction of an upper lateral incisor with a bone screw with a prepared head to receive a prosthetic crown. This implant and restoration survived until 1955 ( Figure 32-2 A, B ).
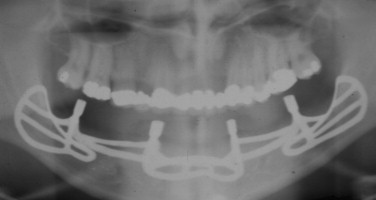
Implants placed in subsequent years had a variety of shapes, designs, materials, and techniques for placement. One common procedure, however, was that many of these implants were placed and restored according to a one-stage procedure that included direct impressioning and rigid splinting of the implants with provisional restorations at the time of surgical placement ( Figure 32-3 ).
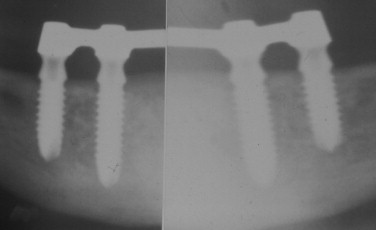
Early, well-documented studies of the titanium plasma sprayed screw (TPS), developed by Dr. P. Ledermann in the 1960s, showed that by following basic biologic and biomechanical principles immediate provisional function of implants could be achieved ( Figure 32-4 ). It was recognized that the selected biomaterial, a roughened TPS implant, placed in a dense bone osteotomy that had been prepared slightly undersized resulted in gentle compression of the bone and excellent initial implant stability. The protocol required that four implants be placed in the anterior mandible between the mental foramina to allow adequate support for an immediate (within 24 hours) overdenture supported by a passive-fitting bar that rigidly splinted the implants together. According to the protocol, a complete, tissue-supported, maxillary denture was to provide the opposing dentition. This technique was designed to increase the strength, stability, and support of the implants to withstand the functional forces of the maxillary denture within physiologic limits that allowed bone healing and osseointegration of the implants.
In a 1986 study (unpublished), the author used traditional, two-stage implants for immediate bar overdenture and fixed partial denture cases and achieved clinical results that were comparable with those reported by Ledermann and Babbush et al. who reported an unprecedented success rate of 94.04% at 5 years. Numerous case reports and studies have verified these same statistics, clearly showing that implant restorations subjected to one-stage placement and immediate functional loading can achieve comparable or higher rates when compared with the traditional, two-stage implant approach. ,
▪
PRIMARY BONE-LEVEL IMPRESSIONS
In the late 1980s, the techniques of making a primary bone-level impression for both one- and two-stage implant systems became more frequent. Having the information available to start the prosthetic reconstruction of the case while the patient continued to undergo osseointegration enhances the second-stage procedure by having the final abutment and anatomic restoration ready to be placed. For the first time, certified laboratory technicians were given information from these primary impressions that had not been available from traditional, second-stage impressions. We know from a number of studies how important knowing the level of the osseous crest is to the contact points of teeth for interdental papilla support, formation, and maintenance. With an immediate impression, this information is now visible and available on the master cast.
There are several materials available when choosing an impression material for use in immediate impression taking. The use of polyethers, silicones, and polysulfides is preferable as a result of their durability and rigidity. These materials aid in avoiding flexion upon removal and help prevent positional distortion. Other factors contributing to selection are material accuracy, working time, ease of handling, and physician experience.
Polysulfide rubber base impression materials exist in three phases: light, regular, and heavy bodied, based upon their viscosity and ability to flow under loading. The base material consists of 80% low-molecular-weight organic polymer, containing reactive mercaptan groups and 20% reinforcing agents, including titanium dioxide, zinc sulfate, copper carbonate, or silica. The catalyst is usually lead dioxide, which functions as an accelerator.
Silicone impression materials exist as two types: condensation and addition. The condensation type is composed of a base and a catalyst. The base consists of dimethylsiloxane paste, a relatively low-molecular-weight silicone liquid. The catalyst is made up of a tin organic ester suspension and an alkyl silicate in liquid form. The addition type is usually a two-paste or two-putty combination. Included in the reaction are a low-molecular-weight silicone with terminal vinyl groups, filler for reinforcement, and a chloroplatinic acid catalyst together with low-molecular-weight silicone with saline hydrogens and reinforcing filler.
Polyether rubber base impression materials also exist as base and catalyst reactions. The base is usually a low-molecular-weight polyether with ethylene imine terminal groups. An aromatic sulfonic acid ester catalyst causes a reaction among the terminal groups forming cross-linked high-molecular-weight rubber.
The choice of impression material is usually made by examining their properties. All of the previously mentioned impression materials provide excellent reproduction of detail. Condensation silicone and polyether materials have shorter working times, whereas addition silicone is slightly longer and polysulfide longer still. Polyether materials have the shortest setting time, whereas addition and condensation silicones are moderate, and polysulfide has the longest setting time. Flexibility on removal from lowest to greatest is: polyether, addition silicone, condensation silicone, and polysulfide. Polysulfide materials have the highest tear strength followed by addition silicones, condensation silicones, and polyether. All of these impression materials possess adequate properties to be used as impressions for dental implants. The choice is usually made based on ease of use, cost, and physician comfort with the material.
Day-of-surgery impressions and indexing can allow for placement of the final restoration earlier in the healing period after implant integration. These immediate impressions are also useful in CAD/CAM technology for creating custom abutments. There are several implant impression techniques. The more common techniques are direct, indirect, and direct-splinted. The majority of the current literature suggests that a direct technique is the most accurate, whereas indirect is the least accurate. Whether or not to use a custom tray or stock design for implant impressions is usually based on the material used and the discretion of the practitioner. A similar decision-making process determines the use of an open-tray or closed-tray technique. Open-tray technique is advocated for multiple splinted restorations because of its increased accuracy in these cases.
Once the implant has been placed, impression material chosen, and the transfer post applied, the impression may be taken. Closure of open gingival flaps is not required, although it is imperative that all impression material be removed before closure to prevent foreign body reaction. An adhesive is applied to the impression tray and allowed to dry for the specified time. Care is then taken to insert the impression tray, which is held with gentle pressure until the impression material is primarily set. The tray and impression material are removed ideally in one motion to prevent excessive distortion of the material. Casts are then made using dense stone, and the implant analogs are used for creation of either a temporary or permanent restoration.
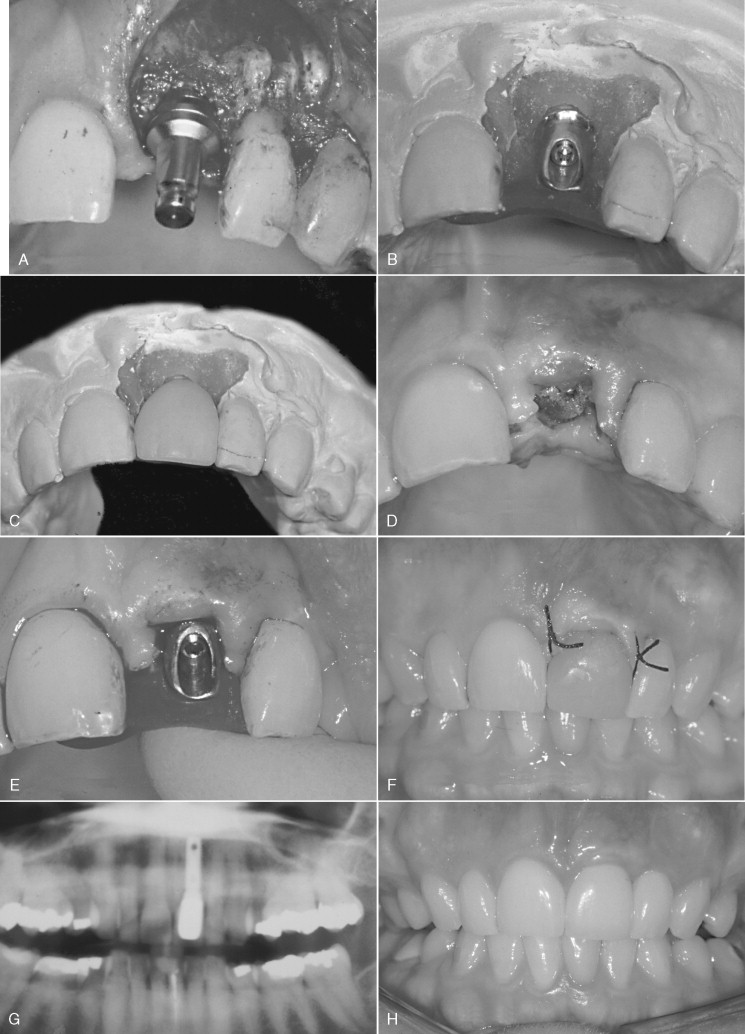
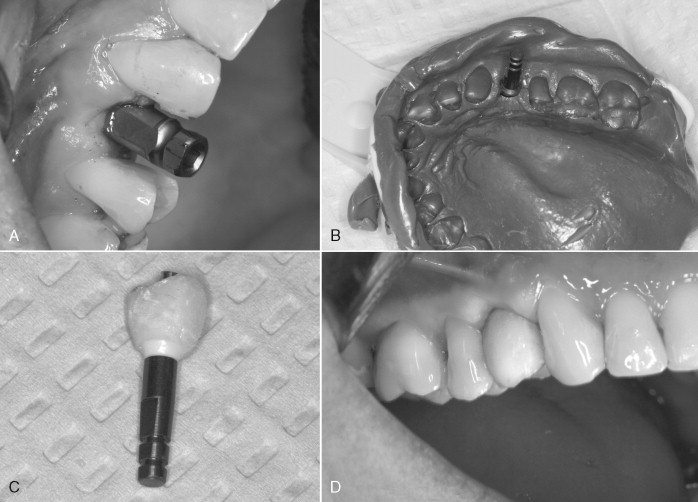
Whichever technique is chosen, impressions at the time of implant placement provide the laboratory technician with the information to create appropriate emergence, gingival contour, and aesthetic form. Recognizing the importance of having this information and the demonstrated effect of immediate function, the placement of an impression post allows the implant surgeon to make an impression of the implant immediately after placement for the fabrication of provisional or definitive abutments and provisional prostheses ( Figure 32-5 A-G ). Zimmer Dental, Inc. has incorporated a premounted fixture mount transfer pin in its product line. This feature allows for implant placement and impression taking to occur without changing any parts on the implant ( Figure 32-6 A-E ).
▪
PRIMARY BONE-LEVEL IMPRESSIONS
In the late 1980s, the techniques of making a primary bone-level impression for both one- and two-stage implant systems became more frequent. Having the information available to start the prosthetic reconstruction of the case while the patient continued to undergo osseointegration enhances the second-stage procedure by having the final abutment and anatomic restoration ready to be placed. For the first time, certified laboratory technicians were given information from these primary impressions that had not been available from traditional, second-stage impressions. We know from a number of studies how important knowing the level of the osseous crest is to the contact points of teeth for interdental papilla support, formation, and maintenance. With an immediate impression, this information is now visible and available on the master cast.
There are several materials available when choosing an impression material for use in immediate impression taking. The use of polyethers, silicones, and polysulfides is preferable as a result of their durability and rigidity. These materials aid in avoiding flexion upon removal and help prevent positional distortion. Other factors contributing to selection are material accuracy, working time, ease of handling, and physician experience.
Polysulfide rubber base impression materials exist in three phases: light, regular, and heavy bodied, based upon their viscosity and ability to flow under loading. The base material consists of 80% low-molecular-weight organic polymer, containing reactive mercaptan groups and 20% reinforcing agents, including titanium dioxide, zinc sulfate, copper carbonate, or silica. The catalyst is usually lead dioxide, which functions as an accelerator.
Silicone impression materials exist as two types: condensation and addition. The condensation type is composed of a base and a catalyst. The base consists of dimethylsiloxane paste, a relatively low-molecular-weight silicone liquid. The catalyst is made up of a tin organic ester suspension and an alkyl silicate in liquid form. The addition type is usually a two-paste or two-putty combination. Included in the reaction are a low-molecular-weight silicone with terminal vinyl groups, filler for reinforcement, and a chloroplatinic acid catalyst together with low-molecular-weight silicone with saline hydrogens and reinforcing filler.
Polyether rubber base impression materials also exist as base and catalyst reactions. The base is usually a low-molecular-weight polyether with ethylene imine terminal groups. An aromatic sulfonic acid ester catalyst causes a reaction among the terminal groups forming cross-linked high-molecular-weight rubber.
The choice of impression material is usually made by examining their properties. All of the previously mentioned impression materials provide excellent reproduction of detail. Condensation silicone and polyether materials have shorter working times, whereas addition silicone is slightly longer and polysulfide longer still. Polyether materials have the shortest setting time, whereas addition and condensation silicones are moderate, and polysulfide has the longest setting time. Flexibility on removal from lowest to greatest is: polyether, addition silicone, condensation silicone, and polysulfide. Polysulfide materials have the highest tear strength followed by addition silicones, condensation silicones, and polyether. All of these impression materials possess adequate properties to be used as impressions for dental implants. The choice is usually made based on ease of use, cost, and physician comfort with the material.
Stay updated, free dental videos. Join our Telegram channel
VIDEdental - Online dental courses


