Fig. 11.1
Short post can induce stress concentration to the side of root dentin upon bending moment therefore can induce root fracture easily. The longer the post, the more evenly the forces are distributed over the length of the root therefore less chance for the root fracture is present
11.3.3 Practitioner’s Clinical Expertise in Root Canal Preparation
(a)
If canal preparation is off centered, the cutting edge of the drill might induce a ledge in the axial wall of root dentin. A root dentin wall with the ledge can be thinner, and stress can be concentrated due to the shape of ledge, which may increase the chance for root fracture failure when a cast D&C is used.
(b)
Short canal preparation might lead to a short cast post, which in turn may increase post debonding and the chance of root fracture.
(c)
A wide root canal preparation may leave a thin root dentin wall, which may increase the chance for root fracture.
(d)
A root canal preparation that is too long or an inadequate gutta-percha removal technique may compromise the 4–5 mm apical seal. As seen in Chap. 1, an insufficient apical seal may result in endodontic failure.
11.3.4 Cementation/Bonding Technique for Cast D&C and Crown
Inadequate bonding of cast D&C to the root dentin or using a mechanically weak luting cement can increase post debonding as well as the possibility of root fracture. Inadequate bonding of full-coverage crown to the cast D&C/tooth margin or using weak cement can increase crown dislodgement chances (Heintze 2010; Kainose et al. 2014).
11.4 Clinical Sequences to Fabricate Cast D&C and Subsequent Full-Coverage Restoration
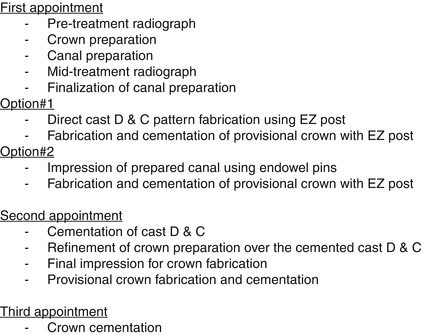
Once a cast D&C is selected as a choice of treatment over the prefabricated fiber post and core build-up from careful clinical and radiographic examinations, the endodontically treated tooth is prepared for a final full-coverage restoration. Clinical sequence of cast D&C and crown treatment is presented in Fig. 11.2.


Fig. 11.2
Clinical sequence of cast D&C and crown treatment
Unless an endodontist has already prepared the canal space, the crown preparation is performed first before root canal preparation for cast D&C is initiated (Fig. 11.3). After an ideal crown preparation, the ideal post length is determined using a radiograph. The ideal post length is the longest possible length with 4–5 mm apical gutta-percha seal remained, while post width should not be thicker than one third of the root diameter. Unless an endodontist made a perfect canal preparation, further gutta-percha is removed using either a heated endo plugger (#5–7, #9–11) or the System B (SybronEndo). If none of these are available, proper size Gates-Glidden bur and Peeso reamer is used to remove gutta-percha and prepare the canal space (Fig. 11.4). Before finalizing the canal preparation, mid-treatment radiograph should be taken to make sure that the canal preparation is centered and an adequate apical seal is maintained. Using an adequately sized Peeso reamer, canal preparation is carefully finalized. Ideally, no gutta-percha or ledges or severe undercuts should be present on the axial wall of the prepared canal space to achieve maximum bonding of cast D&C to root dentin wall and to reduce chances of root fracture upon severe loading.


Fig. 11.3
Prior to canal preparation, an ideal canal preparation is performed, if an endodontist has not prepared canal space already

Fig. 11.4
The ideal post length is determined from the radiograph. Gutta-percha removal and canal preparation are performed using either a heated endo plugger (#5–7, #9–11)/System B or Gates-Glidden or Peeso reamer, if endodontist has not prepared the canal space already. Mid-treatment radiograph is strongly recommended prior to finalizing the canal preparation
11.4.1 Direct Pattern Technique Using EZ Post and Self-Curing Resin
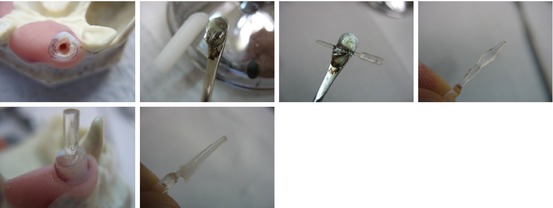
Making a pattern directly from patient’s mouth is indicated for an endodontically treated single root single tooth cast D&C restoration. The ideal shape of a direct pattern can be finalized in the patient’s mouth, and a direct pattern will be sent to commercial laboratory for casting. This same technique can be used for fabrication of provisional restorations for both direct pattern and indirect impression cast D&C fabrication techniques. The post component of the cast D&C direct pattern is fabricated using EZ post system (white compound and plastic endowel; Merritt EZ Cast Post Inc.) (Leong et al. 2009). The white thermoplastic compound is heated until it becomes clear color melted state. The plasticized compound is picked up with the plastic endowel and placed into the prepared canal of a tooth in the patient’s mouth. Once the material cools down to a white solid compound, the plastic endowel with the white compound is removed from the root canal (Fig. 11.5). If the removed white compound post has a void or is short from the orifice of the canal, additional melted compound is added, and post is placed back into the canal space to make a perfect post shape. Once the post portion of the cast D&C direct pattern is completed, the core portion of the direct pattern is fabricated using self-curing acrylic resin (Pattern Resin LS, GC America Inc.).


Fig. 11.5
Direct cast D&C pattern fabrication using the EZ post system (white thermoplastic compound and plastic endowel). The white compound material will turn into clear color once it is heated. Melted compound is picked up with plastic endowel and placed into the prepared canal. Once the color changes to white upon hardening, the plastic endowel with white compound is removed from the root canal
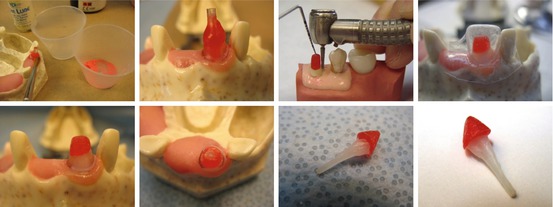
Once the endowel post is fully seated into the canal in patient’s mouth, the polymer and monomer of the pattern resin is applied around the plastic endowel using a sable brush. One must be careful not to drop monomer or polymer of resin into patient’s soft tissue. Once enough self-curing resin is applied around the endowel post and once resin is set, the core portion of the direct pattern is prepared using a diamond bur in situ. In case the direct D&C pattern is not stable during preparation, hold the pattern down in position using a periodontal probe. The core portion of direct pattern should be continuous from the remaining cervical portion of tooth structure, and no extra flash should be left. Remove completed one-piece direct D&C pattern to make sure that the core portion is well attached to the post section. If a vacuum shell preparation guide is available, try it over the core portion of the pattern to make sure that an ideal core shape is achieved. Once the core portion fabrication is completed to an ideal anatomy, a direct pattern of D&C is evaluated for its passive seating into the canal space. To reduce the chance of root fracture induced by cast D&C in the long term, the final cast D&C should seat passively without any friction to the axial wall of root dentin. Any white compound or red self-curing acrylic resin of direct D&C pattern engaging undercuts should be reduced using hot wax spatula and/or diamond bur until an absolute passive fit of direct pattern to the canal space is achieved (Fig. 11.6).


Fig. 11.6
The core portion of the cast D&C pattern is added around the plastic endowel using self-curing acrylic resin (Pattern resin) and a sable brush in patient’s mouth. After setting, the core portion is prepared for an ideal abutment, while the direct cast D&C pattern is held down in position with a periodontal probe. A vacuum shell preparation guide can be used to confirm the ideal preparation of the core portion. Direct cast D&C pattern should have seamless transition to the remaining tooth structure and seat to the canal passively after eliminating any undercut engagement from the EZ post pattern
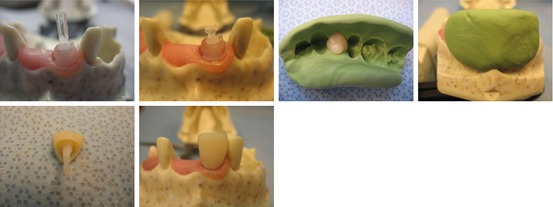
Set aside a direct pattern of D&C in a zipper bag to avoid misplacing it. One extra EZ post is created using the same technique to fabricate a one-piece provisional crown with EZ post. Once the post portion is fabricated, the handle of plastic endowel is turned into the nail head using a hot #7 wax spatula. Make sure that the white compound post with plastic nail head is seated fully in patient’s mouth and the putty matrix for the provisional crown is not interfering with the nail head. The provisional restoration material is applied into the putty matrix, and this matrix is seated onto the tooth. After setting, the one-piece provisional crown with EZ post is removed from the canal space. At this point, we should inspect the provisional crown to make sure that the junction between the provisional crown and the white compound post section is strong and seamless. In this specific case, an EZ post undercut engagement is desirable to gain additional retention for the provisional crown. This crown is cemented using a temporary cement. The cement is applied only under the crown margin, not around the EZ post, to ease the removal of cement from the canal space at a subsequent appointment (Fig. 11.7). Occlusion should be carefully adjusted and patient is dismissed. The direct D&C pattern is then sent to commercial laboratory for casting.


Fig. 11.7
An additional EZ post pattern is fabricated for fabrication of a provisional crown using same technique. Instead of adding the GC pattern resin to create the core portion of the direct pattern, a nail head is created using hot #7 wax spatula against plastic endowel. Provisional restoration material is applied into the putty matrix, and this matrix is seated onto the tooth. After setting, the one-piece provisional crown-EZ post is removed from the canal space. In this case, an undercut engagement of the EZ post is left for additional retention of provisional crown. The provisional crown-EZ post is cemented using a temporary cement
11.4.2 Indirect Impression Technique
This impression technique of the prepared canal space is indicated for multiple teeth cast D&Cs or multiple pieces of cast D&C in a multi-rooted single molar. Making direct D&C patterns for multiple teeth in the patient’s mouth is not an efficient use of time. Also, if patient is pregnant or is allergic to self-curing acrylic resin, the indirect impression technique is indicated even for a single cast D&C fabrication.
Stay updated, free dental videos. Join our Telegram channel

VIDEdental - Online dental courses


