and Paolo Biondi2
(1)
Aesthetic and Maxillofacial Surgery, Padova, Italy
(2)
Maxillofacial Surgery, Forlì, Italy
5.2.1 Frontal View Analysis
5.2.2 Basal View Analysis
5.2.3 Oblique Views Analysis
5.2.4 Profile View Analysis
Abstract
During the first session with a new patient, the analysis and discussion are often focused on a particular facial feature, such as “the nasal hump,” “the crowded upper anterior teeth,” or “the periorbital wrinkles.” This is related to a common idea among patients that there is only one single major problem, which needs treatment, and many minor or “not-detected” details, which are entirely acceptable. I favor this initial approach in every case, writing an itemized list of the patient’s concerns to reassure her about my understanding of her wishes.
During the first session with a new patient, the analysis and discussion are often focused on a particular facial feature, such as “the nasal hump,” “the crowded upper anterior teeth,” or “the periorbital wrinkles.” This is related to a common idea among patients that there is only one single major problem, which needs treatment, and many minor or “not-detected” details, which are entirely acceptable. I favor this initial approach in every case, writing an itemized list of the patient’s concerns to reassure her about my understanding of her wishes.
Even if I confirm the patient’s concerns, a basic analysis of the entire face must be done next in order to separate the problem into its absolute and relative values.
For example, in the case of a large nose, what is the role of the nose itself and what is the role of a deficient paranasal region, a total hypoplasic maxilla, or a flat lower-lip-chin profile?
5.1 Regions of the Face and Neck
The surface of the face and neck can be divided into basic regions or frames as follows [6]:
1.
Forehead region
2.
Temporal region
3.
Zygomatic arch
4.
Malar region
5.
Orbital region
6.
Infraorbital region
7.
Nasal region
8.
External ear
9.
Parotid-masseteric region
10.
Buccal region
11.
Oral region
12.
Chin region
13.
Mandibular border region
14.
Mandibular angle region
15.
Suprahyoid region
16.
Submandibular triangle
17.
Carotid triangle
18.
Retromandibular fossa
19.
Median cervical region
20.
Sternocleidomastoid region
The landmarks of these anatomical regions are not always obvious, as depicted in Fig. 5.1.
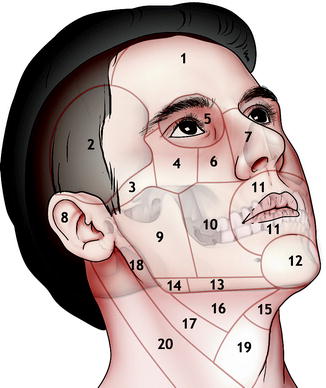
Fig. 5.1
Regions of the face and neck: 1 forehead region, 2 temporal region, 3 zygomatic arch, 4 malar region, 5 orbital region, 6 infraorbital region, 7 nasal region, 8 external ear, 9 parotid–masseteric region, 10 buccal region, 11 oral region, 12 chin region, 13 mandibular border region, 14 mandibular angle region, 15 suprahyoid region, 16 submandibular triangle, 17 carotid triangle, 18 retromandibular fossa, 19 median cervical region, 20 sternocleidomastoid region
5.2 Basic Qualitative Facial Analysis (Without Measurements)
The preliminary analysis – the most important – of a clinical case first requires exploring some basic facial features without taking any metric or angular measurements. These quantitative measurements are frequently at variance with each other: the same nasal tip can be 2 mm under-projected utilizing the norms proposed by Doctor JX, 1 mm under-projected utilizing the parameters of Doctor JJ, or normal utilizing the data of Doctor JK! Furthermore, are the subject’s sex, age, height, weight, race, hormonal balance, head positioning, and many other variables all taken into account in these normative data? I think not.
So, a general assessment must be created without comparing it to normative values or a given template but using only adjectives and referring them to the whole face and to the main facial subunits, lines, and points. Some of the most utilized adjectives are normal, symmetric–asymmetric, present–absent, long–short, large–small, wide–narrow, deep–shallow, convex–concave, full–hollow, open–closed, acute–obtuse, straight–curved, projected–depressed, balanced–unbalanced, and deviated–centered.
A particular effort is made to recognize which areas are in an ideal position and/or have a normal shape and volume, as they will be used in evaluating and comparing the other regions.
5.2.1 Frontal View Analysis
Frontal analysis starts by assessing the transverse and vertical facial dimensions and general symmetry. The relationship between the bitemporal, bizygomatic, bigonial, and mental widths, also in comparison with facial heights, determines the facial form, which varies from wide to narrow, from long to short, and from square to triangular (Fig. 5.2). The grade of angularity and skeletonization of the facial form should also be noted.
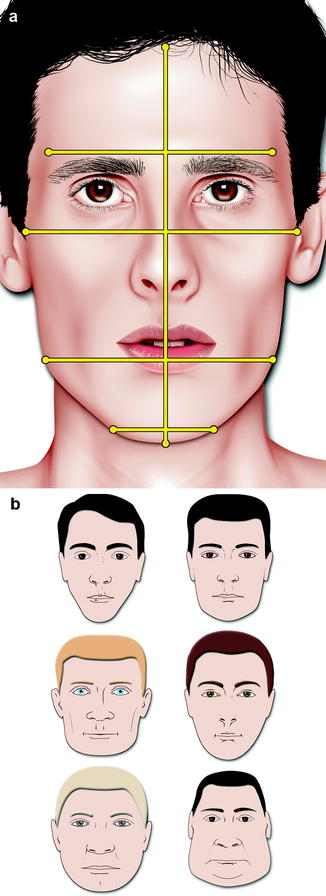
Fig. 5.2
The bitemporal, bizygomatic, bigonial and mental widths, and the total facial height (a). Examples of differences in facial form obtained by varying the width of the face at different levels (b)
Symmetry is always checked. Many patients are unaware of minor facial asymmetries, and if they discover these in the postoperative period, it will lead to patient dissatisfaction and misunderstanding. My preferred way to document and show all the facial asymmetries to the patient requires the marking of the midline skin points, using a fine-tip surgical skin marker and taking the frontal, basal, and facedown views again (Fig. 5.3). If the facial asymmetry is located in a lateral structure and not in the midline, as in the case of unilateral upper lid ptosis, a simple picture taken in frontal view is the best way to communicate this to the patient.

Fig. 5.3
Frontal (a), facedown (b), and basal (c) views with midline facial points, marked with blue ink, in a clinical case of posttraumatic nasal asymmetry
My attention is almost always focused on the central oval of the face. This extended facial region, described by Oscar Ramirez in his articles on facial rejuvenation, is also of interest in every basic facial analysis [7]. The central oval of the face comprises the eyes, the eyebrows, the zygoma, the nose, the mouth, and the chin, as depicted in Fig. 5.4.
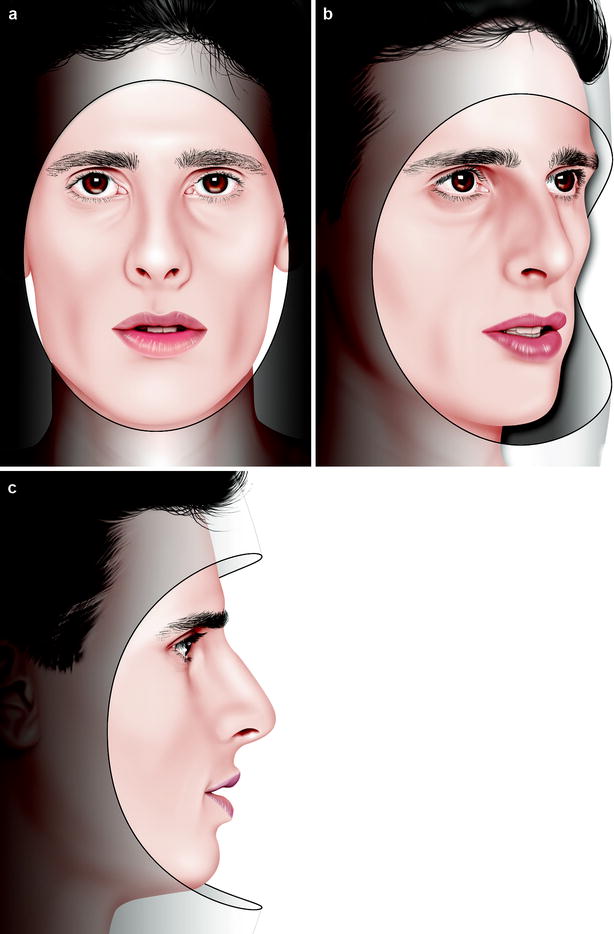
Fig. 5.4
The central oval of the face in frontal (a), oblique (b), and profile views (c)
5.2.2 Basal View Analysis
The basal views offer an additional check in the evaluation of general facial symmetry. The shape of the nasal base, the projection of the nasal tip and eye globes, and the shape of the zygomatic arches and chin are all evaluated and judged utilizing the basal view (Fig. 5.5).
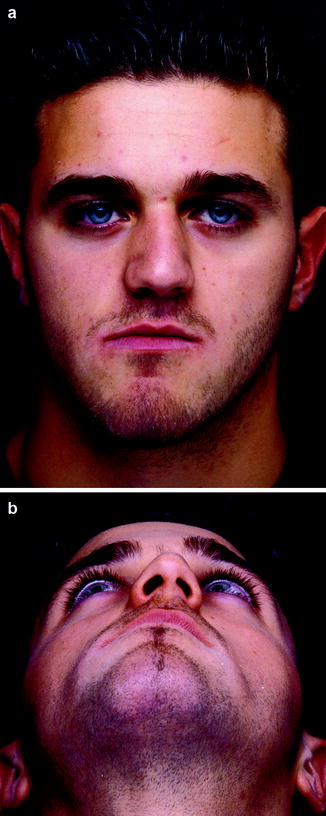
Fig. 5.5
Frontal (a) and basal (b) views in a clinical case of facial asymmetry
5.2.3 Oblique Views Analysis
There are multiple oblique views because, from the pure frontal to the pure profile views, we can find 89 different head positions to the right and 89 different head positions to the left by making small intermediate rotations of 1°. When we try to document a nose with a dorsal deformity, the best oblique view is quite different with the oblique view we need to judge the spatial position of the malar eminence, as depicted in Fig. 5.6.
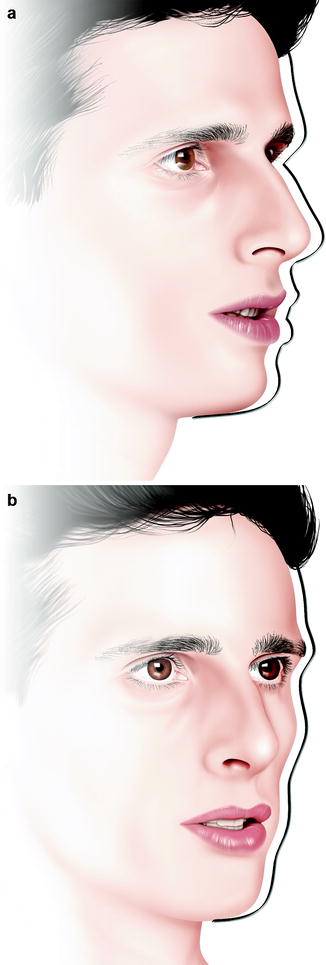
Fig. 5.6
A more rotated oblique view is preferred to document the nasal pyramid (a), whereas a less rotated oblique view is necessary to document the shape of the orbito-zygomatic region (b)
As recommended in Chap. 3, in every clinical case, I prefer to take at least three different right and left oblique views, changing the camera position and maintaining the position of the subject, with the lighting system fixed.
Ideally, an oblique view should be considered as being composed of two distinct components, which need to be analyzed separately.
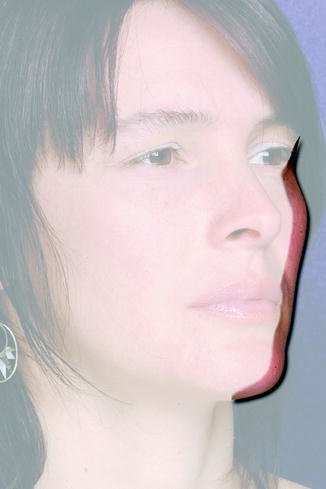
The first one (Fig. 5.7) is the half of the face that is facing the camera (or the eyes of the observer) and is a great aid in the evaluation of the lateral components of the face such as the temporal, zygomatic, orbital, cheek, paranasal, preauricular, and mandibular angle. This component is usually familiar to the patient, as is the frontal view, so it is utilized extensively during communication with her.

Fig. 5.7
The first component of the oblique views is facing the camera or the observer’s eyes. It is a great aid in the evaluation of the lateral regions of the face such as the temporal, zygomatic, orbital, cheek, preauricular, and mandibular angle
The second component (Fig. 5.8) is the profile of the opposite side of the face that emerges on the background panel. In a youthful subject, it is composed of a series of gentle curves, which resembles the outline of an ogee. Here is how J. William Little describes these curves: “the youthful facial ogee typically arises from a high, subtle lid–cheek interface and rises gradually and gracefully to a broad, uniform convexity that peaks near or above the nasal tip. It then continues as a descending convex curve to the level of the upper lip, where it rapidly reverses itself through the occlusal plane, entering a limited concavity that rises slightly at the mandibular border before curving acutely around that structure into the neck” [4].
Stay updated, free dental videos. Join our Telegram channel
VIDEdental - Online dental courses


