9
9
Surgical and Osteodistraction
Procedures
This chapter provides basic preoperative, intraoperative and postoperative instructions for surgical procedures and a section on Distraction Osteogenesis. At first sight these may appear adequate for the correction of all deformities. However, in practice most cases have a complexity requiring the integration of several procedures, as described in Chapter 10.
General Preoperative Considerations
Informed consent is essential. Patients should be given an accurate although reassuring description of the immediate postoperative period. The possibility of prolonged neurapraxia of the mental or infraorbital nerves must be stressed and recorded. They should be given details of postoperative regimens for feeding and oral hygiene and also be asked to bring to hospital a child’s small soft and medium toothbrush. All this is best done as a handout.
The patient must be fit, with a normal haemoglobin concentration. A chest film is probably only necessary where a rib graft is required as a base line should there be any postoperative problem. The nasal airway must be bilaterally patent. Enlarged tonsils may create postoperative oropharyngeal obstruction when swollen, especially with maxillary osteotomies.
Emotionally unstable patients are usually unsuitable for surgery and find intermaxillary fixation intolerable. However this is rarely a problem with rigid fixation.
Preoperative Investigations
1. Haemoglobin, full blood count and blood film.
2. Urinalysis.
3. Blood group and transfusion antibody screening.
4. For major procedures especially when a bone graft is taken, cross-matching blood should be arranged at the last preoperative visit.
5. Sickling test, hepatitis B surface antigen (HBsAg) and HIV screening where appropriate.
6. Chest radiograph, if indicated by the medical history or procedure.
Blood Replacement
Loss of blood can be significantly reduced with hypotensive anaesthesia and antifibrinolytic medication. Mandibular procedures rarely require transfusion, however it is good practice to group the patient’s blood and screen for transfusion antibodies but hold the serum for emergency cross-matching. With the increased concern about cross-infection, autologous blood is now being used in some centres for elective surgery.
Antibiotics
Preoperatively
Microbiologists advocate minimal regimes for non-infected surgery. The following alternatives are reasonable choices.
- Amoxicillin 1G intravenously at induction followed by 500 mg intravenously 3 hours postoperatively is recommended. However there is anecdotal evidence that continuing the antibiotic orally 500 mg 8-hourly for the traditional 3 days reduces the low incidence of postoperative infection at the sagittal split site. But this may be prevented by using mandibular vacuum drains after the osteotomy rather than more antibiotics.
- Metronidazole can be given as a 1g rectal suppository pre- and postoperatively. This is more convenient than a 500 mg slow intravenous infusion, to be followed by 400 mg orally 12-hourly for 2-3 days.
- Clindamycin 300 mg intravenously at induction and 150 mg iv. 3 hours postoperatively. This can be extended to 300 mg 6-hourly orally for 2-3 days.
Antibiotics are not required more than 3 days postoperatively unless there is evidence of wound infection or a persistent pyrexia.
Antioedema
Preoperatively
Dexamethasone 8 mg is given intravenously with the anaesthetic induction agents and repeated 12 hours later.
Postoperatively
Dexamethasone 8 mg is given i.v. or i.m. 12-hourly on postoperative day 1, followed by 4-5 mg 12-hourly on day 2.
Operating Considerations
1. The patient must be anaesthetised via a nasal endotracheal tube centrally secured across the forehead. A simple low profile connector between the endotracheal and anaesthetic tubing is essential. A 12 FG nasogastric tube for postoperative aspiration should also be passed prior to the operation. Some anaesthetists will also pass a fine-bore feeding tube at the same time.
2. Clean the face and mouth with an aqueous antiseptic such as chlorhexidine or povidone-iodine.
3. Drape so that the orbital margins may be exposed for orientation. Cover the nasal tube and eyes with an adhesive drape (Steridrape — 3M, US; Opsite — Smith and Nephew, UK) (Figure 9.1).
4. If a bone graft is being taken, strip the patient, clean the hip or chest twice with iodine detergent and square drape the area with towels; cover and seal the site with a Steridrape or Opsite.
5. Check bipolar diathermy is in place. The anaesthetic machine is best placed with a long hose at the lower end of the table on the opposite side to the graft site. If used, the compressed air cylinder can also be conveniently placed at the foot end of the table so that the air drill hose may pass upwards along the long axis of the patient to the head end. This is avoided by the use of an electric drill.
6. Tilt the feet down and the head up. Lubricate the lips initially and repeatedly with 1% hydrocortisone ointment.
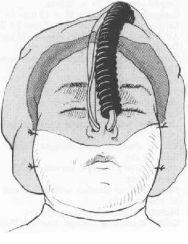
Figure 9.1
Instruments
The following list gives the basic osteotomy instrumentation. Most of the instruments are shown in Figures 9.2a–9.2d.
1. Ward’s cheek retractor
2. Prognathism channel retractors (x2)
3. Chin holding retractor
4. Cairn’s malleable retractor 17 mm
5. Cairn’s malleable retractor 11 mm
6. Lac’s tongue depressor — child
7. Lac’s tongue depressor — adult
8. Kilner cheek retractors — insulated (x2)
9. Forked retractor 70 x 12 mm
10. Langenbeck retractors 44 x 13 mm (x2)
11. Langenbeck retractors 23 x 7 mm (x2)
12. Allis tissue forceps, 4 in 5 teeth, 15 cm (x2)
13. Halstead Mosquito artery forceps, curved 12.5 cm (x10)
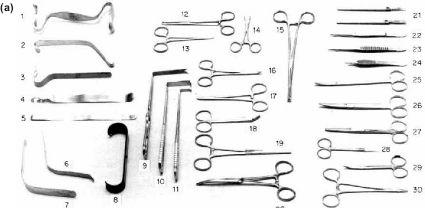
Figure 9.2 (a)
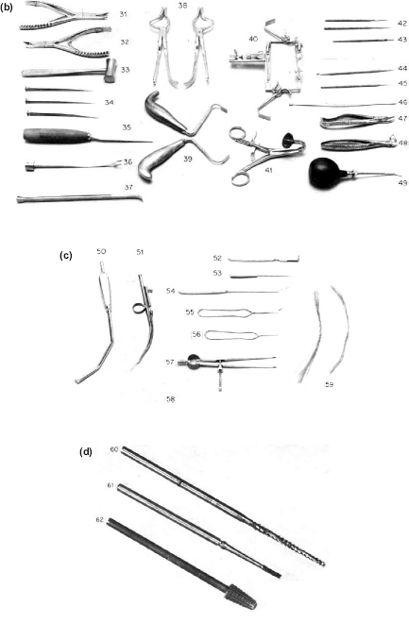
Figure 9.2 (b), (c), (d)
14. Bachaus towel clips (x10)
15. Rampley spongeholders 24 cm (x3)
16. Dunhill artery forceps 13 cm (x10)
17. Lawson Tait artery forceps (x2)
18. Universal wire and plate shears 12 cm (x2)
19. Kocher artery forceps, straight 1 in 2 teeth 18 cm
20. Kocher artery forceps, curved 1 in 2 teeth 18 cm
21. Barron scalpel handles with No. 5 and 10 blades (x2)
22. McIndoe dissecting forceps 15 cm
23. Gillies dissecting forceps, toothed 15 cm
24. Adson dissecting forceps, toothed
25. Mclndoe scissors T/C edge 18 cm
26. Mayo scissors T/C 17 cm
27. Blunt-ended scissors 15 cm
28. Iris scissors T/C 12 cm
29. Strabismus scissors T/C 11.5 cm marked with black tape
30. Crilewood needleholders T/C jaws 15 cm (x2)
31. Luer Jansen bone rongeur 19 cm
32. McIndoe bone cutting forceps 19 cm
33. Small mallet
34. French osteotomes 5 mm, 7 mm and 11 mm
35. Osteotomes ½ (13 mm) with round handle (x2)
36. Obwegeser nasal septal chisel
37. Pterygoid chisel
38. Rowes disimpaction forceps — right and left
39. Tessier maxillary mobilisers — right and left
40. Dingham mouth gag. Frame with cheek retractor, 3 blades S, M, L (not shown)
41. Featherstone or other self retaining mouth gag
42. Kilner skin hooks 15 cm (x2)
43. Mapping pen (with nib)
44. Mitchell trimmer
45. Dental probe No. 6
46. Howarth’s nasal raspatories (periosteal elevators) (x2)
47. Dental extraction forceps 76 N
48. Dental extraction forceps 74 N
49. Chip syringes (x2)
50. Yankauer suction tube
51. Self-clearing suction tube
52. Farabeouf rougine curved 11mm
53. Flat screwdriver
54. Obwegeser mandibular awl
55. Kelsey Fry bone awl — curved
56. Kelsey Fry bone awl — straight
57. Caliper
58. Ruler
59. 0.50mm and 0.35mm stainless steel tie wires (x25)
60. Long shanked Lindemann surgical bur (Meissinger)
61. Tungsten carbide surgical bur (Ash)
62. Cone shaped acrylic bur
There are an infinite number of refinements such as a coronoid stripper and coronoid forceps, and many types of periosteal elevator.
Not shown are: surgical handpieces for drills and oscillating and sagittal saws or arm miniature titanium bone plating set with transfacial trocar, canullae and retractor.
Note: To ensure a harmonious operation, check the radiographs, study models with the patient the day before and the instruments, especially burs, drills and wafers preoperatively. A pre-admission checklist can be invaluable.
Postoperative Care
Immediate
The patient is nursed at 45 for comfort and access. A nasopharyngeal airway is left in situ overnight, with strict instructions to staff to suck out the nasopharynx every 30 minutes with a fine catheter passed through the tube. Ideally it should be humidified to prevent crusting. Some anaesthetists prefer to leave the endotracheal tube in situ overnight. However, it is doubtful whether suction of blood and mucus from the entire length of the tube to maintain the airway can always be guaranteed. Oxygen (40%) in air is usually administered by face mask at approximately 5 litres/min.
Hourly aspiration of accumulated blood, oral and gastric secretions, and bile from the stomach help to eliminate vomiting. As most patients are fit prior to the procedure, dedicated nursing supervision with half-hourly observations is required rather than intensive care.
Analgesics
Pain experience is variable and surprisingly often absent. However repeated moderate doses of a subcutaneous or intravenous opiate, such as morphine 10 mg p.r.n. x 4 doses each 24 hours (more useful than 10 mg 4-hourly), with an antiemetic such as metoclopromide 10 mg, should be prescribed. Control is better and the analgesic dose lower when morphine is given 1 mg/ml by a Patient Controlled Administration “pump” system. This may be administered as morphine 50 mg in 50 ml normal saline into a drip or by a separate cannula.
The infiltration of the long-acting local analgesic 0.5% (5 mg/ml) bupivacaine hydrochloride (Marcain) with adrenaline (1:200 000) is said to reduce postoperative pain experience in addition to its intraoperative analgesic and vasoconstrictor effects. It is interesting to note that this reduced pain experience extends beyond the possible action of the drug. Up to 2 mg/kg may be used in any operative procedure.
First Postoperative Day
Check in particular:
1. Airway and chest clinically and if not clear, radiographically. All patients benefit from chest physiotherapy.
2. Fluid balance, i.e. blood and fluid replacement should approximate to blood and fluid loss. Note the urinary output and ensure the patient’s bladder has been emptied, especially as transient retention may follow narcotic analgesics. Remember the loss via gastric aspiration, vomiting and the drains. Two litres of compound sodium lactate intravenous infusion (Hartmann’s solution) should suffice in addition to blood replacement.
3. Occlusion and elastic fixation if used.
4. Cutaneous sensation and facial motor function.
5. Drug regimen. Antibiotics should be given intravenously or rectally, and analgesics and antiemetics intravenously. However, many patients will tolerate soluble analgesics orally or by nasogastric tube on a regular as required basis. A rectal non-steroidal anti-inflammatory analgesic, such as flurbiprofen 150 mg 12-hourly, is also useful to avoid continuous opiate analgesia.
6. Nutrition. During the first 24 hours continue the Hartmann’s solution, 2 litres i.v., but try 100 ml/h water by mouth, then tea or orange juice, etc. as soon as the patient can tolerate feeding, using a syringe and quill, feeding cup or straw. If this is not possible use a fine-bore (Clinifeed — Roussel, UK) nasogastric tube which should be passed preoperatively to permit feeding until the patient can accept fluid and calories by mouth. If a fine-bore tube is not available, the standard Ryle’s tube (12 or 14 FG) may be used. (See also Chapter 9 for postoperative feeding regimen.)
7. Oral hygiene with Chlorhexidine 0.2% solution is commenced.
Second Postoperative Day
Repeat the above but change from intravenous to an oral or nasogastric regimen, increasing the feed to a full diet.
Note: Oral fluids may be difficult for some patients up to 3 days after major procedures, especially those involving the chin, producing difficult lip control.
Discharge from hospital is determined by the nature of the procedure, the individual, and the care available at home. Most patients can be discharged on the second or third postoperative day, and on discharge should have adequate simple analgesics and instructions on oral hygiene, especially the use of a small tooth brush with chlorhexidine gluconate gel or mouthwash. Advice on a blended diet and the provision of a diet sheet is also important.
Follow-Up
The occlusion may be checked weekly or fortnightly. It is reassuring for the surgeon to assist maximal intercuspation with the final wafer and elastics. However wafers are uncomfortable and difficult to keep clean and are probably unnecessary. Soluble sutures should be left or removed when they are accessible and are a source of irritation. Patients require reassurance that impaired labial or infraorbital sensation will return to normal within 6 months and that excess soft tissue will also remodel and disappear over this period.
The Operative Procedures
The Obwegeser Sagittal Split Osteotomy
Indications
This versatile operation may be used for placing the mandible backwards or forwards, but should not be used for an anterior open bite without a simultaneous maxillary impaction to reduce the posterior upper facial height.
Technique
The operation for a backward correction will be described first.
1. The jaws must be supported as widely apart as possible by a self-retaining gag which gives better access than a prop (Figure 9.3a).
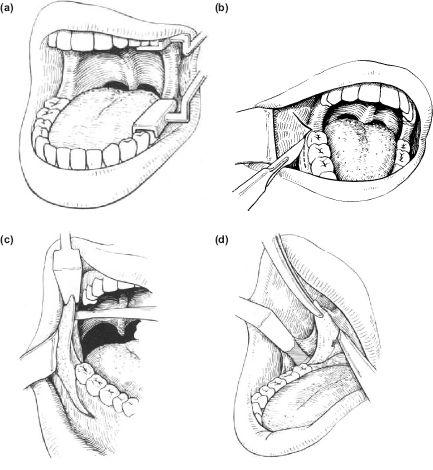
Figure 9.3 (a), (b), (c), (d)
2. The tissues on the lingual and buccal aspect of the ascending ramus and adjacent body of the mandible are infiltrated generously with a vasoconstrictor containing local anaesthetic, e.g. 0.5% bupivacaine with 1:200 000 adrenaline.
3. The incision is a buccally based triangular flap with the apex at the back of the last standing molar (Figure 9.3b). The anterior limb should leave a generous skirt of alveolar mucoperosteum attached to the gingival margin of the first molar to assist suturing (Figure 9.3c).
4. The buccal periosteum is widely elevated, exposing the outer surface of the body and ramus of the mandible. This can be facilitated by using the forefinger, stretching and incising the periosteal layer to produce a buccal space which helps retraction of the tissues with a channel retractor and also provides good operative access for the insertion of bone plates. Techniques recommending limited exposure are difficult to understand (Figure 9.3d).
Raise the lingual flap, with a Howarth periostal elevator, detaching the mucoperiosteum downwards and forwards from the anterior aspect of the ascending ramus to the distolingual aspect of the last molar. The inferior extent of the periosteal reflection needs to be no deeper than the mylohyoid ridge.
5. Dissect up the anterior aspect of the ramus, detaching the temporalis tendon with the sharp end of the Howarth elevator or a forked coronoid stripper. By inserting the Obwegeser coronoid retractor half way up and applying strong traction, the exposed tendon can be gradually stripped off with the elevator so that the retractor may be eventually seated comfortably on the coronoid tip. This degree of elevation greatly helps the access to the lingual aspect of the ramus (Figure 9.3c). The application of a heavy pair of curved Kocher’s or coronoid forceps to the coronoid will now dispense with the forked retractor and provide a comfortable and secure alternative for the assistant.
6. Carefully raise the lingual periosteum to the level of the sigmoid notch and follow its margin until the condylar neck is reached; then smoothly detach the tissues downwards until the lingula is reached. Care will avoid troublesome venous bleeding, which usually ceases after the channel retractor (or a reversed bent Lacs retractor) is inserted with its tip passed behind the condylar neck.
7. The horizontal cut should be made as low as possible close to the lingula where the cortices are always separated by adequate cancellous bone. The higher the cut the less chance there is of splitting the ramus cleanly. Improved access is obtained by rotating the flat or channel retractor 45 to the vertical plane so that it lies parallel to the neurovascular bundle (Figure 9.3e).
8. The cut is made through the cortex of the bone with a long-shanked, medium-sized tapering fissure bur (Ash, Meissinger, Busch) and should be extended beyond the concave inner surface to the distal aspect of the ramus as the Hunsuck modification does not always work! With maxillary impactions parallel medial cuts allow a fillet of cortex to be removed. This allows the mandible to follow the maxillary vertical displacement (Figure 9.3f).
9. The buccal channel retractor is now placed vertically opposite the mid-point of the second molar with its tip below the lower border of the mandible (Figure 9.3g).
10. Access is remarkably improved by taking out the gag and all other instruments bringing the teeth into occlusion. A line of bur holes is made parallel to the external oblique ridge, which is continued onto the lateral surface of the mandible following the lateral bony prominence as it curves down on the buccal surface towards the lower border (Figure 9.3h).
11. This ensures an accurate line when they are joined together, and produces a natural continuous, lingual-buccal cortical cut. It is important to emphasise the cuts through the cortex proximally at the junction of the medial (lingual) and mid section and also antero-inferiorly through the thick cortex of the lower border to a depth of 2 mm.
If the mandibular osteotomy is part of a bimaxillary procedure the cuts are done bilaterally, tonsil swabs inserted, and the maxillary osteotomy carried out and fixed with the intermediate wafer against the unchanged mandible.
12. The split is traditionally done with two ½ inch osteotomes which must have thick round handles enabling a firm twisting action to be used without the glove slipping. However a more controlled division can be achieved with a narrow 5 mm. osteotome tapped first distally below the horizontal medial bur line “feeling” the inner surface of the outer cortical plate. This is repeated at least twice with an identical osteotome obliquely downwards and backwards through the buccal cut, and then downwards just within the line of the external oblique ridge which seems to be a natural plane of cleavage (Figure 9.3i). This bone dissecting manoeuvre may produce an instant and clean split. If not the ½ inch osteotome is gently tapped into the anterior cortical cut until firm, and rotated slowly but continually until the cancellous bone begins to split. The cortical split is generated by rotating anticlockwise on the right side and clockwise on the left. Slow separation permits the neurovascular bundle to be identified if exposed and dissected from the outer fragment where it may be adherent. If a single osteotome is used, it should then moved from the anterior buccal end of the cut to the superomedial end (Figure 9.3j). The two segments must be completely separated by inserting a finger into the depths of the osteotomy cut to vigorously detach all muscular and periosteal restraints. Where the mandible is narrow or the fragments refuse to separate on twisting, the fine 5 mm osteotome can be used as just described to divide the bone by gently tapping it through to the lower and posterior borders on the inner aspect of the buccal cortex. However such resistance suggests that the cortical bur cuts are inadequate and should be repeated.
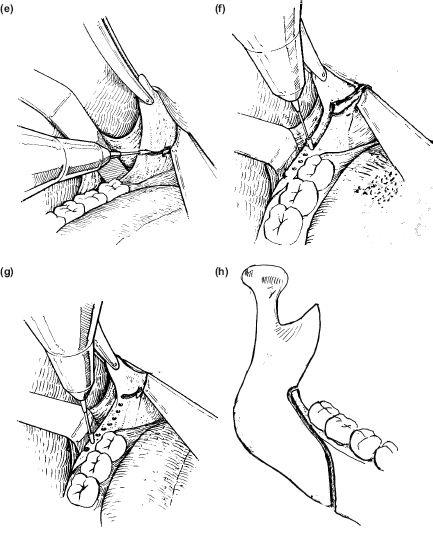
Figure 9.3 (e), (f), (g), (h)
13. The estimated setback has been measured on the study models. This amount of buccal plate is held firmly in Kocher or Dingman bone-holding forceps and cut off with a Lindemann fissure bur protecting the underlying inferior dental bundle with a flat retractor (Figure 9.3k). A horizontal fillet of bone may have to be trimmed with an acrylic bar from the upper margin of the inner cut on the ascending ramus to allow a good fit, especially in cases where the maxilla has been elevated — and the mandible has to rise to maintain the occlusion.
14. The forward correction requires the buccal cortical cut to be made at the mesial aspect of the second molar. After the split, no bone is removed.
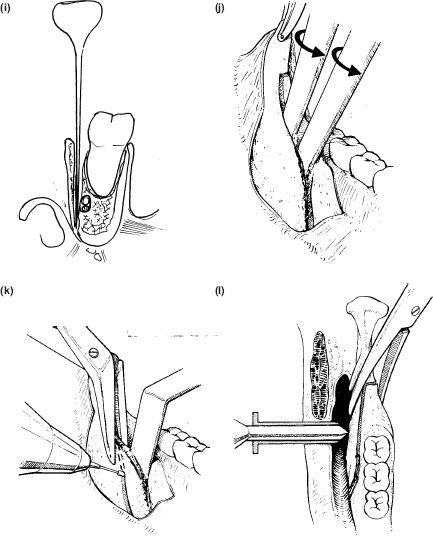
Figure 9.3 (i), (j), (k), (l)
15. Internal fixation requires accurate, firm intraoperative intermaxillary fixation which is applied after the osteotomy cuts have been completed.
16. A transfacial trocar, cannula and retractor are essential for bicortical screws. A short stab wound (5 mm) is made through the skin, a finger’s breadth above the lower border of the mandible just anterior to the masseter muscle. Fine mosquito forceps are pushed through the tissues to enter the wound in the mouth, opened and closed, rotated through 90, and opened again to create an entry for the canulla.
17. The trocar and cannular sleeve are then firmly pushed through to reach the buccal plate (Figure 9.3l). The trocar is removed and the cannula is attached to the extra and intraoral arms of the retractor. The design varies with the manufacturer. The cannula has a projection which helps to immobilise the buccal plate if a bone clamp is not used (Figure 9.3m).
18. The antero-posterior position of the proximal fragment (ascending ramus) is crucial Light self-retaining bone-holding or Allis forceps are used to grip the proximal fragment which is pushed back for mandibular advancements and pulled forwards for push backs. It should also be rotated downwards to lower the buccal plate just below the upper margin of the retromolar lingual cortical surface. This maintains the contour of the gonial angle which can be lost if the proximal fragment is inadvertently allowed to rotate forwards (Figure 9.3n).
The two bone plates can then be stabilised by clamping them with an Allis until the screws have been inserted or with experience the tip of the cannula can so be used to hold them in place.
19. If there is sufficient bone beneath the neurovascular bundle the first screw hole may be drilled with the special long-shanked twist drill at this level. The drill should be applied gently as the shank is fragile and does not take kindly to torsion. A sense of give is felt when each plate is penetrated. The lingual side should be protected.
20. Screws 9-13 mm are usually adequate for bicortical fixation and are inserted with a screwholding screwdriver, which should be ready mounted to use the moment the hole is drilled. Two further screws are inserted above the bundle behind the last standing molar (Figure 9.3o). When the opposite side is complete the intermaxillary fixation is released.
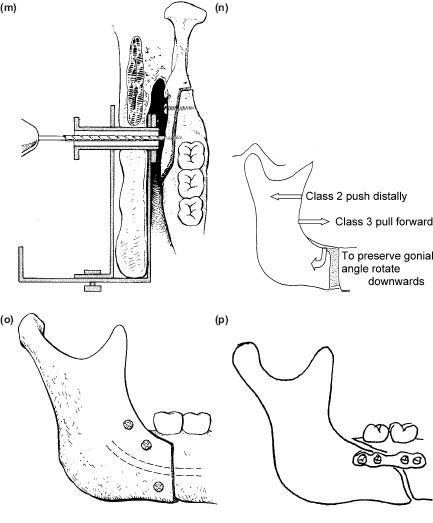
Figure 9.3 (m), (n), (o), (p)
21. The stab wounds are closed with 6/0 prolene.
22. An alternative and simpler technique of intraosseous fixation is the application of a buccal titanium plate bridging the osteotomy gap and fixed intraorally with 5 mm moncortical screws (Figure 9.3p).
23. Vacuum drains are inserted in the buccal pouches bilaterally, sutured to the skin and attached to separate bottles. There are those who do not use drains despite evidence that the subperiosteal sump gives rise to morbidity and infection without this standard practice.
24. The intra oral wounds are carefully closed with a 3/0 polyglycollate suture.
25. When all bleeding has been controlled the throat pack is removed and the pharynx carefully sucked out.
26. The wafer may be left suspended to the maxillary arch wire, but intermaxillary fixation with elastics is unnecessary and the patient is returned to the recovery area.
27. The use of the wafer and postoperative training elastics for 2 weeks is uncomfortable for the patient of no proven value except for providing comfort for the surgeon.
Additional Notes
- As varying degrees of relapse invariably take place, especially with large movements, the planning should be based on a relaxed supine centric relation squash bite, as close as possible to the operating position. In addition overcorrection should be built into the model surgery. This should be an edge to edge incisor relationship for forward mandibular movements and a class 2 div1 relationship for mandibular setbacks.
- With major facial deformities, such as a hemifacial microsomia, the neurovascular bundle often lies superficially adjacent to the buccal cortex and can be easily severed whilst carrying out the buccal cut. With such a mandible, an extraoral subsigmoid osteotomy is recommended for vertical lengthening or an inverted L osteotomy with a bone graft for forward movements.
- Despite careful intraoperative intermaxillary fixation and a perfect immediate postoperative occlusion, occlusal discrepancies can still mysteriously appear from 24 hours to 14 days later. The cause may be postoperative condylar recoil, intracapsular oedema or lack of muscle adaptation. This usually remits and the use of training elastics is probably unnecessary.
- If the preoperative arch co-ordination is imperfect and requires restorative or orthodontic correction, it is essential to construct a final wafer which will ensure that the midlines and incisor overjet are correct and the arch alignment is symmetrical. The underlying malocclusion can then be corrected as required.
The Subsigmoid (Subcondylar) Osteotomy
Indications
Although formerly a very popular operation and easier to perform than the sagittal split, the subsigmoid osteotomy is less versatile. It also requires elastic intermaxillary fixation unless secure plating is achieved. It can be carried out intraorally or through an external skin-crease incision, leaving a discrete scar.
The subsigmoid osteotomy is not an operation for lengthening the body of the mandible but it is useful where the mandible is narrow as in a congenital deformity, or atrophic in the older edentulous patient with unerupted wisdom teeth, when it can be used for setting back the body or lengthening or shortening the ascending ramus.
Extraoral Subsigmoid Osteotomy
Technique (Figure 9.4)
1. A 5 cm submandibular or retromandibular incision is marked with a pen and infiltrated with 4 ml local anaesthetic containing 1:80,000 adrenaline. This is made in a skin crease two fingers’ breadth below the mandibular border to avoid the marginal (mandibular) branch of the facial nerve. A lower crease requires a larger incision (Figure 9.4a). Note: Never mark an incision with the head rotated: this will produce unexpected changes in the surface anatomy.
2. The skin, fat and platysma are divided with a No.15 blade. The flap margins are undermined with MacIndoe scissors or the knife to increase the elasticity of the wound margins which are carefully retracted with cat’s paw retractors.
3. The deep fascia is identified, picked up with fine-tooth dissecting forceps and divided widely beyond the ends of the flap incision with a knife or scissors. Deep veins, usually the posterior facial, can be identified, divided and tied with 3/0 polyglycollate.
4. Access through the submandibular incision requires the identification of the mandibular branch of the facial nerve which lies under the deep fascia just below the lower border of the mandible. As it passes upwards on to the face it crosses the facial artery and vein. This important motor nerve may be protected by identifying the facial artery and vein as they emerge between the submandibular salivary gland and lower border of the mandible. Use scissors or Spencer Wells forceps to separate the tissues, and divide and tie these vessels, then retract and suture the distal ends upwards over the lower border of the mandible. This will carry the marginal branch of the facial nerve with them.
5. The muscle and periosteum can now be incised along the lower border with a knife and stripped upwards to the sigmoid notch and coronoid process. The Obwegeser channel or Robertson ramus retractor may be hooked over the notch to expose the ramus (Figure 9.4b).
6. A small buccal prominence is a reasonably accurate landmark of the lingula area, so a cut downwards and behind this from the midpoint of the sigmoid notch to the beginning of the curve of the angle avoids the inferior dental neurovascular bundle. This may be done with a fissure bur or reciprocating saw. A flat retractor should be placed on the medial aspect of the ramus to protect the soft tissues.
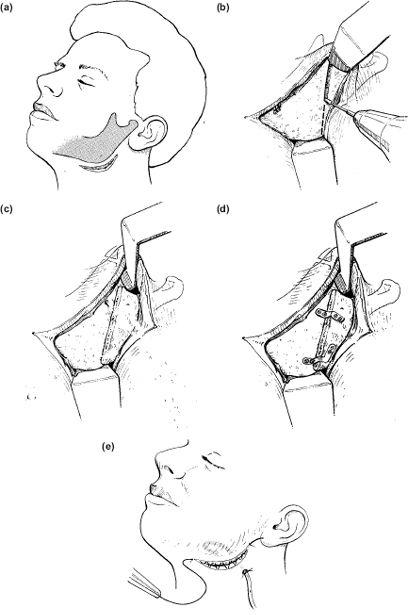
Figure 9.4 (a), (b), (c), (d), (e)
7. Once separated, the inner cortex of the narrow fragment and the outer cortex of the main segment may be bevelled with an acrylic bur to ensure good opposition.
8. For large distal displacements, i.e. greater than 0.7 cm, it is necessary to do a coronoidectomy to remove the restraining influence of the temporalis muscle (Figure 9.4c).
9. A saline-soaked tonsil swab is inserted in the wound and the procedure repeated on the opposite side.
10. With the appropriate wafer the intermaxillary wires are applied, with the teeth held in occlusion.
11. As rigid fixation is being used the cut should be as vertical as possible in order to leave a substantial posterior border. After putting on intermaxillary fixation the larger, i.e. distal, fragment should be trimmed to allow close approximation of the osteotomy margins. An L or T-shaped plate with six holes is then fashioned and screwed into the lateral aspects of the posterior and inferior borders of the mandible to bridge the bone cut firmly.
12. Vacuum drains are placed bilaterally overlying the bone surface and sutured firmly to the skin as soon as the introducer has been pulled through; ensure that at least 2 cm of non-perforated drain lies within the wound (Figure 9.4d).
13. The wound is closed by suturing the muscle and periosteum with 3/0 polyglycollate on a 22 mm half-round needle. The fas-cia/platysma layer and subcutaneous tissue are similarly closed, with the knots buried by suturing from deep to superficial. For a fine scar, the skin should be closed with a 3/0 continuous subcuticular monofilament [Prolene, Ethilon (Ethicon Ltd., Edinburgh, UK) or nylon] suture on a straight needle. This can also be done with a half-round non-cutting needle. Alternatively, wound closure may be achieved with 5/0 Prolene or Ethilon interrupted sutures, or even adhesive Steri-strips (3M, US) if subcutaneous closure is satisfactory.
14. The throat pack is removed.
Intraoral Subcondylar Osteotomy
This is a relatively simple procedure and is a rapid way of treating minor displacements of the mandible, i.e. less than 7 mm, which may involve a backward or a rotational correction for asymmetry. Major movements should be accompanied by a coronoidectomy or even a horizontal ramus osteotomy because of the restraining influence of the temporalis muscle.
However neither have the great advantage of dispensing with intermaxillary fixation. The best application of the intraoral procedure is a means of salvaging a sagittal split that has not separated the condyle from the body of the mandible.
Technique
Buccal Ramus Approach (Figure 9.5).
Infiltrate the tissues on the buccal aspect of the ascending ramus with a vasoconstrictor (Figure 9.5a).
1. A buccal-based triangular incision is made with a No.15 blade with the apex behind the last molar tooth, the upper limb stopping at the external oblique ridge halfway up the ascending ramus (Figure 9.5b).
2. The flap is elevated subperiosteally as widely as possible, using the Howarth periosteal elevator and then the forefinger to stretch the periosteum and create a generous pouch. A J-shaped periosteal elevator is useful in freeing the muscular attachment at the posterior and inferior borders. The sigmoid notch, condylar neck and angle of the mandible should be readily palpated.
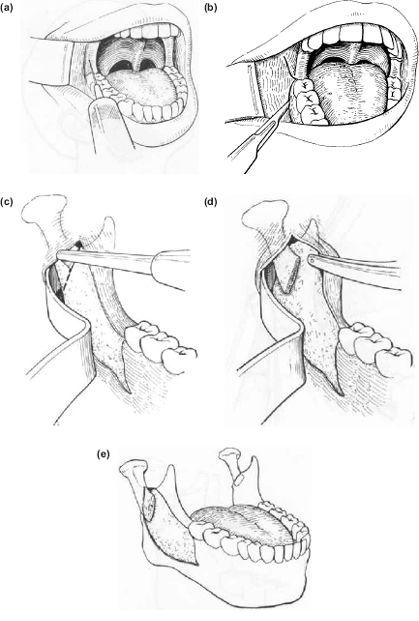
Figure 9.5 (a), (b), (c), (d), (e)
3. The Merrill or similar retractor is inserted so that the curved distal flange may be firmly placed behind the posterior border of the ascending ramus (Figure 9.5c).
4. The sigmoid notch may then be visualised and a 1.5 cm right-angled oscillating saw is used to cut downwards and backwards to 1 cm below the mid-point of the posterior border, i.e. where the condylar neck has narrowed and fused with the flat ascending ramus. It is essential to use a sharp-edged saw. Some operators prefer a blade which is 70 to the long axis of the saw.
5. Once separated, the condylar component is displaced buccally with the Howarth elevator. When both sides have been completed the mandible is displaced backwards between them (Figures 9.5d and 9.5e).
6. A vacuum drain is inserted into the wound prior to closure.
7. As this procedure does not lend itself to internal fixation elastic intermaxillary fixation is necessary.
Medial Ramus Approach (Figure 9.6)
This procedure is useful to salvage a failed sagittal split.
1. The basic exposure is almost exactly the same as for the sagittal split technique except that only minimal stripping is required on the buccal surface of the mandible. However, with the curved Kocher’s forceps in place above the coronoid process and the ramus channel retractor inserted just above the level of the lingula and hooked behind the posterior border of the ascending ramus, an excellent view of the sigmoid notch and posterior border is achieved form the contralateral side of the patient (Figure 9.6a).
2. With a long-shanked fissure bur and oblique cut is made through the thick posterior ramus border as low as possible, passing forwards and upwards into the sigmoid notch (Figure 9.6b).
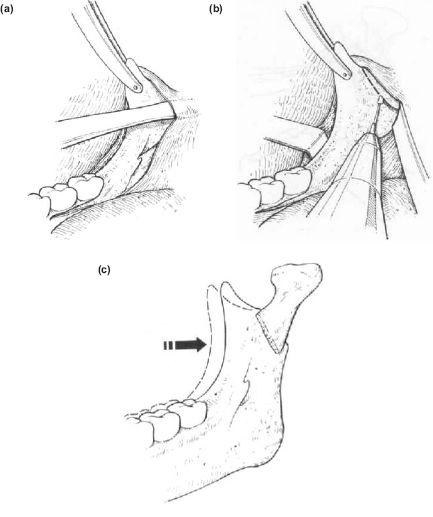
Figure 9.6 (a), (b), (c)
3. Separation of the osteotomy may be completed with a 5 mm osteotome. The small condylar fragment is then manipulated medially with the channel retractor and a perio-steal elevator into the hollow medial surface of the ramus (Figure 9.6c).
4. This is repeated on the contralateral side and the mandible is placed into the planned occlusion.
5. The wounds are closed.
6. Again this procedure requires elastic intermaxillary fixation.
Note:
Stay updated, free dental videos. Join our Telegram channel

VIDEdental - Online dental courses


