9
Safe, Effective, In-Office Implant Maintenance
Unless you try something beyond what you have already mastered, you will never grow.
—Ronald E. Osborn
Meet all the peri-implant challenges with evidence-based protocols! Implant therapy is here to stay; with the responsibility of placement and restoration on the dentist, it will fall upon the hygienist for long-term supportive implant maintenance; see Figure 9.1. With an estimated 2 million implants placed annually, if you aren’t seeing many implant patients, you will!
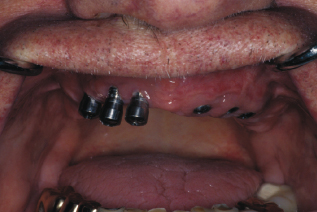
Figure 9.1 Implant maintenance on fused prosthetic.
Before implants became relatively predictable and routine, hygienists were charged to maintain many periodontal involved teeth to either support a bridge or removable partial denture, or to keep a dentition intact and the patient from needing to have dentures. Today we have a new role: to educate, motivate, and care for patients with natural teeth, periodontal involved teeth, and implants.
Despite the success of implant dentistry, it is important to remember that the majority of implant patients are dental failures, patients who have lost their teeth. It is critical to identify why these patients lost their natural teeth and help them understand the importance of proper implant maintenance at home and routine implant maintenance appointments to maintain their implants for the rest of their lives.
The hygienist needs a basic knowledge of the patient’s implant treatment plan, the proposed time line, and maintenance objectives. How can the hygienist provide effective home care instruction if he or she has no knowledge of implant placement, restorative options, and regenerative adjunctive procedures in the patient’s treatment plan? Consult with the dentist prior to the patient’s implant maintenance appointment.
The steps for safe, effective in-office implant maintenance are outlined in the evidence-based protocol in this chapter: review the medical history, assess/monitor the implant, and provide safe instrumentation and polishing. Also, knowledge of home care products that are safe to use with implants that you can recommend for your patients is extremely helpful.
In the word “protocol,” my friend Catherine Fairfield, RDH, outlines a way to remember all the necessary criteria in treating implants:
Protocol:
Medical history
The patient’s medical history and overall health should be updated and reviewed at every implant maintenance appointment. Any changes in the patient’s health status could impact the implants or treatment. Risk assessment questions are also a vital part of a comprehensive medical history. Health risk factors include uncontrolled diabetics, history of poor wound healing, or systemic diseases. Risk factors such as age, sex, obesity, smoking, functional habits, oral health (biofilm), and socioeconomic status are also important. If these factors are combined it could make any implant treatment case more complicated and potentially risky for a successful case outcome.
Walk the patient through the medical history and risk assessment. Record if the patient is in the care of a physician at the present time and for what medical condition. This could have an impact on the overall health of the implant, maintenance requirements, and/or the proposed treatment plan. Overall good general health is one of the keys to the success of the implant(s) and may affect the length of time between implant maintenance appointments (1).
Finally, a comprehensive written and signed by the patient medical history is important. Carefully read, review, ask specific questions, go down the list, and listen. For more specifics, see Chapter 2.
Assess and monitor
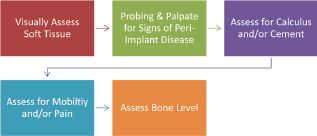
The assessment and monitoring protocol (Figure 9.2) involves a visual assessment of the soft tissue that surrounds the implant (i.e., keratinized, nonkeratinized), to probe and assess for signs of peri-implant disease, to assess for cement and/or calculus, to assess for mobility and/or pain, and to assess the bone level with appropriate radiograph(s). These are all necessary for a comprehensive implant maintenance exam. See Chapter 6 for more specifics on each of these assessments.
Figure 9.2 Steps for assessment and monitoring.
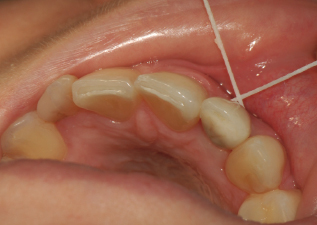
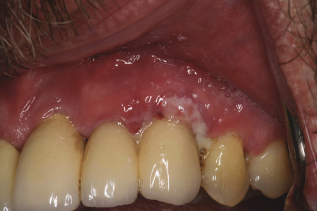
The first step is to visually assess if the soft tissue is keratinized or nonkeratinized. After placement, the implant should be surrounded by at least 2–3 mm of keratinized tissue. Record any sign of inflammation or changes in color, contour, or consistency. Figure 9.3 shows inflammation in nonkeratinized tissue.
Figure 9.3 Inflammation, nonkeratinized tissue. Courtesy of Dr. Robert Schneider.
The second step is to probe and palpate any implants for signs of peri-implant disease. To palpate the implant for infection, place a finger on both sides of the alveolar bone of the implant starting at the apex of the implant, keeping pressure on each side of the alveolar bone. Draw upward/downward toward the restoration and if the implant is infected, exudate will ooze up from the sulcus surrounding the implant. Palpating for infection can be done at any time, but hygienists should wait 6 months to probe after the implant(s) has been loaded.
Probing is now considered to be safe and essential to the overall health of the implant with the tidal wave of peri-implant disease (2). Use a flexible probe with only 0.15 N of pressure to assess for infection.
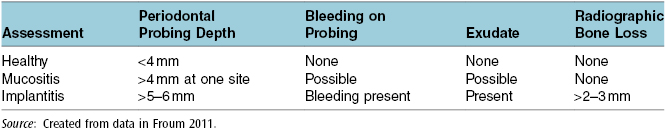
Remember that the diagnosis of peri-implantitis is based on probing depths of 5 mm to 6 mm or greater, bleeding on probing, and bone loss greater than 2 mm to 3 mm around the implant; see Table 9.1, which lists clinical signs of peri-implant disease. Treatment depends on the extent of probe depth and the radiographic bone loss. That is why it is recommended the hygienist or dentist probe and record findings at every implant maintenance appointment (3). If the implant has a probing depth of 5–6 mm or greater, bleeding, and/or a presence of exudate, a radiograph(s) should be taken to assess the implant and evaluate for bone loss (3).
Table 9.1 Clinical signs of peri-implant disease.
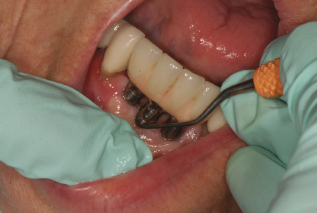
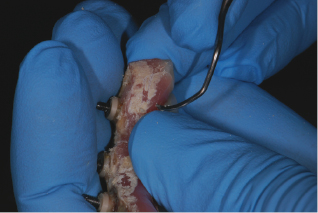
The third step is to assess for calculus and/or cement. To check for calculus and/or cement, insert floss in contact with both sides of the implant, wrap in circle, and crisscross in front; see Figure 9.4. Move in a shoe-shining motion in the peri-implant crevice. Check floss, and if it is frayed or roughened, cement and/or calculus is present. This is an important role for the hygienist to identify and detect any cement residue. Another way to detect calculus and/or cement is radiographically.
Figure 9.4 Assess for calculus and/or cement with floss. Courtesy of Dr. Peter Fritz.
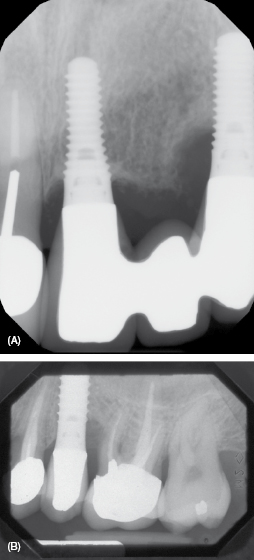
To identify cement residue on a radiograph, look for a saucer-like radiolucent area surrounding the implant; see Figure 9.5A. However, due to the lack of radiopacity in many implant specific cements, the cement may not be evident on a radiograph (4). If calculus is present it often appears asymmetrical and has a similar appearance as formed on a natural tooth; see Figure 9.5B.
Figure 9.5 (A) Cement: notice the saucer-like radiolucent area. Courtesy of Dr. John Remien. (B) Calculus: notice that it is not symmetrical. Courtesy of Dr. John Remien.
If calculus or cement is detected (see Figure 9.5), often it is not easy to discern which is present. Use the appropriate scaler to dislodge calculus and/or cement. If it is difficult to dislodge, chances are it is cement. The complications from cement-retained prostheses are evident in time with symptoms of increased bleeding on probing, inflammation, and bone loss. For more information, refer to Chapter 7.
The fourth step is to ask the patient if he or she is experiencing any discomfort or mobility with the implant. If patient is experiencing pain in the implant area, use the VAS scale to determine the pain of the patient. Record this number in the patient chart for future reference. After an implant is placed, discomfort around an implant may be the first sign of a failing implant even before it is evident on a radiograph. If pain is present, the dentist will need to evaluate if the pain is from occlusal trauma, lack of osseointegration, or infection, and may recommend a referral to the implant surgeon or periodontist for an evaluation.
Lay out the necessary tools for the dentist to evaluate for occlusal trauma (e.g., articulating paper). An occlusal adjustment may be all that is necessary since the implant is held in place with bone, not by a periodontal ligament, so it does not respond to forces like a natural tooth. If there is mobility of the implant itself or a broken screw, it is a greater cause for concern. The dentist may request a radiograph to assess the source of the mobility; the restoration may not be fully seated.
Any sign of mobility is a loss of osseointegration and needs to be addressed. Mobility following osseointegration can be present due to a loose fixed restoration, an infection, a loose or fractured abutment thread, an implant fracture, or trauma. In contrast, mobility due to failure of osseointegration occurs in the initial post-surgical period and can be much more serious.
As a part of the implant maintenance appointment or if the patient feels the implant is loose, test for mobility of both the restoration and the implant. Testing for mobility can be conducted using a mirror handle to gently push on the implant crown. If mobility is present, test by placing two mirror handles on either side of each implant if access is possible (see Figure 9.6). If bubbling of saliva occurs along the gingival margin of the restoration, the internal screw may be loose (see Figure 9.7). Alert the dentist, have him or her repeat the process, confirm with a radiograph, and record if there is a gap in the implant stack, as this can confirm a loose screw.
Figure 9.6 Testing for mobility with two mirrors. Courtesy of Glidewell.
Figure 9.7 Check around gingival margin of the crown for note bubbles. Courtesy of Dr. John Remien.
The final step, a radiographic assessment for monitoring the bone level, is the most valuable tool in evaluating the health of an endosseous dental implant (5). The dentist looks for bone remodeling, biological width invasion, and bone loss due to trauma or residue (i.e., cement) left behind; see assessment summary Table 9.2 and Chapter 6 for more information.
Table 9.2 Assessment summary.
| Assessment | Summary |
|---|---|
| Visual | Record any sign of inflammation or changes in color, contour, or consistency. Record if a crater appearance of the tissue around the implant is visible. Record texture of the tissue; keratinized or nonkeratinized. Record if inflammation or infection signs are present. |
| Probe | Use a flexible probe, record baseline at 6 months loading. Gently probe using 0.15 N grams of pressure. Record if inflammation, bleeding, cement, or exudate is present. Report findings to the dentist. |
| Calculus/Cement | Insert floss in contacts on both sides of the implant, wrap in circle, and crisscross in front. Move in a shoe shining motion in the peri-implant crevice. Check floss; if frayed or roughened, calculus and/or cement is present. |
| Pain | Record if patient reports any discomfort around an implant, severe pain lasting more than 3 days or severe bleeding. Use the VAS scale to determine the pain of the patient. |
| Mobility | Test for mobility by using a mirror handle to gently push on the implant crown. If mobility is present, test by placing two mirror handles on either side of each implant and record if any bubbling of saliva along the gingival margin of the restoration presents at testing (possible internal loose screw). |
| Radiograph | One to four implants: Make vertical bitewing or periapical (PA) of each implant. Five or more implants: Panorex or individual PAs of all implants. Note: All taken at implant placement, cover screw, restoration, 6 months, and 1 year. If inflammation or systemic health risk continue on 1-year interval and if healthy on an every 2–3-year interval for subsequent years. |
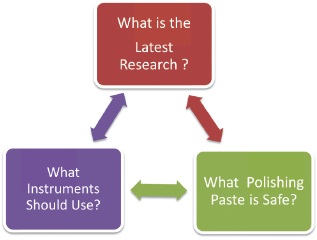
Figure 9.8 Latest research.
Safe instrumentation and polishing
After careful implant assessment, the dental hygienist will assess if calculus or residue (i.e., cement) is present on the implant or abutments. Minimal or no instrumentation may be necessary for an implant with a healthy gingival attachment (6); however, if calculus and/or cement are present, a safe instrumentation protocol is required.
Instrumentation
The key to proper instrumentation is the removal of plaque and any other deposits with the proper instruments that will remove all plaque and calculus deposits without scratching the surface of the implant or prosthesis (see Figure 9.9). Instrumentation of an implant is different than scaling on a natural tooth. Natural teeth are anchored in the bone by the periodontal ligament and sulcular epithelium, while implants are osseointegrated, with direct contact between bone and the dental implant.
Figure 9.9 Calculus removal under an implant bridge during a maintenance visit. Courtesy of Dr. Alfonso Piñeyro.
For instrumentation of a natural tooth, place the blade of the scaler against the side of the tooth, gently move between the periodontal ligament and the tooth, and scale/remove all calculus to the bottom of the pocket. Vertical, horizontal, and oblique stokes can all be used to remove any calculus present, which is matrixed to the tooth surface and thus harder to remove.
Proper dental implant instrumentation includes removing, dislodging the microbial deposits without altering the implant surfaces or adversely affecting biocompatibility (7). Calculus deposits on implants are generally softer than those on teeth, and are more often found supragingivally than subgingivally, making calculus easier to remove with short horizontal strokes (8). Scratches and gouges may affect the titanium-oxide layer, reducing the corrosion-resistant nature of titanium implants (9).
The literature and studies using scanning electron microscopy (SEM) have shown that titanium, graphite, and plastic implant scalers are all within safe limits for instrumenting on implant surfaces (10); however, the surface can become contaminated with trace elements that plastic, graphite, or stainless steel scalers leave behind, which can compromise the long-term success of the implant (10). According to a 1990 Journal of Periodontology study, authors Dmytryk, Fox, and Moriarty state, “Although the use of a plastic curette did not significantly roughen the implant surface there was concern that some of the plastic material may have been smeared or deposited on the implant surface, perhaps altering the biocompatibility of the titanium surface” (11).
The results of a current SEM study by Jim Driver are shown in Figure 9.10 and Box 9.2. These research results led to the conclusion that more studies are needed to evaluate the effects of instrument debris left behind on the implant surface and the biocompatibility of this debris with the titanium implant surface.
Figure 9.10 (A–E) 2009 SEM study comparing instrumentation on implant surfaces. Courtesy of Dr. J. Driver, PhD. (A) SEM Control implant surface. (B) SEM Implant surface after plastic scaler. (C) SEM Implant surface after titanium scaler. (D) SEM Implant surface after graphite scaler. (E) SEM Implant surface after stainless steel scaler.
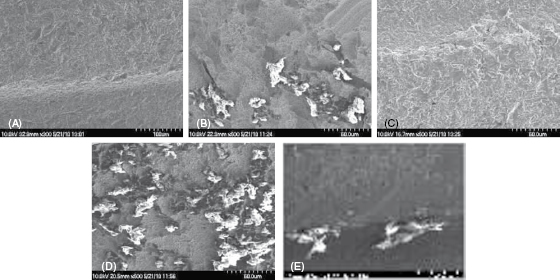
SEM Study Comparing Instrumentation Result/Observations (James D. Driver, PhD, Division of Biological Sciences, University of Montana, 2009)
The upper ball head of the implant had machining grooves on it that showed defects or pockets only visible at the high magnifications possible in the SEM. These pockets were large enough to easily harbor many bacteria, which have an average size of 2 μm × 0.5 μm.
The titanium hygiene instrument passage across the implant surfaces generally smoothed over rather than gouged the surface. The stainless steel instrument, however, did produce surface scratches with areas of material gouged from the titanium, thereby forming new pockets for bacterial colonization.
The plastic instruments had no effect on the implant surfaces but they did leave plastic debris that was firmly attached to the surface as if melted or embedded to it. This plastic debris could not be removed by a jet of air commonly used to clean surfaces for SEM. This debris could also provide additional pockets of a size suitable for bacterial colonization.
Implants today have a roughened surface to attract the patient’s own bone to more effectively osseointegrate to the implant. When implant scalers that are not compatible with titanium, not like metals, not made from medical grade titanium are used for debridement on a roughened implant surface trace elements can become lodged on the surface, causing bacteria to adhere, which can result in peri-implant disease.
Also, the coronal aspect of implants can have a highly polished collar approximately 1–4 mm wide. Scratching this polished collar can result in increased bacterial plaque retention. Therefore, due to the increase risk of peri-implant infections caused by bacterial plaque attached to the implant, the proper instrument selection becomes even more critical.
Implant scalers selection
Current implant scalers on the market are plastic, graphite, titanium coated, or solid medical-grade titanium; see Table 9.3. Not all implant scalers are recommended for use on all titanium implants. Plastic implant scalers and air-powder spray systems leave deposits (i.e., residue) on the titanium implant surfaces with hydroxyapatite or titanium plasma spray (TPS) coatings and therefore are not recommended for implants with surface coatings (11). These deposits have negative effects in vivo on tissue healing processes and bone regeneration. This has been confirmed in multiple studies (11, 12). However, the long-term effects of this residue are still being studied to see to what extent this leads to implant failure.
Table 9.3 Examples of implant scalers.
| Instrument Material | Name | Description |
|---|---|---|
| Plastic | Implacare™, Hu-Friedy Implant Prophy+™, TESS Oral Health |
Plastic disposable tips in several designs. Can be sharpened |
| Graphite | Dental Facial Implant Scalers, Premier | Nonmetallic, autoclavable graphite and can be sharpened |
| Titanium coated | Suvan-O’Hehir Implant Curettes, G. Hartzell and Son | Scoop design |
| Solid titanium alloy | ImplantPro™, Brasseler ImplaMate™, Nordent Wingrove™ Series, Paradise Dental Technologies (PDT) |
Replaceable titanium tips Multiple universal scalers Professionally designed, implant-specific set of three scalers, can be sharpened |
Safe instrumentation on titanium implant surfaces should be performed with an implant scaler that is biocompatible, “titanium on titanium,” to prevent instrument debris from becoming lodged on the surface, as it can harbor bacteria and increase the risk for peri-implantitis. Using a titanium implant scaler on titanium implants only makes logical sense: they are biocompatible, like metals, and this allows one to avoid leaving trace elements from a scaler on the implant surface. They are thinner than plastic or graphite implant scalers, yet provide more strength to dislodge calculus and residue cement, which makes them more effective (13).
Stainless steel scalers, metallic sonic, and magnetostrictive (i.e., ultrasonic) stainless steel inserts have all been found to gouge or scratch titanium and are therefore contraindicated for implant instrumentation (14). However, ultrasonic inserts can be used with caution if fitted with implant-specific sleeves to prevent the stainless steel from coming in contact with the implant (15, 16; see Figure 9.11).
Figure 9.11 Examples of implant-specific ultrasonic inserts. Courtesy of Dentsply and Parkell.
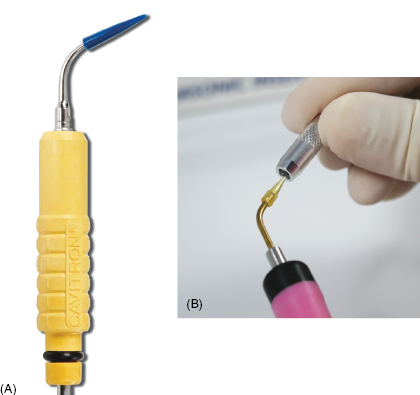
Ultrasonic and piezoelectic inserts specifically designed for implant maintenance are becoming an integral part of implant maintenance, primarily for the benefit of disruption of plaque and biofilm, especially for suprastructures (e.g., All-on-4™). Implant-specific inserts are safe for use with caution around implants and have water ports that allow a lavage indication that is beneficial for suprastructure maintenance.
To ultrasonically clean around implants safely, use a gentle, modified pen grasp with light pressure, and have an established fulcrum. Use the lowest power setting (i.e., BlueZone™) possible that will allow the water spray to lavage and disrupt the biofilm. Avoid touching the implant or implant restoration or prosthesis with the tip; the goal is to lavage, disrupting the biofilm and remove loose calculus debris after scaling with appropriate hand scaler.
Adapt the tip to spray in a parallel position, not pointing into the sulcus surrounding the implant, being careful not to harm the permucosal seal or touch the implant/prosthesis. Too much vibration can compromise the stability of the implant and damage the permucosal seal surrounding the implant. There is more information on ultrasonic lavage in the section detailing fixed-prosthesis protocol.
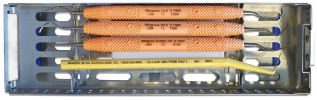
Every office should have a minimum of one “Go-to-Set” implant kit for each hygienist in the office that includes all the necessary instruments to meet all the peri-implant maintenance challenges: implant curettes, flexible plastic probe, and implant specific ultrasonic/piezoelectric insert (see Figure 9.12). This kit can be kept separated from the other instrument maintenance kits and retrieved as needed for any implant maintenance patients.
Figure 9.12 Example of “Wingrove go-to set.” Courtesy of PDT, Inc.
Peri-implant challenges include biofilm and calculus removal from a variety of implants and their restorations/prostheses: narrow-based, wide-based, and single implants with ball/Locator/bar attachments, as well as the full fixed prostheses that include cement- or screw-retained and suprastructure (i.e., All-on-4) prostheses. As well as the challenges of cement or other residue affixed to the implant surface and to treat peri-implant infections (i.e., mucositis, implantitis). The key to proper instrumentation is light, effective debridement with the proper implant scaler to remove all bacterial biofilm and calculus with the ultimate goal of no debris left in the sulcus.
Narrow-base implants
Narrow-base implants (Figure 9.13) are implants with a narrow platform used in both the anterior and posterior oral cavity (i.e., lower incisors, congenially missing laterals, and areas with limited horizontal bone). In the/>
Stay updated, free dental videos. Join our Telegram channel
VIDEdental - Online dental courses


