6
AIM for Implant Success: Assess, Identify, and Monitor
Dental hygienists play a key role as ‘first responders’ in recognizing potential complications and then referring patients for treatment.
—Scott Froum, Dept. of Periodontology, SUNY Stony Brook
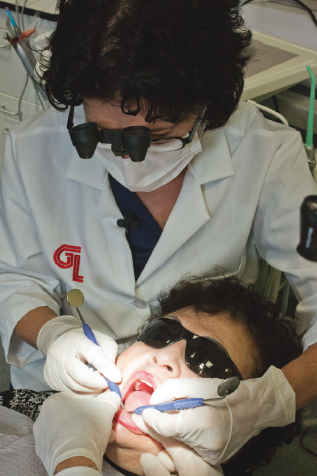
As the “first responders” (Figure 6.1), hygienists need to understand and be able to recognize implant complications with strategies for early detection and prevention. Implant complications can involve both mechanical (structural) and biological (hard and soft tissue) component considerations. Routine assessment and monitoring protocols can reveal early signs of problems with the implants and allow the dentist to complete intervention procedures to save the implant from being lost.
Figure 6.1 Hygienists are first responders. Courtesy of Glidewell.
Dental implants have been reported to be as more than 90% successful, making dental implantation one of the most successful treatments that dental professionals can offer their patients in dentistry (1). However, new information on the longevity of implants to remain stable and functioning with no peri-implant disease is reported to be 61%, due to complications (2). The American Academy of Periodontology (AAP) in their position paper (2000) on implant complications and maintenance refers to failing implants as clinically mobile or with complications involving the soft and hard tissues surrounding the implants. The biological complication of soft tissue surrounding the implant that does not involve the supporting bone is referred to as “ailing implants” (3).
Assess
Mechanical and biological component complications
It is critical to assess, identify, and monitor implants, according to Adell et al. They describes why implants fail as “too much occlusal force in the first year (i.e. mechanical) and bacteria related to the tissue (i.e. biological)” (1). Complications fall into two categories: mechanical and/or biological.
Mechanical complications are defined as an implant that is affected by stress or occlusal forces resulting in failure and generally becoming mobile. Bruxism is a severe, debilitating disease that does not have a known etiology and is a concern for implant therapy. The patient needs to be aware of it and precautions taken (complete treatment planning and possible occlusal guard). The bottom line is implants should still remain the treatment of choice for bruxism patients.
If the implant is affected by occlusal forces, a stretch and bending can occur and may result in fracture. Mechanical complications include poor prostheses, prosthesis facture, implant itself fractures, abutment screw loosening, and/or screw fracture. Screws loosening is the number one reason for mechanical complications in 6–49% of all placed screw-retained implants (4).
Dental hygienists can detect mechanical complications by testing for mobility and/or radiographs. If a screw is loose it needs to be taken care of immediately by having the dentist retighten and adjust the occlusion for the patient (5).
Biological complications include the peri-implant hard and soft tissues that surround the implant. Implants rarely fail after the first year of placement (2, 6), but hygienists need a protocol to treat biologic complications for implants similar to periodontal therapy for inflammation that can occur in the surround tissues of an implant (7). The peri-implant sulcus and the surface of the dental implant is still susceptible to the patient’s indigenous periodontal microflora (8). The literature supports that healthy and failing implants are the same as healthy and periodontally compromised teeth (9, 10).
The hygienist also needs to be able to recognize the early complications before osseointegration has taken place and the late complications after osseointegration with prosthesis in place. The surgeon will see and treat most of the most of the early complications, including hemorrhage, damage to adjacent teeth, loss of feeling to the lip or face, and maxillary sinus violations. Hygienists see patients on their regular prophylaxis recare visits with implants that are in the cover screw stage. Cover screws can become loose and create an abscess that can be detected radiographically. This is the rational for taking a radiograph at the cover screw stage in the radiographic protocol. Healing abutments, if they are not properly seated, may need to be reseated by the dentist. Any tissue that has migrated into or over the exposed implant platform will need to be removed also by the dentist. The late complications are either mechanical or biologic that effect the hard/soft tissue.
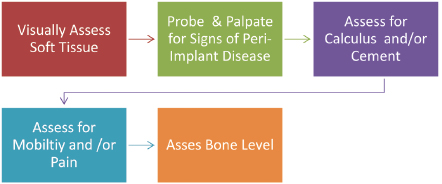
Routine assessment and monitoring protocols visually assess the soft tissue that surrounds the implant (i.e., keratinized, nonkeratinized), probe and assess for signs of peri-implant disease, assess for cement and/or calculus, and assess for mobility and/or pain. Finally, they also assess the bone level with appropriate radiograph(s) that are necessary for a comprehensive implant maintenance exam, as shown in Figure 6.2.
Figure 6.2 Steps for assessment and monitoring.
Assessment: visual soft tissue
To assess the implant, the hygienist starts with a visual soft tissue assessment. Record any sign of inflammation or changes in color, contour, or consistencyf there is presence of a fistulous tract this is a sign of a serious biologic complication or an implant fracture (11).
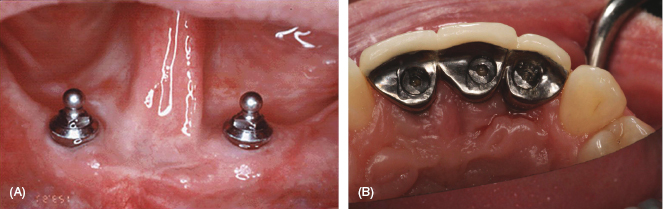
The tissue should look pink, firm, and keratinized with no signs of infection. Hygienists should strive to help patients achieve keratinized tissue around their implants where possible. There are indications that nonkeratinized tissue can lead to peri-implant disease (12). If the patient lacks keratinized tissue, place the patient on a home-care protocol to stimulate the gum tissue, better clean the prosthesis, and initiate more frequent implant maintenance scheduled visits. The implant maintenance visits are critical to the overall success of the implant as they monitor the implant(s) for signs of complications. See Figure 6.3a and b for examples of normal and inflamed tissues, respectively.
Figure 6.3 (A) Normal. (B) Inflammation.
An optional tool to use with a soft tissue assessment is an intraoral camera or digital camera. A photo of the soft tissue surrounding the implant is helpful as a base point to monitor the inflammation, can educate the patient about the appearance of healthy tissue or inflammation, and can be an excellent visual tool to reinforce the importance of good home care. Record the color of the tissue, whether there is a crater appearance of the tissue surrounding the implant, and if the texture of the tissue is keratinized or nonkeratinized. Take note if inflammation or infection signs are present, as it can indicate a great deal about what is going on beneath the surface and the health of the implant.
Assessment: probe and palpate for signs of peri-implant disease
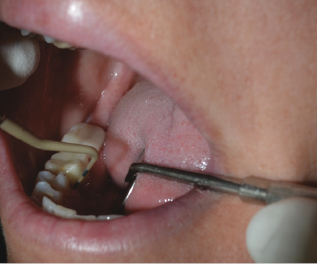
An important but controversial component of the assessment is probing the dental implant, a probing question (see Figure 6.4). In assessing for peri-implant disease, bleeding on probing (BOP) is invaluable in the diagnostic process for peri-implant mucositis and the probing depths are valuable in assessing loss of bone support around osseointegrated implants (13, 14).
Figure 6.4 Probing the dental implant. Courtesy of Nancy Adair, RDH, Hygiene Excellence Inc., www.hygiene-excellence.ca.
Some implant surgeons recommend not probing the implant or waiting 3–6 months following abutment attachment to avoid disrupting the perimucosal seal (15). The perimucosal seal is fragile and penetration during probing can introduce pathogens and jeopardize the success of the implant. According to Gerber et al., “results of the present study demonstrate that 0.15N might represent the threshold pressure to be applied to avoid false positive BOP readings around oral implants” (16). Currently clinicians are using 0.15–0.20 N pressure, but agree that probing around dental implants should be more sensitive than probing natural teeth and caution should be used (16). Bacterial infections and the loss of alveolar bone tend to be more severe and progress much faster around dental implants than in natural teeth (17).
New research is emerging that probing is not harmful, but actually essential to the overall health of the implant. Complete regeneration of junctional epithelium and establishment of new epithelial attachment has been studied and it was revealed that probing around osseointegrated implants “does not appear to have detrimental effects on the perimucosal seal” (18). Peri-implantitis infections occur in 28–56% of implants after 5 years according to Nogueira-Filho et al. in 2010 (19). With increased reported cases of peri-implant diseases (the collective term for inflammatory lesions: mucositis and peri-implantitis), there is a significant reason for monitoring and probing dental implants.
The hygienist should record a baseline probing measurement 6 months after restoration or prosthesis has been loaded. This gives the hygienist a way of determining if detrimental changes are occurring at future recall visits, to distinguish health from disease or loss of osseointegration. Also if more than one hygienist is employed in the office, measurement with compatible probes in millimeters for all inflammation, exposed threads, or bone loss on films allows for more accurate monitoring and consistency.
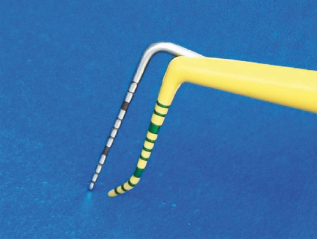
First, the complexity of implants makes the flexibility of the probe essential. Now with more platform-switching implants, narrow implants, and fixed prostheses, the tip needs to be flexible to follow the anatomy of the implant and get an accurate reading. Use a flexible probe or a probe specifically designed for probing implants to reduce the potential for trauma to the perimucosal seal; see Figure 6.5.
Figure 6.5 Note the flexibility of the plastic probe versus the metal probe. Courtesy of PDT, Inc.
Second, record a probe baseline measurement at a specific location to establish a clinical parameter for the patient’s record. Place the probe parallel to the long axis of the buccal/lingual surface of the implant. Take six measurements per implant and identify a location on the restoration as a monitor marker. Record this base line in the patient’s record notes at the first maintenance appointment after the allotted 6 months (20).
It is recommended to wait to probe an implant for 3 months in the mandibular, 6 months in the maxillary. The recommended time to wait to probe for adjunctive bone regeneration procedures is 6 months for mandibular or maxillary. Therefore with a predominance of adjunctive procedures used in conjunction with implants, a “6 month rule” for probing implants after restoration is recommended. If possible, consult the implant surgeon and restorative dentist as to the recommended time to probe each individual implant cases.
Ideally, the probe measurement should read 2.5–5.0 mm or less, depending on soft tissue depth with no other signs of inflammation (21). Compare the measurement with the baseline, and if the probe depths changes note this in the patient’s record notes. If the implant has a probing depth of 5–6 mm or greater, bleeding, and/or a presence of exudate, a radiograph(s) should be taken to assess the implant and the dentist needs to evaluate for bone loss (22).
A well known fact is that the “quantity and quality” of inflammation is important; a grading system is in place to document the amount of inflammation or exudate. However, for clinical practicality reasons in general dentistry, categorize the quantity of inflammation in a word: light, moderate, heavy, or acute. Notation should be taken if there is acute inflammation by using an asterisk, as acute requires immediate attention. Literature states that active inflammation, with BOP, is more of a concern than the actual probing depth.
Inflammation, bleeding, or exudate present on probing should not occur in the sulcus of a healthy implant. If redness, inflammation, bleeding, or exudate upon probing is present, check for plaque or the presence of calculus deposits around the implant. />
Stay updated, free dental videos. Join our Telegram channel
VIDEdental - Online dental courses


