9
Intrusion and Anterior Openbite Treatments
The ability to effectively intrude teeth (and avoid extrusion of anchor unit teeth) is one of the most revolutionary applications of mini-implant anchorage. For the first time in orthodontics it is realistic to intrude single or multiple anterior and posterior teeth, albeit with the caveat that the periodontium needs to be healthy in order to avoid an exacerbation of pocket depth. In the presence of normal periodontal tissues, the intrusion mechanism appears to involve alveolar remodelling (a reduction in alveolar height), rather than just submergence of the teeth within the alveolus. Kanzaki et al. (2007) suggested that this is ‘conceptually equivalent to surgical impaction of alveolar bone by using a segmental osteotomy’.1 Hence, only a limited reduction in clinical crown height occurs and normal probing depth is maintained. Furthermore, it appears that orthodontists’ classical concern of apical root resorption (due to intrusive forces) is not a significant problem, even with relatively heavy forces.2,3
Single Tooth and Anterior Segment Intrusion Treatments
Clinical objectives
- Intrusion of an over-erupted tooth, or the entire group of upper or lower incisors to correct a deep overbite, and perhaps also reduce excessive vertical incisal display.
Treatment options
- Conventional approaches such as reverse curve archwires or segmental arch mechanics.
- Maxillary impaction orthognathic surgery, especially in the presence of excessive gingival display and lip incompetence.
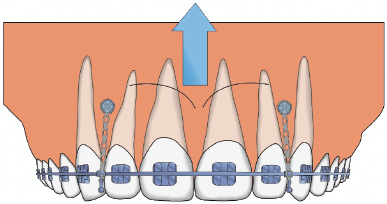
- Direct intrusive traction from labial/buccal mini-implants to the orthodontic brackets or archwire (Fig. 9.1). This may be supplemented in the maxillary arch by traction from a palatal alveolar mini-implant.
- Cantilever traction from mini-implants in ‘remote’ alveolar or palatal sites (if there is insufficient interproximal space adjacent to the target teeth).
- Indirect anchorage of a molar tooth whilst a utility intrusion arch or a cantilever wire is utilised from an auxiliary tube on the molar.
Figure 9.1 Diagram of incisor intrusion mechanics where vertical traction is applied from bilateral mini-implants, sited mesial to the canines, to the archwire or nearby brackets.
Relevant clinical details
- The incisor relationship and inclinations.
- Upper incisor vertical display (passive and smiling) in relation to the patient’s age, i.e. is incisor intrusion beneficial in terms of reducing the incisal show or would this risk prematurely aging the patient?
- Presence of an occlusal cant/vertical facial asymmetry.
- The periodontal status since teeth should not be intruded in the presence of active periodontal disease (bleeding or pocketing).
- The height of attached gingiva adjacent to the tooth/teeth to be intruded. If this is reduced then it will limit the intrusion range for direct traction (from an adjacent mini-implant), given that the intruding teeth will move towards the mini-implant. In this situation indirect anchorage of a posterior tooth and the use of an intrusive lever arm may be preferable.
- The root proximity of teeth adjacent to the planned insertion sites.
Biomechanical principles
- Buccal mini-implants may cause undesirable inclination/torque changes since traction applied to the labial crown surface tends to tip the crown labially. This is reduced by the use of a low profile mini-implant (where the traction is applied close to the gingival surface), insertion of the mini-implants distal to the canines, and/or the addition of archwire torque.
- If the incisors procline during intrusion then anterior spacing will develop. This is avoided by cinching back the ends of the archwire or applying traction for space closure.
Clinical tips and technicalities
- If there is a prominent labial frenum then either avoid midline mini-implant insertion or undertake a frenectomy to deter soft tissue interference or overgrowth (over the mini-implant head).
- Labial tipping of intruding single teeth may also be controlled by the use of a vacuum-formed baseplate to contact the coronal aspect of the crown and with a window cut to allow for apical movement of the attachment on the tooth.
Pre-insertion
Mini-implant selection
Insertion
Post-insertion
- A 45 year old female with a Class II division 1 malocclusion (Fig. 9.2a) complicated by mandibular retrognathia, a very low MMPA and a compromised dentition (unsuitable for comprehensive orthodontics). A mandibular advancement osteotomy was performed (utilising mini-implant intermaxillary fixation) to correct the traumatic overbite, followed by limited alignment and levelling of the lower buccal segments. This required intrusion of the over-erupted upper left canine.
- 1.5 mm diameter, 6 mm length, short neck Infinitas mini-implants were fully inserted on the buccal aspect mesial and distal to the upper left canine. Elastomeric traction was applied to a cleat on the canine’s labial surface (Figs 9.2b, c). By 16 weeks the canine had been vertically over-corrected, without labial crown tipping. The canine was allowed to settle into occlusion as the lower buccal teeth were extruded using a box elastic from the mini-implants (Figs 9.2d, e).
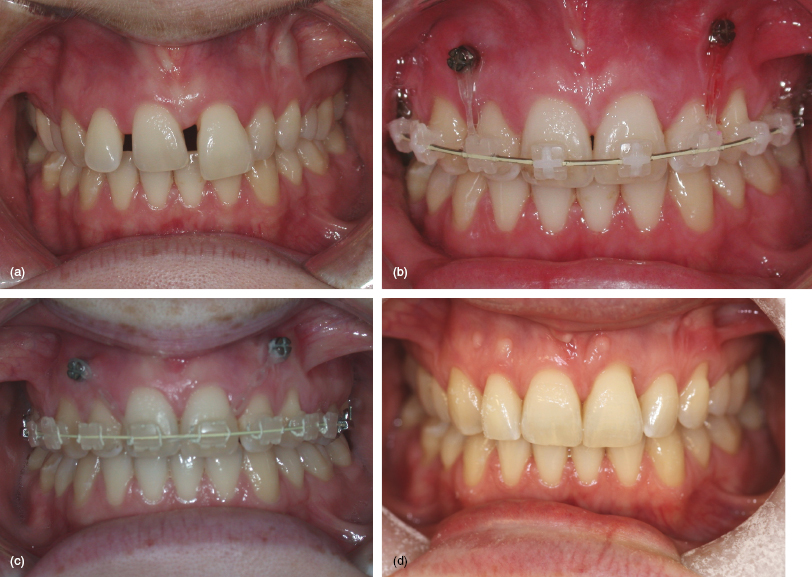
- A 24 year old female with a Class II division 2 malocclusion with absent upper right first premolar and left canine teeth, and a history of aggressive juvenile periodontitis (Fig. 9.3a). She required periodontal stabilisation, then alignment and intrusion of the over-erupted upper incisor teeth and the creation of inter-incisal clearance for a bonded retainer.
- The maxillary arch was levelled to accommodate a 0.019 × 0.025 NiTi archwire then 1.5 mm diameter, 9 mm length, short neck Infinitas mini-implants were inserted on the buccal aspect of the arch, distal to the upper lateral incisors and close to the MGJ. Light elastomeric traction was applied for 6 months, initially to the lateral and then to the central incisor brackets (Figs 9.3b, c). The later traction vector was more oblique to limit labial crown tipping. The periodontal status and overbite remained stable as seen over four years after debond (Fig. 9.3d).
Figure 9.2 (a) Pre-treatment views showing this severe Class II division 1 malocclusion complicated by over-eruption of the maxillary left canine and inadequate dental support for formal fixed appliance treatment. (b) The upper left canine at the start of its intrusion, following a mandibular advancement osteotomy to correct the Class II discrepancies. Elastomeric traction is applied from mesially and distally sited 6 mm length mini-implants to a low profile cleat. This intrusion will enable the lower buccal teeth to be levelled. (c) The canine intrusion is progressing by eight weeks and (d) by sixteen weeks its level has been over-corrected, without buccal tipping. A vertical box elastic is then added to extrude the lower teeth. (e) Debond view, accepting incomplete occlusal interdigitation.
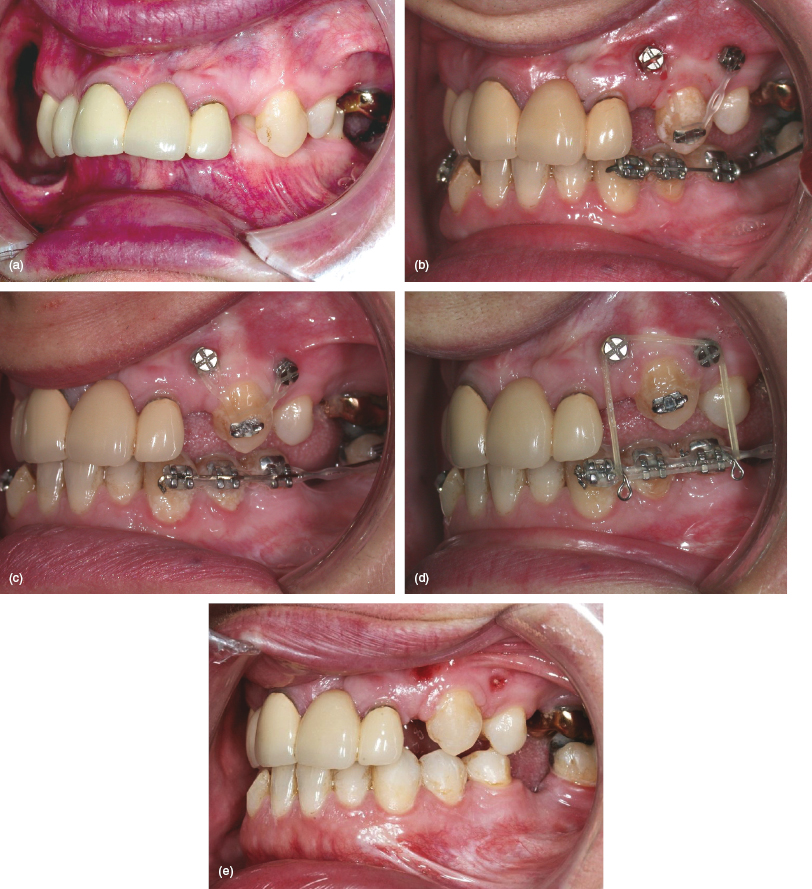
Figure 9.3 (a) Pre-treatment view showing the over-erupted upper left central incisor, absence of the upper right first premolar and left canine teeth, and anterior spacing. (b) Vertical traction from bilateral mini-implants, inserted at the mucogingival junction, with a 0.019 × 0.025 steel archwire. (c) View of aligned teeth and the improved gingival contour during treatment, and then (d) four years after debond.
Anterior Openbite Treatment
Anterior openbite (AOB) is one of the most difficult malocclusion features to treat non-surgically. Traditional orthodontic camouflage tends to extrude the incisors, but this has several key disadvantages: the risk of excessive upper incisor exposure (crown length display); unfavourable incisor retroclination; an unaesthetic effect on the nasolabial profile and smile; and a particularly high relapse risk (partly due to practical difficulties in retention).4,5 There is also a greater tendency to prescribe premolar extractions in AOB cases with the aim of limiting incisor proclination and consequently vertical incisor separation. Furthermore, it is claimed that premolar extractions enable mesial movement of the molars and consequently reduce the maxillo-mandibular planes angle (MMPA), but this is not supported by research evidence.6 Therefore, extraction decisions should be based on dental factors such as crowding and centreline discrepancies, rather than the AOB per se. The alternative of surgical impaction of the posterior maxilla is effective, but it involves invasive and expensive treatment, it must be delayed until after completion of facial growth, and it entails surgical morbidity and risks, and possibly unfavourable nasal changes. How much better would it be to both correct the AOB and improve dentofacial aesthetics by a more effective and patient-friendly approach?
Mini-implant molar intrusion now represents a real alternative to orthognathic surgery in Class I and II skeletal AOB cases (but not in skeletal Class III patients where mandibular autorotation would worsen the antero-posterior relationship). In effect, clockwise rotation of the maxillary occlusal plane causes a reduction in both the MMPA and AOB.7,8,9,10,11 Crucially, intrusion treatment is feasible in both adults and adolescents, and avoids the surgical morbidity and in-patient costs associated with a maxillary osteotomy. Over the last few years I have given those AOB patients, whom I think may benefit from orthognathic surgery, the opportunity to discuss the options fully on a combined orthognathic clinic: none have opted for surgery on the basis of their AOB problems, and some have been desperate to avoid surgery even accepting residual Class II facial features. I find this to be genuine informed consent and would advise that such patients are given details of all options open to them. In my experience, none have regretted taking a non-surgical approach.
After first utilising buccal mini-implant sites, I have found palatal insertion sites to be much more effective for maxillary molar intrusion in terms of the greater availability of interproximal space, sufficient cortical bone support and range for vertical traction.12 Consequently, the clinical steps outlined here describe the culmination of this experience with palatal mini-implants combined with an intrusion transpalatal arch (TPA) or quadhelix.
Clinical objectives
- Intrusion of the maxillary, and possibly the mandibular, molars to correct an AOB (and Class II discrepancies where present).
- Counter-clockwise mandibular autorotation.
Stay updated, free dental videos. Join our Telegram channel
VIDEdental - Online dental courses


