Class III, IV, and V Direct Composite and Glass Ionomer Restorations
Class III, IV, and V Direct Composite Restorations
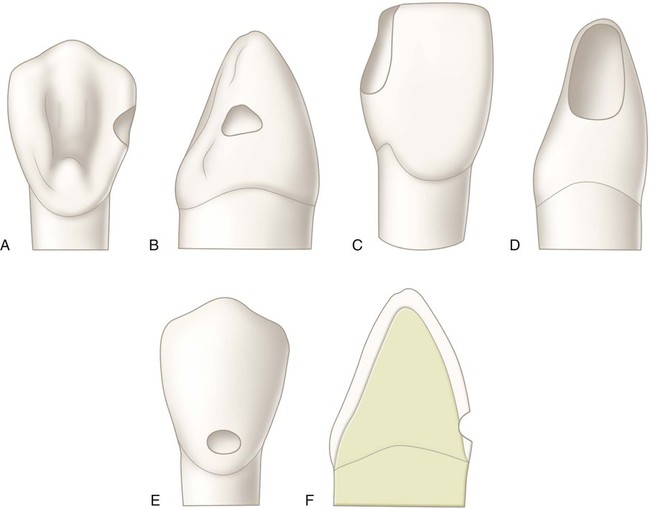
This chapter presents information about Class III, IV, and V direct composite restorations (Fig. 9-1). It also presents information about any differences in these classes of restorations when a glass ionomer type of material is used for the restoration.

Contraindications
The main contraindication for use of composite for Class III, IV, and V restorations is an operating area that cannot be adequately isolated.1–3 Class V composite restorations also may have their durability compromised when the restoration extends onto the root surface (no marginal enamel). Because bonding to dentin is not as predictable or durable as bonding to enamel, in such situations, the dentin gingival margin is more prone to microgap formation and marginal microleakage than the enamel coronal margin.4–7 Any extension onto the root surface requires the most meticulous efforts of the operator to best ensure a successful, long-lasting restoration.
Clinical Technique for Class III Direct Composite Restorations
Initial Clinical Procedures
Chapters 7 and 8 presented information about procedures necessary before beginning the restoration: (1) Anesthesia is usually necessary for patient comfort and helps decrease salivary flow during the procedure; (2) occlusal assessments should be made to determine the tooth preparation design and to properly adjust the restoration’s function; (3) the composite shade must be selected before the tooth dehydrates and concomitantly lightens; (4) the area must be isolated to permit effective bonding; (5) if the restoration involves the proximal contact, inserting a wedge in the area beforehand may assist in the re-establishment of the proximal contact with composite.
Tooth Preparation
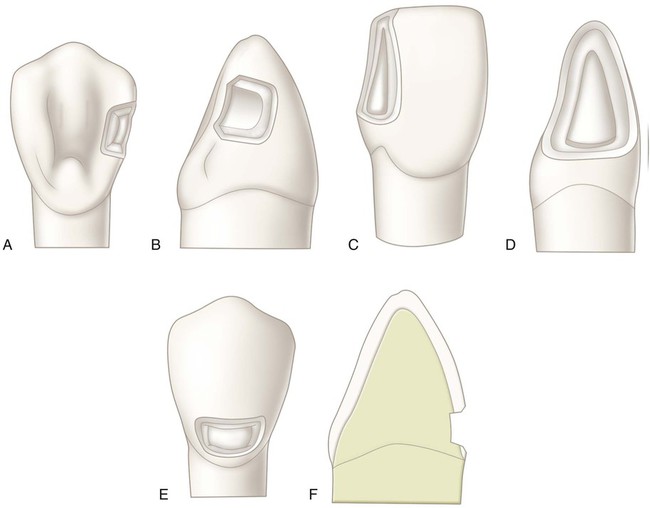
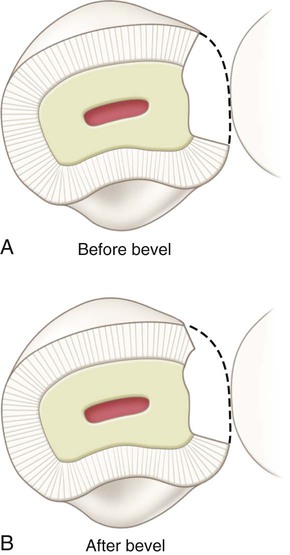
In general, the tooth preparation for a Class III direct composite restoration involves (1) obtaining access to the defect (caries, fracture, non-carious defect), (2) removing faulty structures (caries, defective dentin and enamel, defective restoration, base material), and (3) creating the convenience form for the restoration (Fig. 9-2). In most cases, an enamel bevel is used on the facial cavosurface margins to increase the surface area for bonding, and to provide a gradual transition from the restoration to the surrounding tooth structure for esthetics. Obtaining access to the defect may include removal of sound enamel to access carious dentin. The extension of the preparation is, therefore, ultimately dictated by the extension of the fault or defect. It is usually not necessary to reduce sound tooth structure to provide “bulk for strength” or to provide conventional retention and resistance forms.
Because of the adequate bond of composite to enamel and dentin, most Class III composite restorations are retained almost exclusively by bonding, and no additional preparation retention form is necessary. Using diamond rotary instruments for tooth preparation leaves the surfaces rougher than when carbide burs are used, increasing the surface area and the micromechanical retention. Diamonds also leave a thickened smear layer, however.8–10 Self-etch bonding systems can be negatively affected by thick smear layers because of their mildly acidic nature and the resultant difficulty in penetrating thick smear layers.11 The selection of the rotary preparation instrument is operator dependent, consistent with appropriate knowledge and technique. In the rare cases where additional retention form is needed, it can be achieved either by increasing the surface area with a wider enamel bevel or by adding retentive features in the preparation internal walls.
1. The facial enamel is conserved for enhanced esthetics. (Some unsupported, but non-friable, enamel may be left on the facial wall of the preparation.)
2. Shade matching of the composite is less critical.
3. Discoloration or deterioration of the restoration is less visible.
Indications for a facial approach include the following:
1. The caries lesion is positioned facially, and facial access would significantly conserve the tooth structure.
2. Teeth are irregularly aligned, and facial access would significantly conserve the tooth structure.
3. An extensive caries lesion extends onto the facial surface.
4. A faulty restoration that originally was placed from the facial approach needs to be replaced.
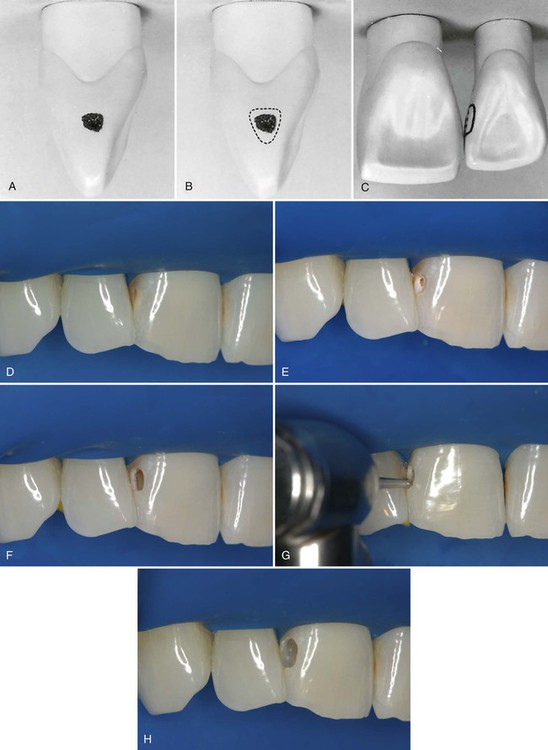
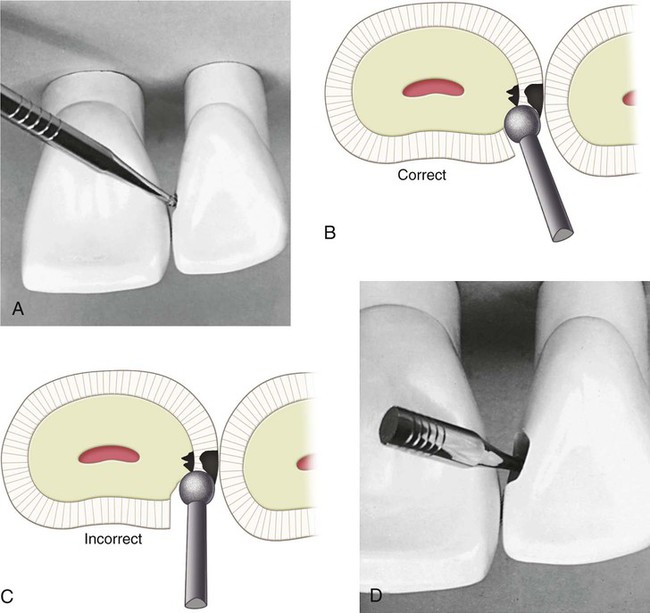
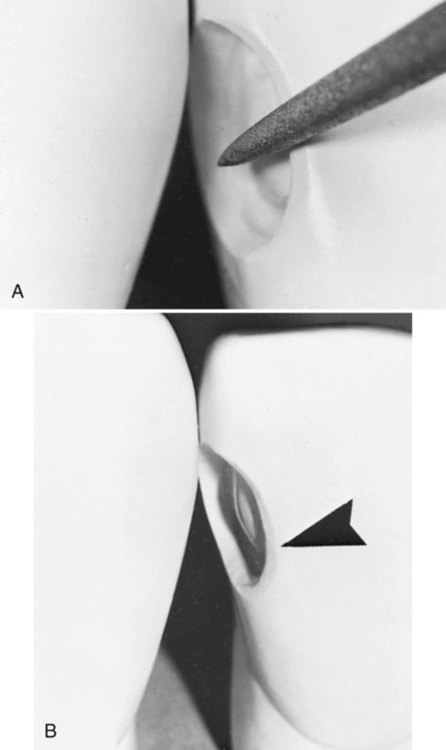
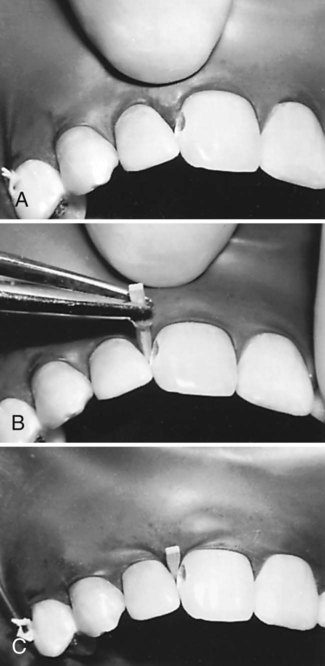
The preparation is initiated from a lingual approach (if possible) by using a round carbide bur or diamond instrument of a size compatible with the extent of the lesion. Before contacting the tooth, the bur is positioned for entry and rotated at high speed using air-water spray. The point of entry is located within the incisogingival dimension of the lesion or defect and as close to the adjacent tooth as possible without contacting it (Fig. 9-3, A). The cutting instrument is directed perpendicular to the enamel surface but at an entry angle that places the neck portion of the bur or diamond instrument as far into the embrasure (next to the adjacent tooth) as possible; light pressure and intermittent cutting (brush stroke) are used to gain access into the preparation. Incorrect entry overextends the lingual outline and unnecessarily weakens the tooth (see Fig. 9-3, B and C).
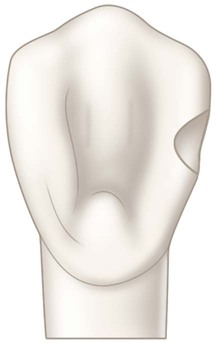
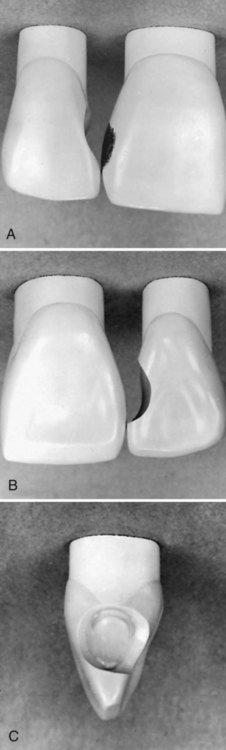
The same instrument may be used to enlarge the initial access opening sufficiently to permit, in subsequent steps, caries removal, completion of the preparation, and insertion of the restorative material (see Fig. 9-3, D). No effort is made to prepare the walls that are perpendicular to the enamel surface; for small preparations, the walls may diverge externally from the axial depth in a scooped shape, resulting in a beveled marginal design and conservation of internal tooth structure (Fig. 9-4). For larger preparations, the initial tooth preparation still is as conservative as possible, but the preparation walls may not be as divergent from the axial wall. Subsequent beveling or flaring of accessible enamel areas may be required. Despite the size of the lesion, the objective of the initial tooth preparation is the same: to prepare the tooth as conservatively as possible by extending the outline form just enough to include the peripheral extent of the lesion. Sometimes, the incorporation of an enamel bevel also may be used to extend the final outline form to include the caries lesion (Fig. 9-5). If possible, the outline form should not (1) include the entire proximal contact area, (2) extend onto the facial surface, or (3) be extended subgingivally. Extensions should be minimal, including only the tooth structure that is compromised by the extent of the caries lesion or defect. Some undermined enamel can be left in nonstress areas, but very friable enamel at the margins should be removed.
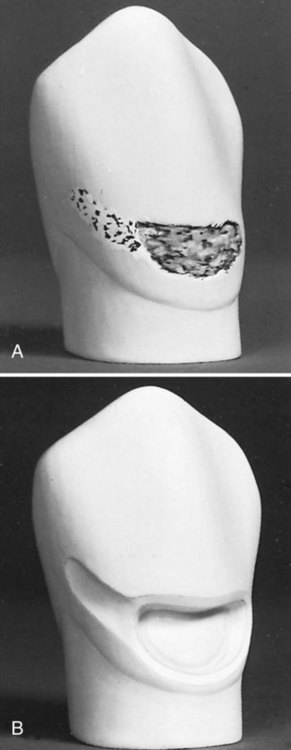
The extension axially also is dictated by the extent of the fault or caries lesion and usually is not uniform in depth. As noted earlier, most initial composite restorations (primary caries) use a scooped or concave preparation design (Fig. 9-6, A and B). Because a caries lesion that requires a restoration usually extends into dentin, many Class III preparations are done to an initial axial wall depth of 0.2 mm into dentin (Fig. 9-7). No attempt is made, however, to prepare distinct or uniform axial preparation walls; rather, the objective is to include only the infected carious area as conservatively as possible by “scooping out” the defective tooth structure. Additional caries excavation (deeper than the initial stage of 0.2 mm pulpal to the dentinoenamel junction [DEJ]) or marginal refinement may be necessary later.
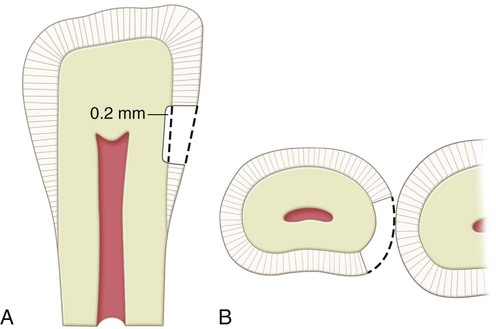
The axial wall must provide access for the removal of infected dentin and the application of the adhesive and composite. If the preparation outline extends gingivally onto the root surface, the gingival floor should form a cavosurface margin of 90 degrees, and the depth of the gingivoaxial line angle should be not more than 0.75 mm at this initial stage of tooth preparation. The external walls are prepared perpendicular to the root surface. In this area of the tooth, apical of the cementoenamel junction (CEJ), the external walls are composed entirely of dentin and cementum. Another consideration could be the use of a resin-modified glass ionomer (RMGI) liner on the root surface portion before composite placement to help maintain the seal.12–15
Larger preparations may require additional beveling of the accessible enamel walls to enhance retention by bonding (Figs. 9-8, A and B, and 9-9). These enamel margins are beveled with a flame-shaped or round diamond instrument. The bevel is prepared by creating a 45-degree angle to the external surface and to a width of 0.5 to 2.0 mm, depending on the size of the preparation, location of the margin, and esthetic requirements of the restoration (Fig. 9-10; see Fig. 9-9). If the gingival floor has been extended gingivally to a position where the remaining enamel thickness is minimal or nonexistent, the bevel is omitted from this area to preserve the remaining enamel margin or maintain 90-degree cavosurface margin in dentin. Likewise, a bevel on the lingual enamel margin of a maxillary incisor may be precluded because of the presence of occlusal contact.
Remaining old restorative material on the axial wall should be removed if any of the following conditions are present: (1) the old material is amalgam, and its color would negatively affect the color of the new restoration; (2) clinical or radiographic evidence of caries under the old material is present; (3) the tooth pulp was symptomatic preoperatively; (4) the periphery of the remaining restorative material is not intact (i.e., some breach has occurred in the junction of the material with the adjacent tooth structure, which may indicate caries under the material); or (5) the use of the underlying dentin is necessary to effect a stronger bond for retention purposes. If none of these conditions is present, the operator may elect to leave the remaining restorative material, rather than risk unnecessary excavation nearer to the pulp and subsequent irritation or exposure of the pulp. A RMGI base is applied only if the remaining dentin thickness is judged to be less than 1.5 mm and in the deepest portions of the preparation.16 Calcium hydroxide liners are used only in cases of pulp exposures or near-exposures as a direct pulp-capping material.16 If used, the calcium hydroxide liner should always be covered with a RMGI base, sealing the area and preventing the etchant (applied later) from dissolving the liner.16,17
For Class III direct composite preparations with facial access, with a few exceptions, the same stages and steps of tooth preparation are followed as for lingual access. The procedure is simplified because direct vision is used (Fig. 9-11).
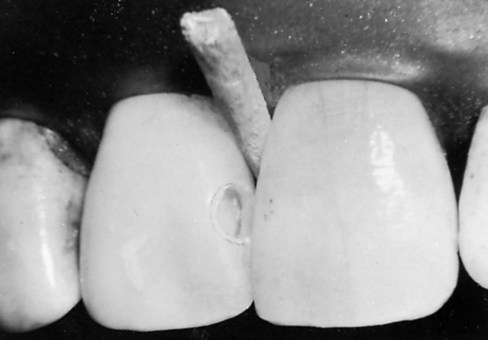
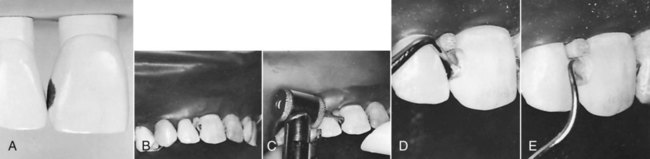
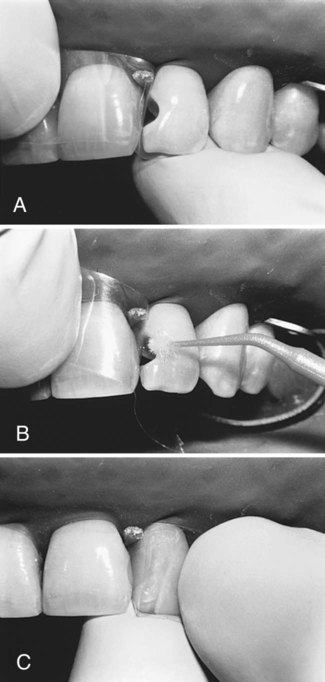
A large Class III lesion on the distal surface of a maxillary right central incisor is shown in Fig. 9-12, A. The rubber dam is placed after the anesthetic has been administered and the shade has been selected. A wedge is inserted in the gingival embrasure to depress the rubber dam and underlying soft tissue, improving gingival access (see Fig. 9-12, B). Using a carbide bur or diamond instrument rotating at high speed and with air-water spray, the outline form is prepared with appropriate extension and the initial, limited pulpal depth previously described in the lingual approach preparation (see Fig. 9-12, C). Caries removal with a spoon excavator and an explorer is shown (see Fig. 9-11, D and E). Some undermined enamel can be left if it is not in a high-stress area.
When a proximal caries lesion or defective restoration extends onto the facial and the lingual surfaces, access may be accomplished from either a facial approach or a lingual approach. An example of an extensive Class III initial tooth preparation that allows such choice is illustrated in Fig. 9-13.
Restorative Technique
Matrix Application
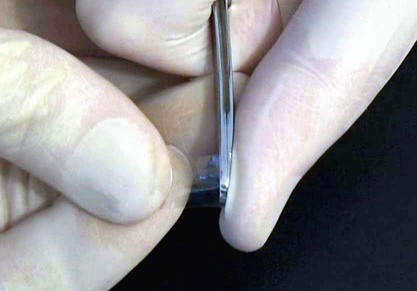
A properly contoured thin Mylar strip matrix is used for most Class III and IV preparations. Because the proximal surface of a tooth is usually convex incisogingivally and the strip may be flat, it is necessary to shape the strip to conform to the desired tooth contour. One way to contour a Mylar strip is by drawing it along a hard, rounded, object (Fig. 9-14). The amount of convexity placed in the strip depends on the size and contour of the anticipated restoration. Several pulls of the strip with heavy pressure across the rounded end of the operating pliers may be required to obtain enough convexity. The contoured strip is positioned between teeth so that the convex area conforms to the desired tooth contour (Fig. 9-15, A). The matrix strip is extended at least 1 mm beyond the prepared gingival and incisal margins. Sometimes, the strip does not slide through or is distorted by a tight contact or preparation margin. In such instances, a wedge is lightly positioned in the gingival embrasure before the strip is inserted. Care must be taken not to injure the interproximal tissues and induce bleeding. When the strip is past the binding area, it may be necessary to loosen the wedge to place the strip past the gingival margin (between the wedge and margin). Then the wedge is re-inserted tightly (see Fig. 9-15, B).

The wedge is placed using No. 110 pliers from the facial approach for lingual access preparations, and vice versa for facial access, just apical to the gingival margin. When isolation is accomplished with the rubber dam, wedge placement may be aided by a small amount of water-soluble lubricant on the tip of the wedge. The rubber dam is first stretched gingivally (on the side from which the wedge is inserted), then released gradually during wedge insertion (Fig. 9-16). Subsequently, a trial opening and closing of the matrix strip is helpful. It must open enough for access to insert the adhesive and composite and close sufficiently to ensure a proper contour. It may be necessary to shorten the wedge or insert it from the opposite embrasure to optimize access.
Placement of the Adhesive
The usual technique for adhesive placement when using an etch-and-rinse adhesive is as follows: First, the proximal surface of the adjacent unprepared tooth should be protected from inadvertent etching by placing a Mylar strip, if not yet applied, or a Teflon tape. Then, phosphoric acid gel etchant is applied to all of the prepared tooth structure, approximately 0.5 mm beyond the prepared margins onto the adjacent unprepared tooth. The etchant typically is left undisturbed for 15 seconds. The area is rinsed thoroughly to remove the etchant. If dentin is exposed, rather than air-dry the rinsed area, it may be better to use a damp cotton pellet, a foam pellet, or a disposable brush to remove the excess water. If the area is dried, it can be re-moistened with water, a re-wetting agent, or a desensitizing agent such as glutaraldehyde-containing desensitizers. Glutaraldehyde-containing desensitizers have been shown to have no adverse effects on bond strength and have been shown to reduce postoperative sensitivity by reducing dentin permeability.18–21 Ultimately, the dentin surface should appear moist, as evidenced by a glistening appearance. Over-drying or pooling of excess water should be avoided.
If the bonding system combines the primer and the adhesive, as in a one-bottle etch-and-rinse adhesive, the solution is applied next on all of the tooth structure that has been etched. Every effort should be made to prevent the adhesive from pooling in remote areas of the preparation or against the Mylar strip, if used (Fig. 9-17, A). When applied, the adhesive is air-dried to evaporate any solvent (acetone, alcohol, or water), then light-activated, as directed. Because these materials are resin-based, they generally exhibit an oxygen-inhibited layer on the surface after polymerization. The composite material bonds directly to the polymerized adhesive, unless the oxygen-inhibited layer is contaminated. The application of the adhesive and the composite should occur in a timely manner.
Stay updated, free dental videos. Join our Telegram channel
VIDEdental - Online dental courses


