Chapter 8
V to Y advancement flap
Introduction
The V to Y advancement flap has many uses in the reconstruction of skin defects at various head and neck sites. This advancement flap is commonly used in the reconstruction of defects located in the cheek region1 or in the upper lip.2 The technique can be used in various other sites within the head and neck, and its use seems to be gaining popularity, particularly for reconstructing scalp defects.3,4,5
One advantage of the V to Y advancement flap is the ability to use tissue that is located adjacent to the defect site and which therefore possesses similar quality skin color and texture. Another advantage of the use of this flap is that the placement of the incision sometimes camouflages the final scar as it is in a less conspicuous area.6
The V to Y advancement flap is excellent for reconstruction of superficial defects of the upper lip skin. The location of these defects makes reconstruction challenging, often leading the less experienced surgeon to convert them to a full thickness defect and advancing the lip or undermining and closing the lip. Either of these two options leads to a less than desirable esthetic outcome.
Anatomy
The use of the V to Y advancement flap is dependent on the random perfusion to subcutaneous tissues and ultimately to the skin. Because the design of the flap is often in the reconstruction of small defects, its transposition is not dependent on a named source vessel. The main perfusion to the flap comes from the dermal plexus and from the subdermal plexus from the perforating arteries.7
The venous drainage of the flap is equally random and depends on the integrity of the vascular bed of the flap to its underlying bed.
The survivability of the flap is generally dependent on the maintenance of the perforating vessels from the underlying tissues. The reliance on the perfusion from the perforators requires a broad subcutaneous bed under the cutaneous portion of the flap to be transposed.
Flap harvest
- The most important step when raising a V to Y advan-cement flap is the location and design of the flap.
- The location of the defect needs to be well understood as it relates to the potential movement of the surrounding skin in a V–Y advancement.
- An understanding of the pliability of the skin over its underlying tissue bed is essential in the design of the flap.
- The location of the donor site should take into account where the final scar will be placed and whether the movement will cause distortion of the surrounding tissues or structures.
- Once the location is determined, the donor site is marked and the flap is designed taking into consideration the size and shape of the defect to be reconstructed.
- The shape and size of the defect is drawn to fit within the design of a large V-shaped flap.
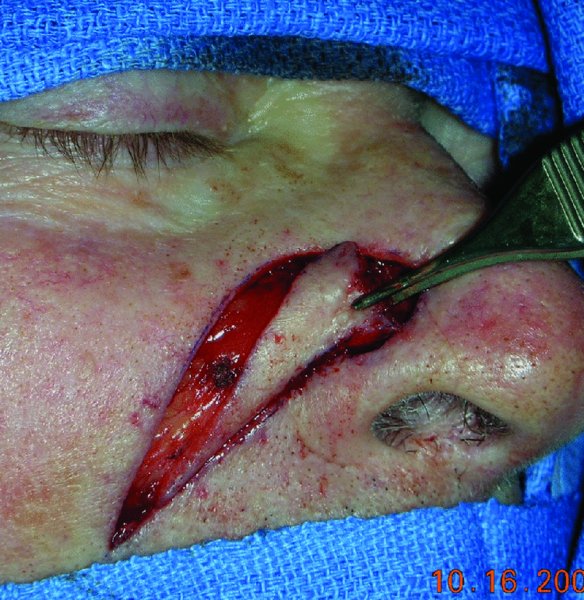
- The flap is elevated by making the skin incision deep to the dermis and into the subcutaneous fat.
- The adjacent tissues are undermined in a broad front on both sides of the V as well as inferiorly along the point of the V. This undermining should be in the subcutaneous layer along the same depth of the incision of the flap.
- The area along the front of the V (at the opening) is slightly undermined, usually just superficial to the muscle.
- This area under the flap, along the shape of the V, should not be undermined as this is where the flap gains its vascularity from the perforating vessels that come from below.
- The mobility of the flap is checked to see if it will reach the defect site without tension.
- If the flap doesn’t reach the defect site, further undermining is carried out and the process rechecked until the desired mobility is achieved, and the flap is mobilized to cover the defect site.
- The flap is then contoured to fit the shape of the defect and to achieve a harmonious fit.
- The donor site is closed and the amount of advancement is noted by the area from the tip of the V at its new location compared to its location at the time of incision.
- The difference between the two points is the amount of advancement achieved with the flap advancement.
- The wound is closed by first placing a few sutures deep in the dermal layer and then the skin is closed with non-resorbable sutures.
- See Figures 8.1 to 8.6.
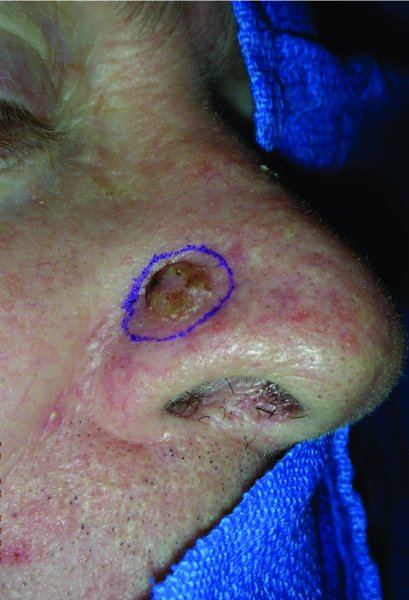
Figure 8.1 View of a lateral nasal lesion prior to excision.
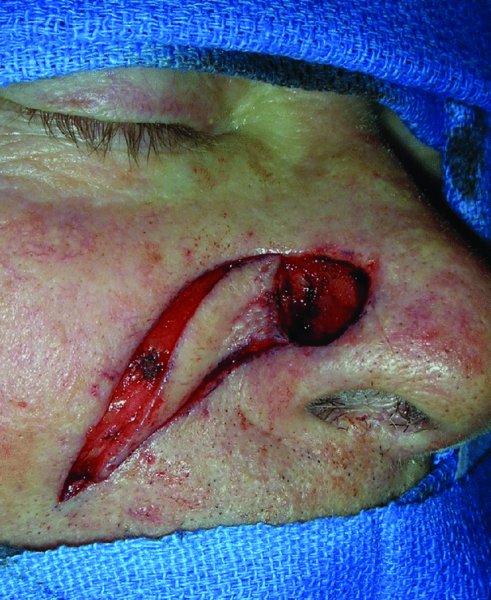
Figure 8.2 incision of the V–Y flap with lateral undermining prior to advancement.
Stay updated, free dental videos. Join our Telegram channel
VIDEdental - Online dental courses


