Chapter 7
Ultrasonic instrumentation technique modules
CHAPTER OBJECTIVES
On completion of this chapter, the student will be able to:
- Utilize instrumentation sequencing strategies that improve the efficiency of ultrasonic instrumentation.
- Demonstrate appropriate implementation of each of the transitions in adaptation used to advance the ultrasonic tip through the treatment area.
- Rationalize the preferential use of furcation-specific, ball-end tips for the debridement of furcational surfaces.
- Execute proper ultrasonic instrumentation technique, using an appropriate tip design, in any area of the dentition.
In order to accomplish thorough debridement in the most efficient manner, the principles of ultrasonic instrumentation presented in Chapter 6 should be implemented in a systematic method or sequence. This chapter first addresses several strategies for instrumentation sequencing in general, followed by instructional technique and sequence modules specific to anterior and posterior sextants of the dentition, advanced furcation involvement, dental implants, and supragingival deposits.
STRATEGIES FOR INSTRUMENTATION SEQUENCING
Work by sextant
While it is common practice to treatment plan periodontal therapy by quadrant, ultrasonic instrumentation should be performed, in stages, by sextant (Figure 7.1), regardless of the extent of the treatment area (single quadrant, multiple quadrants, or full mouth).
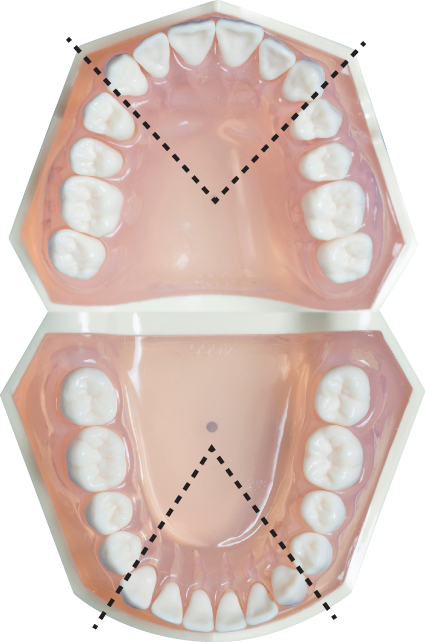
Figure 7.1 Division of the dentition into sextants; two anterior and four posterior sextants
As instrumentation of anterior and posterior teeth predictably require changes in regard to tip design and operator position, working by sextant reduces the frequency of changing these variables, resulting in a more efficient execution of instrumentation.
Likewise, when the presence of moderate–heavy calculus dictates two stages of instrumentation, as is frequently the case in initial periodontal therapy, completion of all scaling instrumentation, by sextant, throughout the designated treatment area before initiating any debridement instrumentation reduces the frequency of changing tip design per stage (scaling/debridement) and per location (anterior/ posterior).
Advance toward operator
Instrumentation in the designated treatment area should always advance toward the operator. This means in posterior sextants, for both left- and right-handed operators, instrumentation begins on the most posterior tooth and advances anteriorly, or toward the operator (Figure 7.2a). In anterior sextants, instrumentation begins on the tooth most distant from the operator, which differs according to handedness (left/right), and advances toward the operator (Figure 7.2b,c).
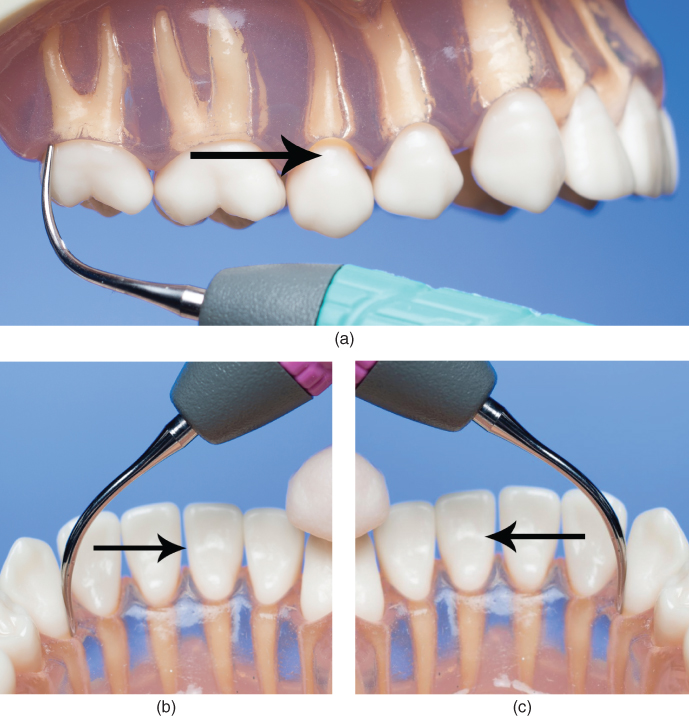
Figure 7.2 The sequence of instrumentation always advances towards the operator from (a) posterior to anterior or, in anterior sextants, from the tooth furthest from operator, which will differ for (b) right-handed versus (c) left-handed operators
Points of adaptation
As with hand instrumentation, the point of adaptation (site on the tooth surface where instrumentation will commence) is the midline of an anterior tooth (Figure 7.3a) and the distal line angle of the buccal and lingual surfaces of a posterior tooth (Figure 7.3b).
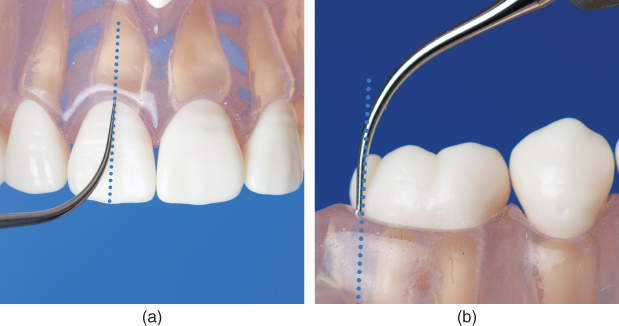
Figure 7.3 To initiate a sequence of instrumentation, the tip is adapted at (a) the midline of an anterior tooth and (b) the distal line angle of a posterior tooth
Unlike hand instrumentation, during which the bladed instrument is advanced through the treatment area by readapting the cutting edge at these points on each tooth, the ultrasonic tip is adapted at this point only on the first tooth in the designated treatment area to initiate an instrumentation sequence which advances by transitioning the tip to the adjacent surface, as described in the next section.
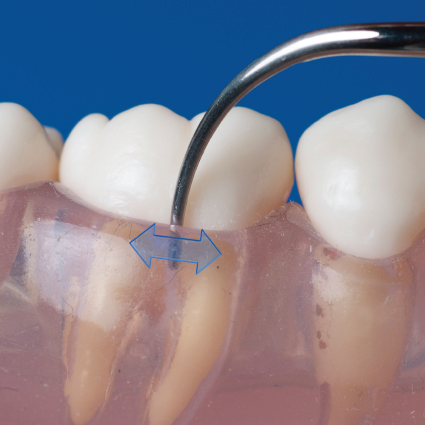
Figure 7.4 Lateral surface of tip vertically adapted to buccal surface. Arrow indicates horizontal stroke pattern
Box 7.1 “Proximal” versus “Interproximal”: What’s the difference?
The terms “proximal” and “interproximal” are used frequently throughout this chapter to distinguish different parts of the dentition. As these terms are often confused, it is important that they be defined prior to studying the remainder of this chapter.
Proximal: Nearest, next, immediately adjacent to; distal or mesial.
Proximal contact area: Proximal area on a tooth that touches an adjacent tooth; seen on the mesial or distal side.
Interproximal: between the proximal surfaces of adjoining teeth in the same arch.
Interproximal space: V-shaped spaces between the teeth formed by the proximal surfaces of adjoining teeth and their contact areas.
Advance by transitioning
Four fundamental transitions in adaptation are made to advance the oscillating tip through a designated treatment area in a sequence that optimizes the use of all surfaces of the tip, thus enabling thorough, efficient, and ergonomic instrumentation of all tooth surfaces.
Figures 7.5–7.13 illustrate and describe each transition, with the blue arrow in each image indicating the direction of the working stroke used on each surface.
Starting from the primary position of vertical adaptation (as shown in Figure 7.3b), a lateral surface (or when applicable, the back) of the tip is advanced across buccal and lingual surfaces using horizontal strokes.
Transition to Proximal Root Surface: On reaching a line angle, vertical adaptation is maintained as the tip crosses the line angle to the proximal surface. On a mesial root surface, the back of the tip inherently adapts with this transition (Figure 7.5); on a distal root surface, the lateral surface of the tip remains adapted (Figure 7.6). The tip is then advanced across the proximal root surface using an oblique stroke pattern.
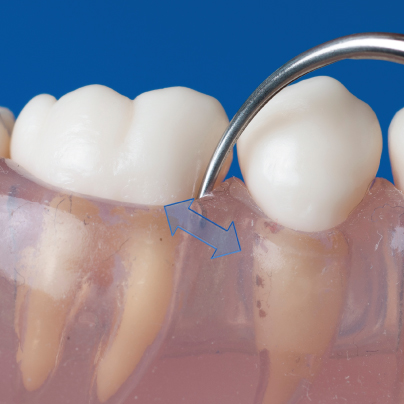
Figure 7.5 Back of tip vertically adapted to mesial surface. Arrow indicates oblique stroke pattern
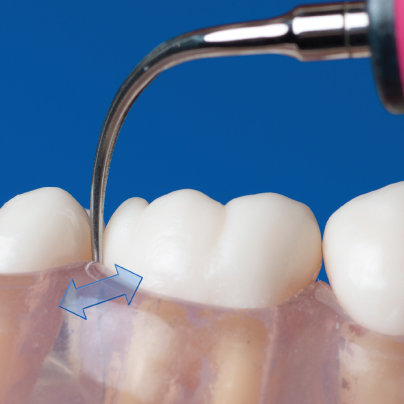
Figure 7.6 Lateral surface of tip vertically adapted to distal surface. Arrow indicates oblique stroke pattern
Box 7.2 Technique pointers
While the convex back of the tip is the ideal surface to adapt to concave root anatomy, it is not clinically possible on the distal aspect (Figure 7.7). Alternatively then, the lateral surface is used to debride the distal root surface (Figure 7.6).
During subgingival instrumentation, DO NOT rotate the tip at the line angle, as is required during manual instrumentation. Rotating at the line angle undesirably transitions the tip from vertical adaptation of the preferred tip surface to oblique adaptation of a lateral surface (Figure 7.8), compromising access and contact of the tip to the proximal surface of the root.

Figure 7.7 Although preferable, vertical adaptation of the convex back of the tip to the distal root anatomy is not clinically possible
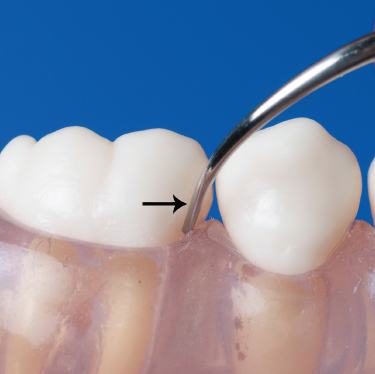
Figure 7.8 Arrow indicates oblique adaptation of the lateral surface resulting from rotation of the tip at the line angle. Compare the position of the tip in this image to the preferable position illustrated in Figure 7.5
Transition to Interproximal Space: As the interproximal space (or cervical embrasure) is entered, contact with the tooth is maintained while the tip is transitioned from vertical to horizontal adaptation by a slight rolling motion. On the distal aspect, the rolling motion adapts the face of the tip to the distal surface (Figure 7.9). On the mesial aspect, the back of the tip remains adapted to the mesial surface throughout this transition (Figure 7.10). It is critical that this transition occurs in the interproximal space against enamel, rather than against root structure, to avoid severe root gouging by the point of the tip during the rolling motion. Stroking of the back or face of the tip against the interproximal surface ensues in a vertical direction.
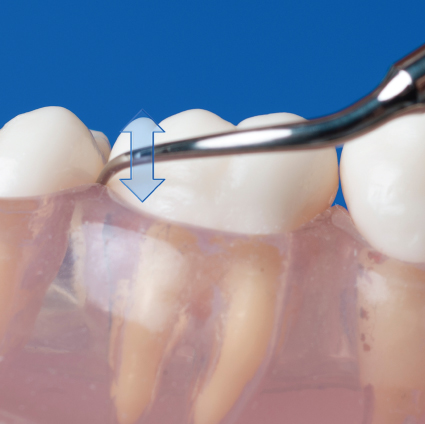
Figure 7.9 Horizontal adaptation of the face of the tip to the distal surface of the crown. Arrow indicates vertical stroke pattern
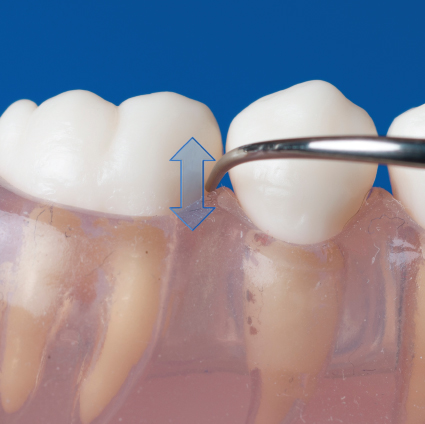
Figure 7.10 Horizontal adaptation of the back of the tip to mesial surface of the crown. Arrow indicates vertical stroke pattern
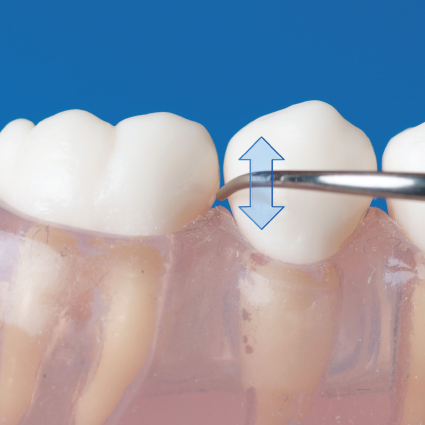
Figure 7.11 Instrumentation advances to the next tooth by horizontally adapting the face of the tip to the distal surface of the crown. Arrow indicates vertical stroke pattern
Transition to Next Tooth: Advancing from the mesial surface of one tooth to the next tooth in the treatment area is accomplished by maintaining horizontal orientation and bringing the face of the tip into adaptation with the distal surface of the adjacent tooth; stroke vertically against the distal surface.
Transition from Interproximal Space: Contact with the tooth is maintained as the tip is transitioned from horizontal to vertical adaptation by a slight rolling motion that adapts the lateral surface of the tip to the distal surface of the tooth (Figure 7.12). As with the transition to the interproximal space, it is critical that this transition also occurs in the interproximal space against enamel to avoid severe root gouging by the point of the tip during the rolling motion. The tip is then advanced subgingivally and stroked in an oblique direction over the distal root surface, toward the distal line angle (Figure 7.13).
Figure 7.12 Vertical adaptation of the lateral surface of the tip to the distal surface of the tooth
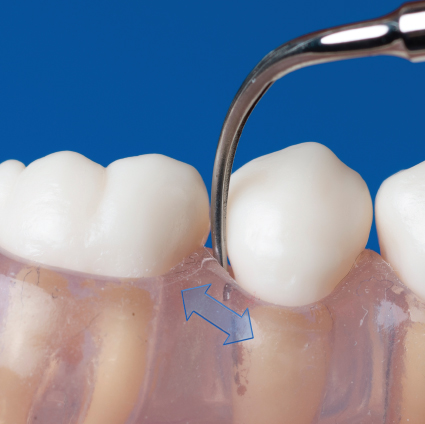
Figure 7.13 After transitioning to vertical adaptation in the interproximal space, the tip is advanced subgingivally to the base of the pocket. Arrow indicates oblique stroke pattern
Utilization of these transitions in specific sextants of the dentition is described in the modules which follow.
SEXTANT SPECIFIC INSTRUMENTATION MODULES
Step-by-step instructional modules for instrumentation of an anterior sextant (Module 1) and a posterior sextant (Module 2) are provided to exemplify the fundamental technique and sequence implemented throughout the dentition.
Although the tip design utilized will change according to the stage of instrumentation and anatomy of the treatment site (Chapter 4), the technique employed is common to all ultrasonic instruments. Thus, a variety of tips are shown throughout the modules to demonstrate universal application of the principles of ultrasonic technique and develop familiarity with an array of tip configurations.
Module 1 Anterior Sextant: Mandibular Anterior Lingual
Table 7.1 Operator position: mandibular anterior sextant (facial/lingual)
| Operator | Preferred position | Alternative position |
| Right-handed | ||
|
Figure 7.14 |
Figure 7.15 |
|
| Left-handed | ||
|
Figure 7.14 |
Figure 7.16 |

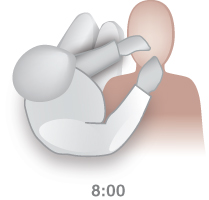

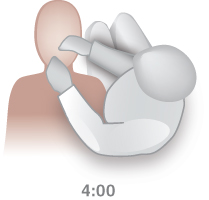
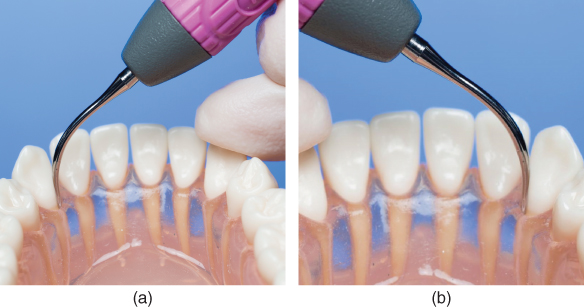
Figure 7.17
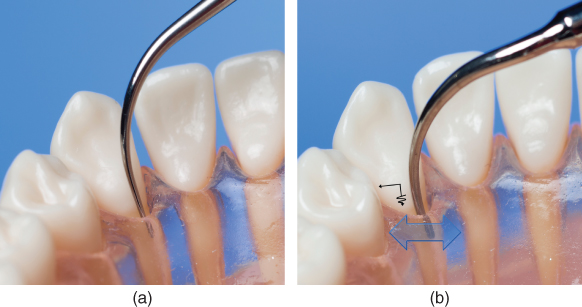
Figure 7.18 #22 (33) L: (a) ultra-thin straight tip (b) slim right curved tip; blue arrow indicates direction of the working stroke, black arrows indicate the path of tip advancement from this point
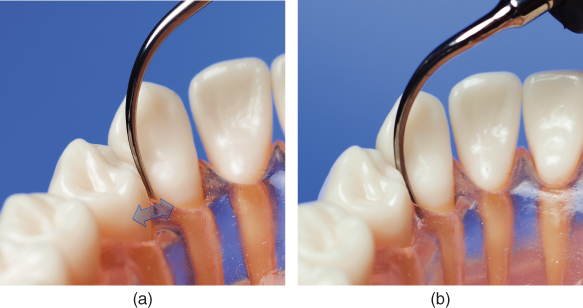
Figure 7.19 #22 (33) D: (a) ultra-thin straight tip; (b) slim right curved tip
Begin at the tooth furthest away from operator: (a) #22 (FDI 33) for right-handed operators; (b) #27(FDI 43) for left-handed operators.
NOTE: Figures 7.18–7.27 illustrate the sequence for right-handed operators. Left-handed operators will follow the same sequence, but advancing through the sextant from the opposite direction.
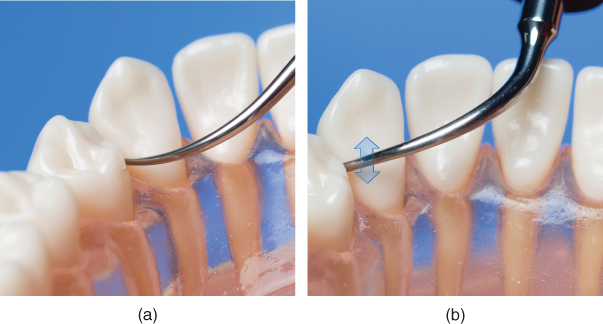
Figure 7.20 #22 (33) D IP: (a) ultra-thin straight tip; (b) slim right curved tip

Figure 7.21 #22 (33) D: ultra-thin straight tip
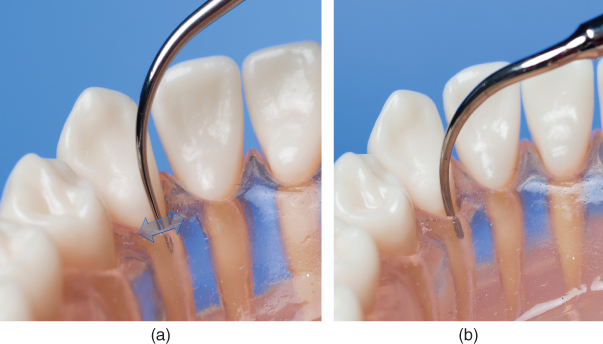
Figure 7.22 # 22 (33) L: (a) ultra-thin straight tip; (b) slim right curved tip
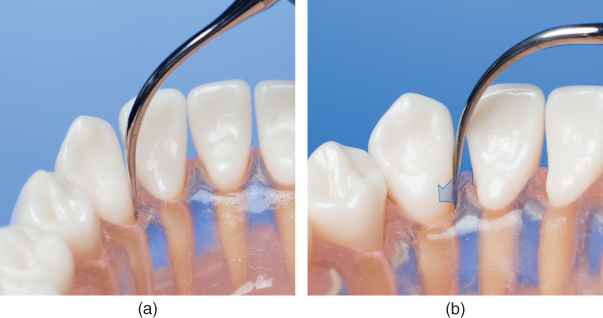
Figure 7.23 # 22 (33) M: (a) ultra-thin straight tip; (b) slim right curved tip
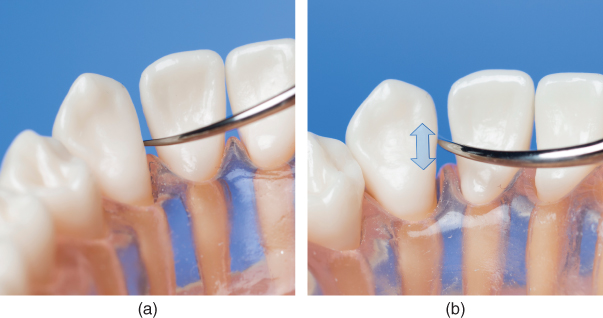
Figure 7.24 #22 (33) M IP: (a) ultra-thin straight tip; (b) slim right curved tip
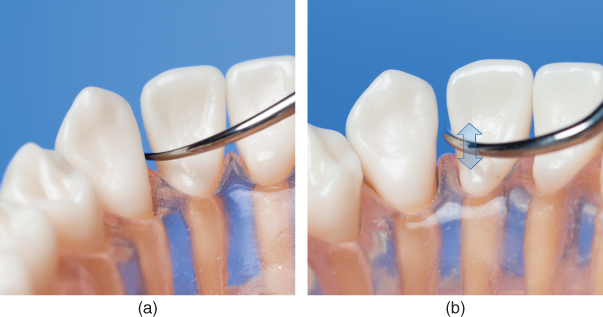
Figure 7.25 #23 (32) D IP: (a) ultra-thin straight tip; (b) slim right curved tip
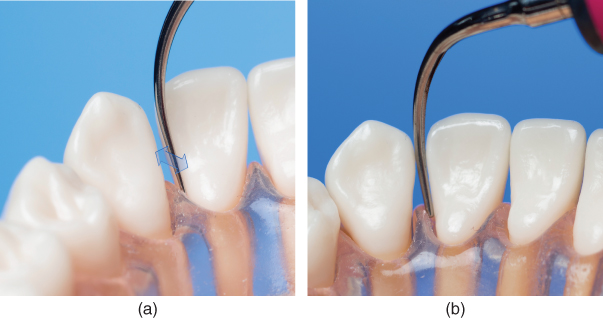
Figure 7.26 #23 (32) D: (a) ultra-thin straight tip; (b) slim right curved tip
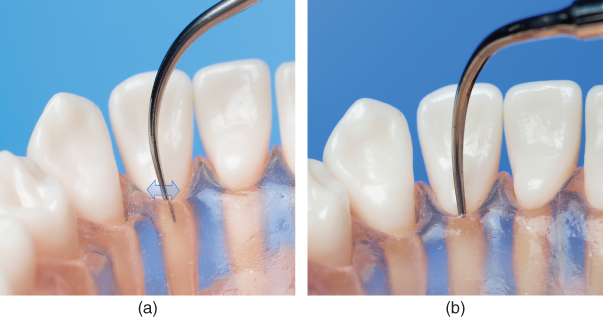
Figure 7.27 #23 (32) L: (a) ultra-thin straight tip; (b) slim right curved tip
Vertically adapt lateral surface (or back) of active tip at the midline (i.e. point of adaptation). Implement horizontal strokes to advance tip subgingivally and distally toward DL line angle.
As tip crosses DL line angle, transition to distal root surface by maintaining vertical adaptation of lateral surface to distal aspect of tooth. Advance subgingivally and facially using horizontal or slightly oblique strokes until hindered by contact point.
Transition to distal interproximal space by horizontally adapting face of tip to distal surface of #22 (FDI 33); stroke vertically.
Transition from distal interproximal space by returning to vertical adaptation of the lateral surface; stroke to retreat tip to DL line angle.
Cross DL line angle and proceed with horizontal strokes to advance tip subgingivally and mesially across lingual surface, toward ML line angle.
As tip crosses ML line angle, transition to mesial root surface adapting back of tip to mesial root surface. Advance subgingivally and facially using horizontal or slightly oblique strokes until hindered by contact point.
Transition to mesial interproximal space by keeping back of tip adapted to mesial crown of #22 (FDI 33) while rolling into horizontal adaptation; stroke vertically against mesial surface.
Transition to next tooth by adapting face of tip to distal #23 (FDI 32); stroke vertically against the distal surface.
Transition from distal interproximal space to vertical adaptation of the lateral surface. Advance subgingivally and lingually towards DL line angle using horizontal or slightly oblique strokes.
Cross the DL line angle of #23 (FDI 32) and proceed with horizontal strokes to advance tip subgingivally and mesially across lingual surface toward ML line angle.
As tip crosses ML line angle, maintain vertical adaptation as the back of the tip adapts to the mesial root surface. Stroke horizontally/obliquely, advancing tip subgingivally and facially across surface of mesial root until hindered by contact point.
At contact point, transition to horizontal adaptation of the back; stroke tip vertically against mesial surface.
Advance to distal of #24 (FDI 31) by maintaining tip in horizontal orientation and adapting face; stroke vertically against distal surface.
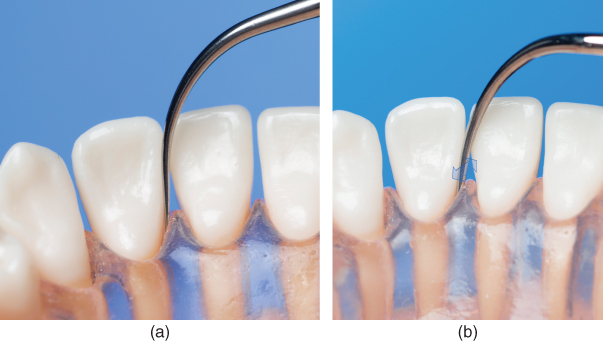
Figure 7.28 #23 (32) M: (a) ultra-thin straight tip; (b) slim right curved tip
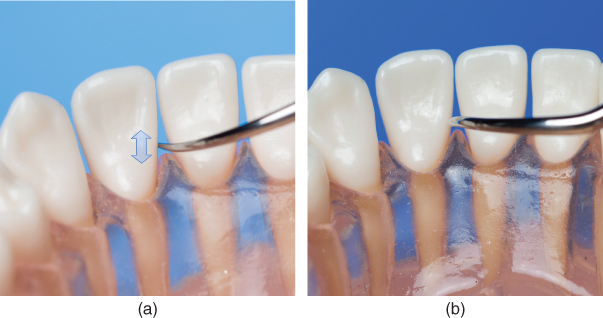
Figure 7.29 #23 (32) M IP: (a) ultra-thin straight tip; (b) slim right curved tip
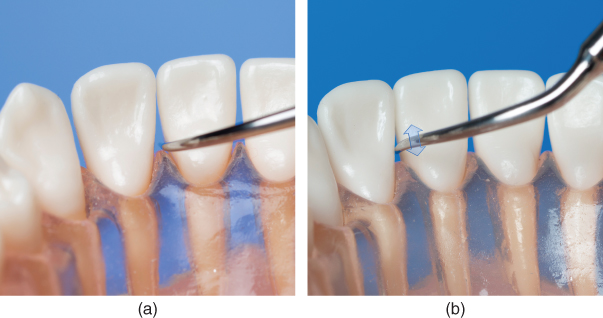
Figure 7.30 #24 (31) D IP: (a) ultra-thin straight tip; (b) slim right curved tip
Stay updated, free dental videos. Join our Telegram channel
VIDEdental - Online dental courses


