CHAPTER 6 Treatment of the Edentulous Maxilla
Anterior Tilted Implant Concept
In 1969 Brånemark first suggested topographically positioning four implants in the edentulous maxilla and four implants in the edentulous mandible1 Four osseointegrated implants distributed along the edentulous arch to support a fixed, implant-supported prosthesis lend structural support and restores edentulous alveolus functionality to a state similar to the dentate alveolus, hence preventing further resorption. This biomechanical reconstruction not only restores form and function, but also has significant psychosocial effects for these patients.2–5 The use of four implants to support a fixed maxillary prosthesis has also been recently reported with favorable outcomes by this author,6 Maló,7 Aparicio,8 and Krekmanov.9
Duyck et al.10 studied the magnitude and distribution of occlusal forces in vivo using four implants. Their study confirmed the appropriateness of using four implants as long as distribution of the implants is similar to “cornerstones.” It has been customary to arbitrarily place six to eight implants in the maxilla for reconstruction with a fixed bridge. Rangert11 demonstrates, however, that intermediate implants do not support occlusal load, which, in a fixed, implant-supported prosthesis, is biomechanically borne largely by the anterior-most and posterior implants.
On occasion, patients with edentulous maxilla may demonstrate on panoramic radiographic examination adequate vertical bone in zone I and limited zone II alveolar bone. Limited available bone in zone II is a function of the anterior extension of the patient’s anterior maxillary sinus wall. The thinner the bony septum between the anterior border of the maxillary sinus and the lateral nasal cavity wall, the more limited the available zone II bone. This finding was initially presented by Brånemark in 1978.12 Brånemark classified the anterior extension of the maxillary sinus from A through E (Figure 6-1). To better appreciate the bone volume available for implant placement, computed tomography or in-office cone beam computed tomography can be used (Figure 6-2). If adequate bone volume is present in zone II, placement of two anterior maxillary implants within zone I and anterior tilting of the posterior implant within zone II allows adequate anterior-posterior (AP) distribution for occlusal force support (Figure 6-3).
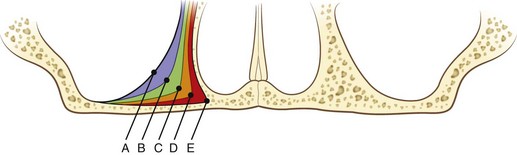
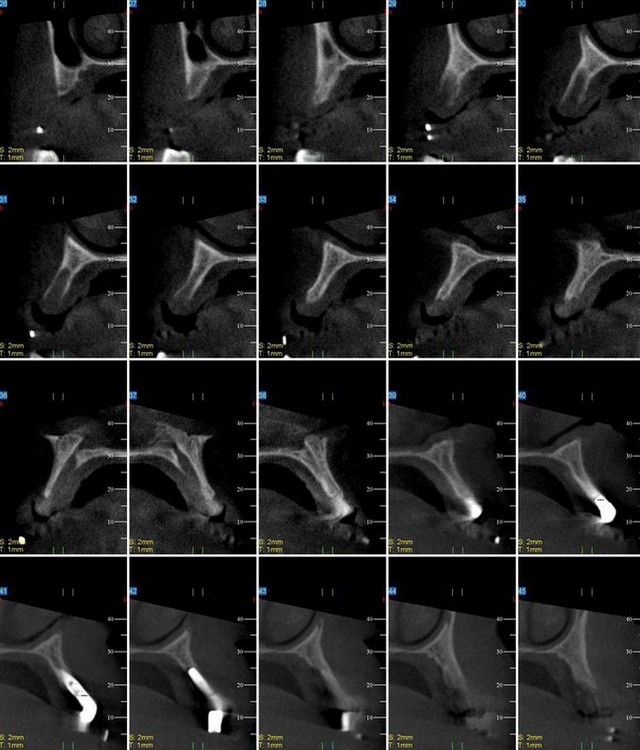
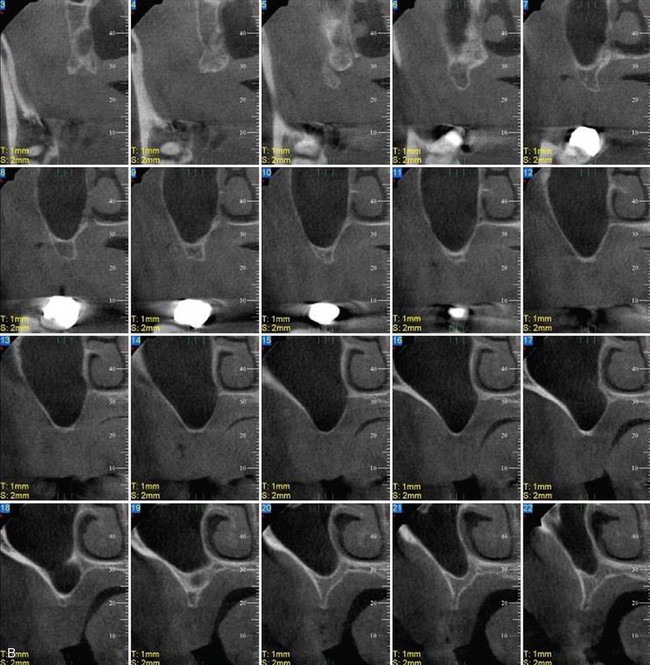
FIGURE 6-2 Preoperative evaluation of a three-dimensional radiographic study of the residual bony volume.

FIGURE 6-3 A “tilted concept” is considered for patients with available bone in zones I and II.
(Courtesy Nobel Biocare, Yorba Linda, Calif.)
Radiographic Evaluation
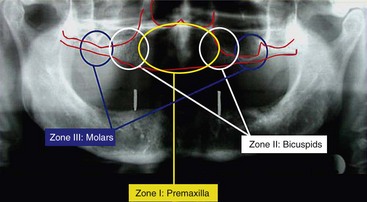
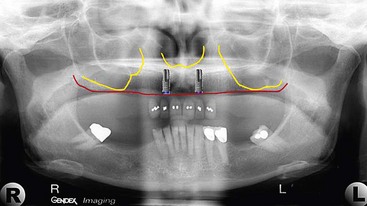
The patient’s panoramic radiographic examination to establish the presence or absence of zones I and II is the primary radiographic study used (Figure 6-4). To establish adequate width of the residual alveolus, intraoral clinical evaluation, cone beam computed tomography, and, on occasion, “sounding” of the residual alveolus may be considered.
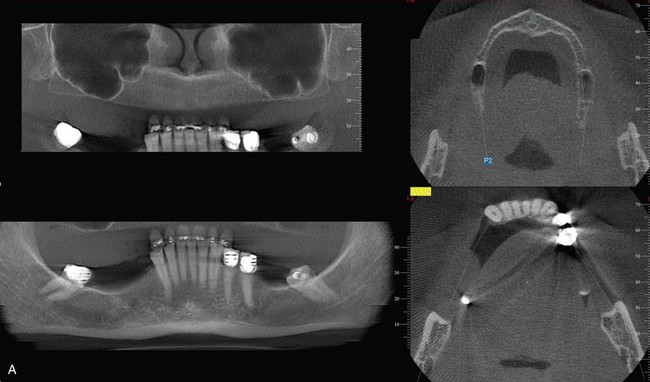
Three-dimensional radiographic evaluation of the residual alveolus is a helpful tool in planning implant sites. As is evidenced by scout films of the cone beam study in Figure 6-5, A, adequate bone volume in the vertical dimension is noted; the cross-sectional studies, however, clearly show the limited bone volume present in Figure 6-5, B. These studies help the surgeon determine whether to continue the graftless approach or consider alternative treatment options.
Treatment Planning
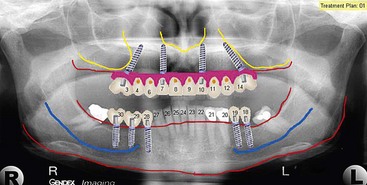
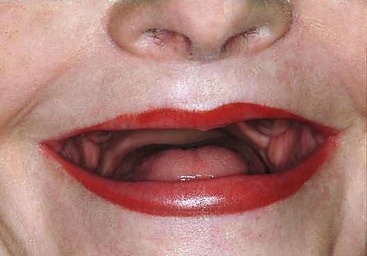
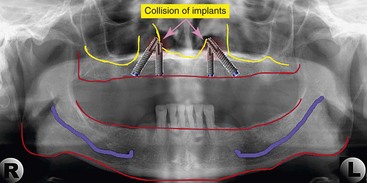
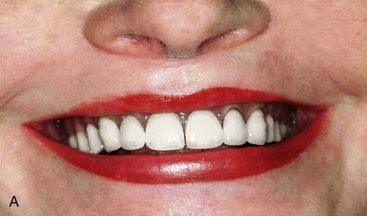
Three factors are evaluated in the initial treatment planning phase.13 Presence or absence of a composite defect is noted. If there is a composite defect, a profile prosthesis is considered (Figure 6-6). The transition line is also evaluated clinically with the patient’s existing denture removed to determine whether the edentulous ridge is visible. A favorable outcome is expected if the transition line is not visible in a patient with a composite defect (Figure 6-7). To determine the position and length of the implants to be used in zones I and II, implant templates are superimposed onto the preoperative panoramic radiograph. Using this simple approach, the practitioner can determine the length of the posterior implant in zone II. To avoid collision of the two implants, however, caution must be taken to relate the apex of the tilted implant in zone II with the body of the axially placed implant in zone I (Figure 6-8).
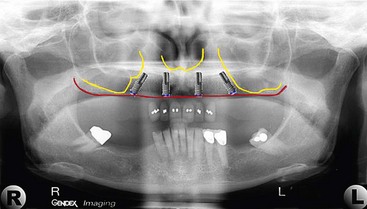
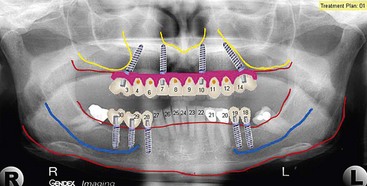
To achieve the most biomechanically stable prosthesis, the largest AP distribution of the implants is preferred. To begin this process, the anterior implants in zone I are planned (Figure 6-9), followed by the two tilted posterior implants in zone II (Figure 6-10). Once the abutment and pontic teeth are selected, the treatment plan is complete (Figure 6-11).
Preoperative Protocol
The surgical procedure is usually performed in the office setting with intravenous sedation, although the procedure can be performed with local anesthesia or in a hospital operating room with general anesthesia. The patient is premedicated with 2 g of amoxicillin or 600 mg of clindamycin (Cleocin) 1 hour prior to the procedure. If the patient will be edentulated, the immediate denture should be present during the surgical appointment to permit immediate conversion of the patient’s “immediate denture” into an immediate-load profile prosthesis (ILPP). If the patient is already edentulous and wears a full maxillary denture, earlier preoperative and treatment planning appointments should have determined whether the existing denture has the proper vertical dimension of occlusion (VDO) and the proper AP tooth position (Figure 6-12) for conversion into an ILPP. If the patient’s existing denture does not have the proper VDO and AP tooth position, a restorative dentist should be asked to fabricate a new denture prior to surgery.
Surgical Protocol
The preoperative radiographic examination determines the presence or absence of zone I and zone II bone (Figure 6-13). Clinical evaluation of the buccal plate of the edentulous maxilla generally demonstrates either an “hour glass” depression or a straight line between the maxillary alveolus and the maxilla proper. The preoperative models in Figure 6-14 are consistent with “hour glass” topography of the maxillary alveolus; to allow placemat of the implants without perforation of the buccal plate, alveoloplasty is planned prior to implant placement.
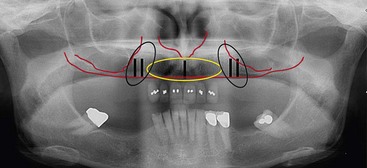

FIGURE 6-14 Hour-glass buccal contour of the maxillary buccal plate is evident on the preoperative cast.
Before beginning treatment, the patient is sedated. Local anesthetic administration, including circumvestibular infiltration of the maxilla and greater palatine, and nasopalatine nerve block are completed. A “hockey stick” releasing incision over the tuberosity of the maxilla is initiated and carried full thickness over the edentulous maxillary alveolar ridge to the opposite tuberosity (Figure 6-15). Elevation of a full-thickness flap exposes the maxilla (Figure 6-16). A lateral view of the exposed maxilla confirms the hour glass deformity (Figure 6-17). Alveoloplasty to reduce the depth of the buccal concavity is performed (Figure 6-18). A surgical marking pen may be used to identify the outline of the anterior maxillary wall (Figure 6-19). Transilluminating the lateral maxilla usually makes the anterior wall of the maxillary sinus visible. If the practitioner chooses, prior to initiati/>
Stay updated, free dental videos. Join our Telegram channel
VIDEdental - Online dental courses


