6 Brow and Forehead Lifting
This chapter will focus on endoscopic and open-brow techniques, but there are many other proposed means of upper facial rejuvenation. The longest-standing brow lift is the coronal brow lift. Although some surgeons still perform this procedure, it has largely been displaced by other techniques. Significant problems with the classic coronal technique include alopecia, unfavorable scarring, and sensory nerve disturbances. I have seen many patients over the last 12 years who were treated elsewhere with coronal technique, and most of them would not do it again. The lift was not worth the scar, hair changes, and sensory nerve problems. Far less invasive techniques are now available. Numerous other techniques have been developed for upper facial rejuvenation. Chapter 5 is devoted to my “mini open brow and forehead lift,” which I think is a great technique.
Upper Facial Diagnosis
Numerous surgical approaches for brow and forehead lifting have been described over the last 50 years (Figure 6-1). Although many of these approaches have fallen in and out of favor over the years, no brow and forehead lift has received more contemporary attention than the endoscopic technique.1–14
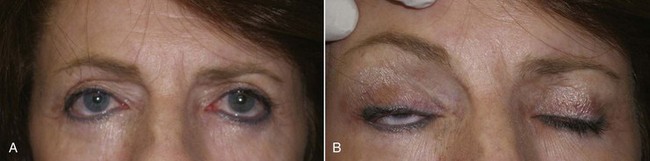
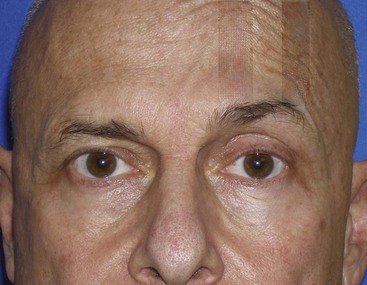
One problem that exists, even among some very well-known surgeons, is failure to diagnose ptotic changes in the forehead and brow. I have seen patients who had blepharoplasty done by competent surgeons from every specialty when in fact they needed a browlift. Many of these patients are shocked to find out that a brow and forehead lift (BFL) option existed and are disappointed when they realize that after having eyelid skin removed numerous times, they are no longer candidates for BFL (Figure 6-2). In essence, these patients have been crippled by previous excess lid skin removal and cannot have the required or desired procedure for fear of permanent lagophthalmos. I am familiar with at least one case of litigation for misdiagnosis and treatment of a patient who clearly should have been offered a BFL option but was repeatedly treated with aggressive blepharoplasty. Offering patients contemporary options is critical to competent practice, even if the treating surgeon does not perform that particular operation.
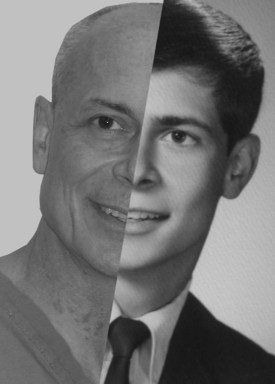
The average adult in their mid-40s has some component of brow and forehead ptosis. It is informative to examine youthful pictures of prospective patients to determine if they in fact ever had arched or higher-positioned brows. Many patients have ptotic brows in adulthood, but some may not have had elevated brows in youth (Figure 6-3).
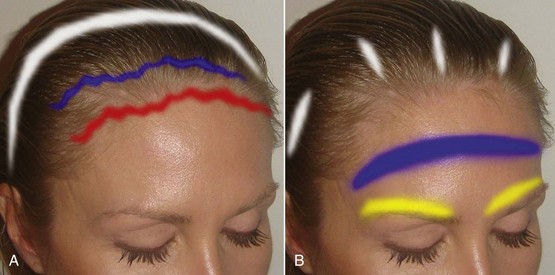
When the brow is manually elevated, numerous things occur. First, the brow is superiorly repositioned, improving appearance and producing a fresh, youthful, and alert appearance. Second, the upper eyelid complex is improved in numerous ways. The elevated brow improves hooding and dermatochalasis because it stretches the excess skin, providing a more youthful eye. Lifting the brow repositions the protruding periorbital fat and improves fat protrusion. The elevated brow also produces a more distinct shelf between the ciliary margin and the upper lid crease. The posed elevation will also stretch the ptotic frontal skin and improve its appearance. Finally, elevating the midforehead will decrease the redundant tissue in the glabellar region, giving a more youthful appearance. The sum of all of these lifting changes is a more youthful upper-facial appearance (Figure 6-4).
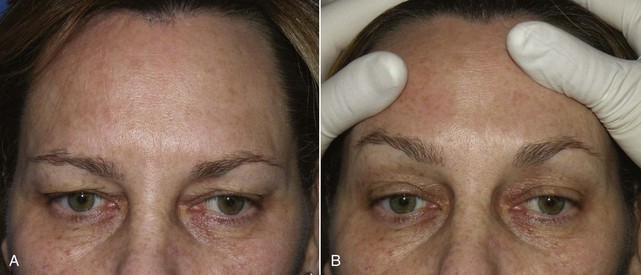
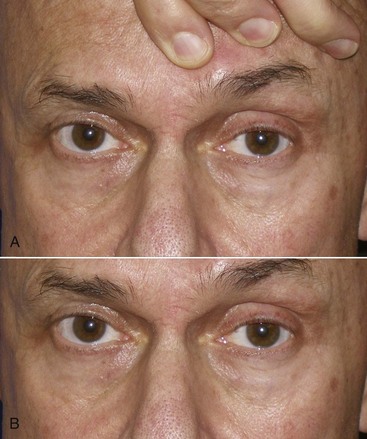
Another method to demonstrate predictive brow changes is simply taping the brow to an elevated position on one or both sides. This is helpful for some patients, because they can observe the new look over several hours at home (Figure 6-5). A photograph with the patient’s brow and forehead relaxed is easily morphed to an elevated position with digital imaging software, which can also be used for prediction and patient education. If the surgeon does not have imaging software, he or she can take a picture with the assistant elevating the patient’s brow (or brows), then crop the assistant’s fingers from the picture to mimic the surgical repositioning (Figure 6-6).
Patients Either Like the Look of Elevated Brows or They Don’t
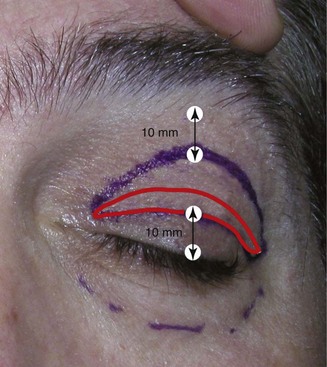
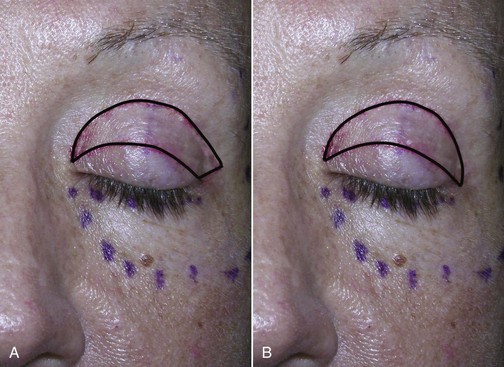
All surgeons approach diagnosis and treatment differently, but one thing that became apparent to me in my early years of performing brow lift surgery was that virtually all brow-lift patients also needed blepharoplasty. This would exclude younger patients or those brow-lift patients whom have had previous significant upper-lid skin removed. In 99% of my BFL surgeries, I am also performing simultaneous upper lid blepharoplasty, and that fee is included as part of the brow lift. The reasons for this are multifactorial. Many older patients will still have upper lid skin excess after surgical brow elevation, so some conservative removal is advantageous for an aesthetic result. Experienced surgeons may feel they have done a very successful brow lift—the brow position was improved, the forehead elevated, the glabella narrowed—but the patient focuses on the small amount of upper lid skin redundancy that was not addressed. By performing conservative blepharoplasty with most BFLs, there is a symbiotic relationship: the brow lift makes the lid look better, and the conservative blepharoplasty makes the brow look better. In conjunction, they are a winning combo. Caution must be exercised so as not to perform aggressive blepharoplasty; only 50% or less skin is removed when performing the BFL with simultaneous upper blepharoplasty. In a typical case where I might normally remove 10 to 12 mm of upper eyelid skin if blepharoplasty were the sole procedure, I will remove 3 to 4 mm of upper eyelid skin when performing concomitant BFL (Figure 6-7). When performing upper blepharoplasty with simultaneous BFL, I do not generally remove upper lid fat unless it is very excessive. The small skin (and or orbicularis oculi) excision simply serves to make a more defined brow/lid complex. When performing blepharoplasty as a sole procedure, some lateral expansion of the upper blepharoplasty incision is made to account for lateral upper lid skin. I call this outline a “bird’s beak” configuration (Figure 6-8, A). Since the excess lateral upper lid skin is automatically addressed by lateral brow elevation when performing BFL in conjunction with upper blepharoplasty, no lateral incision modification is required. For upper blepharoplasty in conjunction with BFL, I use a “Napoleon’s hat” configuration (see Figure 6-8, B).
Endoscopic Brow and Forehead Surgical Procedure
The evolution of endoscopically assisted brow and forehead lift is well detailed, and numerous changes have been employed since its inception.1–14
Instrumentation
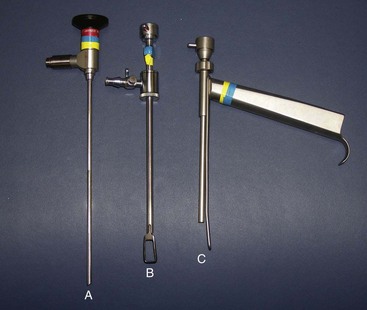
When I wrote this type of chapter 12 years ago, I needed to be very precise in terms of what equipment was required and available. At that time, EBFL was in its infancy, and most practicing surgeons had not received residency training in the technique. It was therefore necessary to be extremely specific about equipment. Now that EBFL has become a frontline technique, the available cameras, scopes, light sources, and surgical instruments are refined and readily available. Realizing this, I will not spend significant time in this chapter discussing armamentaria. I will say that for the recent graduate with limited funds, discounted or free used endoscopic equipment may be available from their local hospital. Many specialties utilize cameras, scopes, and light sources, and some hospitals and factory reps have older but well-functioning equipment they are happy to part with. A 15-cm, 30-degree endoscope is preferred for EBFL. A decent camera, scope, and light source are mandatory for a clear image and precise surgical technique. Figure 6-9 shows an endoscope and two popular types of sheaths with terminal retractors to keep the soft tissue from obscuring the endoscopic field.
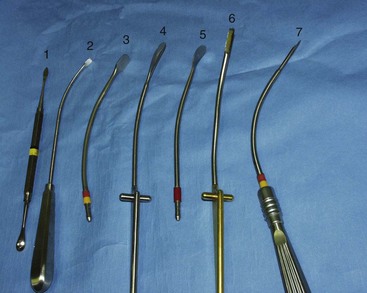
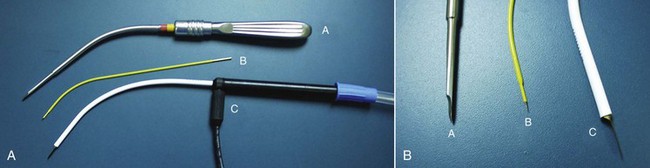
Although a vast array of instruments are available for EBFL, in reality, very few are necessary. A simple Molt Number 9 periosteal elevator can be used for about 80% of the subperiosteal dissection (Figure 6-10). Numerous other instruments facilitate subperiosteal dissection, especially around nerve trunks and orbital rims (see Figure 6-10). Multiple instruments are also available for incising periosteum and brow-depressor musculature (Figure 6-11).
Over the past 5 years, widescreen plasma and LCD television monitors have become very affordable. These monitors have been welcome additions to the cosmetic surgery office for numerous reasons, including patient entertainment while waiting, patient education and marketing, monitoring vital signs during anesthesia, and endoscopic surgery (Figure 6-12).
Surgical Procedure
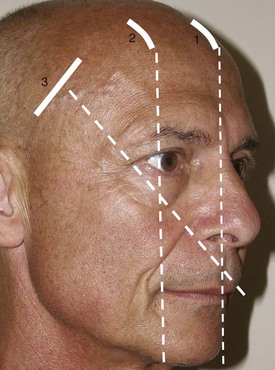
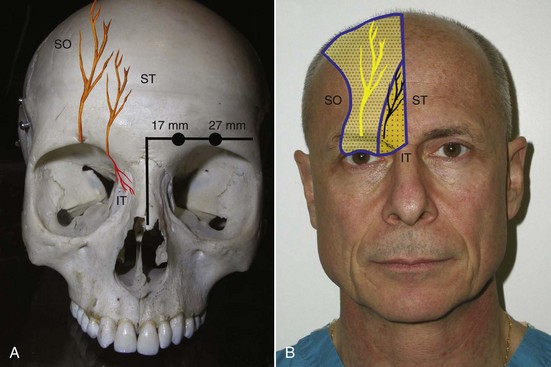
Various surgeons utilize different markings and incisions. I prefer to make three frontal incisions, one central at the midline (Figure 6-13, 1) and two lateral incisions that correspond to the approximate area of maximum desired brow elevation. This most frequently corresponds to an imaginary line tangent to the lateral limbus (see Figure 6-13, 2) and also to the junction of the central and lateral third of the brow. Two temporal incisions are also made. These incisions are about 3-4 cm long and perpendicular to an imaginary line drawn through the ala and canthus (see Figure 6-13, 3). It is also helpful to draw the approximate position of the supraorbital and supratrochlear nerves on the soft tissue over their hard-tissue landmarks (Figure 6-14). The supratrochlear nerve is located approximately 17 mm lateral to the glabellar midline and the supraorbital nerve is located approximately 27 mm lateral to the glabellar midline. Although all of these incisions are relatively standard in text descriptions, it is important for the surgeon to keep in mind that each patient presents a different situation, and the lateral frontal incisions should be in the anticipated region of maximum brow elevation. Similarly, the temporal incisions should be placed in a direction that will maximally elevate the lateral brow when placed under tension.
The actual incision is first infiltrated with local anesthesia and then made directly through periosteum with a scalpel. It is important to place the incision far enough behind the hairline to hide it but not too far posteriorly to make endoscopic access difficult. Also, the incision should be long enough for proper access. A too-small incision not only limits access of the scope and instruments, it is also traumatic to the surrounding scalp and hair follicles. The old surgical adage that incisions heal from side to side, not end to end applies here. The hair follicles must be continually protected from abrasion and tension from the scope, instruments, and drill shafts. Although it is convenient, the surgeon and staff should refrain from using the hair to elevate the incision for portal entry. Damage to the hair follicles and related postincision hair loss is an avoidable complication. A small, wire eyelid speculum serves as a convenient retractor to keep the wound open for entry and fixation (Figure 6-15).11

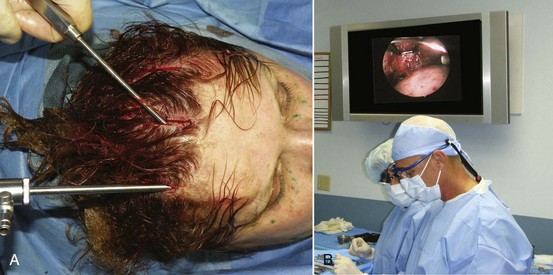
After the patient is sedated, the entire region to be dissected (central and lateral optical cavities) is infiltrated with tumescent anesthesia at the periosteal level (Figure 6-16), and the incision sites are infiltrated with 2% lidocaine with epinephrine in all planes. Generally, all the incisions are made at the same time so that the scalpel/incision portion of the surgery is completed. Figure 6-17 shows the actual surgical incisions on a live patient.
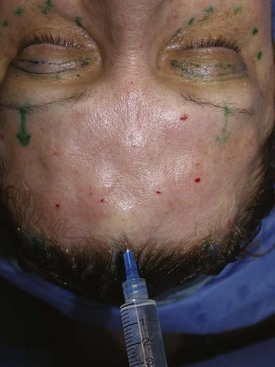
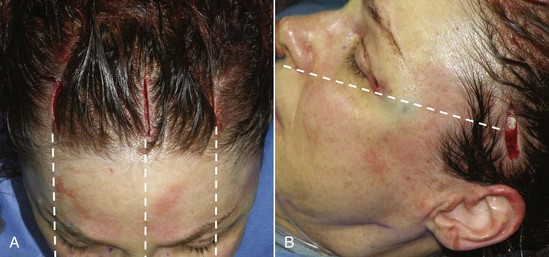
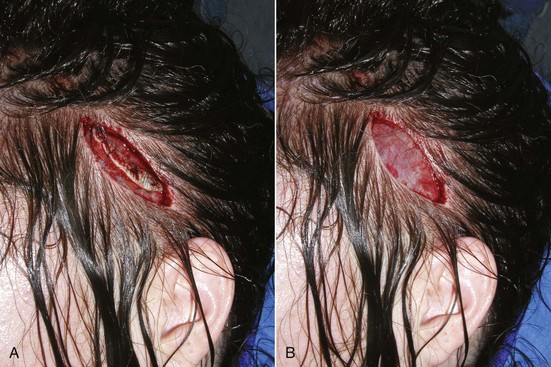
FIGURE 6-17 Frontal incisions (A) and lateral incisions (B) commonly used in endoscopic brow and forehead surgery.
Although most incisions are straight-line vertical, some surgeons prefer horizontal access incisions for the central and lateral incisions. I also frequently utilize an elliptical tissue excision for the temporal incisions. Since many patients have excess skin and scalp in this region, an ellipse of tissue is removed, leaving an elliptical incision that when closed can assist with tightening in the lateral brow areas (Figure 6-18). The initial incision is made just to the subcutaneous plane and the ellipse is removed. It is imperative to protect the frontal nerve when working in this area.
Stay updated, free dental videos. Join our Telegram channel
VIDEdental - Online dental courses


