3: Clinical Digital Photography

3 Clinical Digital Photography

There is no more important instrument in cosmetic surgery than the camera.

I feel I have accomplished a lot of academic milestones in lecturing and publishing in my lifetime, and I was recently asked what my secret is. My answer was “my camera.” Over the first decade of my cosmetic surgery career and to date, I have always taken time to meticulously document my experiences. I currently have about 75,000 images on my laptop that represent operations, complications, before-and-after images, and the like. With this repository of images for every procedure I perform, I can instantly put together a lecture, publication, or text, because I have the documentation.

Most cosmetic surgeons collect pictures of their work but fall short in creating high-quality, standardized images. Nothing makes a surgeon look shoddier than poor, nonstandardized images. Quality surgeons should have quality images to share with clients and colleagues. Pictures serve as diagnostic aids, part of the operative record, learning and teaching tools, marketing tools, and legal defense. I have been accused of being “anal” about my photographs, but they represent my knowledge, skill, and ultimately, me.

Thanks to the innovations of digital photography, it has never been easier to make excellent clinical images. There is no reason why a surgeon (or his or her staff) cannot make high-quality, standardized images. My before-and-after images have given me a distinct marketing advantage in my community and internationally. Although most surgeons have a few images on their websites, I have a few thousand. Prospective patients are more likely to migrate to a surgeon who can document hundreds or thousands of cases than to a surgeon with a handful of images or to a surgeon who uses images from an organization or—even worse—drawings or another surgeon’s pictures. Images are everything in cosmetic surgery.

Equipment

A decade ago, many surgeons had complicated, expensive photographic equipment frequently relegated to a dedicated “photography room,” but with the digital age, photography is no longer arduous and cumbersome, it is a breeze.

I am not a proponent of the dedicated photography suite, mainly because I am constantly taking clinical images; having to stop and move a patient to a single room in my office would create an unworkable bottleneck in my busy practice. Instead, I have the ability to make high-quality, standardized images in every room in my office. On the back of the door in any room where patients are evaluated, I have installed a photographic cloth background (I prefer sky blue) on a movable frame (Figures 3-1 to 3-3). Since some patients are tall and some are short, the frame is on a moveable track that can be adjusted up or down to accommodate individual height. Because I only perform head and neck cosmetic facial surgery, this works perfectly. For cosmetic surgeons who perform full-body surgery, a longer frame can be used.
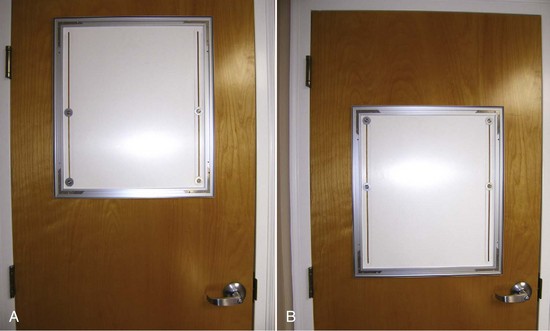
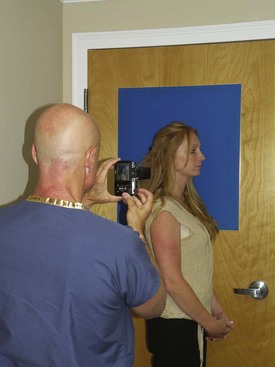
Cameras

In writing past chapters about digital photography, I directed much attention to the type of camera to use. This had to do with needing specialized cameras and flash attachments and ancillary lighting. Today, camera choice is greatly simplified. With the rapid advances in digital photography, virtually any high-quality, name-brand, off-the-shelf camera can be used to take excellent photographs. I have used $1000 cameras and $500 dollar cameras, and they perform equally well so long as the resolution is comparable. Almost all higher-end digital cameras have versatile lenses that can accommodate clinical poses. Most of these cameras also have good macro (some have supermacro) settings for crystal-clear close-up pictures. Many higher-end digital cameras also have a “program” mode that allows the user to make and save default settings. I program my camera for a profile mode to take head-and-neck shots and a macro mode to take intraoperative pictures. The program mode allows the camera to remember preferred settings, so adjustment is unnecessary for each shot. Most of these cameras also have more than adequate flash settings for clinical photography. When shopping for a camera, I make test shots of my wristwatch to evaluate the macro mode and also take a head-and-neck shot to judge that quality.

Although there are numerous 35-mm single-lens reflex digital cameras with detachable lenses available, I have grown to prefer the smaller vacation-type cameras for their compactness and portability (Figure 3-4). These cameras can be carried from room to room in my scrub pants pocket and thrown in my briefcase without taking up room. These small-format cameras also have unbelievable video capability. I have a $1500 high-definition digital video camcorder, but I find myself taking many of my surgical videos with my cigarette pack–sized camera.
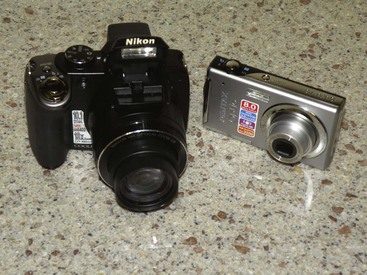
For those surgeons who want a more dedicated clinical camera, Lester A. Dine, Inc. (www.dinecorp.com) has for several generations made out-of-the-box, high-quality, user-friendly cameras. These cameras have been modified specifically for clinical photography.

Digital Editing Software

The other integral piece of digital photography is imaging software. Although Adobe PhotoShop (www.Adobe.com) is the most popular software, I have been using PhotoImpact (www.corel.com) for the past 15 years and find it a bit more user friendly but just as powerful. Imaging software is integral to producing quality images through enhancement, cropping, adding text and symbols, and stitching before-and-after pictures (Figure 3-5).

Taking and Making Pictures

High-quality, standardized clinical photos don’t just happen, they are a result of getting the right pose with the right background with the right focus and the right lighting. Digital photography has made this so easy that many surgeons relegate this to their staff, but I continue to personally take all of my pictures.

The biggest problem when photographing a patient is first getting them to relax. The second you stand someone up against a background and point a camera at them, they assume an unnatural position and expression. It is simply a natural human response to pose, so the patient must be instructed to relax. Most patients will “stand at attention” with their chin raised, raise their shoulders, smile, and raise their eyebrows. I ask them to drop their arms to the side, relax their shoulders and neck, and not smile, grimace, smirk, frown, or express emotion. I ask them to think happy thoughts without smiling, spit out gum or candy in the mouth, lick their lips, and gently touch their teeth together, which produces a natural oral posture. I remind them to not raise their brows. Women are notorious for raising their brows and must be continually reminded not to. Chin position is critical for standardizing pictures; the chin should not be raised or lowered, and the Frankfort horizontal plane should be parallel with the floor. The patient’s gaze must be directed straight ahead, not up or down. Nothing looks more contrived than a “before” facelift photo with the chin down and an “after” photo with the chin raised.

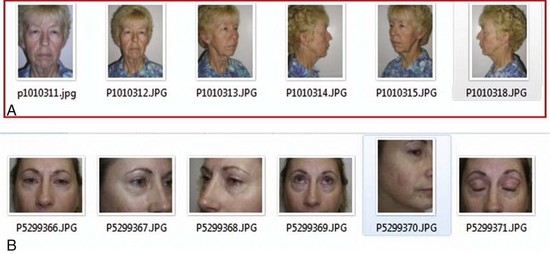
Depending upon the procedure to be performed, I generally take a full face-and-neck photo straight on, right and left three-quarter views, and right and left lateral views (Figure 3-6, A). For blepharoplasty or brow lift, I also take a close-up series of those views and a picture with the head straight but the eyes in an upward gaze (see Figure 3-6, B). Obviously, some instances call for pictures in repose and animation and are procedure specific. For instance, the surgeon may want animated images to show the condition of the facial nerve or pre-facelift images or the muscle movement in a pre-Botox image.

I take a makeup-on image at the preoperative visit and a makeup-off image just before surgery. All jewelry should be removed in all instances, and if the patient has full hair, a hair band or clip should be used to expose the face. Regardless of how the photos are taken, the before image and after image should closely match. To guide the patient, marks can be placed on the wall so every patient is looking at the same spot in every picture. Alternatively, the assistant can direct the patient’s gaze.

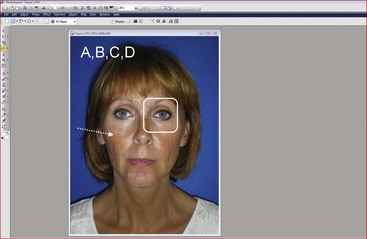
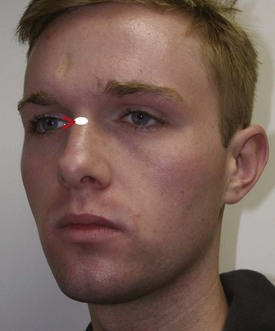
Standardization is everything in photography. To better standardize the three-quarter views, the patient should be rotated so the lateral canthus is in line with the soft-tissue nasion (or nasal radix) (Figure 3-7). By doing this on the right and left side, every patient will be at the same relative standardized angle.

Stay updated, free dental videos. Join our Telegram channel

Jan 12, 2015 | Posted by in Oral and Maxillofacial Surgery | Comments Off on 3: Clinical Digital Photography

VIDEdental - Online dental courses

Get VIDEdental app for watching clinical videos