Chapter 5
Chair-side Bleaching
Aim
To give an overview of chair-side bleaching and to evaluate the contribution of heat and light to accelerating the process.
Outcome
The practitioner will be more informed about the controversies surrounding chair-side bleaching, particularly in relation to claims made for the efficacy of customised lights on bleaching.
Chair-side Bleaching
Chair-side bleaching is also known as power bleaching or in-surgery bleaching.
History
The first use of hydrogen peroxide for dental bleaching is attributed to Harlan in 1884. He called hydrogen peroxide “hydrogen dioxide”. Its use was said to be applicable in the management of all discolourations of teeth. In 1910, Prinz described the use of 30% hydrogen peroxide on live and dead teeth. In 1918, Abbot reported that high-intensity light accelerated tooth bleaching with hydrogen peroxide. In 1924, Prinz described the use of a mixture of perborate and hydrogen peroxide, activated by a light source in order to accelerate bleaching.
To increase the effectiveness of chair-side bleaching, heat was used to help speed up the rate of disassociation of a highly concentrated preparation of hydrogen peroxide. This approach was deemed necessary to save clinical time. Chair-side time was, and remains, a valuable commodity, but as the high-concentration chemicals necessary are caustic and damaging to soft tissues, the advantages of the time saved must be weighed against the risks and nature of the possible adverse side-effects.
Mechanism
The consecutive conjugated double bonds within the discolouring molecules need to be broken down by the hydrogen peroxide. For this to happen, hydrogen peroxide has to release perhydroxyl ions continuously while the material is kept in contact with the teeth but away from the soft tissues.
Technique
Patient Assessment
All dental procedures have advantages and disadvantages. Assessment of patient expectations of bleaching is extremely important and should be done at the earliest opportunity. Patient management is discussed in detail in Chapter 2.
Safety
Gloves, masks and eye protection are essential for all team members throughout the chair-side bleaching procedure. Full protection should also be used when cleaning up. Patients must wear protective glasses. They should be advised in advance that they will not be able to touch their face during the procedure and they should keep their hands underneath the non-absorbent protective bib throughout.
Prophylaxis with a slurry of pumice and water, possibly following ultrasonic cleaning of the teeth, is indicated prior to bleaching in order to remove extrinsic stains, other deposits and salivary pellicle. It is important that teeth are cleaned thoroughly prior to the application of the rubber dam.
Isolation of the Teeth
Great care needs to be taken to ensure that the soft tissues remain protected throughout the bleaching procedure when applying high-concentration hydrogen peroxide gel. Teeth to be bleached must be fully included in the rubber dam, with the dam inverted into the gingival sulcus to ensure bleaching of the necks of the teeth. Rubber dam is not an optional extra. When high-concentration hydrogen peroxide comes in contact with soft tissue there is profound blanching followed by a marked inflammatory response. Prolonged contact, as may occur where the rubber dam does not fully protect the underlying soft tissue, may result in epithelial sloughing and ulceration. This may result in localised recession on healing, or possibly the loss of one or more interdental papillae, altering the gingival contour and significantly compromising the aesthetic outcome of the treatment.
Painful burns to the skin have been the source of litigation in the past. Damage to patients’ eyes through accidental splashing of the hydrogen peroxide preparation is the most serious possible consequence.
Isolation using rubber dam and caulking material
It is important to punch and fit the rubber dam carefully around the necks of the teeth. In practical terms, the difficult areas to isolate are the cervical margins. In addition, it is prudent to use a separate caulking system (Oraseal, Ultradent Products Inc.) underneath the dam to give extra protection to the soft tissues. If the necks of the teeth are to be bleached, then the dam needs to be inverted. Any caulking material that may have escaped on to the teeth from below the dam needs to be removed before the bleaching gel is applied (see Figs 5-1 to 5-3). Fig 5-4 shows sclerosed teeth prior to bleaching.
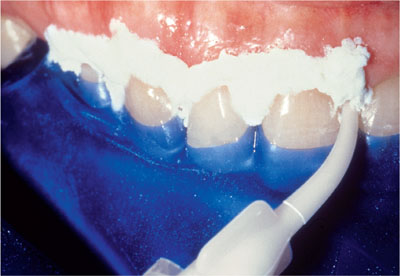
Fig 5-1 Caulking system in place. (Figure courtesy of Dan Fischer, Ultradent Products Inc.)
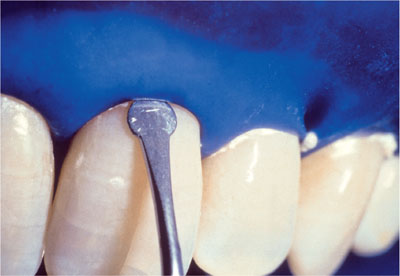
Fig 5-2 Rubber dam inverted. (Figure courtesy of Dan Fischer, Ultradent Products Inc.)
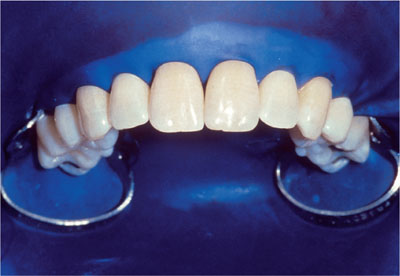
Fig 5-3 Rubber dam in position. (Figure courtesy of Dan Fischer, Ultradent Products Inc.)
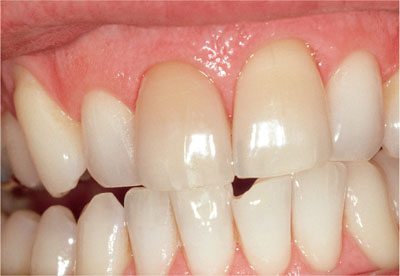
Fig 5-4 Sclerosed teeth prior to bleaching.
Wedjets (Hygenic Corp., Akron) can help to secure the rubber dam in difficult situations (Fig 5-5).
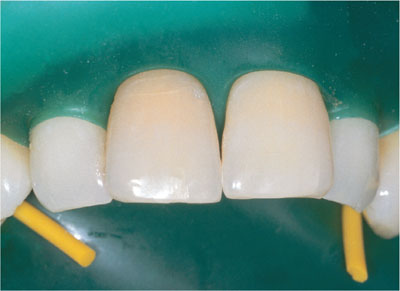
Fig 5-5 Rubber dam with Wedjets (Hygenic Corp., Akron) and prior to floss ligatures being placed.
Using rubber dam and floss
Floss ligatures can be tied around the necks of the teeth to help keep the rubber dam in position. The ligatures must be made of waxed dental floss (see Figs 5-6 and 5-7). Unwaxed dental floss will act as a wick to draw up the hydrogen peroxide gel by capillary action. This may result in burns to the gingival tissues.
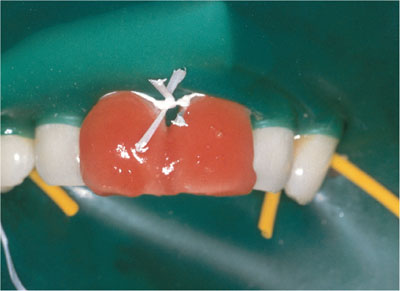
Fig 5-6 Waxed dental floss in position.
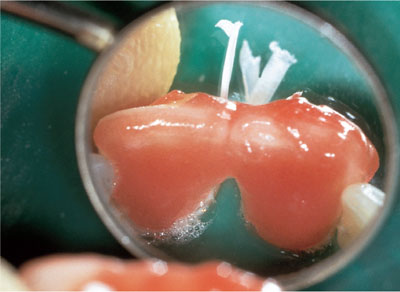
Fig 5-7 Palatal view of 38% hydrogen peroxide gel in position. Note floss ligatures and bubbling.
Plastic rather than metal rubber dam clamps will prevent a build-up of heat. An absorbent tissue is placed over the lower face to protect the lower lip and chin from any gel that may be accidentally splashed or dropped during the procedure.
It should be noted that the placement of rubber dam and inversion of the dam into the gingival crevices is not pleasant and sometimes can be painful for patients.
Fig 5-8 shows the teeth one week following chair-side bleaching. If bleaching teeth following orthodontic treatment, it is important to “check etch” the teeth to verify that the orthodontic resin cement has been removed. If resin tags are still present in the enamel, the areas formerly covered by the bracket cement will become apparent following etching. This residual composite needs to be cut back with a multibladed plain-cut tungsten carbide bur (Jet FG 7901) in a high-speed handpiece, with a light touch to minimise enamel damage, and a dry field to see the composite more clearly. The removal of the resin-impregnated enamel to a depth of 50 microns is all that is required to allow uniform bleaching of the tooth surface.
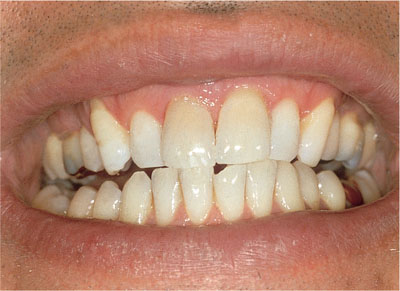
Fig 5-8 Teeth one week after chair-side bleaching – only modest improvement.
Etching of the teeth with ortho-phosphoric acid has been suggested to enhance the penetration of hydrogen peroxide. In general terms, such etching, or indeed any etching, is neither essential nor beneficial to th/>
Stay updated, free dental videos. Join our Telegram channel
VIDEdental - Online dental courses


