CHAPTER 43
Otoplasty
Curtis W. Gaball1,2 and Matthew Keller1
1Department of Otolaryngology—Head and Neck Surgery, Naval Medical Center San Diego, San Diego, California, USA
2Uniformed Services of the Health Sciences University, San Diego, Cal ifornia, USA
Procedures aimed toward the correction of ear over– and underdevelopment and asymmetries.
Indications
- Poorly developed or absent antihelical fold
- Protruding ear (conchal cartilage overdevelopment or hypertrophy)
- Significant asymmetry (i.e., unilateral protruding ear)
Contraindications
- Incomplete ear growth (the ear is typically fully developed by age 6)
- Unrealistic expectations of the patient or family
- Patients unable to comply with strict postoperative instructions
- Presence of active ear infection
Anatomy
The auricle is a complex combination of cartilage and skin with many involutions and folds. Its underlying structure is composed of fibroelastic cartilage. The auricle is composed of five critical elements: the concha, helix, antihelix, tragus, and lobule (Figure 43.1).
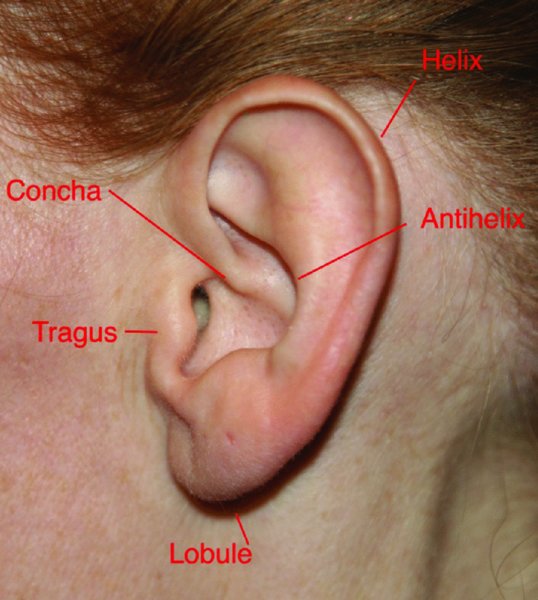
Figure 43.1. Normal external ear landmarks.
Initial Examination
The normal auricle protrudes 20–30° from the skull when viewed from the top of the head. The ideal conchomastoid and conchocephalic angles are 90°. The average length and width of the male auricle are 63.5 and 35.5 mm, respectively, compared to 59.0 and 32.5 mm in females. The average ear width should be approximately 60% of the ear length.
During the preoperative evaluation, measurements are typically made at three points (Figure 43.2) to identify ear deformities and asymmetries:
- The mastoid-helical distance measured from the superior aspect of the helix (normal range: 10–15 mm) (Point A)
- The mastoid-helical distance measured from the midpoint of the helix (normal range: 16–20 mm) (Point B)
- The mastoid-helical distance as measured from the level of the lobule (normal range: 20–22 mm) (Point C).

Figure 43.2. Measurements are made at point A, point B, and point C to determine ear deformities and asymmetries.
Mustarde Technique (Conchascaphal Suturing): Correction of a Poorly Defined Antihelix
- Preoperative photos and measurements are taken and are made available for intraoperative reference.
- Sedation is performed with intravenous, laryngeal mask airway, or endotracheal anesthesia. Intravenous preoperative antibiotics are given based on patient weight. The patient is positioned supine on the operating room table, and ear wicks are placed bilaterally. The face, scalp, neck, and ear are prepped with Betadine or iodine (chlorhexidine may cause damage to the middle ear if a perforation of the tympanic membrane exists, and it can also damage the cornea).
- Head drapes may be sutured or stapled to the scalp to prevent migration during surgery. Surgical drapes should be positioned to offer simultaneous visibility of both ears in addition to the entire face, and to allow the head to be turned easily from side to side during the procedure.
- Local anesthetic in the form of 1% lidocaine with 1:100,000 epinephrine is injected horizontally across the lateral surface of the sternocleidomastoid muscle (SCM) at a level 6 cm below the tragus. This will block the greater auricular nerve as it courses superficial to the SCM and will provide anesthesia to the lower ear and lateral cheek. Additional local anesthetic is deposited just behind the postauricular sulcus to block the lesser occipital braches to the posterior pinna and within the areas of the auricle to be surgically manipulated, facilitating hydrodissection of the anterior and posterior skin–soft tissue envelope.
- Using a #15 blade, a postauricular fusiform skin incision is placed within the postauricular sulcus (Figure 43.3). In planning the incision, account for the fact that the act of retracting the ear forward moves the skin overlying the sulcus laterally. The incision should be kept less than 1 cm from the superior and inferior extent of the postauricular crease so that it remains hidden.
- The postauricular skin over the concha, antihelix, and helical cartilage is undermined with a blunt elevator. The dissection typically does not extend to the helical rim, but can if necessary.
- To determine the position of the new antihelix, the auricle is bent backward, and a line is marked along its summit. A 30-gauge needle is used to make through and through markings to assist with subsequent suture placement by marking out the arc of the desired antihelical fold along the posterior surface of the cartilage (Figure 43.4). The point at which the needle is protruding on the medial surface of exposed cartilage is marked with a standard marking pen. Alternatively, a 30-gauge needle dipped in Methylene blue dye may be used to mark the cartilage. Repeat along the entire arc of the desired antihelical fold.
- Optionally, a small incision may be placed at the most cephalic end of the desired antihelical fold on the aurical’s lateral surface, hiding the incision under the helical rim. A blunt elevator may be used to create a tunnel under the soft tissue envelope overlying the desired arc of the antihelical fold, and a rasp may be used to abrade the cartilage along this arc, thereby weakening the cartilage and increasing its pliability. Care should be taken to avoid cutting through the cartilage, which can result in an acute angulation and abnormal appearance of the antihelical fold.
- Using the arc of dots along the posterior cartilaginous surface, 3–4 permanent 4-0 undyed Mersilene horizontal conchascaphal (Mustarde) sutures are used to secure the newly developed antihelical fold (Figure 43.5). It is important to use undyed sutures so that the sutures are not visible through the skin. The sutures should incorporate both the cartilage and perichondrium from the opposite surface. If the opposing perichondrium is not engaged, the suture is more likely to fail because ear cartilage is somewhat friable. Care is taken to not pierce the anterior skin during suture placement. As the Mustarde sutures are placed, lightly pull on the sutures to watch the ear’s response to determine if suture placement is ideal, but refrain from tying the sutures at this point. This technique will allow for adjustment of the sutures in order to “fine-tune” the result. Attempt to minimize the number of suture passes, and try to make clean passes using the natural curve of the needle so as not to fracture the friable cartilage.
- Sutures are not tied until all sutures are placed and their ideal location is verified. Plan for a slight overcorrection, perhaps 2 mm, as some relaxation will occur.
- Prior to closure, confirm meticulous bipolar hemostasis while avoiding accidental thermal skin injury, ensure that the suture knots are free of hair, and assess surgical correction with preoperative photographs and goal measurements.
- If performing conchamastoid suturing (Furnas technique), do so at this point.
- Trim excess skin (only if necessary), and close the postauricular skin incision in a tension-free manner with 5-0 plain ca/>
Stay updated, free dental videos. Join our Telegram channel
VIDEdental - Online dental courses


