4 Extraction of teeth
ASSUMED KNOWLEDGE
It is assumed that at this stage you will have knowledge/competencies in the following areas:
INTENDED LEARNING OUTCOMES
At the end of this chapter you should be able to:
CLINICAL AND RADIOGRAPHIC ASSESSMENT
Not all extractions are straightforward; sometimes teeth fracture or there is risk of damage to adjacent structures during the process. It is important to attempt to evaluate, before the extraction, the likely degree of difficulty and the chances of adverse events. This maximizes the chance of things going according to plan.
Clinical examination and radiographic assessment
Check that the extraction is appropriate
Teeth may be taken out for a number of reasons:
EXTRACTION FORCEPS: HOW THEY WORK AND HOW TO SELECT THEM
Forceps for upper teeth
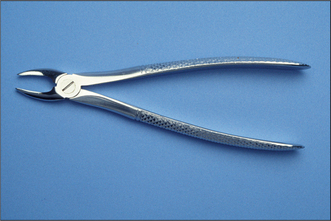
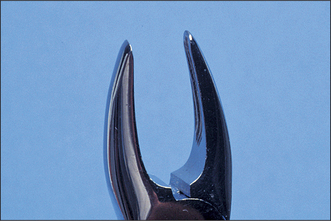
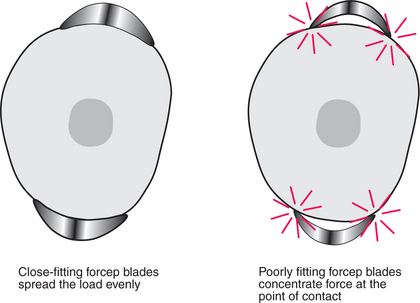
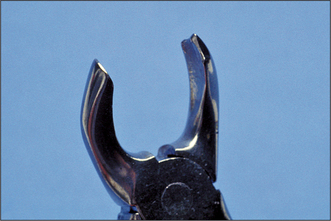
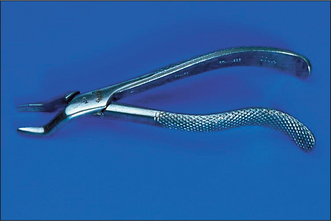
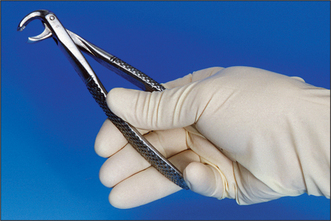
Forceps for extracting upper anterior teeth are of a simple design (Fig. 4.1). The handles are straight and 12–14 cm long, joined at a hinge to the beaks, which are 2–3 cm long. The handles are contoured on their outer surface to allow a good grip. The beaks are both concave on their inner aspect (Fig. 4.2), shaped to fit around the root of the tooth as closely as possible (Fig. 4.3) when the forceps are applied in the long axis of the tooth. The beaks are applied labially and palatally. All extraction forceps can be seen as modifications of this basic design.
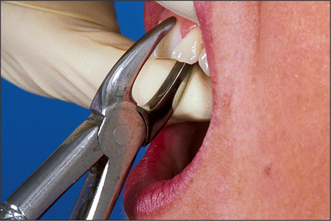
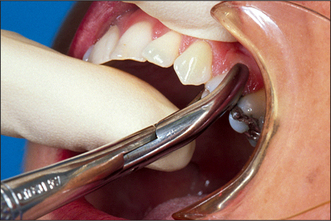
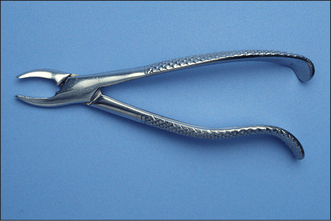
These forceps can be applied to the long axis of anterior teeth, gaining access by the patient opening their mouth fairly widely (Fig. 4.4). However, if one were to attempt to use these forceps on an upper first premolar, there is a risk of traumatizing the lower lip. Forceps for use in the upper jaw further back than the canine have a curve in the beak (Fig. 4.5), which keeps them above the lip when they are in the long axis of the tooth. The beaks of these forceps are also concave on their inner aspect to fit the root of upper premolars.
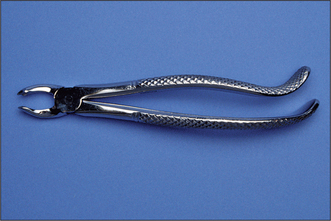
These forceps could be used to extract posterior teeth, but for teeth with multiple roots, forceps are available with beaks specifically designed to fit complex root forms (Fig. 4.6). In principle, the more closely the beaks are adapted to the roots, the more widely the forces of extraction are distributed and the lower the likelihood of tooth fracture. The buccal beak has a point to fit into the bifurcation, with concavities on either side to fit around the buccal roots and a broader concave palatal beak. Because of this distinction between buccal and palatal beaks, there must be separate designs for left and right sides of the mouth.
For all upper extractions it is necessary to push firmly in the long axis of the tooth during extraction (see p. 32). For this reason many forceps for upper posterior teeth have a curve at the end of the handle (‘Read pattern’) so that they fit in the palm of the hand (Fig. 4.7). This inevitably means that such forceps must have separate designs for right- and left-handed operators (Fig. 4.8).
Access for extraction of teeth far back in the mouth can be difficult. A further variation involves a step in the beaks of the forceps (Fig. 4.9), which enables you to put the beaks on the upper third molar whilst avoiding the lower lip.
Forceps for lower teeth
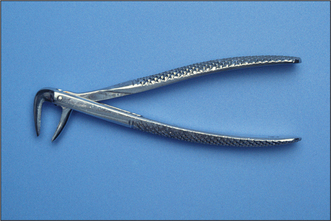
If you were to attempt to apply upper anterior forceps to a lower anterior tooth you would have difficulty in getting past the nose and upper alveolus. In the UK it is usual to overcome the problem by using forceps with a right-angled bend in them; this permits the handles to come straight out of the mouth when the beaks are in the long axis of the tooth (Fig. 4.10). The beaks of these simple forceps are similar to those used on upper anteriors. Such forceps can be used effectively on all lower teeth, from second premolar to second premolar.
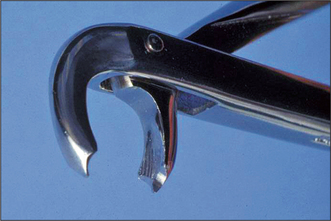
Just as with the forceps for upper teeth, beak design has been modified for multiple-rooted teeth. Full molar forceps have a point and two adjacent concave facets on both buccal and lingual beaks (Fig. 4.11).
HOW TO HOLD FORCEPS TO BEST EFFECT
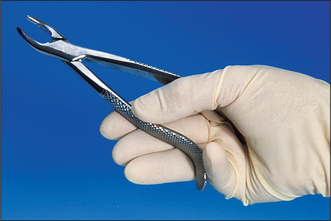
During all extractions it is necessary to push the forceps firmly towards the apex of the tooth. For maxillary teeth this is achieved by pushing on the end of the handle. In order to maintain that position, the end of the handle must rest centrally in the palm of the hand, with the wrist held straight (Fig. 4.12). The first three fingers are placed around the handles and initially the little finger is placed between the handles to help hold them apart. The little finger can be brought around the handle once the forceps are thoroughly applied. The thumb is braced on the handle but not placed around it—that could produce too great a compressive force and tends to misalign the instrument in the hand. The thumb should not be placed between the handles as this also misaligns the instrument and tooth breakage during extraction risks injury to the thumb.
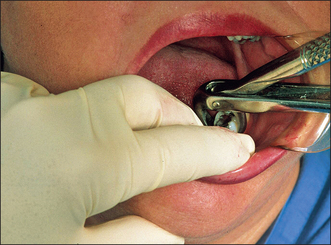
For mandibular extraction the position of the forceps is very similar (Fig. 4.13), but it is not necessary to push in the long axis of the forceps, so rigid adherence to keeping the end of the handle in the palm is less important. Nevertheless, the further the hand is from the hinge and beaks, the greater will be the leverage applied, and the lower the amount of interference of the hand with the patient’s face.
HOW TO POSITION YOURSELF AND YOUR PATIENT
Extraction of maxillary teeth
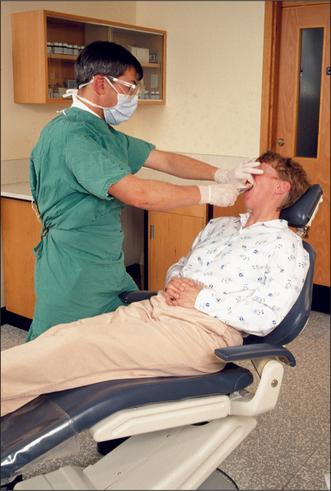
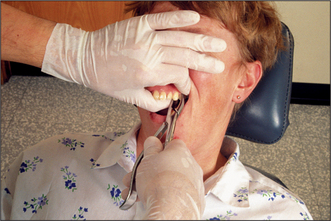
The positioning is determined by the need to push in the long axis of the tooth. The operator stands in front and to the right of the patient (Fig. 4.14). The operator’s legs should be spaced so that it is possible to push hard with the right leg which should be to the rear and straight. The left leg should be forward and slightly bent. Both feet should be close to the chair and pointed towards the patient’s head. The back should be kept straight. The patient should be tipped back by about 30° so that the surgeon can see directly into the mouth. The height of the chair should be adjusted so that the tooth to be extracted is about at the height of the operator’s elbow. The patient’s head is tipped just far enough to their right that access to the tooth is comfortable.
Extraction of mandibular teeth
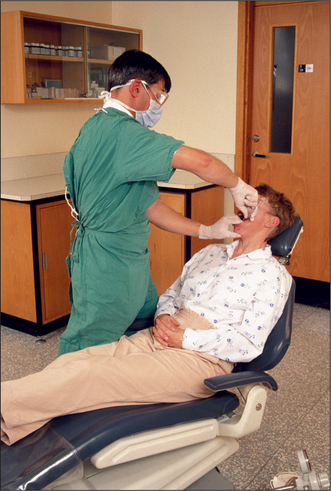
For teeth in the lower left quadrant, the operator stands much as for maxillary extractions (Fig. 4.15), but the patient can be placed a few inches lower. When the operator’s back is straight and the forceps are applied to the tooth, both of the operator’s wrists should be in a comfortable neutral position. This will be helped if the patient turns slightly toward the operator.
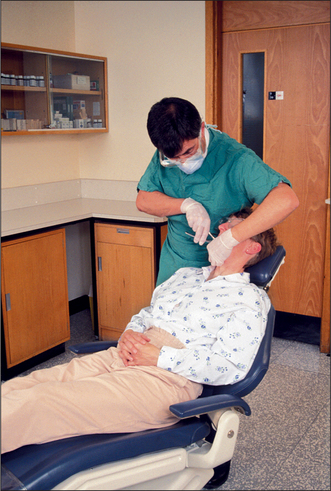
For teeth in the lower right quadrant the operator stands behind the patient (Fig. 4.16) but beside the head, usually on the patient’s right (occasionally, depending on the angulation of the tooth, it is more comfortable to stand on the other side). The chair can be tipped further back than for the maxillary teeth (maybe as much as 45°) and its height can be a little lower than when standing in front for the left side. There is little advantage in spreading the legs widely; for this extraction one is pushing down.
The supporting hand
The left hand is used to support the jaw and stabilize it during extraction. It also holds soft tissue out of the way to permit good vision. For maxillary teeth, the index finger and thumb are placed either side of the alveolus adjacent to the tooth to be extracted (Fig. 4.17). This usually requires the elbow to be up in the air. The remaining fingers are either kept straight or bunched tightly, so that they do not rest hard against the face or eyes.
For extractions in the mandible two fingers and the thumb are used (Fig. 4.18). For the lower left this means placing the index and second fingers either side of the alveolus in the mouth and the thumb beneath the mandible outside the mouth to lift up. For the lower right use the index finger and thumb inside the mouth and the second finger beneath the jaw, supporting it.
Stay updated, free dental videos. Join our Telegram channel

VIDEdental - Online dental courses


