Dental Hand Instruments
Learning Outcomes
On completion of this chapter, the student will be able to achieve the following objectives:
• Pronounce, define, and spell the Key Terms.
• Describe the three parts of a dental hand instrument.
• Describe the instrument formula designed by G.V. Black.
• List the examination instruments and their uses.
• List the types of hand (manual) cutting instruments and their uses.
• List the types of restorative instruments and their uses.
• Describe additional accessory instruments and items used in general dentistry.
• Describe the use of preset trays and tubs in dentistry.
• Discuss the theory of placing an instrument in a specific sequence.
Performance Outcomes
On completion of this chapter, the student will be able to meet competency standards in the following skills:
• Identify examination instruments.
• Identify hand (manual) cutting instruments.
Electronic Resources
 Additional information related to content in Chapter 34 can be found on the companion Evolve Web site.
Key Terms
Beveled (BEV-uld) Characterized by an angle of a surface that meets another angle.
Blade Flat edge of instrument, sharp enough to cut.
Handle Part of a dental instrument that the operator grasps.
Plane Flat or level surface of the working end of an instrument.
Point Sharp or tapered end.
Serrated (suh-RAY-ted) Having notchlike projections that extend from a flat surface.
Shank Part of an instrument where the handle attaches to the working end.
Tactile (TAK-til) Having a sense of touch or feeling.
Working end Part of a dental instrument that is used on the tooth or when dental materials are mixed.
A wide variety of dental instruments are used in dentistry today. This chapter describes the design and purpose of dental instruments that are most commonly used by dentists for general restorative procedures.
Dental supply companies manufacture many variations of instruments for the purpose of accommodating personal preferences. As you study the instruments in this chapter, you will learn that each instrument is designed for a specific area of a tooth, for a specific type of dental material, and for the specific needs of the dentist.
Identifying Hand Instruments
Each type of dental instrument has a specific purpose in a dental procedure. Knowledge of each instrument is the responsibility of the clinical assistant when setting up for a procedure. The assistant will set up the instruments on the tray in a precise order of use and is expected to transfer from the tray setup when the operator signals for a new instrument.
Instruments are made of stainless steel, carbon steel, plastic, or a specialized metal. Because instruments withstand constant use, they must be able to endure sterilization procedures, as described in Chapter 21.
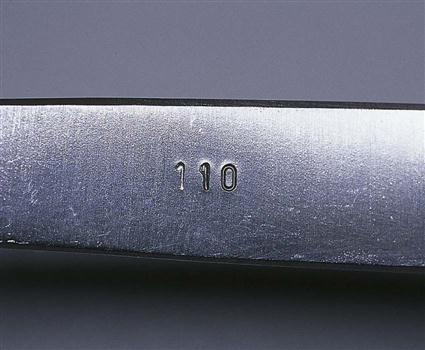
Instrument Number
The dental manufacturer assigns a number to most instruments (Fig. 34-1). This number is a universal representation of that instrument. The dentist will often refer to pliers and forceps by their number, rather than by their name. When studying the accessory instruments, orthodontic pliers and surgical forceps, it will be advantageous to learn both the number and the name.
Instrument Design
Hand instruments are designed with three specific parts: the handle, the shank, and the working end (Fig. 34-2).
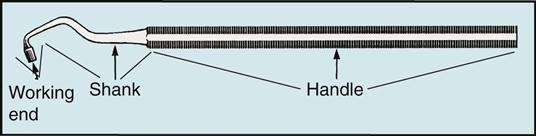
Handle
The handle portion of the instrument is where the operator grasps or holds the instrument. Handles are manufactured in various shapes and sizes; some handles are round, and others are hexagonal. They may be smooth or may have a grooved pattern for a better grasp. Instruments are now designed to have a larger handle in circumference, as well as padding for a better grip. As seen in writing instruments, this new padding provides the operator with greater control of the instrument and causes less fatigue on the fingers and the hand muscles.
Shank
The shank refers to the part of the instrument that attaches the working end to the handle. The bends or angles in the shank are designed so that an instrument can reach specific areas of the tooth. For example, instruments used interproximally have more angles in their shanks, whereas instruments used on the facial or buccal surface of a tooth have a straight shank.
The thickness and strength of the shank dictate the amount of pressure that can be applied to the instrument without breakage.
Working End
The working end refers to the portion of the instrument with a specific function. This end can have a point, blade, or nib. If the instrument has a nib, the area may be smooth or serrated.
Hand instruments are single or double ended. The double-ended instrument has a shank and a working end at both ends of the handle. Often, double-ended instruments are mirror images (reverse angles) of each other, allowing adaptation to all surfaces of the tooth. These are referred to as left and right instruments.
Black’s Instrument Formula
As you have learned in previous chapters, G.V. Black played a significant role in developing many aspects of the way dentistry is practiced today. Black designed a formula that describes the angulations and dimensions of the working end of a hand instrument (Fig. 34-3). Hand cutting and scaling instruments have three sets of numbers that identify the blade’s width, length, and angle. Table 34-1 presents the numbers and formulas used in the design of an instrument.

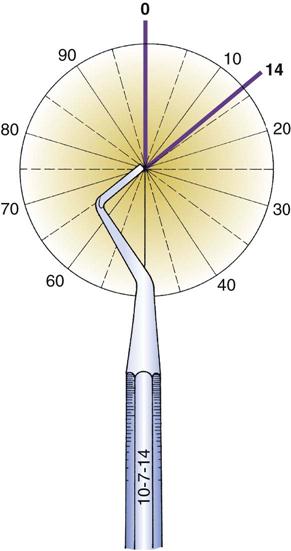
TABLE 34-1
Numbers in G.V. Black’s Instrument Formula
| Sequence | Description |
| First number | Width of the blade in tenths of millimeters (e.g., if the number is 10, the width is 1 mm) |
| Second number | Length of the blade in millimeters (e.g., if the number is 7, the length is 7 mm) |
| Third number | Angle of blade in degrees in relation to the handle (e.g., if the number is 90, the working tip [blade] is at a 90-degree angle [right angle] to the handle) |
Instrument Classification
The instruments used in restorative dental procedures are classified into four categories: examination, hand cutting, restorative, and accessory. By learning the instruments by their classification, it will be easier to learn their names, uses, and sequencing for a procedure:
• Accessory instruments are miscellaneous instruments and items that are used to complete a procedure.
Instrument Sequence
A procedure tray is set up from left to right. This sequenc/>
Stay updated, free dental videos. Join our Telegram channel
VIDEdental - Online dental courses


