31 System B/Obtura
The continuous wave of compaction technique was developed by Dr Stephen Buchanan in 1987 to simplify the warmed gutta-percha down-packing technique. With the warm vertical compaction technique, which involves three to four warming and compaction cycles, the application of heat during down-packing is interrupted three to four times. In contrast, the continuous wave technique of down-packing permits a single, regular movement of the material with continuous heating. The continuous wave process softens the gutta-percha mass mainly in a lateral direction and also in the coronal parts; it is therefore also possible to obturate lateral canals in the coronal area (Buchanan, 1994, 2005).
The System B heat source comes with continuous wave heat pluggers of various tapers, in accordance with the nonstandardized gutta-percha points. Hence most of the hand pluggers and the heat carrier are substituted with a single instrument during down-packing.
The backfilling is ideally performed with warmed gutta-percha (e.g., from the Obtura-III gun), which in contrast to the classical backfilling method, offers significant time saving. The Elements Obturation Unit is a recent development in which the System B heat carrier and the gutta-percha gun are combined into a single device.
31.1 The sealer
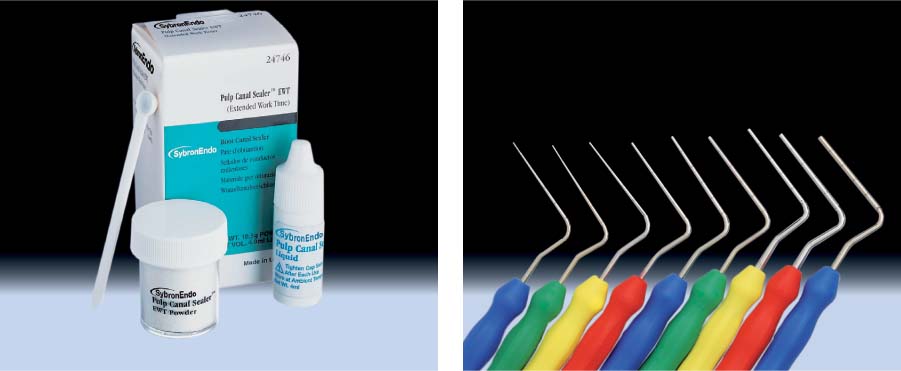
Left: The ideal sealer for use with the vertical compaction technique is Sybron Pulp Canal Sealer EWT (extended working time).
Right: Set of nine Schilder pluggers, sizes 8–12 in half sizes. These are commercially available for use in both anterior and posterior teeth.
31.2 Continuous wave heat pluggers
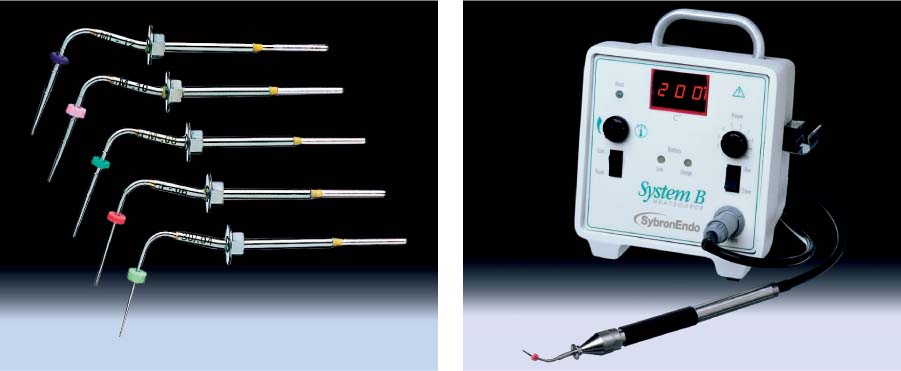
Left: The electric continuous wave heat pluggers are available in sizes (tip diameter/taper) 30/.04, 40/.06 (fine), 50/.08 (fine-medium), 60/.10 (medium), and 70/.12 (mediumlarge).
Right: System B permits temperature control; tapered tips are used for the continuous wave obturation technique.
31.3 Gutta-percha gun
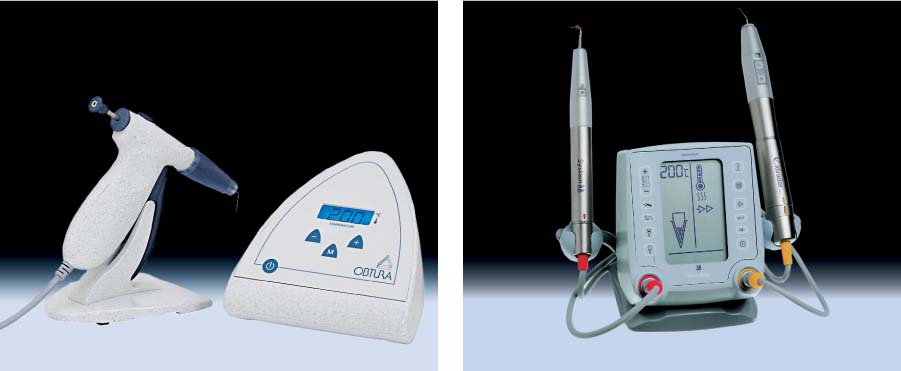
Left: The backfilling technique is simplified with the use of a guttapercha gun, Obtura II or Obtura III.
Right: The Elements Obturation Unit combines the continuous wave heat carrier and gutta-percha gun into one unit.
Preparation
The cone fit is determined in a process similar to the warm vertical compaction technique. The master cone is fitted to the entire working length and shortened by 0.5 mm before cementation. The continuous wave obturation heat plugger is selected to correspond with the taper of the master cone.
The continuous wave heat pluggers are characterized by two parameters. The first is the size of the nonstandardized guttapercha points (extra-fine, fine, fine-medium, medium, and medium-large), and the other is the taper of the completed canal preparation (.04,.06,.08,.10, and.12).
The selected continuous wave heat plugger is pushed into the canal until it binds with the dentinal walls. The most apical “binding point” is marked with a rubber stopper and serves as a reference point during obturation.
By careful maneuvering within the canal, smaller continuous wave heat pluggers can be adapted to the root canal anatomy; larger ones should be carefully prebent to adapt to the curvature of the canal. The hand pluggers for down-pack as well as for back-fill compaction should be adapted before initiating the definitive obturation.
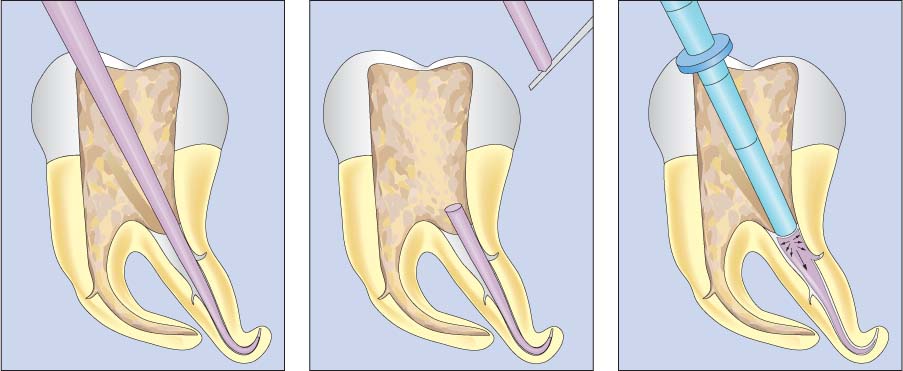
31.4 Selecting the master cone
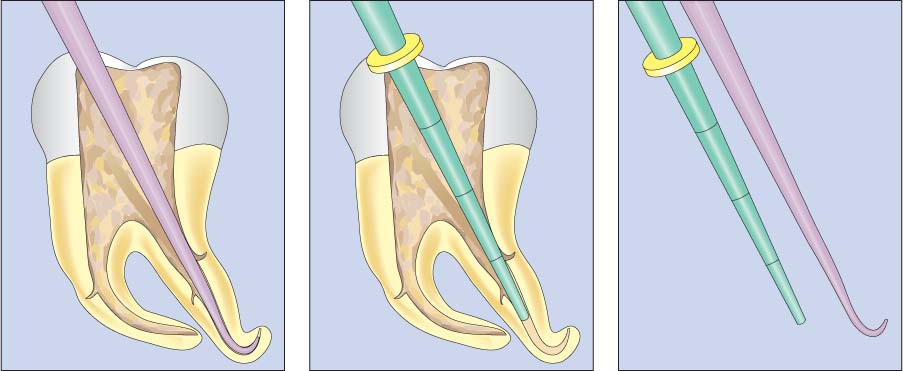
Left: The master cone should extend to the full length, “bind” in the last 1 mm of the canal, and then be shortened by 0.5 mm.
Middle: The choice of the continuous wave heat plugger is determined by the taper of the master cone.
Right: Adapted master cone and continuous wave heat plugger; ideally, the plugger should reach a point 4–6 mm short of the full working length.
31.5 Hand plugger selection. The CW plugger must be adapted, and there should be a choice of at least three hand pluggers
Left: The first plugger should be inserted only a few millimeters into the canal without touching the dentinal walls. If the markings on the instrument are not satisfactory guides, rubber stoppers should be used.
Middle: The second plugger should extend to the middle of the canal, without touching the dentinal walls.
Right: The third plugger should extend into the apical section of the canal, 4–6 mm short of the full working length, again without contacting the dentinal walls.
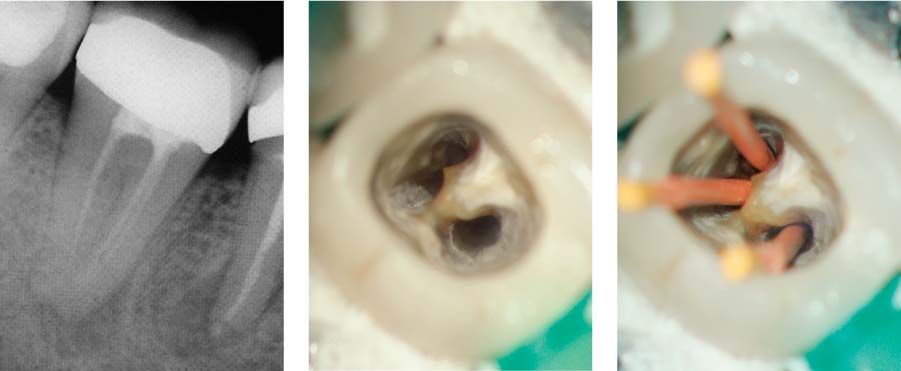
31.6 Clinical example
Left: Radiograph showing a mandibular second molar root canal system with complex configuration.
Middle: Occlusal view of the pulp chamber following complete instrumentation.
Right: Fitting of the cone must be carried out extremely carefully in this case because of the complicated root canal anatomy and the fused canals.
Down-packing
After inserting the master cone with sealer (ideally Pulp Canal Sealer EWT) the cone is seared off at the canal orifice level and vertically compacted with the preselected hand plugger. For this procedure, the System B should be set, in general, at approximately 200°C. With the use of a size.04 or.06 plugger, the temperature can be maintained at 185°C, with a size.10 plugger at 220°C and with a size.12 plugger at 240°C (Buchanan, 2005). The power regulator is set at 10 and the “touch” function activated.
When using the Elements Unit, the high-heat down-packing mode can be activated independent of the plugger size.
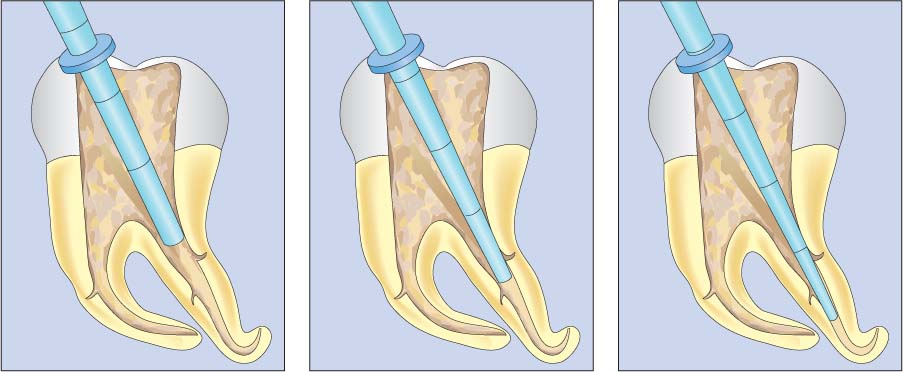
The continuous wave heat plugger is then brought into contact with the gutta-percha and activated and guided in a continuous movement through it. Shortly before reaching the binding point, the plugger is inactivated and additional apical pressure is applied. Then the plugger is inserted further into the gutta-percha to just coronal to the binding point. Pressure is then applied for an additional 10 seconds to compensate for shrinkage. After the apical compaction has been completed, the continuous wave heat plugger is activated for 1 second; following an additional 1-second pause, the plugger is removed with the surplus gutta-percha. The down-pack is then compacted using the preselected hand plugger.
31.7 Step I
Left: The master cone should “bind” the canal walls in the final apical 1 mm following adaptation to full working length, be shorten/>
Stay updated, free dental videos. Join our Telegram channel
VIDEdental - Online dental courses


