3: Photography: Digital and Analog

Chapter 3 Photography

Digital and Analog

Section A Clinical Photography Standards

Christopher Orr

Relevance of Photography to Esthetic Dentistry

Good photography lies at the heart of absolutely every area of esthetic dentistry. The correct use of the clinical camera is an invaluable way for the practitioner not only to document what is being done in terms of pre-treatment and post-treatment photographs of cases, thereby maintaining excellent clinical records, but also to improve patient education and enhance his or her self-education.

Brief History of Clinical Development and Evolution of the Procedure

The major advance in dental photography centers on the shift from film-based to digital imaging. Film was a great step forward when introduced over a century ago. Clinically, however, it was not a useful or efficient tool, as it was impossible to analyse the images immediately and check whether the desired views had been obtained. Pictures were taken as slides because slide films were considered best for color reproduction. However, the film had to be sent out to commercial laboratories for processing. Due to the specialized processing needed, there was always a delay in return of the photographs, often 1 to 2 weeks. Showing patients their own teeth was inconvenient owing to the need to project the images. Copying images when required was an added inconvenience, as it was very difficult to achieve consistent quality and color accuracy in duplication.

It was very difficult to show the pictures to patients at the chairside; thus, for most practitioners, excepting those taking post-graduate examinations or clinicians on the lecture circuit, photography was not considered a routine practice.

Digital photography has been around for some time, but it was only in 2003-2004 that a good-quality digital single-lens reflex (SLR)–type camera become affordable for most practitioners. The mass marketability of consumer digital SLR cameras has revolutionized how clinical photography is done, how it is delivered, and its practicality and reliability. With digital photography, there is the advantage of immediately verifying that the desired image has been captured. It is very easy to look at the picture on the camera’s screen, identify what is not right, and retake it immediately. There is no need for processing, so images can be viewed immediately, and they can be shared with patients right away.

Photography also improves the quality of referrals. If a general practitioner sees a suspicious red lesion under a patient’s tongue, it is quite easy to take a picture of it, put that into a referral letter or attach it to an email, and send it to the oral medicine specialist. A complex restorative referral can be made much easier for the practitioner receiving the referral if photographs can be included along with radiographs and the referral letter as it allows the treatment planning process to begin even before the patient visits the prosthodontist’s office. Not only does this allow the dentist to document what is being done, but it helps in caring for patients more comprehensively and more efficiently.

Equipment options

There are three levels of sophistication. Assuming that the 35-mm film camera is no longer in use, many dentists’ entry point into clinical photography is a modified “point-and-shoot” camera (Figure 3-1) or an entry-level digital SLR camera (Figure 3-2). For the dentist who wants to improve their clinical photography, there is more sophisticated equipment that allows better images and greater clinical latitude.

image

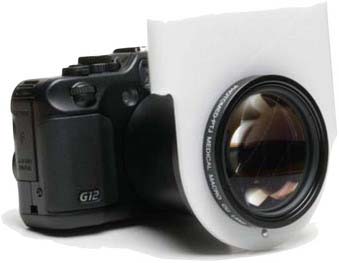
FIGURE 3-1 A typical “point-and-shoot” setup.

(Courtesy PhotoMed International, Van Nuys, California.)

image

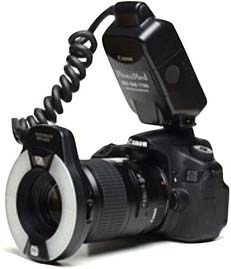
FIGURE 3-2 A typical single-lens reflex (SLR) setup.

(Courtesy PhotoMed International, Van Nuys, California.)

The modified point-and-shoot cameras have an important place in clinical photography. The early consumer-level digital SLRs were more expensive than some practitioners could afford. The point-and-shoot cameras have the advantage of being compact, light, and (at that time) relatively less expensive. Their disadvantages relate to their distinct operational and a long learning curve, the need for a substantial degree of practice and familiarity with the setup to get the best images.

Often the dental practice has a second camera for the staff to use. When clinical photography is properly implemented in the practice, staff members and particularly hygienists become involved with patient picture taking as part of their educational process. Many staff members find the simpler, modified point-and-shoot cameras to be preferable to their SLR counterparts.

Current Best Approach

The best practice for most people begins with the purchase of the equivalent of a 35-mm–type digital SLR camera. Even today’s entry-level digital SLR cameras have a pixel count that makes their digital images superior to film images. Their ease of use and efficiency in obtaining reproducible results are excellent.

The technical setup comprises a camera body and a macro lens, typically one with a focal length around 100 mm. The lens must be a specifically dedicated macro lens rather than a zoom lens that has a macro capability; for clinical photography dentists require easy access for close-ups of the teeth. This is another area in which SLR cameras are superior to modified point-and-shoot cameras. With point-and-shoot cameras it is more difficult to get close-up views and occlusal images that require the use of mirrors.

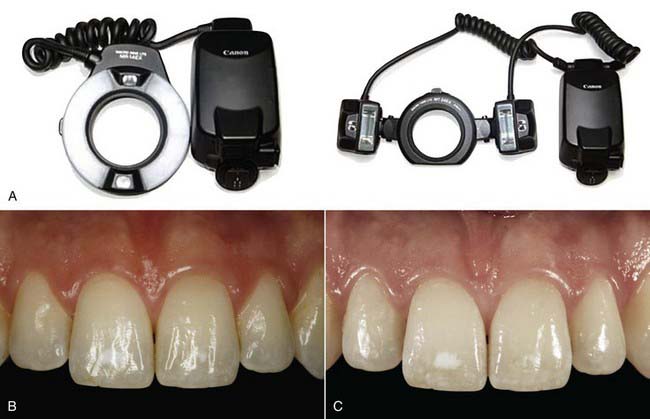
In addition to the body and the lens, a flash is required. In order to achieve images with all the teeth in sharp focus, the shutter speed is set to a fraction of a second to eliminate camera shake, the aperture is set to a very small opening size to maximize depth of field, and thus there is a need for an additional light source as ambient light will be far from sufficient. The most straightforward option for most practitioners is a ring flash. For a few practitioners who are very interested in taking the absolutely best-quality clinical pictures possible, more sophisticated flashes are available (Figure 3-3). These include a dual point flash, a twin light source that allows the alteration of the illuminations to show line angles and translucencies on teeth and restorations more accurately. This permits one to have more control over the final image. However, the requirement to adjust the flash heads individually for each shot makes it impractical for many dentists.

The best combination is therefore an SLR camera, a macro lens, and a ring flash. The camera sits assembled in the operatory, ready to be picked up and pointed at the patient. In addition, any practitioner taking photographs will need cheek retractors and mirrors. The more sophisticated practitioner may prefer visual contrast and can use black-out sticks in close-up shots to eliminate the out-of-focus background of the mouth. This is an issue of personal preference but improves the final picture significantly.

Specific camera systems change so quickly that it is difficult to recommend a certain model. Generally, any SLR body made by either Nikon or Canon provides very good results. Other manufacturers’ systems are available, but they may lack the full range of lenses or other accessories for optimal clinical usage. In terms of lenses, both Nikon (Nikon Inc., Melville, New York) and Canon (Canon USA, Inc., Lake Success, New York) make very good 100-mm focal length macro lenses. Sigma also makes good-quality macro lenses that are somewhat less expensive. Canon makes a very good ring flash, and a Sigma or Metz ring flash can be used with either Nikon or Canon products. Point-and-shoot setups vary greatly, so it is best to speak with one of the major suppliers such as PhotoMed (Van Nuys, California) or Clinipix (Wellington, Florida) to determine the latest products. If the dentist wants more sophisticated twin lights, Canon and Nikon both offer good choices. Clinical photography is a specialized area, so it is advisable to use one of the specialized clinical photography suppliers, as general photographic suppliers lack the technical knowledge of dentistry’s specific requirements.

Other considerations

Generally the best person to be taking the photographs is the dentist. However, in many practices well-trained staff members who understand the important issues of framing, focus, and correct exposure take the pictures on behalf of the dentist. Often for re-care appointments or new patient appointments, the person who takes the photos can be either a hygienist or a specifically trained dental assistant. The images are then ready for the dentist when he or she comes in to conduct the patient examination.

As part of the general consent process, consent for photography is implied by the patient sitting in the chair for the dental appointment. The photographs, however, are part of the clinical record and should be treated in the same way as radiographs and clinical notes. In terms of using clinical photographs in other settings, as with any clinical record items, if the patient is identifiable, one needs the patient’s specific (usually written) permission. If the patient is not identifiable, then no specific consent outside of the general consent is required. If the dentist, for example, wants to use some before-and-after pictures for a portfolio on a website, many patients are delighted that their treatment turned out so well and will readily allow the doctor to show their cases. For most patients the main concern is a picture involving the full face where they are readily identifiable. Sometimes a very distinctive dentition is immediately identifiable. In those cases, permission is needed prior to use. Overall the use of pictures is perfectly acceptable, provided the patient cannot be identified.

Innovative Elements

In terms of clinical photography, there have been a a number of novel evolutions from general photography. First, the range of lighting conditions under which a typical digital camera can produce an acceptable image has expanded greatly. Second, the number of pixels that one can pack onto a camera sensor has increased while technology prices have fallen; pixel count is no longer the main determinant of cost.

The advent of the improved “through the lens” (TTL) light metering has had a major impact on the predictability of capturing good images. With film photography one had to make an educated guess and take multiple slightly different exposures (bracketing) in the hope of getting one perfect image. Today’s electronic TTL (E-TTL) flashes decide exactly how much light should be generated to correctly illuminate the subject, leaving the dentist free to think about focusing the picture and correctly framing it. This eliminates yet another barrier for practitioners.

One area that remains the same is the differentiation between auto focus and manual focus. Auto focus is essentially the default setting on most consumer cameras, but it often does not work effectively when one is very close to the subject and doubly so when one is photographing a reflected image on a mirror. For that reason, manual focus is the best way to make sure that one achieves consistent framing and consistent exposure. It is best to choose a particular magnification ratio on the camera’s lens barrel and then move the camera back and forth slightly to achieve the correct distance from the subject. This allows the dentist to take the same picture at a specified magnification consistently, without referring to previous photographs of the patient.

Light metering is essentially handled by the camera. That is a major reason for buying the E-TTL–capable ring flash. One can be tempted to buy cheaper ring flashes that do not communicate electronically with the camera body; these require guesswork for ideal illumination, and often result in many, many more pictures taken, wasting clinical time. In terms of chairside efficiency, the higher cost of the E-TTL flashes is more than justified by the amount of clinical time that one saves in use.

Stay updated, free dental videos. Join our Telegram channel

Jan 3, 2015 | Posted by in Esthetic Dentristry | Comments Off on 3: Photography: Digital and Analog

VIDEdental - Online dental courses

Get VIDEdental app for watching clinical videos