Chapter 3
Instruments and Instrumentation
Aim
The aim of this chapter is to describe a range of instruments used for the non-surgical management of periodontal disease.
Outcome
After reading this chapter the reader should be able to identify the various types of instruments and have an understanding of the purpose of each periodontal instrument, and its advantages and disadvantages in different situations.
Introduction
The instruments used for periodontal non-surgical management can be divided into of two main categories:
-
hand instruments
-
powered instruments (sonic scalers, ultrasonic scalers and air-abrasive devices).
Hand Instruments
There are many groups of instruments that are used for scaling procedures. Each instrument is designed for use in a specific area of the mouth. An instrument can be categorised by:
-
whether it is to be used for supragingival or subgingival instrumentation
-
whether it is a universal or area/tooth specific instrument.
Scaling instruments fall into the general categories of:
-
chisels
-
trihedral scalers
-
hoes
-
files
-
curettes.
Chisel Scaler or Push Scaler (Guy’s G1 or G2, Cushings or Watch-Spring)
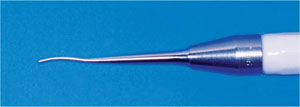
The chisel scaler is a straight instrument that curves slightly as the blade extends from the shank (Fig 3-1). The end of the blade is flat, with a straight cutting edge that is bevelled at 45°. It is available in different widths and is used with a controlled push stroke from the labial aspect of the lower anterior teeth to remove interproximal and lingual supragingival calculus. It should only be used where there is sufficient embrasure space or gingival trauma will result. It may be used subgingivally where the interdental papillae have lost attachment. A mouth mirror should always be used to protect the tongue and the floor of the mouth.

Fig 3-1 The chisel scaler is a straight instrument that curves slightly as the blade extends from the shank.
Trihedral Scalers (H6, H7, G3, G4, J1 and H5)
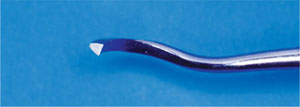
The working end of trihedral scalers is triangular in cross-section (Fig 3-2). It is designed so that its lower border does not damage gingival tissue. There are two blades, one either side of the superior surface, which end in a point. The blades curve in a lateral plane allowing them to engage the tooth surface. The shank may be straight or contra-angled. There are two main types of trihedral scalers: sickle scalers and jacquette scalers (G3, G4, J1 and H5).

Fig 3-2 The working end of trihedral scaler is triangular in cross section.
Sickle scalers (H6 and H7) are principally used for the removal of supragingival calculus or for subgingival calculus that is located just below the gingival margin. For lower anterior teeth a minisickle scaler has a tighter curve at the instrument’s working end that contours more efficiently (Fig 3-3).

Fig 3-3 For lower anterior teeth a mini-sickle scaler has a tighter curve at the instruments working end.
Periodontal Hoes
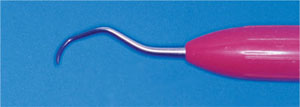
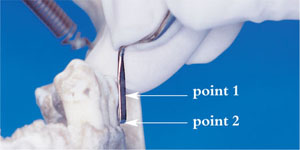
Periodontal hoes (Fig 3-4) have variously angled shanks with a functional “lip” at the end. The single blade is bevelled. Hoes can be used on all tooth surfaces and are primarily used for subgingival scaling and root surface instrumentation. Periodontal hoes are used with a “pull action” parallel to the long axis of the tooth. It is important that a two-point contact is maintained (Fig 3-5) throughout the instrument stroke. Care must be taken to avoid gouging of the cementum with the corners of the blade. These instruments are difficult to sharpen, although tungsten carbide hoes are durable and require less frequent sharpening. There are four instruments, which are designed to enable the mesial, distal, buccal and lingual surfaces to be instrumented (TC 210, 211, 212, and 213). Table 3-1 shows the advantages and disadvantages of periodontal hoes.

Fig 3-4 Periodontal hoe used for root surface instrumentation

Fig 3-5 When using a periodontal hoe a two-point contact must be maintained.
| Advantages | Disadvantages |
| Only four types, so instrument selection is easy |
Only one-point root surface contact (poor efficiency) |
| Rigid shanks result in easier removal of tenacious calculus |
Too wide for narrow pockets |
| Good for wide pockets | Do not contour root surface |
| Increased risk of hard and soft tissue trauma due to sharp corners |
|
| Tungsten carbide tips require special sharpening kits |
|
| Blade at 90° to shank (not ideal) | |
| Not designed for ease of access to posterior teeth |
|
| Finger rest difficult to obtain local to point of action |
Periodontal Files (Hirschfeld 3/7, 5/11 and 9/10)
A periodontal file (Fig 3-6) is an instrument that has multiple, straight cutting edges at the working end of the instrument. There are two main indications for using the periodontal file to facilitate calculus removal. The first is for the removal of burnished calculus deposits that have previously been “over instrumented” and have become smooth. Burnished calculus commonly results from sonic/ultrasonic instrumentation and is difficult to remove because the cutting edge of the instrument tends to slide over the smooth surface. A file is used to roughen the surface of the burnished deposit so that it can then be removed by another instrument. The second indication is for “crushing” calculus making it easier to remove with a curette. Each file is designed for use on a single tooth surface: mesial, distal, lingual and palatal. Diamond tipped files make furcation instrumentation much easier.

Fig 3-6 A periodontal file has multiple straight cutting edges.
Curettes
There are two main categories of curette:
-
universal
-
area-specific.
Universal Curettes (Columbia 2R/2L; Columbia 13/14; Langers 1/2; Langers 5/6, and Langers)
A universal curette (Fig 3-7) is an instrument with a rounded back and rounded toe. Universal curettes have two parallel cutting edges at the working end. Usually curettes are paired as a double-ended instrument and can be applied to all tooth surfaces in both the anterior and posterior parts of the mouth. There are numerous designs of universal curette. In selecting a universal curette for a particular task, the operator should consider the design characteristics of the working end and functional shank. The universal curette is used throughout the entire mouth for the removal of both supragingival and subgingival calculus. Although the cutting edges are several millimetres long, adaptation of the universal curette to the tooth surface is achieved by placing the distal 2 to 3mm of the blade in the appropriate working relationship next to the tooth surface.

Fig 3-7 A universal curette is used for subgingival instrumentation.
Area-specific curettes/site specific curettes
Area- or site-specific curettes are designed for use in particular anatomical areas of the mouth. The most commonly used specific curettes are Gracey curettes (Fig 3-8) that were designed by Dr Clayton Gracey in the 1930s. The name “area-specific” signifies that each curette can be applied only to certain surfaces, and for this reason, a complete set of curettes is needed to instrument the entire dentition. Area-specific curettes were intended to provide access for scaling and root surface instrumentation on root surfaces with deep pockets (>5mm, hence the term “Gracey after-five” curettes is used)/>
Stay updated, free dental videos. Join our Telegram channel

VIDEdental - Online dental courses


