Surgery First
The Protocol of Innovative Surgical Orthodontics
Junji Sugawara, Zaher Aymach, Satoshi Yamada, Hiroshi Nagasaka, Hiroshi Kawamura, Ravindra Nanda
In recent years, a trend toward implementing treatment plans that achieve rapid facial change has arisen.1–5 In the surgery first (SF) treatment plan, the presurgical orthodontic treatment phase is completely eliminated, the jaws are surgically repositioned to the desired locations, and orthodontic tooth movement follows. Caution is important when embarking on SF treatment. Even a highly experienced orthodontist/surgeon will not necessarily find it easy to identify the occlusal relationship that will accompany an ideal facial and functional result. This explains why numerous orthodontists prefer to conduct an orthodontic preparation before surgery. Having a stable postoperative occlusion is thought to be important for maintaining the bony stability.5
The advent of temporary anchorage devices (TADs), including skeletal anchorage, was a breakthrough in achieving teeth movement beyond traditional orthodontics. The skeletal anchorage system (SAS), which uses titanium mini-plates to control moving teeth in nongrowing patients, has shown that it is possible to achieve predictable three-dimensional movement of teeth and entire dentition with fewer bicuspid extractions.6,7
Contemplating SF treatment with the SAS began in 2003 at Tohoku University in Sendai, Japan. The distinguishing feature of this approach is an orthodontics-driven method referred to as Sendai SF. The surgery aims to first correct the skeletal deformity and then the SAS mini-plates, which are placed at the time of orthognathic surgery, manage the dentoalveolar problems and establish the functional and esthetic occlusion postsurgically. The fundamental concept of Sendai SF is to maintain the quality results seen in traditional surgical orthodontics by making a precise prediction of the final outcomes of both orthodontic and surgical correction prior to treatment.
This chapter describes and illustrates the step-by-step protocol used in Sendai SF through four case examples.
Sendai Surgery First Protocol
The Sendai SF protocol has 15 steps (Box 22-1). Among these are four major steps, each of which is discussed below and illustrated with a detailed patient case example.
Step 1: Diagnosis (Establishment of Treatment Goals)
Individualized treatment goals in Sendai SF are established at the initial time of treatment.1–3 This process is led by examining and analyzing the problem list developed for each patient. In our case example, a 37-year-old female presented with a prognathic profile and long face with facial asymmetry, an anterior open bite, and significant retroclination of the lower incisors (Fig. 22-1). According to the posteroanterior (PA) cephalometric radiograph, she had clear mandibular asymmetry. Cephalometric analysis to evaluate skeletal discrepancies was conducted based on five parameters: cephalometric template analysis (CDS analysis),8 McNamara analysis for points A and B, the A point nasion B point (ANB) angle, Wits appraisal,9 and Harvold analysis (Fig. 22-2). Results of the cephalometric analysis revealed her mandibular excess and excessive lower facial height due to vertical maxillary excess. These findings indicated her need for surgical correction with mandibular setback and reduction of lower facial height.
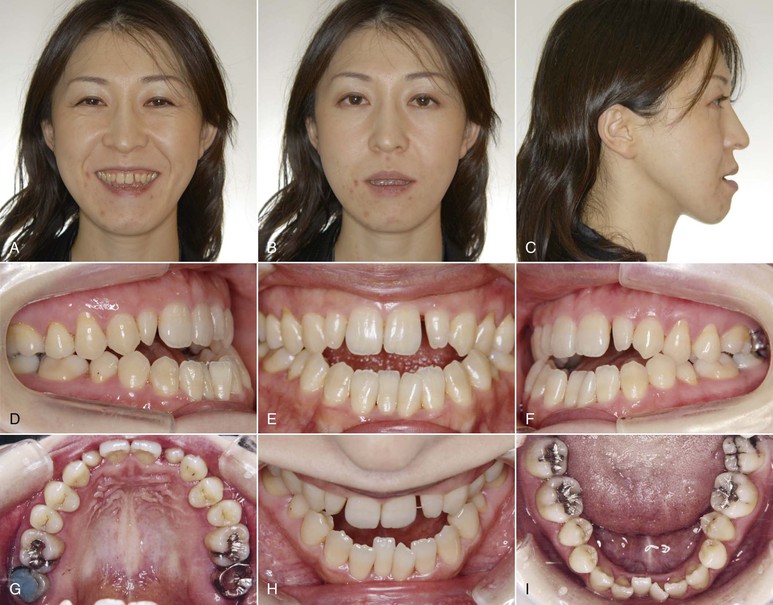
Figure 22-1 Initial (A–C) facial and (D–I) intraoral photos of a 37-year-old female patient show a prognathic profile, long face, Class I dental relationship, anterior crossbite, open bite, and retroclination of the lower incisors.

Figure 22-2 Cephalometric analysis. The line drawing indicates patient (white) and norm (blue). Clearly, the patient’s mandibular protrusion and excessive lower facial height could best be corrected surgically. A, A point; ANB, A point nasion B point; B, B point; CDS, cephalometric template analysis.
Based on the results of the cephalometric analysis, the patient’s treatment goals were established (Fig. 22-3). The amount of mandibular setback and the extent of decompensation of the incisors were evaluated as well. The amount of mandibular setback was predicted to be 10-mm on average and her denture relationship changed from Class III to Class II with open bite. In postsurgical orthodontics, 3-mm intrusion of upper molars and 5-mm protraction of lower dentition were needed to achieve the successful decompensation of her lower incisors and good Class I occlusion.
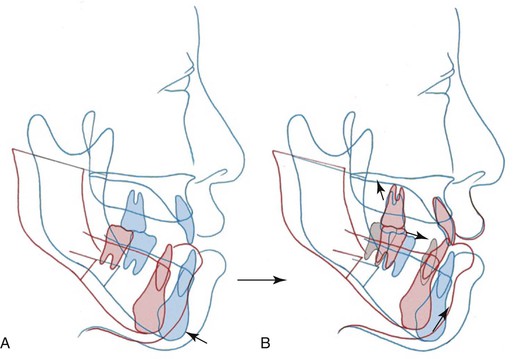
Figure 22-3 Treatment goals. Cephalometric prediction (A) immediately after surgery and (B) at debonding. The amount of mandibular setback and the extent of decompensation of the incisors were predicted. In postsurgical orthodontics, 3-mm intrusion of upper molars and 5-mm protraction of lower dentition were needed to achieve the successful decompensation of the patient’s lower incisors and good Class I occlusion. By using the skeletal anchorage system (SAS) to intrude the maxillary posteriors, the need for two-jaw surgery was eliminated.
At least 1 week before surgery, brackets were bonded indirectly and passive rectangular wires for stabilizing dentition and bone segments were prepared by a dental technician in a laboratory. The brackets and archwires were 0.022-inch and 0.016-inch × 0.022-inch stainless steel, respectively. Surgical hooks were soldered on the archwire (Fig. 22-4).
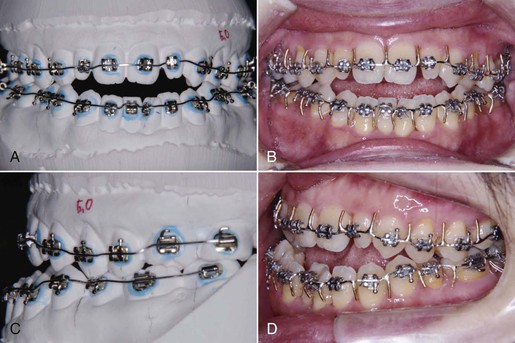
Figure 22-4 Indirect bonding and surgical wires. The passive rectangular surgical wires (0.016-inch × 0.022-inch stainless steel) for stabilizing dentition and bone segments were prepared by a dental technician in a laboratory. A, The passive wire bent on a model after the brackets indirectly bonded; frontal view. B, The passive wire with the surgical hooks soldered; intraoral frontal view. C, Lateral model view. D, Lateral intraoral view.
Step 2: Model Surgery
Model surgery is an essential step in Sendai SF and leads to the fabrication of the surgical splint that will maintain the transit occlusion postsurgically.
The facebow transfer process is used to transfer the maxillary model followed by the mandibular model onto a semiadjustable articulator. Based on the cephalometric prediction, the surgical movement is simulated. The patient needed mandibular setback of 13-mm on the right and 7-mm on the left (Fig. 22-5, A–C). The surgical simulation of mandibular movement should be parallel to the functional occlusal plane so that the posterior facial height is maintained (Fig. 22-5, D). As a result, many Class III cases will show Class II open bite immediately after surgery due to the occlusal interferences at the molar regions.
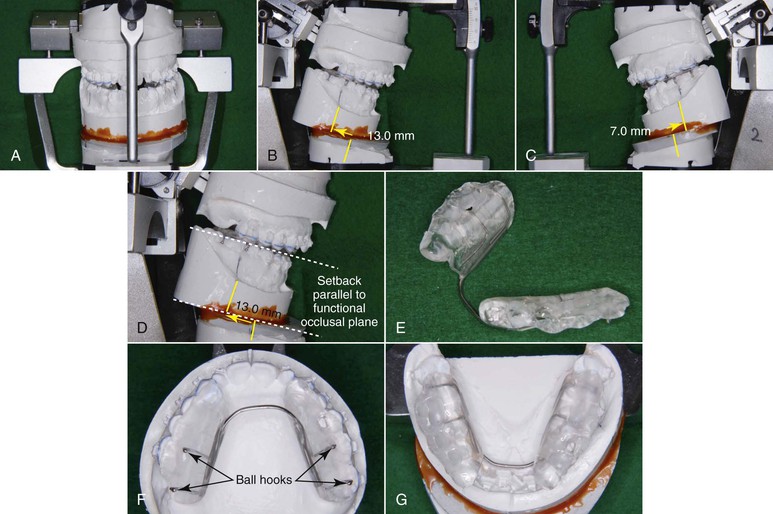
Figure 22-5 A–C, Model prediction with semiadjustable articulator. Based on the cephalometric prediction, the patient’s mandibular model was setback 13-mm on the right side and 7-mm on the left side. D, Mandibular setback should be parallel to the functional occlusal plane to not increase the posterior facial height. Many Class III cases show Class II open bite at that point in the treatment, because of the occlusal interferences at the molar regions. E–G, A surgical splint with four ball hooks is essential to maximize the occlusal contact and to stabilize posterior support immediately after surgery. The splint is usually placed at the mandibular dentition in Class III cases.
Other groups that promote SF treatment recommend establishing three-point contacts in model surgery to acquire stable occlusion and Class I molar relationships immediately after orthognathic surgery.5,10,11 This is not necessarily required in Sendai SF. The surgical movement is aimed to correct the skeletal disharmony. It is the role of the SAS to achieve the proper occlusion postsurgically. Aymach and Kawamura described the attempt to achieve a three-point contact occlusion and close the open bite by counterclockwise rotation of the mandible will extend the pterygomasseteric sling due to the increase of posterior facial height. Such extension of the sling is closely associated with the postsurgical relapse seen with open bite.12,13 Therefore other SF groups must apply more invasive two-jaw surgery in order to avoid the increase in posterior facial height.
With the surgical movement simulated, a surgical splint with four ball hooks and a lingual bar is fabricated (Fig. 22-5, E–G). Using a splint is essential to maximize the occlusal contact and to stabilize posterior support. Even though the molars cause occlusal interferences at this point in the treatment process, no cusp grinding of the molars is performed.
Since distalization of the maxillary molars and constriction of the maxillary dentition are needed at the early stage of postsurgical orthodontics, the surgical splint is usually placed at the mandibular dentition in Class III cases.
Step 3: Orthognathic Surgery
Accurate surgical technique has a major role in the success of Sendai SF. Achieving an appropriate osteotomy design, splitting, fixation technique, and proper condyle seating are key in conferring stable results.
The surgeons on the Sendai SF team use a modified design of a bilateral sagittal split osteotomy (BSSO) combined with a T-shaped bone mini-plate fixation.14–16 The design has a buccal step laid adjacent to the mandibular second molar area. This design prevents condylar dislocation and therefore minimizes relapse (Fig. 22-6). Aymach and Kawamura have shown that for mandibular setback or advancement surgery, a modified BSSO and buccal step, combined with a T-shaped bone mini-plate fixation, optimizes the resistance and stability of the fixation when compared to a standard BSSO fixed with a single straight bone mini-plate.
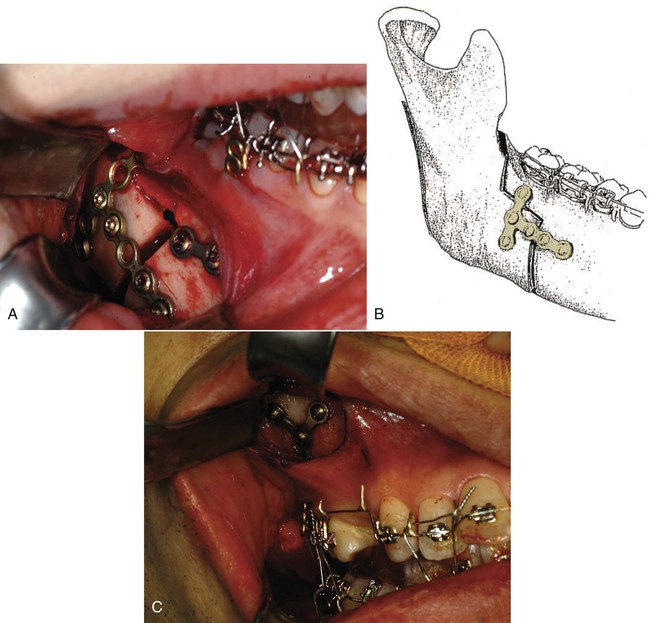
Figure 22-6 A, A modified sagittal split ramus osteotomy with buccal step and T-shaped mini-plate fixation; view of the surgical site. Aymach14 and Kawamura15 found this technique optimizes the resistance and stability of the fixation when compared with a standard bilateral sagittal split osteotomy (BSSO) fixed with a standard mini-plate. (Note that the orthodontic mini-plates for the skeletal anchorage system [SAS] are placed at the time of surgery). B, Schematic view of the T mini-plate fitting and fixating at the site of the buccal step of the osteotomy. C, The SAS placed at the maxillary buttress area during surgery. (Note that the hook of the mini-plate extends through the attached gingiva to be used later for orthodontic movement.)
The authors suggest avoiding the use of positional screws for osteotomy fixation, as they confer a high potential for torquing the condyle and consequentially shifting the occlusion. Using bone mini-plates provides a sufficient semirigid fixation that allows functional stability under minimal bone movement.14,17,18
The patient underwent modified BSSO for mandibular setback. Her maxillary right second molar was extracted because of root fracture. This problem was caused by her general dentist prior to treatment. During the operation, Y-type and L-type orthodontic mini-plates were implanted at the zygomatic buttress and the mandibular body, respectively (Fig. 22-7). Immediately after surgery, the patient showed Class II profile and Class II denture with open bite. Although her profile appeared Class II, her skeletal relationship changed to skeletal Class I. Her mandible was maintained in the proper position using a surgical splint and training elastics at the canine regions (Fig. 22-8). No extraoral appliance, such as a chin cap, was required for maintenance.
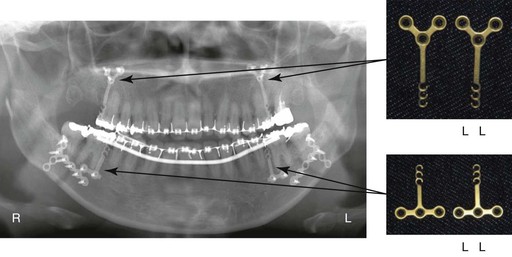
Figure 22-7 Panoramic radiograph obtained immediately after surgery. Orthodontic mini-plates were implanted at the zygomatic buttress and the mandibular body during surgery.
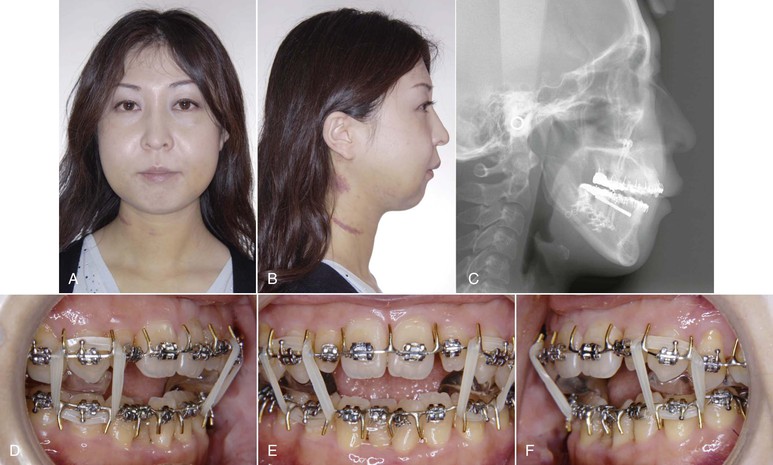
Figure 22-8 A and B, Facial photos and (C) cephalometric radiograph obtained 9 days after jaw surgery. Patient showed a Class II profile and Class II denture with open bite. D–F, Her mandible was maintained in the proper position using a surgical split and up-and-down elastics at the canine regions. Facial swelling takes a little bit longer to resolve.
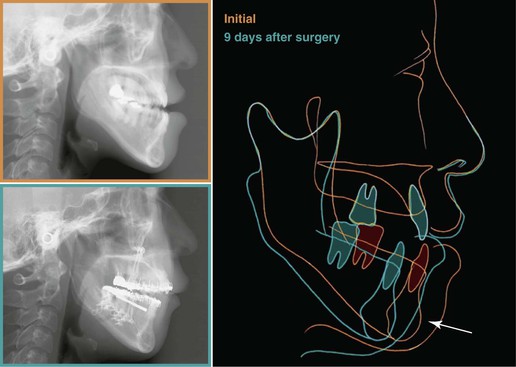
Cephalometric superimposition of images at initial presentation and 9 days after surgery showed a 10-mm setback on average, in line with the treatment goal (Fig. 22-9).
Step 4: Orthodontic Treatment
Orthodontic treatment commonly starts 17 days after surgery. Usually 3 to 4 weeks are allowed for recovery and to enhance nutrition. However, in most Sendai SF cases postsurgical treatment begins 2 to 3 weeks after orthognathic surgery.
In the patient, leveling of upper and lower dentition started using 0.016-inch nickel-titanium (Ni-Ti) archwires (Fig. 22-10). The surgical splint was placed at the mandibular posteriors and modified to an occlusal splint by flattening the occlusal surface. It was used in order to not disturb the tooth movement of the upper dentition and to help with eating. Two months after surgery, rectangular Ni-Ti archwires were engaged and intrusion and distalization of maxillary molars and protraction of mandibular dentition were carried out (Fig. 22-11). The occlusal splint was discontinued at that time. In combination with intrusion and distalization of the maxillary posterior teeth and protraction of the mandibular dentition using SAS biomechanics, correction of her Class II denture was started. In addition to correction of the anteroposterior and vertical problems, transverse correction was needed. Constriction of the maxillary arch with buccolingual archwires was performed to allow for transverse decompensation.
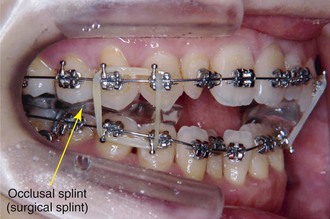
Figure 22-10 Seventeen days after surgery, when orthodontic treatment started. Leveling of upper and lower dentition began using 0.016-inch nickel-titanium (Ni-Ti) archwires. The surgical splint was placed at the mandibular posteriors and modified to an occlusal splint by flattening the occlusal surface.
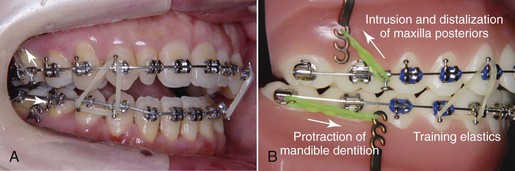
Figure 22-11 Two months after surgery (lateral view). A, Rectangular nickel-titanium (Ni-Ti) archwires were engaged and intrusion and distalization of maxillary molars and protraction of mandibular dentition were carried out. The occlusal splint was discontinued at that time. B, Skeletal anchorage system (SAS) biomechanics are also applied at this stage. The photo shows SAS biomechanics that were applied to the patient. In combination with intrusion and distalization of maxillary dentition and protraction of mandibular dentition, the patient’s Class II denture will be improved quickly.
Copper-nickel-titanium (Cu-Ni-Ti) archwires (0.019-inch × 0.025-inch) for mandibular use were engaged buccally and a 0.032-inch × 0.032-inch TMA lingual arch was placed (Fig. 22-12). In the lower arch, a 0.019-inch × 0.025-inch Cu-Ni-Ti archwire for maxillary use was engaged for expansion of the mandibular arch, as the mandibular posteriors showed excessive Wilson curve. In most Class III cases, occlusal interferences between the functional cusps of the upper and lower molars occur immediately after mandibular setback osteotomy because of transverse dental compensation. To remedy this problem, transverse decompensation by constriction of the upper arch and expansion of the lower arch is required (Fig. 22-13, A). With SAS biomechanics, the cusp to fossa relationship at the posterior teeth is corrected significantly and counterclockwise rotation of the mandible is then induced (Fig. 22-13, B). Anterior open bite is improved and rigid intercuspation is established (Fig. 22-13, C).
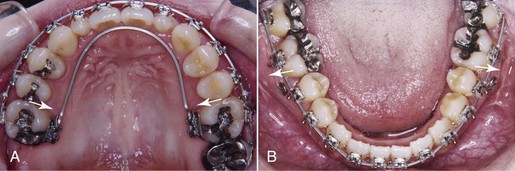
Figure 22-12 Two months after surgery: (A) maxillary occlusal view and (B) mandibular occlusal view. The transverse correction on the maxillary dentition is shown. Constriction of the maxillary arch with buccolingual archwires was performed to allow for transverse decompensation. Copper-nickel-titanium (Cu-Ni-Ti) wires (0.019-inch × 0.025-inch) 40°C for mandibular use were engaged buccally and a 0.032-inch × 0.032-inch TMA lingual archwire was placed. A Cu-Ni-Ti wire (0.019-inch × 0.025-inch) for maxillary use was engaged for expansion of the mandibular arch since the mandibular posteriors showed excessive Wilson curve.
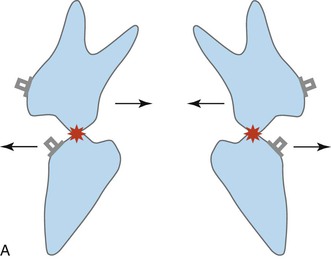
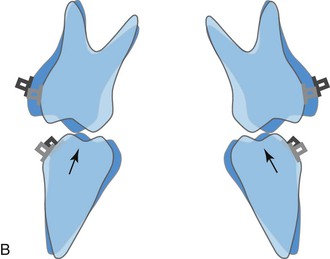
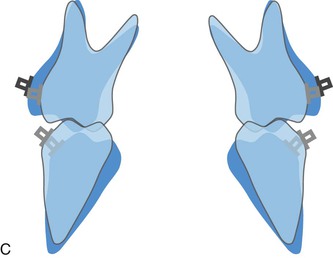
Figure 22-13 A, The mechanism of transverse decompensation in Sendai SF (immediately after surgery). In most Class III cases, occlusal interferences between functional cusps of the upper and lower molars occur immediately after mandibular setback osteotomy because of transverse dental compensation. To remedy this problem, transverse decompensation by constriction of the upper arch and expansion of the lower arch is required. B, After constriction of the upper arch and expansion of the lower arch. The correction of the cusp to fossa relationship at the posterior teeth is responsible on the counterclockwise rotation seen during the orthodontic phase. C, Aft/>
Stay updated, free dental videos. Join our Telegram channel
VIDEdental - Online dental courses


