Bonded Splints and Bridges
Acid-Etched, Resin-Bonded Splints
Periodontally Involved Teeth
Techniques for Splinting Anterior Teeth
In short-span segments subject to minimal occlusal forces, a relatively simple technique can be used for splinting periodontally involved teeth. Online Figure 21-1, A, illustrates a maxillary lateral incisor that remains mobile because of insufficient bone support even after occlusal adjustment and elimination of a periodontal pocket. Esthetic recontouring with composite augmentation can be accomplished along with the splinting procedure.
With a coarse, flame-shaped diamond instrument, enamel on both teeth at the proximal contact area is reduced to produce an interdental space approximately 0.5 mm wide. This amount of space enhances the strength of the splint by providing more bulk of composite material in the connector between teeth. Other enamel areas of the tooth or teeth that need more contour are prepared by roughening the surface with a coarse diamond instrument. Where no enamel is present, such as on the root surface, a dentin adhesive is used, according to the manufacturer’s instructions. Additionally, a mechanical lock is prepared with a No.  round bur in the dentin at the gingivoaxial line angle of the preparation. After the prepared enamel surfaces are acid-etched, rinsed, and dried, a lightly frosted appearance should be observed (see Online Fig. 21-1, B).
The adhesive is applied, lightly blown with air, and polymerized. A hand instrument is used to place a small amount of composite material in the gingival area. Additional shaping with a No. 2 explorer reduces the amount of finishing necessary later. It is helpful to add and cure composite in small increments, building from the gingival aspect toward the incisal aspect. Finishing is accomplished with round and flame-shaped carbide burs, fine diamonds, and polishing disks and points. The retraction cord is removed, and the occlusion is evaluated to assess centric contacts and functional movements. Instructions on brushing and flossing are reviewed with the patient. The result at 4 years is shown in Online Figure 21-1, C.
A typical case is illustrated in Online Figure 21-2. Following isolation with a rubber dam, small spaces (approximately 0.5 mm in width) are created between teeth with a flame-shaped diamond instrument to enable cross-sectionally strong composite connectors (see Online Fig. 21-2, A through C).
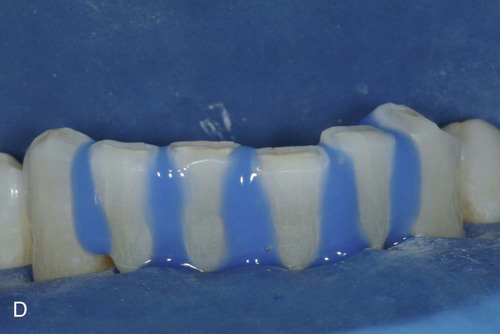
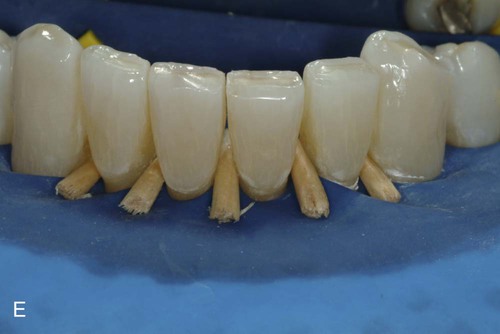
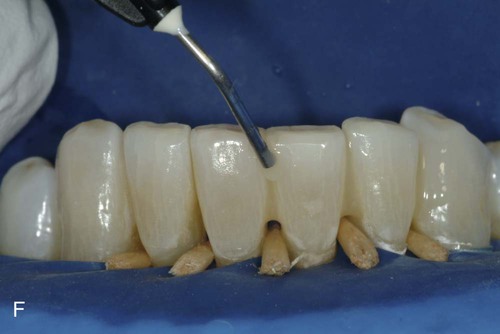

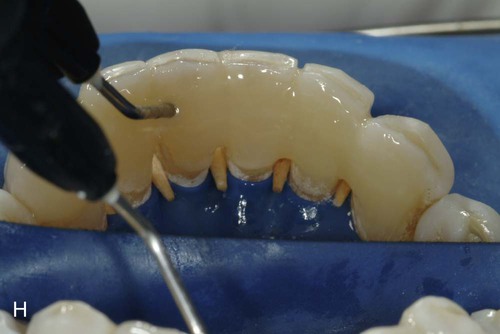
Because a fiber-reinforcing material will be used, the lingual surfaces to be bonded also should be lightly roughened with an oval diamond to enhance the resin bonds. All interproximal and lingual surfaces to be bonded are etched for 15 seconds with a phosphoric acid-etching gel (see Online Fig. 21-2, D), followed by thorough rinsing and drying. Round wooden wedges can be used to stabilize the mobile teeth and to help maintain an open gingival embrasure form. To prevent any resin from sticking to the wooden wedges, a light coat of petroleum jelly can be placed on the wedges prior to positioning the wedges interproximally. Bonding agent is applied and cured to all etched surfaces (see Online Fig. 21-2, E). The interproximal composite connectors are then generated by injecting flowable composite into these areas and shaped (if needed) with a #2 explorer (see Online Fig. 21-2, F). A small amount of flowable composite is placed onto the lingual surfaces (but not cured) to receive the auxiliary splinting strip. An appropriate length of splinting material (polyethylene-coated woven fabric) is cut and first saturated with bonding agent. Then, by using a gloved finger, the strip is pressed into uncured composite and cured initially into place (see Online Fig. 21-2, G). The bonded strip is then covered incrementally with flowable composite, resulting in a smooth lingual surface (see Online Fig. 21-2, H). Facial and incisal embrasures are defined with finishing burs to enhance esthetics. After finishing procedures, the rubber dam is removed, and the occlusion is evaluated. The final result is seen in Online Figure. 21-2, I and J.
Stabilization of Teeth After Orthodontic Treatment
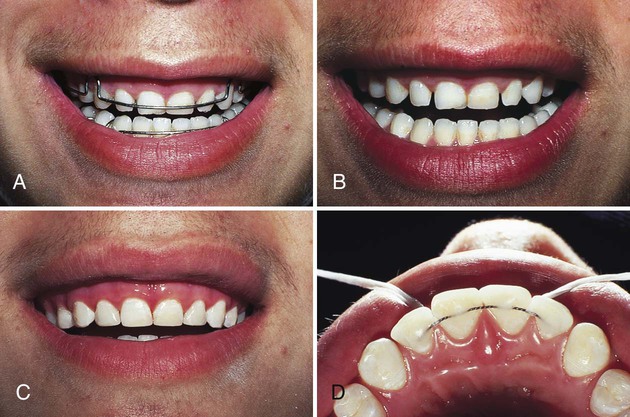
Online Figure 21-3, A, shows a patient with a removable orthodontic retainer. Optimal positioning of teeth has been achieved by orthodontic movement; however, stabilization of teeth is required, and the unattractive spaces caused by undersized maxillary teeth need to be closed (see Online Fig. 21-3, B). A carefully planned appointment is required to accomplish the following: (1) remove any fixed orthodontic appliance, (2) add composite to close the diastemas, and (3) stabilize teeth with a twisted stainless steel wire and composite.
Technique
After the orthodontic appliance is removed and routine procedures are followed for closing the diastemas (see Online Fig. 21-3, C), the occlusion is examined carefully to determine the best position for locating the twisted wire because it will be placed only on the lingual surfaces. A sufficient length of twisted stainless steel wire (i.e., 0.0175 inch [0.45 mm] in diameter) is adapted to the lingual surface of anterior teeth. A stone cast is helpful for adapting the wire. The wire must rest against the lingual surfaces passively without tension or interference with the occlusion. In the mouth, waxed dental tape is used to position the wire against teeth and hold it in place while the occlusal excursions are evaluated. The wire is attached only to the lingual fossa of each tooth. After the position of the wire has been determined, it is removed, and only the enamel in the fossae (not the marginal ridges or embrasures) is etched, rinsed, and dried.
Light-cured composite is best used for attaching the fixed wire splint. The wire is repositioned and held in place with dental tape, while a sparing amount of resin-bonding agent is applied and lightly blown with air. After polymerization of the adhesive, a small amount of composite material is placed to encompass the wire in each fossa and bond it to the enamel. The operator must be careful not to involve the proximal surfaces (see Online Fig. 21-3, D). After polymerization of composite, the occlusion is evaluated and adjusted, as needed, for proper centric contacts and functional movements.
Avulsed or Partially Avulsed Teeth
Treatment of soft tissue lacerations should include lavage, conservative debridement, and suturing. Consultation with or referral to an oral surgeon may be necessary. A partially avulsed tooth is repositioned digitally and may or may not need splinting. Traumatically avulsed teeth that are reimplanted immediately or within 30 minutes have a good prognosis for being retained.1,2 After 30 minutes, the success rate declines rapidly. The avulsed tooth should be repositioned as soon as possible. In the interim, it should be placed in a moist environment such as saliva (i.e., held in the cheek or under the tongue), milk, saline, or wet towel. The replacement of avulsed teeth has immediate psychological value and maintains the natural space in the event that a fixed prosthesis is required later.
Technique
The maxillary right incisors that were completely avulsed in an accident (Online Fig. 21-4, A) are repositioned immediately. After the teeth are repositioned, radiographs reveal that no other complications exist. Isolation with cotton rolls or gauze is preferable to the use of a rubber dam, which could cause malpositioning of the loose teeth. The occlusion should be evaluated to ensure that the teeth are properly positioned.

No preparation of the enamel surface is necessary other than that provided by acid-etching. The middle third of the facial surfaces are etched, rinsed, and dried of all visible moisture. Drying should be accomplished by blotting with a gauze or cotton roll and a light stream of air. Self-cured or light-cured composite may be used. The wire is positioned and held lightly in place, and the ends are attached with composite material (see Online Fig. 21-4, B). Light pressure is applied to the repositioned teeth as the facial surfaces are bonded to the wire in succession (see Online Fig. 21-4, C). Care is exercised not to allow composite to flow into the proximal areas. When the teeth are stabilized, any fractured areas can be conservatively repaired by the acid-etch, resin-bond technique. Finishing is accomplished by a flame-shaped carbide finishing bur and abrasive disks. The occlusion is evaluated carefully to ensure that no premature contacts exist.
Conservative Bridges
Natural Tooth Pontic
Technique
A maxillary right central incisor must be extracted for periodontal reasons (Online Fig. 21-5, A and B). Before the tooth is extracted, a small, round bur is used to place a shallow identifying mark on the facial surface to indicate the level of the gingival crest. After extraction, a 2 × 2 inch (5 × 5 cm) sponge is held in the space with pressure for hemorrhage control.

If the pulp canal and chamber have completely calcified, the next procedure is shaping and polishing the apical end of the natural tooth pontic as described in the following paragraphs. If the chamber is calcified as disclosed on the radiograph and the canal is nearly calcified, the canal is opened from the apical end by using a small round bur or diamond to the extent of the canal. The operator should be as conservative of the tooth structure as possible and yet provide access for subsequent injection of the composite material to fill the canal. A large chamber and canal are instrumented and debrided using conventional endodontic procedures with access from the apical end (see Online Fig. 21-5, C). Access is provided for subsequent injection of composite. Removal of the pulpal tissue in this manner prevents discoloration of the tooth caused by degeneration products. Traditional lingual access for instrumentation is avoided to prevent weakening the pontic. After these procedures, the canal (and chamber, if present) is filled and closed with self-cured or light-cured composite. Light-cured materials must be placed incrementally to ensure complete polymerization.
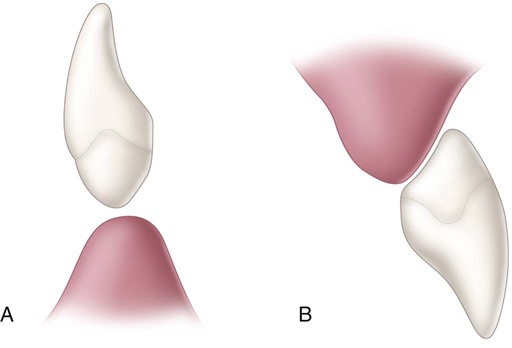
After composite has been polymerized, the apical end is contoured to produce a bullet-shaped ovate design (see Online Fig. 21-5, C). This design provides adaptation of the pontic tip to the residual ridge, and yet it allows the tissue side of the pontic tip to be cleaned with dental floss. It is also the most esthetic pontic tip design that can be used. While being contoured, the tip is occasionally evaluated by trying the pontic in the space. In the maxillary arch, passive contact between the pontic tip and the healed residual ridge is considered ideal for maximal phonetic and esthetic potential. In the mandibular arch (where esthetics is not generally a problem), the pontic tip is best shaped into the same bullet-shaped design but positioned as a hygienic pontic type that does not contact tissue (Online Fig. 21-6, A). The pontic tip is smoothed and polished using a proper sequence of abrasive disks or polishing points. A polished pontic tip not only is easier to clean but also retains less plaque.
Stay updated, free dental videos. Join our Telegram channel
VIDEdental - Online dental courses


