Section 6: Restoration of the Placed Implant
Chapter 18
What Every Surgeon Needs to Know About Implant-Supported Prosthodontics
INTRODUCTION
Implant dentistry has allowed dentists to predictably replace missing teeth. The implant serves as an artificial root that supports and retains an artificial crown; therefore, implant dentistry is a branch of prosthodontics that has a preprosthetic surgical component. To satisfy the patient’s expectations related to aesthetics, phonetics, and function, the implant team—restorative dentist, surgeon, and dental laboratory technician—must work in concert with a clear understanding of the role or roles that each member of the team must play.
Patients request implant dentistry because of their desire for artificial teeth. Consequently, treatment planning should begin with the dentist who will fabricate the artificial tooth or teeth. Also, all members of the team should have a general understanding of the entire treatment process, including treatment planning, surgical procedures, clinical prosthodontic procedures, laboratory procedures, and follow-up care. This chapter reviews what every surgeon must know about implant-supported prosthodontics.
MANAGING THE SINGLE IMPLANT-SUPPORTED CROWN IN THE AESTHETIC ZONE
The conventional method of replacing a single missing tooth with an implant-supported crown involved surgical placement of the implant, covering of the implant with a soft tissue flap, surgical uncovering of the implant after osseointegration, and placement of a healing abutment. After sufficient healing of the soft tissue surrounding the healing abutment, an impression was made, a definitive abutment was placed, and the final crown was then delivered. This approach provided satisfactory results for tooth locations where aesthetic considerations were not paramount; however, when replacing teeth in the aesthetic zone, a more sophisticated approach has the potential to improve the aesthetic outcome substantially (Wöhrle 1998; DeRouck et al. 2009).
Artificial crowns in the maxillary anterior region and the maxillary premolar region can be considered to be in the aesthetic zone, and favorable contours of the artificial crown and the soft tissues are critical to the success of the restorations. In addition, the location and angulation of the implant will influence the final result.
Soft Tissue Contours
When replacing a missing tooth in the aesthetic zone, an adequate thickness of soft tissue must be present to ensure the development of soft tissue contours that mimic natural gingival tissues. Figure 18.1 illustrates a patient who had a missing maxillary left central incisor. This patient was wearing, at the time, a maxillary provisional acrylic resin removable partial denture (RPD). To develop the soft tissue site to receive an implant, the pontic of the RPD was modified to an ovate style that indented the soft tissue and began the process of developing a pseudogingival margin and interdental papillae (Koutrach and Nimmo 2010; Figures 18.2, 18.3).
Figure 18.1 Patient with missing maxillary left central incisor. Site of missing tooth has adequate soft tissue. Soft tissue will be recontoured with a removable prosthesis prior to implant placement.
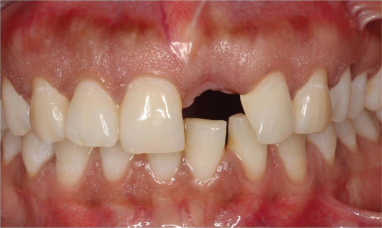
Figure 18.2 Removable partial denture (RPD) has been modified by adding tooth-colored acrylic resin to develop convex, ovate, pontic form (arrow).

Figure 18.3 RPD in place.
A surgical guide template was prepared that duplicated the position of the central incisor on the RPD, and the position and angulation of the implant was planned accordingly. A flapless surgical approach was used and the implant was immediately provisionalized. A 35-Ncm measurement of primary stability (final insertion torque measurement) of the implant is commonly recommended for immediate provisionalization; nevertheless, recommendations in the literature have ranged from as low as 30 Ncm (Drago and Lazzara 2006; Ostman, Hell, and Sennerby 2008) to as high as 40–45 Ncm (Hui et al. 2001; Nkenke and Fenner 2006). The provisional crown must be fabricated free of proximal contacts and occlusal contacts in maximal intercuspal position and in any eccentric positions (Nkenke and Fenner 2006). A screw-retained provisional restoration is preferred to avoid the problem of cleaning excess cement in the presence of a surgical wound. Figures 18.4–18.9 illustrate the surgical and temporization procedures.
Figure 18.4 Flapless surgical procedure for implant placement. Initial drill is aligned and positioned with the aid of a surgical guide template.
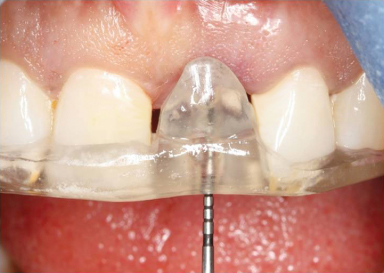
Figure 18.5 Occlusal view of angulation guide. Note optimal placement and angulation of initial osteotomy, as well as the indentation of soft tissue as a result of ovate pontic.
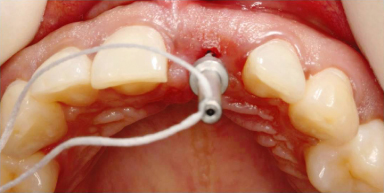
Figure 18.6 Implant placement.
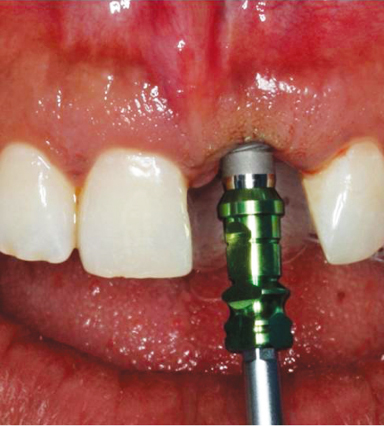
Figure 18.7 Radiograph displaying optimal placement of implant.
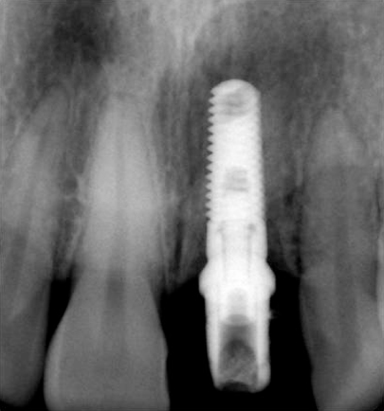
Figure 18.8 Surgical mount is cut back and recontoured in the laboratory to serve as provisional abutment for provisional crown. Contours of the abutment are finalized in the mouth with a coarse diamond rotary instrument and a high-speed hand-piece with copious water irrigation.
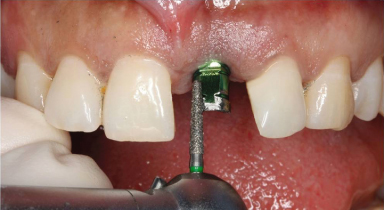
Figure 18.9 Contours of soft tissue around the provisional implant-supported crown after 8 weeks.
Fabrication and Delivery of the Definitive Crown
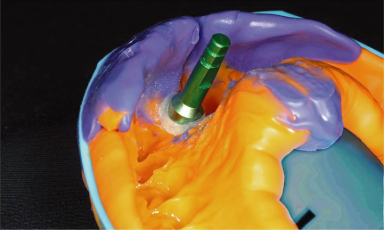
After osseointegration was achieved, a final impression was made. The provisional crown was removed, and an impression coping was placed. To ensure that the soft-tissue emergence profile was captured in the definitive cast, flowable composite resin was placed in the gap between the soft tissue and the impression coping (Figure 18.10). The impression was made, and an implant analog was attached to the impression coping (Figure 18.11).
Figure 18.10 (A) Soft tissue contours with provisional crown removed (after 8 weeks). (B) Occlusal view of emergence profile of soft tissue. Note the classic triangular shape. (C) Implant impression coping in place. Note space between coping and soft tissue. (D) To prevent soft tissue from collapsing against impression coping, space is filled with flowable composite resin.
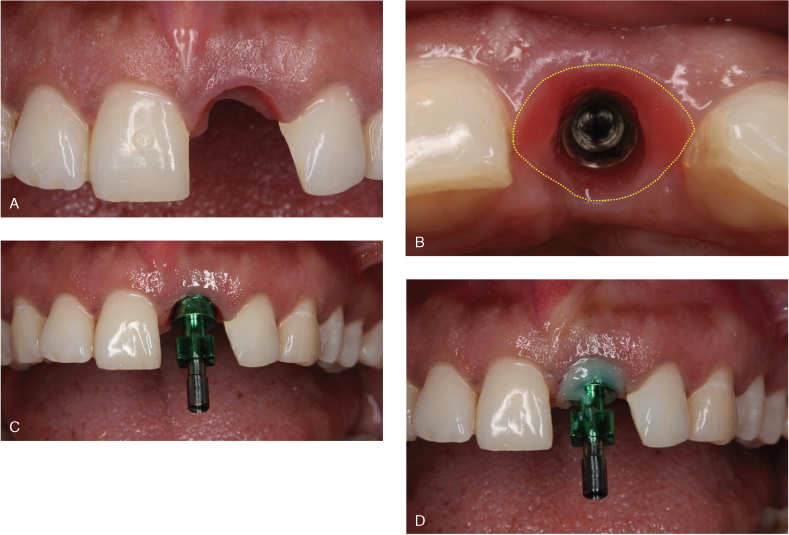
Figure 18.11 Definitive impression with implant analog attached to the impression coping. Note flowable composite resin, which preserves emergence profile.
A definitive cast was fabricated that included a silicone replica of the soft tissue (Figure 18.12). The final crown was waxed to complete the contour (Figure 18.13) and was then cut back to develop the wax pattern for the custom abutment (Figure 18.14). The custom abutment was cast (Figure 18.15). A definite crown was fabricated and delivered (Figure 18.16).
Figure 18.12 Definitive cast. Note silicone replica of soft tissue that preserves the emergence profile developed with the provisional crown.
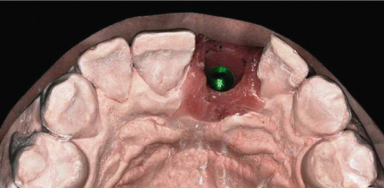
Figure 18.13 (A) Pattern for final crown waxed to complete contour. (B) Emergence profile contours.
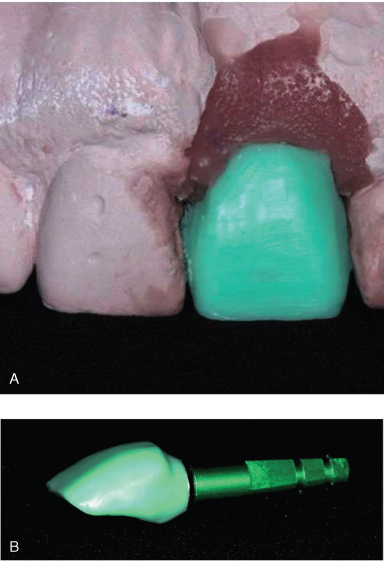
Figure 18.14 The wax pattern has been cut back to form the pattern for custom abutment, preserving emergence profile contours beneath the soft tissue replica. Note favorable location of screw access opening (at crest of cingulum; see arrow) because of controlled placement of implant by using the surgical guide template.

Figure 18.15 Cast gold custom abutment on cast (A) and in the mouth (B).
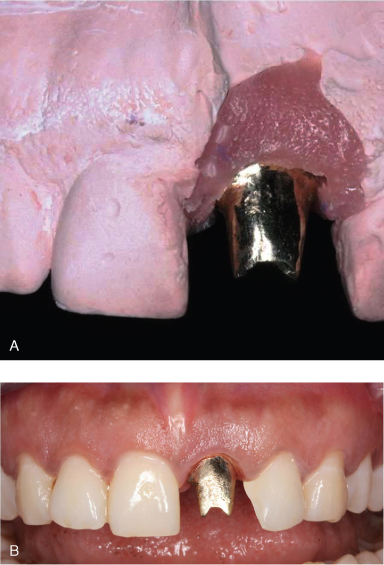
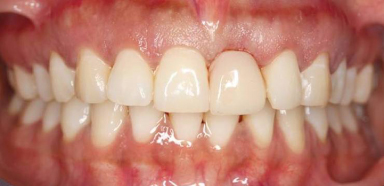
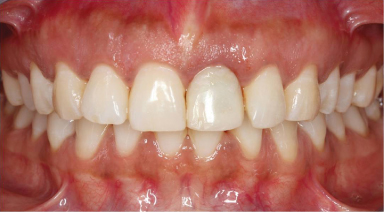
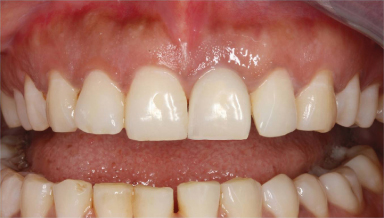
Figure 18.16 Final definitive crown. Note optimal soft tissue contours that mimic natural contours of contralateral incisor.
MULTIPLE IMPLANT-SUPPORTED CROWNS IN A PARTIALLY EDENTULOUS PATIENT
With multiple implant-supported crowns in series, there are limited landmarks to guide the technician in the fabrication of the custom abutments. After the definitive cast is fabricated (Figure 18.17), a diagnostic waxing is made of the planned final implant-supported crowns. The diagnostic waxing is duplicated in stone, and a clear plastic vacuum-formed template is fabricated (Figure 18.18). The clear plastic shell is used to assist the technician in developing the contours of the custom abutments (Figure 18.19).
Figure 18.17 Definitive cast for implant-supported prosthodontics and conventional prosthodontics. Mandibular left first molar and premolars will be restored as splinted implant-supported crowns. Mandibular right first molar will be restored as a single implant-supported crown.
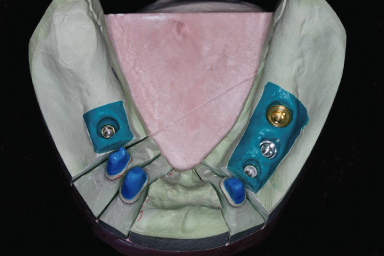
Figure 18.18 Clear plastic vacuum-formed template is fabricated.
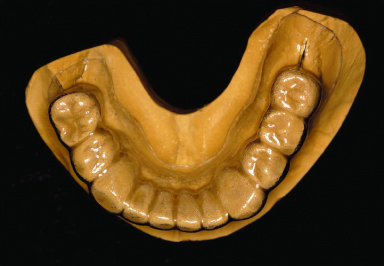
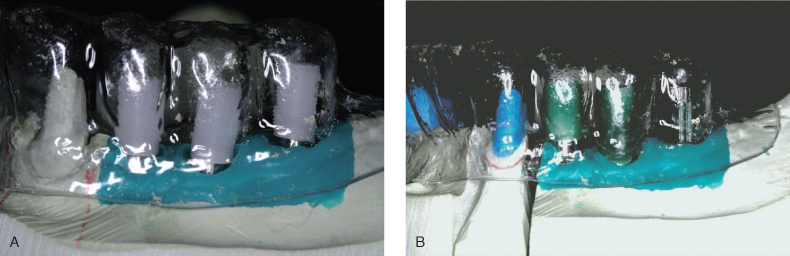
Figure 18.19 (A) UCLA-type abutments are reduced with the aid of the clear plastic template. (B) Wax patterns for custom abutments.
Custom abutments are cast and milled to develop a common path of insertion for the definitive crowns (Figure 18.20). The custom abutments must have a common path of insertion because the crowns are commonly splinted to ensure favorable biomechanics. Castings are made for the splinted crowns and tried to verify their fit (Figure 18.21). The custom abutment/>
Stay updated, free dental videos. Join our Telegram channel
VIDEdental - Online dental courses


