15: Maxillary Pterygohamular Subperiosteal Implant Surgery

CHAPTER 15 Maxillary Pterygohamular Subperiosteal Implant Surgery

CAVEATS

When the lateral posterior mucoperiosteum is reflected, either below or just adjacent to the zygomatic buttress, care must be taken not to perforate the maxillary sinus. Some eggshell bone may come away, but if it is allowed to remain attached to the periosteum, it serves a viable reconstructive role. Antral openings must be protected from becoming filled with impression materials.

An overenthusiastic periosteal elevator or long needle in the posterosuperior area may cause pterygoid plexus hemorrhage. If this should occur (as evidenced by considerable venous bleeding or rapid swelling of the face), the forefinger is used to apply firm tamponade upward and inward in the posterior vestibular area for a full 10 minutes.

A periosteal elevator may injure or tear the infraorbital or greater palatine neurovascular bundles. Care must be taken when approaching these foramina.

The buccal fat pad is always beneath the retractor. If it prolapses, as it often does, it should not be cut or resected, because this may change the patient’s facial symmetry markedly. When the surgery is complete, the pad should be tucked back in and the flaps should be sutured over it.

If the pterygoid plate or raphe dissections are bilateral and are performed vigorously in a susceptible patient, edema from each side may compromise the airway. The surgeon must be aware of this possibility and must be prepared to (1) use steroids (dexamethasone, 10 mg given orally or 20 mg given intravenously, followed by 5 mg four times daily); or (2) institute surgical airway management (e.g., orotracheal or nasopharyngeal tubes or airways or tracheostomy).

Hydroxyapatite (HA) coatings may be beneficial at interface areas, but they do not allow the implant to be flexed or malleted into place, nor do they offer assurance of the classic suspension mechanism required for implant success. Design considerations must play a role in prescribing HA coatings.

In addition, 12- to 36-hour, two-stage subperiosteal implant procedures cannot be performed if HA coatings are ordered, because the time frames are not correct for these procedures.

The surgery for pterygohamular subperiosteal implants requires experience and aggressiveness to expose the prospective bone-bearing areas.

COMPLETELY EDENTULOUS DESIGNS

Experience over the past 20 years has yielded unpredictable prognoses for maxillary unilateral and complete subperiosteal implants. Failure probably occurred because infrastructural components were placed on a bone foundation not well designed to withstand occlusal stresses. The resulting resorption led to failure of bony support, antral complications, and subsequent exteriorization of these devices. However, a design change took place, called the pterygohamular extension. With the addition of peripheral struts in the pterygohamular areas and on other, more reliable basal bone buttresses, a more predictable device was produced. This chapter outlines each step leading to the production of pterygohamular complete, universal, and unilateral maxillary subperiosteal implants. If surgeons are comfortable with other designs, the placement techniques are the same.

Procedure

For surgeons experienced in hospital procedures, this operation may best be performed in the operating room with the patient under general anesthesia. However, regional block with sedation is an alternate way to proceed.

Routine maxillary infiltration anesthesia is not sufficient. Second division (greater palatine), posterosuperior alveolar, and infraorbital blocks are necessary, in addition to considerable deep infiltration into the pterygomandibular raphe. After the tissues have been anesthetized, a sharpened millimeter probe is used to measure the tissue thickness at the sites of planned permucosal abutments, each of which should be placed in attached gingiva. These measurements are recorded on a preoperative study model or chart.

Reflection

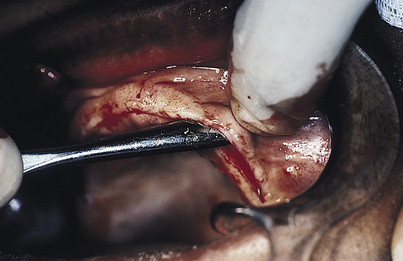
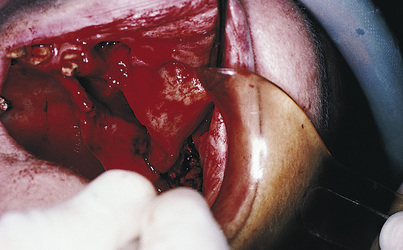
A sharp periosteal elevator is used to lift the palatal flap cleanly from the bone. It is lifted as close posteriorly to the junction of the soft palate as can be managed (Fig. 15-1). This cannot be done without severing the incisive neurovascular bundle, but no significant harm results from doing so. The structures that prevent a complete soft tissue reflection are the greater (anterior) palatine neurovascular bundles bilaterally, and they must be preserved. They may be seen clearly running anteriorly from their foramina (located just medial to the ridge crests in the second molar areas) in the periosteal surface of the reflected palatal flaps. The periosteal elevator is extended behind and lateral to these foramina, and the overlying tissues are lifted away from the hamulus bilaterally (the hamulus is found just at the anterior end of the medial pterygoid plate) (Fig. 15-2).

On the labiobuccal aspects, the mucoperiosteum is elevated beginning at the midline and proceeding posteriorly on both sides. In this way, the structures that are exposed and that may be identified clearly are the anterior nasal spine, pyriform apertures, canine fossae up to the lower rim of the infraorbital foramina, zygomatic buttresses (no less than 3 cm beyond their roots), posterolateral maxillae (to a height level with the superior surfaces of the zygomatic arches), and the entire bony tuberosity.

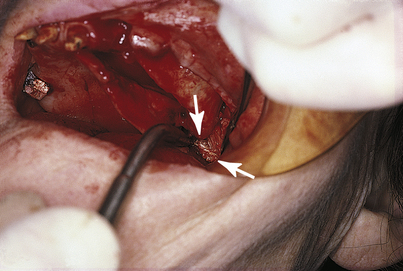
The remainder of the pterygohamular complex is the last structure to be exposed. A Bard-Parker (BP) No. 15 blade on a long handle is used to extend the original incision from the distal end of the tuberosity downward in the mucosa overlying the pterygomandibular raphe. As the mucosa falls open, the gleaming white fibers of the raphe become evident (Fig. 15-3). Blunt dissection with the forefinger on either side of the raphe reveals the attachment of these fibers to the pterygoid plates. The raphe is stretched with the periosteal elevator, and curved or angled, long-handled scissors (Dean) are used to snip away the fibrous attachments, with care taken to stay directly against bone. In most cases, the raphe is extensive, and considerable cutting is necessary. When it finally comes free, it is intact and easy to identify because of its glistening whiteness.

Beneath the raphe are the pterygoid plates, which the surgeon identifies with the fingers of the dissecting hand. Further vigorous blunt dissection of the overlying soft tissues pushes these tissues firmly from both plates. They are clearly palpable, even though they may not be visualized. The probing finger should be able to nestle into the fossa between them. The sharp dissection is complete only when this complex is exposed fully. A saline-soaked sponge is packed into the site to maintain hemostasis and prevent desiccation.

The periosteal elevator should lift the palatal tissues anteromedially from the base of the medial pterygoid plate forward to the hamulus, a small finger of bone. If the tissues are resistant to elevation, a BP No. 12 blade is used as if it were a periosteal elevator, stroking gently but firmly at the bone level until the hamulus is exposed. When the overlying mucosa is elevated, a tendinous structure is found at its lateral base. The hamulus serves as a pulley for this structure, the tendon of the levator veli palatini muscle. To expose the hamulus for the impression, the tendon is cut with a BP No. 12 blade.

The final bit of exposure is done on the lateral maxilla posterior to the zygomatic root and anterior to the lateral pterygoid plate. A periosteal elevator is used to elevate the tissues, starting at the distal attachment of the zygoma and proceeding posteriorly to the lateral surface of the lateral plate. The raphe fibers are resistant to elevation, and the plate comes free of these fibrous encumbrances only if curved, sharp scissors or a BP No. 12 blade is used to separate them. For this the surgeon must remove the original saline-soaked pack and replace it with a larger one that encompasses the entire pterygohamular plate complex.

Before making the impression, the surgeon should note the exposed structures: the anterior nasal spine, the pyriform apertures, the canine fossae up to the infraorbital foramina, the base of the zygomas (including a minimum of 3 cm of exposed arch), the lateral maxillae, the lateral and medial pterygoid plates, the hamuli, the greater (anterior) palatine foramina, the palatal surfaces of the maxillae, and the incisive foramen. Sharp spicules of crestal bone and knife-edge ridges are rounded with burs, rongeur forceps, and bone files.

Not all patients have well-defined pterygoid plates, and in these individuals, even the most careful palpation fails to reveal their presence. Only one plate may be palpated or, in rare cases, neither may be palpated. Some rudiment of a plate is always present at the pterygomaxillary suture, however. Therefore the area must be uncovered, because it is important as a site for implant bearing.

Impression Making

The flaps are packed open with saline-soaked sponges, and the palate is sutured into a midline bundle.

An EZ Tray sheet (see Chapter 14) is placed in the hot water heater at 178° F until it softens. The surgeon lifts the material from the bath while the assistant removes the saline sponges from the wound. As the assistant retracts the flaps, the soft material is slipped beneath them and then teased, massaged, and pushed peripherally to the fullest extent of the dissection. The forefinger is used to press the compliant material over the pterygohamular structures. Before it sets completely, the material is lifted out and reseated several times so that it does not become locked into undercuts.

If not enough working time is available to fabricate the entire custom tray at once, the EZ Tray is augmented in its wet state by adding small, heated, supplementary peripheral pieces These “welds,” even when wet, are reliable, as when handles are added to the trays. Upon each removal of the tray, however, the surgeon must be sure to dry the welded areas and reinforce them by using a heated wax spatula and, when indicated, sticky wax.

If the expos/>

Stay updated, free dental videos. Join our Telegram channel

Jan 5, 2015 | Posted by in Implantology | Comments Off on 15: Maxillary Pterygohamular Subperiosteal Implant Surgery

VIDEdental - Online dental courses

Get VIDEdental app for watching clinical videos