14: Bleaching

Chapter 14 Bleaching

Section A Bleaching and Its Relevance to Esthetic Dentistry

As the techniques and materials available to dentists have improved over the past few decades, better and more conservative restorations have become possible. Extensive preparation and tooth destruction have given way to a genuine concern for the preservation of tooth structure. Most recently, much attention has been devoted to the esthetic aspects of dentistry and the patient’s concerns regarding appearance. The past three decades have been the most dynamic period that the profession has ever seen.

As the population’s dental awareness has grown, so has its demand for a natural (or preferably supernatural) smile. The one inescapable fact is that patients are very eager to have whiter and brighter smiles. The desire for whiter teeth is the strongest driving force in people’s quest for dental treatment. Whereas oral health and function are paramount for the practitioner, the patient’s attention tends to focus rather exclusively on appearance and esthetics. In the cultural environment encouraged by toothpaste advertisements and Hollywood and bolstered by the personal need to appear healthy and young, discolored or dark teeth are no longer socially acceptable. Patients are therefore seeking, and even self-administering, dentist-mediated as well as exotic and questionable treatments to achieve the whiter smiles they desire. It is the dentist’s responsibility to supervise patients who seek to undergo a whitening treatment to ensure that the maximum cosmetic benefit is within the boundaries of oral and systemic health.

Brief History of Clinical Development and Evolution of the Procedure

The desire for whiter teeth is not completely a recent phenomenon. Even in Biblical times white dentition was considered, attractive, youthful, and desirable. In third-century bc Greece, Theophrastus wrote that it was “considered a virtue to shave frequently and to have white teeth.”

If any attention was paid to dental hygiene and appearance during the Middle Ages, there is little surviving documentation. Life spans were short, education was minimal, and the primary concerns were survival, food, and shelter.

Guy de Chauliac, a fourteenth-century surgeon, commented extensively on his dental observations and produced a set of rules for oral hygiene that included the following tooth-whitening procedure: “Clean the teeth gently with a mixture of honey and burnt salt to which some vinegar has been added.” His texts were considered authoritative for the subsequent 300 years.

The following era of dentistry brought the study of dental anatomy and oral disease and a great interest in the prosthetic replacement of teeth whose loss could not yet be avoided. As the craft of dental technology expanded, dentists were better able to replicate both form and function. Then, in the nineteenth century, dentistry began its recognizably modern form of restoring carious and even infected teeth. These advancing skills resulted in patients retaining their teeth for a greater portion of their lives, and an expectation that these aged teeth could be made visually acceptable.

Patient demands, combined with rapidly advancing medical chemistry, resulted in the first vital tooth bleaching agents and procedures. Chapple proposed oxalic acid as the material of choice in 1877. Shortly after, Taft suggested calcium hypochlorite as an effective whitening solution. The first mention of peroxide as a whitening agent was over a century ago; in 1884 Harlan published a report concerning a material that he called hydrogen dioxide.

Some of the more arcane bleaching proposals at the turn of the century included electric currents and ultraviolet waves (Rosenthal). Obviously, neither of these really caught on with the mainstream dentist. Acid dissolution of brown fluoride stains was yet another approach to discoloration. This technique was first documented by Kane in 1916. The technique involved the use of 18% HCI to dissolve the superficial layers of enamel. Further investigations were conducted by McCloskey in 1984. In 1918, Abbot pioneered the whitening effects of Superoxol (Figure 14-1). He found that although the chemical was suitable for bleaching teeth, its activity could be enhanced by the addition of heat and light. Some current bleaching techniques are based on Kane and Abbot’s developments.

image

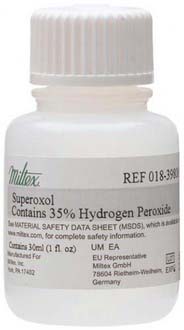
FIGURE 14-1 Superoxol, a whitening agent whose effects were pioneered by Abbot in 1918.

(Permission granted by Integra Miltex, a business of Integra LifeSciences Corporation, Plainsboro, New Jersey.)

The earliest attempts at non-vital bleaching were made at the end of the nineteenth century, but little progress was made until the 1950s. As endodontic therapy became a routine part of dental practice, the increase in functional but un-esthetic teeth prompted dentists to search for newer tooth-whitening techniques. In 1958 Pearson reported on the use of Superoxol sealed within the pulp chamber. He stated that within 3 days the oxygen-releasing capacity of the solution had whitened the experimental teeth to some degree.

By 1967 Nutting and Poe had refined this method, a technique now known as “walking bleaching.” A 30% mixture of Superoxol and sodium perborate was left in the pulp chamber for up to 1 week. This technique provided a dependable treatment modality for tooth bleaching, but its use was obviously limited to endodontically treated teeth. This technique was for several years the most dependable system available but was often associated with internal absorption of the tooth structure some years later. It is no longer used extensively. Far-fetched as it may now seem, before the new vital tooth–whitening procedures, some dentists actually recommended the removal of healthy pulp tissue for the sole purpose of introducing bleaching solutions inside the chamber of severely discolored teeth.

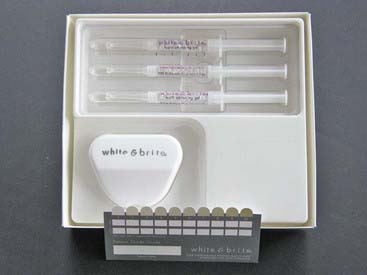
It is only in the last two decades that dentistry has finally begun to provide patients with reasonable methods for vital tooth color de-staining. In 1989 a new procedure was developed (Figure 14-2) whereby a stabilized solution of carbamide peroxide or perhydrol-urea was placed into a custom molded tray, which the patient was required to place over the teeth for hours at a time. This gentle solution worked to gradually whiten the teeth in a much more predictable, safer manner than the earlier bleaching methods.

As the dental awareness of the population has increased, the most common esthetic complaint has been a generalized tooth discoloration or darkness visible when the patient smiles. Today the anterior teeth are nearly always vital. The desired whitening change is often a moderate modification such as lessening the yellow or gray component of the overall color scheme of the teeth. Given that the teeth are vital and therefore more likely to be sensitized by aggressive treatment, and that the desired color change is not a radical one, there is no need to use the caustic materials and extensive procedures that were associated with earlier bleaching techniques.

Safe vital whitening requires an activating material that is acceptable to both the hard and soft tissues, one that is both non-caustic and non-toxic. Feinman, in discussing peroxide-heat-light bleaching procedures, stated that bleaching vital teeth was more difficult than treating non-vital ones. With the more recent, less caustic tooth whitening techniques, precisely the opposite is now true. It is not only much easier to whiten vital teeth than non-vital ones, it is even easier to whiten the entire arch than to work with a single discolored tooth. This paradigm shift alone may account for the immediate acceptance of at-home tooth whitening by the dental community (Box 14-1).

Box 14.1 Tooth Whitening Timeline

Initial Attempts at Bleaching

1877 Chapple—oxalic acid
1888 Taft—calcium hypochlorite
1884 Harlan—hydrogen dioxide
1895 Electrical currents

Non-Vital Bleaching Initiated

1895 Garretson
1911 Rosenthal—ultraviolet waves
1916 Kane—18% hydrochloric acid

Modern Bleaching Techniques Begin

1918 Abbot—Superoxol and heat

Successful Non-Vital Bleaching

1958 Pearson—intrapulpal bleach
1967 Nutting and Poe—walking bleach
1978 Superoxol heat and light

Modern Techniques

1989 Munro—outpatient tooth whitening
1990s General use—in-office vital bleaching
1995 Yarborough—laser-assisted beaching

The historical background of in-office tooth whitening is rather extensive. Whereas historically tooth whitening was first tried about 150 years ago, the materials were very toxic, caustic, and not always effective. In the early 1990s the innovative techniques of at-home bleaching created a demand for a more accelerated in-office procedure. Not all patients were content to wait the weeks required with at-home or tray-mediated bleaching.

The innovations attempted by dentists and manufacturers were usually designed to increase the percentage of the active ingredient, either carbamide peroxide or hydrogen peroxide, in the bleaching gel. The typical 10% carbamide peroxide used in early products was increased to about 35% carbamide peroxide (Lumibrite, Den-Mat, Santa Maria California). The carbamide peroxide was applied for short periods of time in a tray. This material was somewhat caustic to the gingiva but performed effective bleaching of tooth structures. However, materials with an anhydrous formula tended to suck moisture out of the tooth structures, causing both treatment and post-treatment sensitivity, which could be significantly uncomfortableat times.

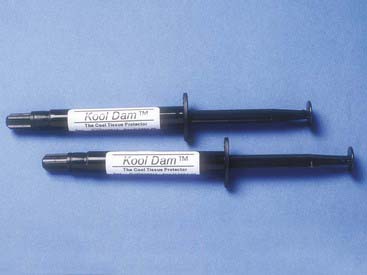
The percentage of hydrogen peroxide in gel or liquid form was also increased. The problem with this innovation was that hydrogen peroxide, even in low concentrations such as 10%, can be quite caustic to the soft tissues. Although it does not appreciably affect the hard tissues, it can create peroxide burns on the gingiva or papillae and nearby oral soft tissues. Thus, application of higher percentage peroxides, up to 35% or 50%, required an effective paint-on rubber dam barrier to protect the gingiva and the oral tissues. Regular rubber dams allowed liquid peroxides to seep between the teeth and the dam and burn the peridental soft tissues. Protective gels were often applied to the soft tissues as well, but some of the higher-concentration peroxides still managed to cause damage. The paint-on rubber dams (Figure 14-3) (Pulpdent Kool-Dam paint-on dam) offered protection for the lips, cheeks, and face.

Clinical Considerations

In-office bleaching is useful in the removal of stains throughout the arch (e.g., age, diet or tetracycline staining), for lightening a single tooth in an arch (e.g., post-endodontically), or perhaps even for treating specific areas of a single tooth (e.g., as in some types of fluorosis). The dentist is in complete control of the process throughout treatment. This provides the advantage of being able to continue treatment or to terminate the de-staining process at any time. In-office bleaching is usually so rapid that visible results are observed after even a single visit. As patients become visually motivated at the first appointment, they tend to be more compliant for the second and third appointments that are often required to complete the in-office treatment process. Many patients prefer bleaching by the dental professional (rather than utilizing at-home techniques) because it requires less active participation on their part. In order to best serve their patients, dentists should ideally be familiar with both at-home and in-office treatment modalities. It is not uncommon to combine both techniques for a customized whitening treatment of a single patient. In this way the patient sees immediate results and is encouraged to continue the treatment both at home and in the office. By the combination of these two techniques, the whitening process is continued between the office bleaching sessions, and thus the final result is achieved more rapidly than if either technique were to be used alone.

Contraindications

There are few contraindications for tooth whitening or bleaching. Of course, any patient who is allergic or sensitive to any of the bleaching components or materials should not attempt the treatment. Allergies of this type are virtually nonexistent.

Women who are pregnant or nursing should also not undergo tooth bleaching. Although there are no reports of problems with this population group, it is simply safer not to begin or continue cosmetic procedures whose effects may, under certain specific conditions, be deleterious to the fetus or newborn. Again, there is no evidence that such effects have ever occurred, but safe is better than sorry.

Vital tooth bleaching techniques, whether performed at home or in office, should be avoided for teeth with large pulp chambers or those that have exhibited sensitivity. In fact, all patients who complain of tooth sensitivity should have this problem solved before commencing tooth de-staining.

Patients with erosions, whether chemical, abrasive, or caused by recession, may experience more bleaching sensitivity through and after treatment, and thus these erosions should be treated before treatment. The same treatment approach should be followed for those with abfractions.

Factors that can limit the success of bleaching are the degree and quality of the discoloration. If the teeth are extremely dark, no matter what the cause, the whitening procedures may require supplementation with other restorative procedures, such as porcelain veneers. This is particularly true with stains in the gray-blue range, which do not respond as well to whitening as stains in the yellow-brown range.

Intrinsic Stains

Intrinsic stains are the result of color changes in the internal structures of the teeth caused by factors that are may be systemic or local in origin. Not only are intrinsic stains more difficult to treat than extrinsic stains, but because of their distribution throughout the tooth, they are more readily apparent. With modern tooth-whitening procedures, most intrinsic stains can be removed. Those difficult situations that do not respond to tooth-whitening procedures can be esthetically improved using composite or porcelain veneers, porcelain crowns.

Intrinsic stains can be divided into those arising during odontogenesis and those occurring after tooth eruption. The difficulties in removing stains and the expected degree of success depend on the type of discoloration being addressed. During odontogenesis, teeth may incorporate discolorations into the enamel or dentin through quantitative or qualitative changes or by the inclusion of pigments to their structure. Post-eruptively, teeth can become intrinsically discolored when discoloring agents are integrated into the hard tissues internally from the pulp chamber or extrinsically from the tooth surface.

Intrinsic Discolorations Created during Odontogenesis

Alkaptonuria is a recessive genetic deficiency resulting in the incomplete oxidation of tyrosine and phenylalanine, causing increased levels of homogentisic (or melanic) acid. It is also known as phenylketonuria and ochronosis. The condition can cause a dark brown pigmentation of the permanent teeth. Tooth whitening can lessen or even eliminate the discoloration. In severe cases the teeth may require restorative esthetic procedures to achieve acceptable results.

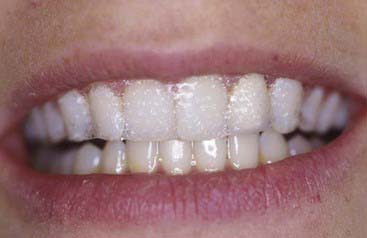
Amelogenesis imperfecta (Figure 14-4) is considered a genetic defect that can affect both the primary and the permanent dentitions. The most common modes of inheritance are either autosomal recessive or autosomal dominant. Three categories have been identified: hypomaturation, hypocalcific, and hypoplastic. These display considerable differences in appearance both within and among groups. Hypomaturation has an autosomal dominant mode of inheritance, and presents as enamel that has chipped away from the underlying dentin. Hypocalcific cases exhibit enamel that has normal thickness but is soft. The enamel is often completely abraded away soon after eruption. The tooth crown ranges in appearance from a dull opaque white to a dark brown. These teeth are also have a rough and pitted surface. Hypoplastic teeth have enamel that is quite thin, often to the point where interproximal contacts are eliminateed. Hypoplastic teeth have a smooth, hard, yellow appearance, with pitting found on occasion.

image

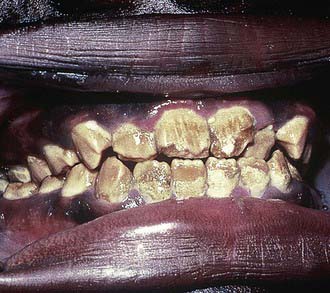
FIGURE 14-4 Amelogenesis imperfecta, hypocalcified type.

(From Pinkham J, Casamassimo P, Fields H, et al: Pediatric dentistry: infancy through adolescence, ed 4, St Louis, 2006, Mosby.)

The treatment of amelogenesis imperfecta depends on the condition of the enamel. If the enamel is sufficiently thick, the teeth are aggressively treated with topical fluoride, after which direct bonding procedures may be appropriate; the more predictable treatment, however, is providing full prosthetic coverage for the affected teeth; insufficient tooth thickness or abraded enamel are indications for full prosthetic coverage.

Dentinogenesis imperfecta (Figure 14-5) is an inherited trait that is the most prevalent hereditary dystrophy affecting tooth structure. Typically seen more severely in the primary dentition, the clinical crowns appear reddish-brown to gray opalescent. The enamel is often friable and breaks off soon after eruption. The exposed softened dentin rapidly abrades away. The thin or nonexistent enamel makes full prosthetic coverage the only viable treatment option. Vital bleaching is contraindicated.

image

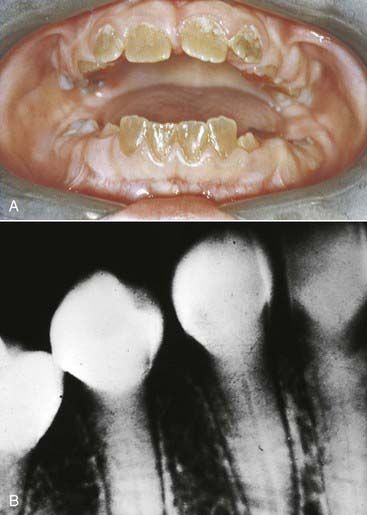
FIGURE 14-5 (A) Clinical and (B) radiographic appearance of dentinogenesis imperfecta.

(From Ibsen O, Phelan J: Oral pathology for the dental hygienist, ed 5, St Louis, 2009, Saunders.)

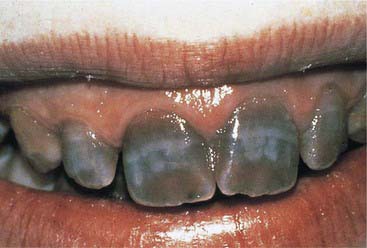
Endemic fluorosis (Figure 14-6) is an enamel discoloration caused by excessive intake of fluoride during odontogenesis. Fluorosed teeth range from slight wisps or flecks of opaque white to mottled or pitted darkened surfaces. The condition was described as early as 1916, although the causative agent was not identified until 1931. Black thought the stain was caused by replacement of the normal cementing substance between enamel rods by a material that he named “brownin.” It is now known that dental fluorosis is a form of enamel hypoplasia, resulting from metabolic alteration of the ameloblast during enamel formation. Dental fluorosis is often found in communities where the fluoride content of the drinking water exceeds 1 part per million. The severity of the staining is directly proportional to the amount of fluoride absorbed. The teeth can be affected from the second trimester in utero through age 9 years.

Areas of the tooth that are darkened by endemic fluorosis respond to vital tooth-whitening procedures. If the stains are set deep into the tooth and are very opaque, however, only limited success can be achieved. In these cases, tooth-whitening procedures should be followed by bonded porcelain or composite. Teeth that exhibit white areas cannot be darkened by the tooth-whitening process. For superficial areas, enamel abrasion (although it is invasive of tooth structure) can be used. If the tooth has both dark and opaque white areas, the treatment of choice is abrasion of the areas where the stain is superficial, followed by tooth-whitening procedures. If the improvement is not sufficient, conservative bonding procedures are indicated.

Erythroblastosis fetalis is a blood disorder of the neonate caused by Rh incompatibility between the fetal and maternal blood supplies. It is characterized by agglutination and hemolysis of the erythrocytes, producing free blood pigments. These can discolor all the teeth that are in the process of being concurrently formed. Affected teeth can range in color from brown to green-blue. This condition is usually self-treating, and the staining resolves as the child matures. Treatment is usually not needed.

Porphyria (Figure 14-7) is a porphyrin metabolism disorder that results in increased formation and excretion of porphyrins. It is usually genetically transmitted and rare, but may develop later in life. Neurological, psychological, and gastrointestinal symptoms may present as well. The hematoporphyrin pigment causes a characteristic reddish-brown discoloration of the teeth (erythrodontia). The dental effects are more common in the primary than the permanent dentition. Coloration is dispersed throughout the enamel, dentin, and cementum, and fluoresces under ultraviolet light. Tooth whitening, and possibly bonding, can be effective.

image

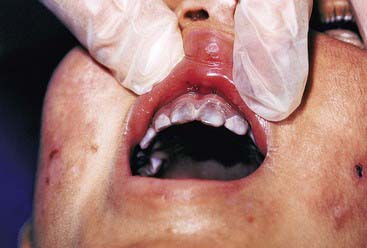
FIGURE 14-7 Congenital erythropoietic porphyria. Brownish teeth fluoresce under Wood lamp examination.

(From Kliegman R, Behrman R, Jenson H, Stanton B: Nelson textbook of pediatrics, ed 18, St Louis, 2008, Saunders.)

Sickle cell anemia and thalassemia are both inherited blood dyscrasias that result in tooth discoloration similar to that caused by erythroblastosis fetalis. Unfortunately, unlike erythroblastosis fetalis, these discolorations are more severe and do not improve with time. Tooth whitening plus bonding procedures can be effective for the more difficult cases.

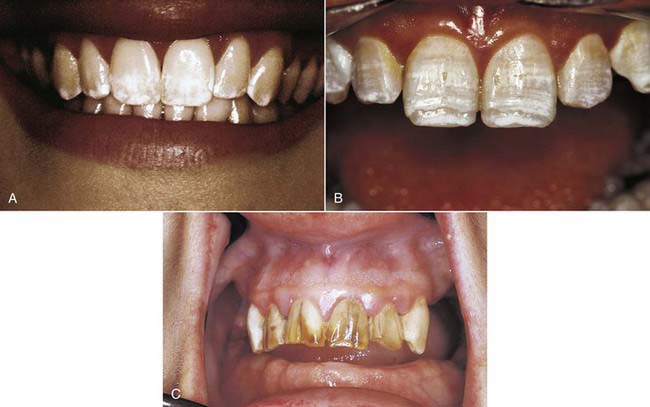
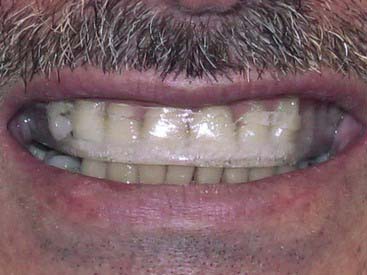
The potential for tetracycline to cause discoloration (Figure 14-8) of the dentition is well documented and studied since it was first reported by Schwachman and Schuster in 1956. Because tetracycline can cross the placental barrier, tetracycline affects both the deciduous and permanent dentitions, making the teeth vulnerable throughout odontogenesis. Even an exposure as short as 3 days can cause discoloration of the teeth at any time between 4 months in utero and age 9 years. The mechanism of the staining caused by tetracyclines is related to the calcium binding in the tooth. Tetracycline binds to the tooth calcium, forming a tetracycline–calcium phosphate complex. It occurs throughout the tooth but is most highly concentrated in the dentin near the dentino-enamel junction. Both the quality and the severity of the discoloration are directly related to the specific tetracycline ingested as well as the dose. Some early investigations revealed that teeth affected by tetracycline first exhibit a yellow coloration and a bright yellow fluorescence that differs significantly from the blue fluorescence of normal, healthy teeth. The color of the affected teeth gradually changes over the succeeding months or years. The shade change is most noticeable in those teeth that are most exposed to extraoral light—specifically, the facial surfaces of the anterior teeth. Wallman and Hilton clearly demonstrated the role of light in this process in 1962 by splitting a tetracycline-stained tooth lengthwise and exposing only one half to light. The light-exposed half underwent a color change to brown, whereas the unexposed half remained yellow. For this reason many researchers believe that the use of heat and light bleaching systems to treat tetracycline stains may be contraindicated.

Clinically, tetracycline-stained teeth can exhibit light-yellow to dark-gray bands. These bands may correspond to the active area of tooth formation at the specific time that the tetracycline exposure occurred. Usually the darker shades are confined to the gingival third of the teeth, but the lighter, hay-colored shades are most often located in the incisal third. Standard tooth whitening can be expected to improve the appearance, although the results are less than ideal. The differentiation between the light and dark tooth areas is usually diminished by the whitening process. On some teeth, selectively etching the darker enamel areas prior to whitening can further improve the result. Bonding is usually required in more darkly stained teeth to achieve an acceptable result, although the degree of improvement from vital tooth whitening alone can be profound. Because the differentiation between the lighter and darker areas becomes less distinct, many patients are satisfied and content to defer bonding. Teeth with a yellow or brown discoloration generally whiten more completely than those with a gray or blue stains.

Post-Eruptive Discoloration

Age can be a cause of discoloration. Several non-pathologic conditions related to the aging process gradually discolor the teeth. The natural process of gradual pulp withdrawal with the simultaneous formation of secondary dentin causes the tooth to appear more yellowish-brown. This is perhaps the most common indication for tooth whitening. The results are the most rapid and predictable. Standard vital tooth whitening treatment options are applicable.

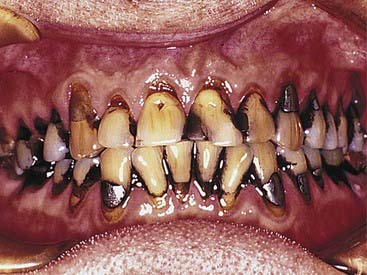
Dental metals are the most ubiquitous source of staining—specifically, leeching of amalgam corrosion products (Figure 14-9). Threaded stainless steel pins or gold-plated retentive pins can cause similar extremely dark stains that pose significant challenges for any whitening effort.

image

FIGURE 14-9 Extrinsic metallic stain.

(From Daniel S, Harfst S, Wilder R: Mosby’s dental hygiene, ed 2, St Louis, 2008, Mosby.)

Teeth that are stained by dental alloys or pins must first have the offending dental metals replaced by composite or porcelain restorations. If the stain is very dark, the whitening prognosis is not good. Adhesive restorative procedures are required for clinically acceptable results.

Some of the most common staining agents are foods and beverages, such as tea, coffee, and soft drinks and lifestyle choice substances such as smoking and chewing tobacco. The degree and quality of staining directly reflect the type, frequency, length, and intensity of exposure to the staining agents. Fortunately, tooth whitening prognosis excels with these stain categories. The standard techniques can be expected to produce rapid, dramatic results in most cases.

Idiopathic pulpal recession sometimes occurs in teeth. The teeth remain vital but gradually display a yellow to brown darkening. The appearance is often similar to that of a non-vital tooth; vitality testing differentiates the two. Such teeth usually typically exhibit a diminished pulp chamber diameter on radiographic examination. Standard tooth-whitening procedures are indicated if the desired result is an overall whitening of all the teeth. This procedure effectively removes the discoloration of the tooth with idiopathic pulpal recession and usually whitens all the neighboring teeth as well. The discolored teeth typically destain more rapidly than the other teeth, resulting in a better blending and better matching of the shades of adjacent teeth. The patient thereby eliminates the problem of a single darker non-matching tooth, and whitens all the others in the arch through the course of treatment. Where there are porcelain crowns that match the existing general shade, this approach is not desirable, as ceramic restorations are not made whiter by bleaching. An alternative in this situation is to mask the discoloration with composite.

Many of the materials used routinely in dentistry have the potential to cause tooth discoloration. Non-alloy dental materials such as eugenol, formocresol, and root canal sealers are implicated in a wide range of tooth discolorations. The prescribed treatment is the same as for dental alloy stains. If the tooth is vital, standard vital tooth whitening is usually effective. The most common complication is that the stain may be very specifically localized. The selected destaining procedure is determined in the same fashion as for idiopathic pulpal recession stains. If the tooth is non-vital, standard non-vital bleaching can be used. Occasionally the stains are so dark and resistant to whitening that additional adhesive restorative dentistry is indicated.

Traumatic injury to the tooth may result in an internal hemorrhage. The ensuing diffusion of bilirubin into the dentin tubules causes an initial pink discoloration that is usually develops over time to a darker, diffuse red-brown stain.

If the pulp is sufficiently resilient to avoid necrotic degeneration, the crown’s natural color returns within a few weeks after injury. If the pulp degenerates, the natural color does not return and the discoloration becomes darker. In some cases, a growing pink spot on the enamel surface indicates progressive internal resorption.

Tooth whitening treatment should not be instituted until the dentist is certain that the tooth has fully recovered from the trauma. Sometimes the natural color returns without intervention. In cases with residual staining, the tooth is tested for vitality and radiographed. If the tooth is vital with no evidence of internal or external resorption, tooth-whitening procedures can be initiated. If the tooth is non-vital, endodontic therapy is followed by non-vital bleaching. If there is internal resorption in a vital tooth, endodontic therapy is indicated, then non-vital bleaching.

Material Options

The material options for at-home bleaching include bleaching trays. In most cases a custom-made tray is fabricated by the dental office or laboratory and given to the patient (Figure 14-10). The patient injects the bleaching agent into the tray during the day, overnight, or both, and inserts the tray over the teeth; treatment for an entire arch (or both arches) typically requires about 2 to 4 weeks. At-home tray-less techniques are similar; no prefabricated or custom-fabricated trays are needed. Double-tray systems, such as Opalescence Trèswhite Supreme (Ultradent Products, Inc., South Jordan, Utah), have an inner, softer tray pre-loaded with the bleaching gel and an outer harder tray that is used to position the entire system over the teeth (Figure 14-11). This technique does not require the in-office fabrication of a tray and thus offers time advantages for most practices. Bleaching strips without trays, such as Crest 3D White Whitestrips (Procter & Gamble, Cincinnati, Ohio), are placed over the teeth and manually adapted to the tooth anatomy (Figure 14-12). The patient pats the strips onto the tooth surfaces and leaves them in place for about 30 minutes per application (Figure 14-13).
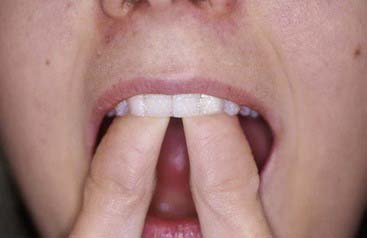
Tray Bleaching Systems

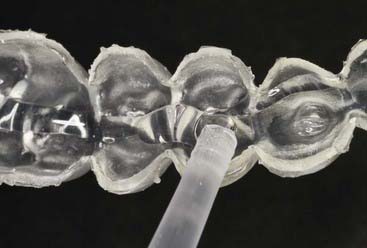
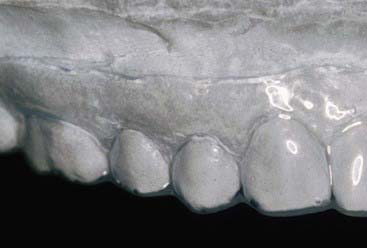
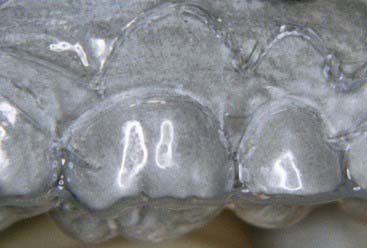
Advantages of the tray system include the predictable volume (Figure 14-14) of the bleach applied to the teeth and the ability to effectively spread the bleach to every tooth, covering their occlusal, buccal, lingual and interproximal aspects as well. The tray can be comfortably worn for several hours to overnight, even though the efficacy of the bleaching gel decreases progressively and the material becomes inactive for bleaching after 3 to 4 hours. Most of the bleaching effect occurs in the first 30 to 60 minutes. Reservoirs can be built into the internal surface of the tray (Figure 14-15) on the buccals of some or all of the teeth to increase the speed of the bleaching by leaving more carbamide peroxide in contact with the dental surfaces. The tray is generally quite thin and is made of transparent material so it can be worn during the day, even during work (Figure 14-16).

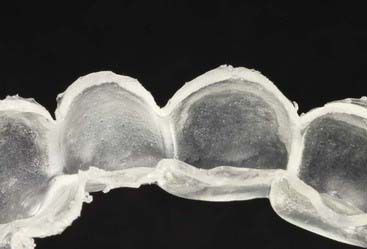
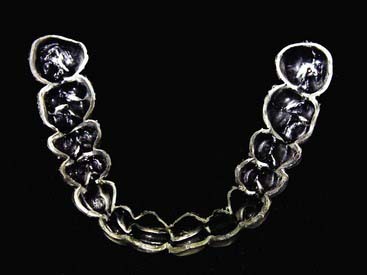
Disadvantages of the tray system include the need to acquire an impression (Figure 14-17) of the dentition prior to tray fabrication. This impression is then poured in stone, and a tray is fabricated with a heat and suck-down tray-former such as the UltraVac Vacuum Former (Figure 14-18) (Ultradent Products, Inc.). This device is relatively easy to operate but does require some chairside and in-office laboratory time. Typically tray fabrication in the dental office can be delegated to an auxiliary who will complete the task in 30 to 60 minutes. Since the bleaching treatment is often an impulse decision for the patient, it is typically unplanned. As a direct result, tray fabrication can contribute to scheduling problems. However, it is important once the patient decides to have their teeth bleached to begin treatment as soon as possible, thus taking advantage of the patient’s active, but possibly fleeting, interest in the color of their dentition. Furthermore, most auxiliaries are not particularly fond of trimming the bleaching trays (Figures 14-19 and 14-20), which should terminate just shy of the gingival margin of the soft tissues. Generally it is a good idea to not have the bleaching tray impinge on the soft tissues (Figure 14-21), as this may cause gingival irritation and patient discomfort. The tissues must be approached as closely as possible (Figure 14-22) to maximize the whitening effect and to minimize treatment time. Customizing the margins to adapt them to the dentition takes several minutes and can be exacting, even with the proper scissors.
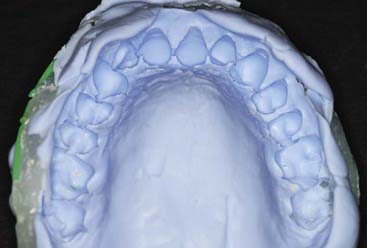
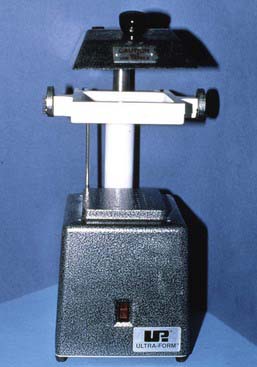
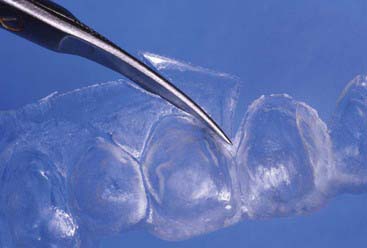
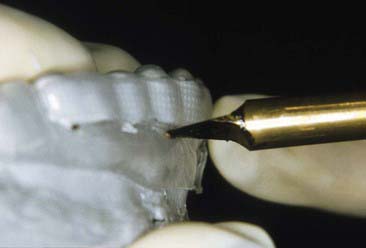
Prefabricated Tray and Tray-less Bleaching Systems

The major advantage of the at-home prefabricated tray system is that no bleaching tray need be fabricated in the office. The only real caveat is that the patient must be thoroughly instructed in the use of the prefabricated tray bleaching process. He or she must fully understand how to properly insert the pre-loaded trays on their dentition.

Disadvantages include: the inner, soft tray material (Figures 14-23 and 14-24) that is adapted to the teeth can slip off sooner than desired, leaving the teeth less bleached than anticipated. Most patients lose comfort (and patience) with the bleaching material on their teeth after about 20 or 30 minutes, and sometimes even less. The soft tray is very easy to remove. Thus compliance with the prefabricated tray system is not as predictable as with the custom-fabricated tray systems.
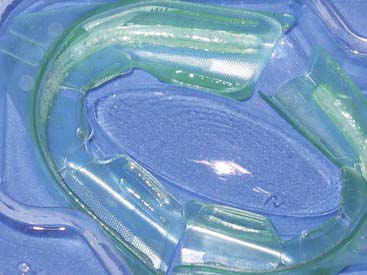
Advantages of the Crest 3D White Whitestrips tray-less system are ease of application, reduced expense, and less labor compared with the tray systems. The only clinical time requirement is that set aside for the patient instruction to properly use the material and place the strips over the teeth. Disadvantages include that the strips tend to slip off (or are removed by patients) somewhat sooner than desirable. It is relatively easy to slip the strips off the teeth with the tongue or fingers. Neither the at-home prefabricated tray, nor the strip systems have as much patient compliance as the custom-fabricated tray system. However, the strip systems are very easy to use and rather inexpensive.

Strip systems can be limited by their overall length; they cover the teeth cuspid to cuspid but not much beyond these teeth (Figure 14-25). Once strip bleaching is completed, the cuspids or first bicuspids will be whitened but the molars will remain more or less at their original color. If these teeth are visible on the smile, supplemental tooth whitening treatment is necessary.

At-Home Bleaching Considerations

The Safety of Tooth Whitening

The dentist’s primary concern for any dental procedure must be its safety. The entire dental team must have absolute confidence in, and comfort with, the dental treatments that are recommended to patients. Safety is typically established by one of two well established mechanisms:

As was to be expected, concerns were raised regarding the safety implications of vital tooth whitening when the technique was first introduced. These issues were largely related to the use of carbamide peroxide (a buffered hydrogen peroxide solution or gel) in the oral environment. (The terms carbamide peroxide, urea peroxide, and perhydrol urea are often used interchangeably.) The typical worries centered on whether carbamide peroxide might be toxic, dangerous, or oncogenic in the short and long terms. These apprehensions were simply the evidence-based inquiries of a responsible profession, as no scientific evidence had been advanced to support these positions. Some of the initial commentaries also asserted that dentistry had little experience with this particular chemistry.

This was not entirely true; although the profession had little direct experience with carbamide peroxide for tooth-whitening purposes, there was a scientific record of the intra-oral use of carbamide peroxide for other purposes that spanned 50 years. The recorded scientific data include both animal and human studies, short and long term, that have evaluated the issue of this material’s safety in the oral cavity.

The testing revealed that carbamide peroxide not only promotes gingival healing but is actively anti-plaque in nature and may be anti-cariogenic, as well. The focus of the carbamide peroxide testing in past years was to evaluate it as an antiseptic (not as a tooth-whitening agent), but the intra-oral conditions under which the tests were conducted were identical to those associated with whitening procedures.

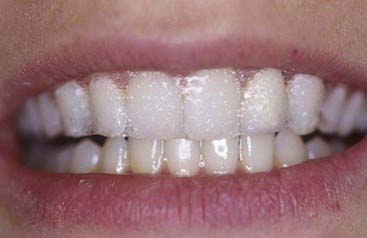
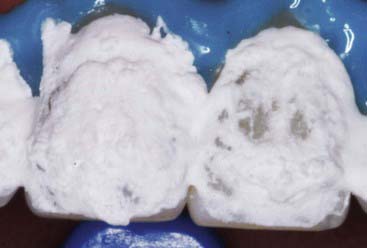
Carbamide peroxide is not a substance that is new to dentistry, nor was its development for dental purposes accidental. Aqueous hydrogen peroxide has long been used by the dental (and medical) profession; its lack of toxicity and minimal side effects, combined with both cleansing and bactericidal properties, make it particularly attractive for intra-oral use. A major practical problem with hydrogen peroxide is its extremely rapid breakdown on contact with body tissues, a reaction that is greatly accelerated by peroxidase and catalase enzymes, which are commonly found in the mouth and the body. Foaming (Figure 14-26) is often observed at the initial application (or re-application) of hydrogen peroxide whitening agents. This is an oxygenated foam that demonstrates the catalysis of the peroxide. A 10% preparation of carbamide peroxide in anhydrous glycerin is equivalent in chemical activity to 3% aqueous hydrogen peroxide, yet far more stable and predictable.

The search fo/>

Stay updated, free dental videos. Join our Telegram channel

Jan 3, 2015 | Posted by in Esthetic Dentristry | Comments Off on 14: Bleaching

VIDEdental - Online dental courses

Get VIDEdental app for watching clinical videos